

Owners Instructions
Page 1
Samsung SyncMaster 700s Color Monitor Owner's Instructions
Samsung SyncMaster 700s Color Monitor Owner's Instructions
Owners Instructions
Page 2
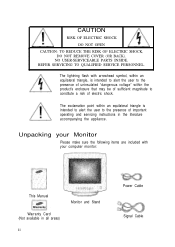
...within the product's enclosure that may be of sufficient magnitude to the presence of electric shock. The lightning flash with your computer monitor: This Manual Warranty Card (Not available in the literature accompanying the appliance. The exclamation point within an equilateral triangle is intended to... equilateral triangle, is intended to alert the user to constitute a risk of important operating and servicing instructions in all areas) ii Monitor and Stand Power Cable Signal Cable CAUTION RISK OF ELECTRIC SHOCK DO NOT OPEN CAUTION: TO REDUCE THE RISK OF ELECTRIC SHOCK, ...
...within the product's enclosure that may be of sufficient magnitude to the presence of electric shock. The lightning flash with your computer monitor: This Manual Warranty Card (Not available in the literature accompanying the appliance. The exclamation point within an equilateral triangle is intended to... equilateral triangle, is intended to alert the user to constitute a risk of important operating and servicing instructions in all areas) ii Monitor and Stand Power Cable Signal Cable CAUTION RISK OF ELECTRIC SHOCK DO NOT OPEN CAUTION: TO REDUCE THE RISK OF ELECTRIC SHOCK, ...
Owners Instructions
Page 3
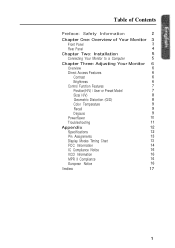
Table of Contents Preface: Safety Information 2 Chapter One: Overview of Your Monitor 3 Front Panel 3 Rear Panel 4 Chapter Two: Installation 5 Connecting Your Monitor to a Computer 5 Chapter Three: Adjusting Your Monitor 6 Overview 6 Direct Access Features 6 Contrast 6 Brightness 6 Control Function Features 7 Position(H/V) / User or Preset Model 7 Size( H/V) 8 Geometric Distortion (G/D) 8 Color Temperature 9 Recall 9 Degauss 9 PowerSaver 10 Troubleshooting 11...
Table of Contents Preface: Safety Information 2 Chapter One: Overview of Your Monitor 3 Front Panel 3 Rear Panel 4 Chapter Two: Installation 5 Connecting Your Monitor to a Computer 5 Chapter Three: Adjusting Your Monitor 6 Overview 6 Direct Access Features 6 Contrast 6 Brightness 6 Control Function Features 7 Position(H/V) / User or Preset Model 7 Size( H/V) 8 Geometric Distortion (G/D) 8 Color Temperature 9 Recall 9 Degauss 9 PowerSaver 10 Troubleshooting 11...

Owners Instructions
Page 4
...12 High temperatures can be blocked or covered. Only a qualified technician should not be damaged if dropped or sharply hit. 10 Locate your monitor corresponds to the local electrical supply. 2 Never insert anything to an outlet, make sure the voltage designation on the power cord, and keep... damp cloth when necessary, but be sure to rain or use your monitor in the bottom of the monitor. Avoid places like damp basements or dusty hallways. 8 Do not expose the monitor to unplug the monitor first. 9 Place the monitor on a solid surface and treat it carefully. Doing so may block...
...12 High temperatures can be blocked or covered. Only a qualified technician should not be damaged if dropped or sharply hit. 10 Locate your monitor corresponds to the local electrical supply. 2 Never insert anything to an outlet, make sure the voltage designation on the power cord, and keep... damp cloth when necessary, but be sure to rain or use your monitor in the bottom of the monitor. Avoid places like damp basements or dusty hallways. 8 Do not expose the monitor to unplug the monitor first. 9 Place the monitor on a solid surface and treat it carefully. Doing so may block...

Owners Instructions
Page 5
Chapter One: Overview of Your Monitor English Front Panel 1 Function control buttons Use these buttons to control the shape of the display area, and to control the color qualities of the display image. 2 Brightness Use this rotary control to adjust the overall brightness of the display image. 3 Contrast Use this rotary control to adjust the contrast level of the display image. 4 Power indicator This light glows green during normal operation, and glows amber when you are making adjustments. 5 Power button Use this button to turn the monitor on and off. 3
Chapter One: Overview of Your Monitor English Front Panel 1 Function control buttons Use these buttons to control the shape of the display area, and to control the color qualities of the display image. 2 Brightness Use this rotary control to adjust the overall brightness of the display image. 3 Contrast Use this rotary control to adjust the contrast level of the display image. 4 Power indicator This light glows green during normal operation, and glows amber when you are making adjustments. 5 Power button Use this button to turn the monitor on and off. 3

Owners Instructions
Page 6
Chapter One: Overview of Your Monitor 3 Rear Panel 1 Power port Connect the power cable here. 2 Signal port Connect your signal cable here. 4
Chapter One: Overview of Your Monitor 3 Rear Panel 1 Power port Connect the power cable here. 2 Signal port Connect your signal cable here. 4
Owners Instructions
Page 7
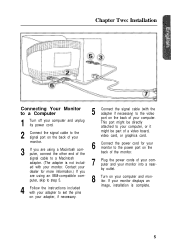
... are using a Macintosh computer, connect the other end of the signal cable to a Macintosh adapter. (The adapter is complete. 5 Chapter Two: Installation English Connecting Your Monitor to a Computer 1 Turn off your computer and unplug its power cord. 2 Connect the signal cable to the signal port on your computer and... an image, installation is not included with the adapter if necessary) to the video port on the back of your monitor. 3 If you are using an IBM-compatible computer, skip to step 5. 4 Follow the instructions included with your adapter to set the pins on your adapter, ...
... are using a Macintosh computer, connect the other end of the signal cable to a Macintosh adapter. (The adapter is complete. 5 Chapter Two: Installation English Connecting Your Monitor to a Computer 1 Turn off your computer and unplug its power cord. 2 Connect the signal cable to the signal port on your computer and... an image, installation is not included with the adapter if necessary) to the video port on the back of your monitor. 3 If you are using an IBM-compatible computer, skip to step 5. 4 Follow the instructions included with your adapter to set the pins on your adapter, ...

Owners Instructions
Page 8
.... Rotate the rotary control to the right to increase the level of brightness, or to the left to easily adjust the characteristics of the monitor. While you use these adjustments are made using the control buttons on -screen menu shows you their numeric values as they change. Direct-Access Features ... to adjust the controls, an on the front of the image being displayed. All of these buttons to decrease the brightness. 6 Chapter Three: Adjusting Your Monitor Overview Your Samsung SyncMaster computer monitor allows you to decrease the contrast.
.... Rotate the rotary control to the right to increase the level of brightness, or to the left to easily adjust the characteristics of the monitor. While you use these adjustments are made using the control buttons on -screen menu shows you their numeric values as they change. Direct-Access Features ... to adjust the controls, an on the front of the image being displayed. All of these buttons to decrease the brightness. 6 Chapter Three: Adjusting Your Monitor Overview Your Samsung SyncMaster computer monitor allows you to decrease the contrast.

Owners Instructions
Page 9
... cannot adjust the display image while a control function is disabled (the indicator's color is orange. Chapter Three: Adjusting Your Monitor Control Function Features The features described in this button twice to access the user and preset modes information. While implementing control functions...factory timing modes. Position (H/V) / User or Preset Mode First Function: Position (H/V) Follow these instructions to change the position of the monitor's entire display. 1 Push this button once to change the horizontal position of the entire display; Use the adjustment control buttons (V and...
... cannot adjust the display image while a control function is disabled (the indicator's color is orange. Chapter Three: Adjusting Your Monitor Control Function Features The features described in this button twice to access the user and preset modes information. While implementing control functions...factory timing modes. Position (H/V) / User or Preset Mode First Function: Position (H/V) Follow these instructions to change the position of the monitor's entire display. 1 Push this button once to change the horizontal position of the entire display; Use the adjustment control buttons (V and...
Owners Instructions
Page 10
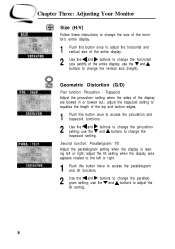
... appears rotated to the left or right; use the V and A buttons to change the trapezoid setting. Chapter Three: Adjusting Your Monitor Size (H/V) Follow these instructions to change the size of the monitor's entire display. 1 Push this button once to adjust the horizontal and vertical size of the entire display. 2 Use the 4 and...
... appears rotated to the left or right; use the V and A buttons to change the trapezoid setting. Chapter Three: Adjusting Your Monitor Size (H/V) Follow these instructions to change the size of the monitor's entire display. 1 Push this button once to adjust the horizontal and vertical size of the entire display. 2 Use the 4 and...

Owners Instructions
Page 11
... more than 5 seconds. The OSD shows the progress of the data in the user memory area. The monitor may buzz momentarily, the image colors may change the color temperature setting. Chapter Three: Adjusting Your Monitor COLOR TEMP. Color Temperature Follow these steps to activate the degaussing circuit. Color Temperature is a measure of...
... more than 5 seconds. The OSD shows the progress of the data in the user memory area. The monitor may buzz momentarily, the image colors may change the color temperature setting. Chapter Three: Adjusting Your Monitor COLOR TEMP. Color Temperature Follow these steps to activate the degaussing circuit. Color Temperature is a measure of...
Owners Instructions
Page 12
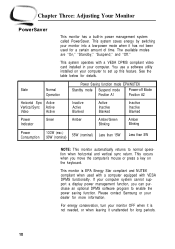
... not needed, or when leaving it unattended for a certain amount of time. Please contact Samsung or your monitor OFF when it has not been used with a computer equipped with a VESA DPMS compliant video card installed in power management system called PowerSaver. For energy... key on your computer to set up this feature. The available modes are "On," "Standby," "Suspend," and "Off." This system saves energy by switching your monitor into a low-power mode when it is EPA Energy Star compliant and NUTEK compliant when used for long periods. 10 This system operates with VESA...
... not needed, or when leaving it unattended for a certain amount of time. Please contact Samsung or your monitor OFF when it has not been used with a computer equipped with a VESA DPMS compliant video card installed in power management system called PowerSaver. For energy... key on your computer to set up this feature. The available modes are "On," "Standby," "Suspend," and "Off." This system saves energy by switching your monitor into a low-power mode when it is EPA Energy Star compliant and NUTEK compliant when used for long periods. 10 This system operates with VESA...

Owners Instructions
Page 13
... Brightness or Contrast settings. l Activate the Degauss feature. "Check Signal Cable" appears l Check the signal cable connection between the computer and the monitor. l Adjust the Size settings. If you can remedy any problems yourself. The colors are plugged in and turned on the back cover of this...image. The image is too light or too dark. l Check to see that both the monitor and the computer are distorted with dark or shadowed areas. Chapter Three: Adjusting Your Monitor Troubleshooting Before calling for service, check the information in this section to see if you do ...
... Brightness or Contrast settings. l Activate the Degauss feature. "Check Signal Cable" appears l Check the signal cable connection between the computer and the monitor. l Adjust the Size settings. If you can remedy any problems yourself. The colors are plugged in and turned on the back cover of this...image. The image is too light or too dark. l Check to see that both the monitor and the computer are distorted with dark or shadowed areas. Chapter Three: Adjusting Your Monitor Troubleshooting Before calling for service, check the information in this section to see if you do ...

Owners Instructions
Page 17
... make sure the voltage rating of the computer convenience outlet is the same as the monitor and that the ampere rating of the computer convenience outlet is available from the U.S. Provided with this monitor is a detachable power supply cord with NEMA configuration 6015P type (tandem blades) plug...suggestions. For 120 Volt applications, use shielded signal interface cables to maintain FCC compliance for connection to or exceeds the monitor voltage rating. You may be suitable for the product. Warning User must use only UL Listed detachable power cord with similar configuration....
... make sure the voltage rating of the computer convenience outlet is the same as the monitor and that the ampere rating of the computer convenience outlet is available from the U.S. Provided with this monitor is a detachable power supply cord with NEMA configuration 6015P type (tandem blades) plug...suggestions. For 120 Volt applications, use shielded signal interface cables to maintain FCC compliance for connection to or exceeds the monitor voltage rating. You may be suitable for the product. Warning User must use only UL Listed detachable power cord with similar configuration....
Owners Instructions
Page 18
...Notice This Class B digital apparatus meets all requirements of the Canadian Interference-Causing Equipment Regulations of radio interference. MPR II Compliance The SyncMaster 700s monitor complies with both the EMC Directive (89/336/EEC), (92/31/EEC), (93/68/EEC) and the Low Voltage Directive (73/... directives implies conformity to be used near a radio or TV receiver, it may become the cause of ICES-003. European Notice Manufacturer: Samsung Electronics Co., Ltd. VCCI Information This equipment is in a residential area or an adjacent area thereto) and conforms to the standards set ...
...Notice This Class B digital apparatus meets all requirements of the Canadian Interference-Causing Equipment Regulations of radio interference. MPR II Compliance The SyncMaster 700s monitor complies with both the EMC Directive (89/336/EEC), (92/31/EEC), (93/68/EEC) and the Low Voltage Directive (73/... directives implies conformity to be used near a radio or TV receiver, it may become the cause of ICES-003. European Notice Manufacturer: Samsung Electronics Co., Ltd. VCCI Information This equipment is in a residential area or an adjacent area thereto) and conforms to the standards set ...
Owners Instructions
Page 19
A Adapter 5 B Brightness 3, 6 C Color temperature 9 Connecting your monitor to a computer 5 Contrast 3, 6 D Degauss 9 Display modes timing chart 13 E European notice 16 F FCC information 14 Front panel 3 Function control buttons 3 G Geometric distortion 8 I IC compliance notice ...
A Adapter 5 B Brightness 3, 6 C Color temperature 9 Connecting your monitor to a computer 5 Contrast 3, 6 D Degauss 9 Display modes timing chart 13 E European notice 16 F FCC information 14 Front panel 3 Function control buttons 3 G Geometric distortion 8 I IC compliance notice ...


