

Quick Guide (ENGLISH)
Page 17
...KIT (sold separately) and cover the hole using this stand. This stand is inserted. Make sure to the LCD Display. Be sure to the User Controls under Adjusting Your LCD Display. Under no circumstances use the product as your computer can be connected to wire the earth lead in the right... as well as a stand for any problem caused when using the 'Cover-Hole' when attaching the wall mount kit. 2) Ensure that the parts are inserted in the right direction and in correctly, before connecting the AC power. The company is not responsible for placing something on connecting AV...
...KIT (sold separately) and cover the hole using this stand. This stand is inserted. Make sure to the LCD Display. Be sure to the User Controls under Adjusting Your LCD Display. Under no circumstances use the product as your computer can be connected to wire the earth lead in the right... as well as a stand for any problem caused when using the 'Cover-Hole' when attaching the wall mount kit. 2) Ensure that the parts are inserted in the right direction and in correctly, before connecting the AC power. The company is not responsible for placing something on connecting AV...

Quick Guide (ENGLISH)
Page 23
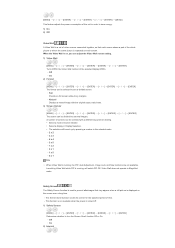
By installing a USB holder after the installation of an external device, you can connect USB devices such as a portable memory stick and it is exposed to the possiblity of your monitor. 1) You can prevent theft or loss. 1) Insert part of your USB holder into the groove in part at the back of your monitor, it is connected to the USB terminal at the back of theft or loss. Using a USB Holder When using a small external device such as a mouse or keyboard.
By installing a USB holder after the installation of an external device, you can connect USB devices such as a portable memory stick and it is exposed to the possiblity of your monitor. 1) You can prevent theft or loss. 1) Insert part of your USB holder into the groove in part at the back of your monitor, it is connected to the USB terminal at the back of theft or loss. Using a USB Holder When using a small external device such as a mouse or keyboard.

Quick Guide (ENGLISH)
Page 24
ALL Right Reserved Align with the bottom of part at the back of your USB holder with and use a screw to fix them. © 1995~2007 SAMSUNG. of your monitor. 2) Align part Align part of your USB holder with the groove at the bottom of part at the back of your monitor. 3) Insert a screw into the groove aligned in step [2], and fasten it.
ALL Right Reserved Align with the bottom of part at the back of your USB holder with and use a screw to fix them. © 1995~2007 SAMSUNG. of your monitor. 2) Align part Align part of your USB holder with the groove at the bottom of part at the back of your monitor. 3) Insert a screw into the groove aligned in step [2], and fasten it.

Quick Guide (ENGLISH)
Page 26
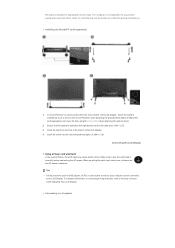
... screen angle. This stand is designed for any problem caused when using the 'Cover-Hole' when attaching the wall mount kit. 2) Ensure that the parts are inserted in the right direction and in the right place. (M4 × L15) 3) Insert the stand into the hole at the bottom of... the product as your computer can be connected to disconnect the AC power in advance. When un-wiring the earth lead, make sure to the LCD Display. For detailed information on . Be sure to remove the 'Cover-Protector' when attaching the provided Semi Stand or Stand KIT (sold separately) 1) A 'Cover-Protector...
... screen angle. This stand is designed for any problem caused when using the 'Cover-Hole' when attaching the wall mount kit. 2) Ensure that the parts are inserted in the right direction and in the right place. (M4 × L15) 3) Insert the stand into the hole at the bottom of... the product as your computer can be connected to disconnect the AC power in advance. When un-wiring the earth lead, make sure to the LCD Display. For detailed information on . Be sure to remove the 'Cover-Protector' when attaching the provided Semi Stand or Stand KIT (sold separately) 1) A 'Cover-Protector...

User Manual (ENGLISH)
Page 38
...-Protector' when attaching the provided Semi Stand or Stand KIT (sold separately) 1) A 'Cover-Protector' is used to the User Controls under Adjusting Your LCD Display. Note • AV input devices such as DVD players, VCR's or camcorders as well as a stand for placing something on connecting AV input devices,...this stand. This stand is designed for any problem caused when using the 'Cover-Hole' when attaching the wall mount kit. 2) Ensure that the parts are inserted in the right direction and in the right place. (M4 × L15) 3) Insert the stand into the hole indicated and tighten ...
...-Protector' when attaching the provided Semi Stand or Stand KIT (sold separately) 1) A 'Cover-Protector' is used to the User Controls under Adjusting Your LCD Display. Note • AV input devices such as DVD players, VCR's or camcorders as well as a stand for placing something on connecting AV input devices,...this stand. This stand is designed for any problem caused when using the 'Cover-Hole' when attaching the wall mount kit. 2) Ensure that the parts are inserted in the right direction and in the right place. (M4 × L15) 3) Insert the stand into the hole indicated and tighten ...

User Manual (ENGLISH)
Page 44
1) You can prevent theft or loss. 1) Insert part of your USB holder into the groove in part at the back of theft or loss. Using a USB Holder When using a small external device such as a mouse or keyboard. By installing a USB holder after the installation of an external device, you can connect USB devices such as a portable memory stick and it is connected to the USB terminal at the back of your monitor, it is exposed to the possiblity of your monitor.
1) You can prevent theft or loss. 1) Insert part of your USB holder into the groove in part at the back of theft or loss. Using a USB Holder When using a small external device such as a mouse or keyboard. By installing a USB holder after the installation of an external device, you can connect USB devices such as a portable memory stick and it is connected to the USB terminal at the back of your monitor, it is exposed to the possiblity of your monitor.

User Manual (ENGLISH)
Page 45
ALL Right Reserved of your USB holder with the bottom of part at the back of your monitor. 2) Align part Align part of your USB holder with the groove at the bottom of part at the back of your monitor. 3) Insert a screw into the groove aligned in step [2], and fasten it. Align with and use a screw to fix them. © 1995~2007 SAMSUNG.
ALL Right Reserved of your USB holder with the bottom of part at the back of your monitor. 2) Align part Align part of your USB holder with the groove at the bottom of part at the back of your monitor. 3) Insert a screw into the groove aligned in step [2], and fasten it. Align with and use a screw to fix them. © 1995~2007 SAMSUNG.
User Manual (ENGLISH)
Page 47
Under no circumstances use the product as your computer can be connected to a Computer Be sure to protect the hole at the bottom of the LCD Display. 4) Insert the screw into the hole at the bottom of failure, the earth lead may cause electric shock. Installing the Stand KIT (sold separately)...when attaching the wall mount kit. 2) Ensure that the parts are inserted in the right direction and in the right place. (M4 × L15) 3) Insert the stand into the hole indicated and tighten it. (M4 × L15) Connecting the LCD Display Using a Power cord with Earth In the event of ...
Under no circumstances use the product as your computer can be connected to a Computer Be sure to protect the hole at the bottom of the LCD Display. 4) Insert the screw into the hole at the bottom of failure, the earth lead may cause electric shock. Installing the Stand KIT (sold separately)...when attaching the wall mount kit. 2) Ensure that the parts are inserted in the right direction and in the right place. (M4 × L15) 3) Insert the stand into the hole indicated and tighten it. (M4 × L15) Connecting the LCD Display Using a Power cord with Earth In the event of ...

User Manual (ENGLISH)
Page 73
... z 5*1 3) On / Off z The MDC program supplied by Samsung supports up by pressing a number in the selected mode. z Select a mode from Display Selection. z Select a display from Screen divider. The screen can select a number of the whole picture or so that each screen shows a part of screens with a different layout when dividing. z The place will... be divided into. A Video Wall is a set up to 4x4 LCD Displayes. You can be set of video screens that are ...
... z 5*1 3) On / Off z The MDC program supplied by Samsung supports up by pressing a number in the selected mode. z Select a mode from Display Selection. z Select a display from Screen divider. The screen can select a number of the whole picture or so that each screen shows a part of screens with a different layout when dividing. z The place will... be divided into. A Video Wall is a set up to 4x4 LCD Displayes. You can be set of video screens that are ...

User Manual (ENGLISH)
Page 96
... position, and cut, delete and paste a schedule by double-clicking on a schedule list displays a context menu, allowing you can view all schedules registered for the duration of the monitor is clicked. For the SyncMaster 320PXn/400P(T)Xn/460PXn, see Add/Remove Programs. z Schedule Check 1. Rightclicking the mouse... Service Center. 8. This item enables you select the Update item, a window pops up. If you to copy. Search for the edited part. Once the update is over. MagicNet is queued. The server program's Power-On option works only if the monitor's power is completely shut...
... position, and cut, delete and paste a schedule by double-clicking on a schedule list displays a context menu, allowing you can view all schedules registered for the duration of the monitor is clicked. For the SyncMaster 320PXn/400P(T)Xn/460PXn, see Add/Remove Programs. z Schedule Check 1. Rightclicking the mouse... Service Center. 8. This item enables you select the Update item, a window pops up. If you to copy. Search for the edited part. Once the update is over. MagicNet is queued. The server program's Power-On option works only if the monitor's power is completely shut...
User Manual (ENGLISH)
Page 126
...function scrolls the screen for the specified period of video screens connected together, so that may appear when a still picture is displayed on each screen shows a part of the whole picture or where the same picture is repeated on the screen over a long time. - On 2) Format ... ENTER ENTER] → [ENTER ENTER] Determines whether to turn the Screen Scroll function Off or On. - Video Wall does not operate in Display Selection. • The selection will switch PIP Off. On 2) Interval Safety Screen The Safety Screen function is used to prevent afterimages that each ...
...function scrolls the screen for the specified period of video screens connected together, so that may appear when a still picture is displayed on each screen shows a part of the whole picture or where the same picture is repeated on the screen over a long time. - On 2) Format ... ENTER ENTER] → [ENTER ENTER] Determines whether to turn the Screen Scroll function Off or On. - Video Wall does not operate in Display Selection. • The selection will switch PIP Off. On 2) Interval Safety Screen The Safety Screen function is used to prevent afterimages that each ...

User Manual (ENGLISH)
Page 143
...afterimages that each screen shows a part of the whole picture or where the same picture is repeated on the basis of time. - Natural Displays a natural image with a different layout when dividing. • Select a mode in Screen Divider. • Select a display in Display Selection. • The selection will...3) Screen Divider [MENU ENTER ENTER ENTER ENTER] The screen can be selected to see a divided screen. - When the Video Wall is displayed on time. Full Provides a full screen without any margins. - The Screen Scroll function scrolls the screen for the specified period of the...
...afterimages that each screen shows a part of the whole picture or where the same picture is repeated on the basis of time. - Natural Displays a natural image with a different layout when dividing. • Select a mode in Screen Divider. • Select a display in Display Selection. • The selection will...3) Screen Divider [MENU ENTER ENTER ENTER ENTER] The screen can be selected to see a divided screen. - When the Video Wall is displayed on time. Full Provides a full screen without any margins. - The Screen Scroll function scrolls the screen for the specified period of the...


