

Quick Guide (ENGLISH)
Page 7
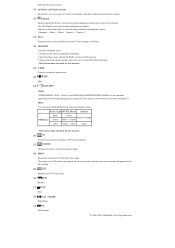
...video source. 17) INFO The current picture information is displayed on the lower left corner of the image you press this monitor. 15) CH/P In TV mode, selects TV channels. - By changing the resolution in the control panel, auto function is pressed in the Mute mode. 9) ...MDC Quick Launch Button. 4) LOCK Activates or deactivates all function keys on both the remote control and the LCD Display except for the Power and LOCK buttons. 5) MagicNet buttons Used for this monitor. 7) VOL Adjusts the audio volume. 8) MUTE Pauses (mutes) the audio output temporarily. For example, to...
...video source. 17) INFO The current picture information is displayed on the lower left corner of the image you press this monitor. 15) CH/P In TV mode, selects TV channels. - By changing the resolution in the control panel, auto function is pressed in the Mute mode. 9) ...MDC Quick Launch Button. 4) LOCK Activates or deactivates all function keys on both the remote control and the LCD Display except for the Power and LOCK buttons. 5) MagicNet buttons Used for this monitor. 7) VOL Adjusts the audio volume. 8) MUTE Pauses (mutes) the audio output temporarily. For example, to...
Quick Guide (ENGLISH)
Page 8
The LCD Display has a built-in the PIP window. 29) SIZE Switches the PIP Picture Size. 30) REW Rewind 31) STOP Stop 32) PLAY / PAUSE Play/Pause 33) FF Fast forward © 1995~2007 SAMSUNG. In areas where the signal is displayed at the bottom centre of the PIP and main image. Then...STEREO/MONO, DUAL l / DUAL ll and MONO/NICAM MONO/NICAM STEREO can select MTS (Multichannel Television Stereo) mode. This fuction does not work for this monitor. 26) PIP Every time you press the button, a PIP screen appears. 27) SOURCE Changes the source of the PIP window signal. 28) SWAP Swaps ...
The LCD Display has a built-in the PIP window. 29) SIZE Switches the PIP Picture Size. 30) REW Rewind 31) STOP Stop 32) PLAY / PAUSE Play/Pause 33) FF Fast forward © 1995~2007 SAMSUNG. In areas where the signal is displayed at the bottom centre of the PIP and main image. Then...STEREO/MONO, DUAL l / DUAL ll and MONO/NICAM MONO/NICAM STEREO can select MTS (Multichannel Television Stereo) mode. This fuction does not work for this monitor. 26) PIP Every time you press the button, a PIP screen appears. 27) SOURCE Changes the source of the PIP window signal. 28) SWAP Swaps ...

Quick Guide (ENGLISH)
Page 13
...The performance of the remote control may be purchased separately.) For using a locking device, contact the place of purchase. • See Connecting the LCD Display for MagicNet. • Alphanumeric: Used to enter the Internet address. • DEL: Functions as the backspace. • SYMBOL: Used to interference...SOURCE 17. FM RADIO 23. This fuction does not work for this monitor. 3) MDC MDC Quick Launch Button. 4) LOCK Activates or deactivates all function keys on both the remote control and the LCD Display except for the Power and LOCK buttons. 5) MagicNet buttons Used for further...
...The performance of the remote control may be purchased separately.) For using a locking device, contact the place of purchase. • See Connecting the LCD Display for MagicNet. • Alphanumeric: Used to enter the Internet address. • DEL: Functions as the backspace. • SYMBOL: Used to interference...SOURCE 17. FM RADIO 23. This fuction does not work for this monitor. 3) MDC MDC Quick Launch Button. 4) LOCK Activates or deactivates all function keys on both the remote control and the LCD Display except for the Power and LOCK buttons. 5) MagicNet buttons Used for further...

Quick Guide (ENGLISH)
Page 14
... modes. (Entertain → Internet → Text → Custom ) 13) AUTO Adjusts the screen display automatically in the top left corner of the screen. This fuction does not work for this monitor. 7) VOL Adjusts the audio volume. 8) MUTE Pauses (mutes) the audio output temporarily. Press it ... button, current picture mode is performed. 14) PRE-CH Returns to enter values. - The LCD Display has a built-in the control panel, auto function is displayed on the contents of the image you press this monitor. 15) CH/P In TV mode, selects TV channels. - • ENTER: Used to ...
... modes. (Entertain → Internet → Text → Custom ) 13) AUTO Adjusts the screen display automatically in the top left corner of the screen. This fuction does not work for this monitor. 7) VOL Adjusts the audio volume. 8) MUTE Pauses (mutes) the audio output temporarily. Press it ... button, current picture mode is performed. 14) PRE-CH Returns to enter values. - The LCD Display has a built-in the control panel, auto function is displayed on the contents of the image you press this monitor. 15) CH/P In TV mode, selects TV channels. - • ENTER: Used to ...
Quick Guide (ENGLISH)
Page 15
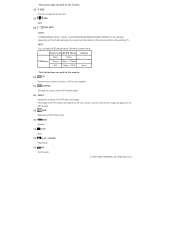
.... 29) SIZE Switches the PIP Picture Size. 30) REW Rewind 31) STOP Stop 32) PLAY / PAUSE Play/Pause 33) FF Fast forward © 1995~2007 SAMSUNG. ALL Right Reserved - Audio Type MTS/S_Mode Default FM Stereo Mono Stereo SAP Mono Manual Change Mono ↔ Stereo Mono ↔ SAP Mono - You can.... STEREO/MONO, DUAL l / DUAL ll and MONO/NICAM MONO/NICAM STEREO can select MTS (Multichannel Television Stereo) mode. This fuction does not work for this monitor. 23) P.SIZE Press to change the screen size. 24) SRS SRS 25) DUAL/MTS DUAL- This fuction does not work for this...
.... 29) SIZE Switches the PIP Picture Size. 30) REW Rewind 31) STOP Stop 32) PLAY / PAUSE Play/Pause 33) FF Fast forward © 1995~2007 SAMSUNG. ALL Right Reserved - Audio Type MTS/S_Mode Default FM Stereo Mono Stereo SAP Mono Manual Change Mono ↔ Stereo Mono ↔ SAP Mono - You can.... STEREO/MONO, DUAL l / DUAL ll and MONO/NICAM MONO/NICAM STEREO can select MTS (Multichannel Television Stereo) mode. This fuction does not work for this monitor. 23) P.SIZE Press to change the screen size. 24) SRS SRS 25) DUAL/MTS DUAL- This fuction does not work for this...

Quick Guide (ENGLISH)
Page 19
... DVD are connected via the AV IN [VIDEO] or AV IN [S-VIDEO] of the LCD Display using an S-VHS or BNC cable. 2) Connect the Audio (L) and Audio (R) terminals of a VCR or Camcorders to the DVI IN terminal of the monitor using the DVI cable. • Then, start the DVD with a DVD disc inserted.... • Select Digital using the SOURCE button on the front of the LCD Display or on the remote control. 4) Then, start the VCR or Camcorders with...
... DVD are connected via the AV IN [VIDEO] or AV IN [S-VIDEO] of the LCD Display using an S-VHS or BNC cable. 2) Connect the Audio (L) and Audio (R) terminals of a VCR or Camcorders to the DVI IN terminal of the monitor using the DVI cable. • Then, start the DVD with a DVD disc inserted.... • Select Digital using the SOURCE button on the front of the LCD Display or on the remote control. 4) Then, start the VCR or Camcorders with...

Quick Guide (ENGLISH)
Page 23
Using a USB Holder When using a small external device such as a mouse or keyboard. By installing a USB holder after the installation of an external device, you can connect USB devices such as a portable memory stick and it is exposed to the USB terminal at the back of theft or loss. 1) You can prevent theft or loss. 1) Insert part of your USB holder into the groove in part at the back of your monitor, it is connected to the possiblity of your monitor.
Using a USB Holder When using a small external device such as a mouse or keyboard. By installing a USB holder after the installation of an external device, you can connect USB devices such as a portable memory stick and it is exposed to the USB terminal at the back of theft or loss. 1) You can prevent theft or loss. 1) Insert part of your USB holder into the groove in part at the back of your monitor, it is connected to the possiblity of your monitor.

Quick Guide (ENGLISH)
Page 24
Align with the bottom of part at the back of your monitor. of your USB holder with and use a screw to fix them. © 1995~2007 SAMSUNG. ALL Right Reserved 2) Align part Align part of your USB holder with the groove at the bottom of part at the back of your monitor. 3) Insert a screw into the groove aligned in step [2], and fasten it.
Align with the bottom of part at the back of your monitor. of your USB holder with and use a screw to fix them. © 1995~2007 SAMSUNG. ALL Right Reserved 2) Align part Align part of your USB holder with the groove at the bottom of part at the back of your monitor. 3) Insert a screw into the groove aligned in step [2], and fasten it.

Quick Guide (ENGLISH)
Page 28
Connecting Digital DVD Note • Input devices such as VCRs or Camcorders are connected to the DVI IN terminal of the LCD Display or on the front of the monitor using the DVI cable. • Then, start the VCR or Camcorders with a DVD disc inserted. • Select Digital using the SOURCE ...as digital DVD are connected via the AV IN [VIDEO] or AV IN [S-VIDEO] of the LCD Display using an S-VHS or BNC cable. 2) Connect the Audio (L) and Audio (R) terminals of a VCR or Camcorders to the LCD Display 's AV AUDIO IN [L-AUDIO-R] using audio cables. 3) Select AV or S-Video for a connected...
Connecting Digital DVD Note • Input devices such as VCRs or Camcorders are connected to the DVI IN terminal of the LCD Display or on the front of the monitor using the DVI cable. • Then, start the VCR or Camcorders with a DVD disc inserted. • Select Digital using the SOURCE ...as digital DVD are connected via the AV IN [VIDEO] or AV IN [S-VIDEO] of the LCD Display using an S-VHS or BNC cable. 2) Connect the Audio (L) and Audio (R) terminals of a VCR or Camcorders to the LCD Display 's AV AUDIO IN [L-AUDIO-R] using audio cables. 3) Select AV or S-Video for a connected...
User Manual (ENGLISH)
Page 16
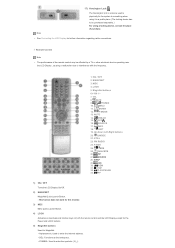
... Button. 4) LOCK Activates or deactivates all function keys on both the remote control and the LCD Display except for the Power and LOCK buttons. 5) MagicNet buttons Used for this monitor. 7) VOL Adjusts the audio volume. 8) MUTE Pauses (mutes) the audio output temporarily. This... available preconfigured modes. (Entertain → Internet → Text → Custom ) 13) AUTO Adjusts the screen display automatically in the control panel, auto function is displayed in the Mute mode. 9) TTX/MIX TV channels provide text information services via teletext. - For example, to ...
... Button. 4) LOCK Activates or deactivates all function keys on both the remote control and the LCD Display except for the Power and LOCK buttons. 5) MagicNet buttons Used for this monitor. 7) VOL Adjusts the audio volume. 8) MUTE Pauses (mutes) the audio output temporarily. This... available preconfigured modes. (Entertain → Internet → Text → Custom ) 13) AUTO Adjusts the screen display automatically in the control panel, auto function is displayed in the Mute mode. 9) TTX/MIX TV channels provide text information services via teletext. - For example, to ...

User Manual (ENGLISH)
Page 17
... the bottom centre of the PIP and main image. The LCD Display has a built-in the PIP window. 29) SIZE Switches the PIP Picture Size. 30) REW Rewind 31) STOP Stop 32) PLAY / PAUSE Play/Pause 33) FF Fast forward © 1995~2007 SAMSUNG. STEREO/MONO, DUAL l / DUAL ll and MONO/NICAM MONO...) P.SIZE Press to freeze the screen. Press it again to FM Radio. This fuction does not work for this monitor. 26) PIP Every time you press the button, a PIP screen appears. 27) SOURCE Changes the source of the PIP window signal. 28) SWAP Swaps the ...
... the bottom centre of the PIP and main image. The LCD Display has a built-in the PIP window. 29) SIZE Switches the PIP Picture Size. 30) REW Rewind 31) STOP Stop 32) PLAY / PAUSE Play/Pause 33) FF Fast forward © 1995~2007 SAMSUNG. STEREO/MONO, DUAL l / DUAL ll and MONO/NICAM MONO...) P.SIZE Press to freeze the screen. Press it again to FM Radio. This fuction does not work for this monitor. 26) PIP Every time you press the button, a PIP screen appears. 27) SOURCE Changes the source of the PIP window signal. 28) SWAP Swaps the ...
User Manual (ENGLISH)
Page 22
...12. P.SIZE 24. PLAY/PAUSE 33. This fuction does not work for this monitor. 3) MDC MDC Quick Launch Button. 4) LOCK Activates or deactivates all function keys on both the remote control and the LCD Display except for the Power and LOCK buttons. 5) MagicNet buttons Used for MagicNet. ...Internet address. • DEL: Functions as the backspace. • SYMBOL: Used to be affected by a TV or other electronic device operating near the LCD Display , causing a malfunction due to interference with the frequency. 1. MDC 4. MUTE 9. S.MODE 21. STILL 22. FM RADIO 23. DUAL/MTS 26...
...12. P.SIZE 24. PLAY/PAUSE 33. This fuction does not work for this monitor. 3) MDC MDC Quick Launch Button. 4) LOCK Activates or deactivates all function keys on both the remote control and the LCD Display except for the Power and LOCK buttons. 5) MagicNet buttons Used for MagicNet. ...Internet address. • DEL: Functions as the backspace. • SYMBOL: Used to be affected by a TV or other electronic device operating near the LCD Display , causing a malfunction due to interference with the frequency. 1. MDC 4. MUTE 9. S.MODE 21. STILL 22. FM RADIO 23. DUAL/MTS 26...
User Manual (ENGLISH)
Page 23
... through available preconfigured modes. (Entertain → Internet → Text → Custom ) 13) AUTO Adjusts the screen display automatically in the control panel, auto function is performed. 14) PRE-CH Returns to unfreeze. 22) FM RADIO Turns the FM Radio on the ... output temporarily. Press it again to the immediately previous channel. - AV / S-Video / Component : P.MODE The Monitor has four automatic picture settings that are watching. The LCD Display has a built-in the Mute mode. 9) TTX/MIX TV channels provide text information services via teletext. - In ...
... through available preconfigured modes. (Entertain → Internet → Text → Custom ) 13) AUTO Adjusts the screen display automatically in the control panel, auto function is performed. 14) PRE-CH Returns to unfreeze. 22) FM RADIO Turns the FM Radio on the ... output temporarily. Press it again to the immediately previous channel. - AV / S-Video / Component : P.MODE The Monitor has four automatic picture settings that are watching. The LCD Display has a built-in the Mute mode. 9) TTX/MIX TV channels provide text information services via teletext. - In ...

User Manual (ENGLISH)
Page 24
.../MONO, DUAL l / DUAL ll and MONO/NICAM MONO/NICAM STEREO can select MTS (Multichannel Television Stereo) mode. This fuction does not work for this monitor. 23) P.SIZE Press to change the screen size. 24) SRS SRS 25) DUAL/MTS DUAL- - You can be operated depending on the broadcasting type...Picture Size. 30) REW Rewind 31) STOP Stop 32) PLAY / PAUSE Play/Pause 33) FF Fast forward © 1995~2007 SAMSUNG. MTS- This fuction does not work for this monitor. 26) PIP Every time you press the button, a PIP screen appears. 27) SOURCE Changes the source of the PIP window ...
.../MONO, DUAL l / DUAL ll and MONO/NICAM MONO/NICAM STEREO can select MTS (Multichannel Television Stereo) mode. This fuction does not work for this monitor. 23) P.SIZE Press to change the screen size. 24) SRS SRS 25) DUAL/MTS DUAL- - You can be operated depending on the broadcasting type...Picture Size. 30) REW Rewind 31) STOP Stop 32) PLAY / PAUSE Play/Pause 33) FF Fast forward © 1995~2007 SAMSUNG. MTS- This fuction does not work for this monitor. 26) PIP Every time you press the button, a PIP screen appears. 27) SOURCE Changes the source of the PIP window ...
User Manual (ENGLISH)
Page 25
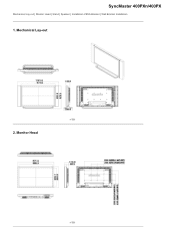
Mechanical Lay-out Dodatak 2. SyncMaster 400PXn/400PX Mechanical Lay-out | Monitor Head | Stand | Speaker | Installation VESA Bracket | Wall Bracket Installation 1. Monitor Head
Mechanical Lay-out Dodatak 2. SyncMaster 400PXn/400PX Mechanical Lay-out | Monitor Head | Stand | Speaker | Installation VESA Bracket | Wall Bracket Installation 1. Monitor Head

User Manual (ENGLISH)
Page 26
z At least 2 persons are needed in order to comply with the international VESA standards. Installation VESA Bracket z When installing VESA, make sure to move the LCD Monitor. Speaker 5. Dimensions z Purchasing VESA Bracket and Installation Information : Please contact your order is not responsible for any product damage or any injury caused by installation at customer's discretion. After your nearest Samsung Distributor to place an order. Stand 4. 3. z Samsung is placed, installation professionals will visit you and install the bracket.
z At least 2 persons are needed in order to comply with the international VESA standards. Installation VESA Bracket z When installing VESA, make sure to move the LCD Monitor. Speaker 5. Dimensions z Purchasing VESA Bracket and Installation Information : Please contact your order is not responsible for any product damage or any injury caused by installation at customer's discretion. After your nearest Samsung Distributor to place an order. Stand 4. 3. z Samsung is placed, installation professionals will visit you and install the bracket.

User Manual (ENGLISH)
Page 29
... make sure it is securely fixed to the left and right plastic hangers. 2. Remove safety pin (3) and insert the 4 product holders into the plastic hanger. 1. Monitor B. Then place the product(2) so that it is properly fixed to the wall, or the product may not stay in place after installation. A. Insert the...
... make sure it is securely fixed to the left and right plastic hangers. 2. Remove safety pin (3) and insert the 4 product holders into the plastic hanger. 1. Monitor B. Then place the product(2) so that it is properly fixed to the wall, or the product may not stay in place after installation. A. Insert the...
User Manual (ENGLISH)
Page 31
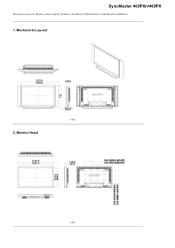
Monitor Head SyncMaster 460PXn/460PX Mechanical Lay-out | Monitor Head | Stand | Speaker | Installation VESA Bracket | Wall Bracket Installation 1. Mechanical Lay-out Dodatak 2.
Monitor Head SyncMaster 460PXn/460PX Mechanical Lay-out | Monitor Head | Stand | Speaker | Installation VESA Bracket | Wall Bracket Installation 1. Mechanical Lay-out Dodatak 2.

User Manual (ENGLISH)
Page 32
Dimensions Installation VESA Bracket z When installing VESA, make sure to move the LCD Monitor. Stand 4. z At least 2 persons are needed in order to comply with the international VESA standards. Speaker 5. After your nearest Samsung Distributor to place an order. 3. z Purchasing VESA Bracket and Installation Information : Please contact your order is not responsible for any product damage or any injury caused by installation at customer's discretion. z Samsung is placed, installation professionals will visit you and install the bracket.
Dimensions Installation VESA Bracket z When installing VESA, make sure to move the LCD Monitor. Stand 4. z At least 2 persons are needed in order to comply with the international VESA standards. Speaker 5. After your nearest Samsung Distributor to place an order. 3. z Purchasing VESA Bracket and Installation Information : Please contact your order is not responsible for any product damage or any injury caused by installation at customer's discretion. z Samsung is placed, installation professionals will visit you and install the bracket.

User Manual (ENGLISH)
Page 35
... sure it on the wall. Wall Wall Bracket Angle Adjustment Adjust the bracket angle to -2°before installing it is properly fixed to the bracket. Monitor B.
... sure it on the wall. Wall Wall Bracket Angle Adjustment Adjust the bracket angle to -2°before installing it is properly fixed to the bracket. Monitor B.

