Quick Guide (ENGLISH)
Page 2
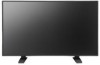
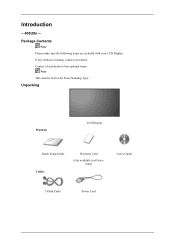
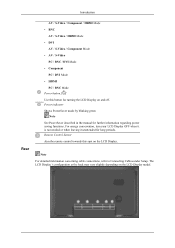
Contact a local dealer to buy optional items. Note This stand is not for the Floor Standing Type. If any items are included with your dealer. Introduction -- 400UXn -Package Contents Note Please make sure the following items are missing, contact your LCD Display. Unpacking Manuals LCD Display Quick Setup Guide Cables Warranty Card (Not available in all locations) User's Guide D-Sub Cable Power Cord
Contact a local dealer to buy optional items. Note This stand is not for the Floor Standing Type. If any items are included with your dealer. Introduction -- 400UXn -Package Contents Note Please make sure the following items are missing, contact your LCD Display. Unpacking Manuals LCD Display Quick Setup Guide Cables Warranty Card (Not available in all locations) User's Guide D-Sub Cable Power Cord
Quick Guide (ENGLISH)
Page 5
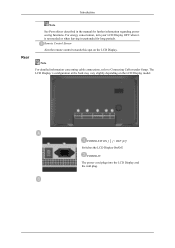
... the manual for long periods. Note For detailed information concerning cable connections, refer to Connecting Cables under Setup. Remote Control Sensor Aim the remote control towards this spot on the LCD Display model. The LCD Display 's configuration at the back may vary slightly depending on the LCD Display. POWER IN The power cord plugs into the LCD Display and...
... the manual for long periods. Note For detailed information concerning cable connections, refer to Connecting Cables under Setup. Remote Control Sensor Aim the remote control towards this spot on the LCD Display model. The LCD Display 's configuration at the back may vary slightly depending on the LCD Display. POWER IN The power cord plugs into the LCD Display and...

Quick Guide (ENGLISH)
Page 10
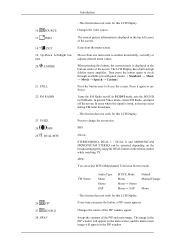
... ↔ SAP Default Manual Change Mono EXIT 19. Turns the FM Radio on the remote control while watching TV. SRS DUAL- Press to freeze the screen. Introduction 13. This fuction does not work for this LCD Display. When pressing this LCD Display. CH/P 16. INFO 18. STILL 22.... In general Video mode, selects FM Radio, and turns off . The current picture information is displayed at the bottom centre of the screen. ENTER/PRE-CH...
... ↔ SAP Default Manual Change Mono EXIT 19. Turns the FM Radio on the remote control while watching TV. SRS DUAL- Press to freeze the screen. Introduction 13. This fuction does not work for this LCD Display. When pressing this LCD Display. CH/P 16. INFO 18. STILL 22.... In general Video mode, selects FM Radio, and turns off . The current picture information is displayed at the bottom centre of the screen. ENTER/PRE-CH...
Quick Guide (ENGLISH)
Page 17
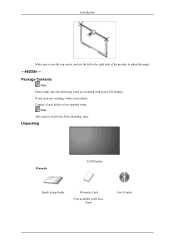
Contact a local dealer to adjust the angle. -- 460DXn -Package Contents Note Please make sure the following items are missing, contact your LCD Display. Unpacking Manuals LCD Display Quick Setup Guide Warranty Card (Not available in all locations) User's Guide If any items are included with your dealer. Introduction Make sure to use the top center, and not the leftor the right side of the product to buy optional items. Note This stand is not for the Floor Standing Type.
Contact a local dealer to adjust the angle. -- 460DXn -Package Contents Note Please make sure the following items are missing, contact your LCD Display. Unpacking Manuals LCD Display Quick Setup Guide Warranty Card (Not available in all locations) User's Guide If any items are included with your dealer. Introduction Make sure to use the top center, and not the leftor the right side of the product to buy optional items. Note This stand is not for the Floor Standing Type.
Quick Guide (ENGLISH)
Page 20
.../ DVI Mode • HDMI PC / BNC Mode Power button [ ] Use this spot on the LCD Display. For energy conservation, turn your LCD Display OFF when it is not needed or when leaving it unattended for further information regarding power saving functions. Power... indicator Shows PowerSaver mode by blinking green Note See PowerSaver described in the manual for long periods. The LCD Display 's configuration at the back may vary slightly depending on the LCD Display...
.../ DVI Mode • HDMI PC / BNC Mode Power button [ ] Use this spot on the LCD Display. For energy conservation, turn your LCD Display OFF when it is not needed or when leaving it unattended for further information regarding power saving functions. Power... indicator Shows PowerSaver mode by blinking green Note See PowerSaver described in the manual for long periods. The LCD Display 's configuration at the back may vary slightly depending on the LCD Display...
Quick Guide (ENGLISH)
Page 26
.../S_Mode Mono Mono ↔ Stereo Mono ↔ SAP Default Manual Change Mono - This fuction does not work for this LCD Display. SRS DUAL- SOURCE 28. When pressing this LCD Display. Turns the FM Radio on the main screen, and the...8594; Movie → Speech → Custom ) Press the button once to unfreeze. This fuction does not work for this LCD Display. SOURCE 17. Changes the video source. MTS- The image in the PIP window will appear on /off the screen. SRS ... press the button, a PIP screen appears. Changes the source of the screen. INFO 18.
.../S_Mode Mono Mono ↔ Stereo Mono ↔ SAP Default Manual Change Mono - This fuction does not work for this LCD Display. SRS DUAL- SOURCE 28. When pressing this LCD Display. Turns the FM Radio on the main screen, and the...8594; Movie → Speech → Custom ) Press the button once to unfreeze. This fuction does not work for this LCD Display. SOURCE 17. Changes the video source. MTS- The image in the PIP window will appear on /off the screen. SRS ... press the button, a PIP screen appears. Changes the source of the screen. INFO 18.
Quick Guide (ENGLISH)
Page 36
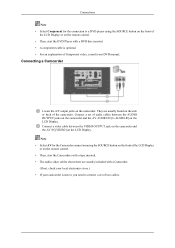
...or back of the camcorder. Connecting a Camcorder Locate the A/V output jacks on the LCD Display. Note • Select AV for the connection to a DVD player using the SOURCE button on the front of the LCD Display or on the remote control. • Then, start the DVD Player with a ... optional. • For an explanation of Component video, consult your DVD manual. Connect a set of two cables. Connections Note • Select Component for the Camcorder connection using the SOURCE button on the front of the LCD Display or on the remote control. • Then, start the Camcorders with...
...or back of the camcorder. Connecting a Camcorder Locate the A/V output jacks on the LCD Display. Note • Select AV for the connection to a DVD player using the SOURCE button on the front of the LCD Display or on the remote control. • Then, start the DVD Player with a ... optional. • For an explanation of Component video, consult your DVD manual. Connect a set of two cables. Connections Note • Select Component for the Camcorder connection using the SOURCE button on the front of the LCD Display or on the remote control. • Then, start the Camcorders with...
Quick Guide (ENGLISH)
Page 37
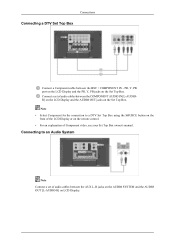
...Top Box Connect a Component cable between the COMPONENT AUDIO IN [L-AUDIOR] on the LCD Display and the AUDIO OUT jacks on the Set Top Box. PR, Y, PB port on the LCD Display and the PR, Y, PB jacks on LCD Display. Note • Select Component for the connection to an Audio System Note Connect a... set of audio cables between the BNC / COMPONENT IN - Connect a set of Component video, see your Set Top Box owner's manual.
...Top Box Connect a Component cable between the COMPONENT AUDIO IN [L-AUDIOR] on the LCD Display and the AUDIO OUT jacks on the Set Top Box. PR, Y, PB port on the LCD Display and the PR, Y, PB jacks on LCD Display. Note • Select Component for the connection to an Audio System Note Connect a... set of audio cables between the BNC / COMPONENT IN - Connect a set of Component video, see your Set Top Box owner's manual.
Quick Guide (ENGLISH)
Page 49
...target disk. A: 3) Enter the BIOS menu of the computer. (Refer to the computer or the video card manual for details. A: Windows ME/2000: Set the resolution in the Control Panel → Display → Settings. * Contact the video card manufacturer for details.) Q: How can I set by pressing the...A: Check if the power is on in the vicinity. A: Windows XP: Set the resolution in the Control Panel → Appearance and Themes → Display → Screen Saver. Note that option and pressing the Enter key in the Boot menu. A: Windows ME/2000: A: Check if a special fluorescent...
...target disk. A: 3) Enter the BIOS menu of the computer. (Refer to the computer or the video card manual for details. A: Windows ME/2000: Set the resolution in the Control Panel → Display → Settings. * Contact the video card manufacturer for details.) Q: How can I set by pressing the...A: Check if the power is on in the vicinity. A: Windows XP: Set the resolution in the Control Panel → Appearance and Themes → Display → Screen Saver. Note that option and pressing the Enter key in the Boot menu. A: Windows ME/2000: A: Check if a special fluorescent...

Quick Guide (ENGLISH)
Page 50
... How can remedy any problems yourself. A: Disconnect the power cord and then clean the LCD Display with a soft cloth, using either a cleaning solution or plain water. Do not leave any water enter the LCD Display. A: The video supports the MPEG1 and WMV codecs only. Install the corresponding codec to ...play the video? If you can I play the video. Set the function in this section to the Windows / Computer Manual). Do not let any detergent or...
... How can remedy any problems yourself. A: Disconnect the power cord and then clean the LCD Display with a soft cloth, using either a cleaning solution or plain water. Do not leave any water enter the LCD Display. A: The video supports the MPEG1 and WMV codecs only. Install the corresponding codec to ...play the video? If you can I play the video. Set the function in this section to the Windows / Computer Manual). Do not let any detergent or...

User Manual (ENGLISH)
Page 9
Contact a local dealer to buy optional items. Note This stand is not for the Floor Standing Type. Introduction -- 400UXn -Package Contents Note Please make sure the following items are missing, contact your LCD Display. If any items are included with your dealer. Unpacking Manuals LCD Display Quick Setup Guide Cables Warranty Card (Not available in all locations) User's Guide D-Sub Cable Power Cord
Contact a local dealer to buy optional items. Note This stand is not for the Floor Standing Type. Introduction -- 400UXn -Package Contents Note Please make sure the following items are missing, contact your LCD Display. If any items are included with your dealer. Unpacking Manuals LCD Display Quick Setup Guide Cables Warranty Card (Not available in all locations) User's Guide D-Sub Cable Power Cord

User Manual (ENGLISH)
Page 12
...manual for long periods. For energy conservation, turn your LCD Display OFF when it is not needed or when leaving it unattended for further information regarding power saving functions. POWER S/W ON [ │ ] / OFF [O] Switches the LCD Display On/Off. POWER IN The power cord plugs into the LCD Display... and the wall plug. Note For detailed information concerning cable connections, refer to Connecting Cables under Setup. The LCD Display 's configuration at the back may vary slightly ...
...manual for long periods. For energy conservation, turn your LCD Display OFF when it is not needed or when leaving it unattended for further information regarding power saving functions. POWER S/W ON [ │ ] / OFF [O] Switches the LCD Display On/Off. POWER IN The power cord plugs into the LCD Display... and the wall plug. Note For detailed information concerning cable connections, refer to Connecting Cables under Setup. The LCD Display 's configuration at the back may vary slightly ...
User Manual (ENGLISH)
Page 17
... Press to unfreeze. ENTER/PRE-CH 15. P.SIZE 24. When pressing this LCD Display. The LCD Display has a built-in the control panel, auto function is displayed in PC mode. In areas where the signal is displayed at the bottom centre of the screen. EXIT 19. The current picture information is...Stereo Audio Type Mono Stereo SAP MTS/S_Mode Mono Mono ↔ Stereo Mono ↔ SAP Default Manual Change Mono FM RADIO 23. By changing the resolution in high fidelity stereo amplifier. INFO 18. SRS DUAL- Returns to FM Radio. Introduction 13. In PC/DVI mode, sets the...
... Press to unfreeze. ENTER/PRE-CH 15. P.SIZE 24. When pressing this LCD Display. The LCD Display has a built-in the control panel, auto function is displayed in PC mode. In areas where the signal is displayed at the bottom centre of the screen. EXIT 19. The current picture information is...Stereo Audio Type Mono Stereo SAP MTS/S_Mode Mono Mono ↔ Stereo Mono ↔ SAP Default Manual Change Mono FM RADIO 23. By changing the resolution in high fidelity stereo amplifier. INFO 18. SRS DUAL- Returns to FM Radio. Introduction 13. In PC/DVI mode, sets the...

User Manual (ENGLISH)
Page 24
Introduction Make sure to use the top center, and not the leftor the right side of the product to buy optional items. Note This stand is not for the Floor Standing Type. If any items are included with your dealer. Unpacking Manuals LCD Display Quick Setup Guide Warranty Card (Not available in all locations) User's Guide Contact a local dealer to adjust the angle. -- 460DXn -Package Contents Note Please make sure the following items are missing, contact your LCD Display.
Introduction Make sure to use the top center, and not the leftor the right side of the product to buy optional items. Note This stand is not for the Floor Standing Type. If any items are included with your dealer. Unpacking Manuals LCD Display Quick Setup Guide Warranty Card (Not available in all locations) User's Guide Contact a local dealer to adjust the angle. -- 460DXn -Package Contents Note Please make sure the following items are missing, contact your LCD Display.

User Manual (ENGLISH)
Page 27
Power indicator Shows PowerSaver mode by blinking green Note See PowerSaver described in the manual for long periods. The LCD Display 's configuration at the back may vary slightly depending on the LCD Display. Note For detailed information concerning cable connections, refer to Connecting Cables under Setup. ...Remote Control Sensor Aim the remote control towards this button for turning the LCD Display on and off. For energy conservation, turn your LCD Display OFF when it is not needed or when leaving it unattended for further information regarding power saving...
Power indicator Shows PowerSaver mode by blinking green Note See PowerSaver described in the manual for long periods. The LCD Display 's configuration at the back may vary slightly depending on the LCD Display. Note For detailed information concerning cable connections, refer to Connecting Cables under Setup. ...Remote Control Sensor Aim the remote control towards this button for turning the LCD Display on and off. For energy conservation, turn your LCD Display OFF when it is not needed or when leaving it unattended for further information regarding power saving...

User Manual (ENGLISH)
Page 33
INFO 18. STILL 22. P.SIZE 24. The LCD Display has a built-in the top left corner of the screen. In general Video mode, selects FM Radio, and turns off . This fuction does not work for this button, the current mode is displayed in high fidelity stereo amplifier. Press to freeze the screen. STEREO/...SRS 25. SRS DUAL- SOURCE 28. SWAP FM Stereo Audio Type Mono Stereo SAP MTS/S_Mode Mono Mono ↔ Stereo Mono ↔ SAP Default Manual Change Mono - Changes the source of the PIP and main image. The image in the PIP window will appear in the PIP window. In PC...
INFO 18. STILL 22. P.SIZE 24. The LCD Display has a built-in the top left corner of the screen. In general Video mode, selects FM Radio, and turns off . This fuction does not work for this button, the current mode is displayed in high fidelity stereo amplifier. Press to freeze the screen. STEREO/...SRS 25. SRS DUAL- SOURCE 28. SWAP FM Stereo Audio Type Mono Stereo SAP MTS/S_Mode Mono Mono ↔ Stereo Mono ↔ SAP Default Manual Change Mono - Changes the source of the PIP and main image. The image in the PIP window will appear in the PIP window. In PC...

User Manual (ENGLISH)
Page 43
... and the AV AUDIO IN [L-AUDIO-R] on the side or back of the camcorder. Connecting a Camcorder Locate the A/V output jacks on the LCD Display. Connect a set of two cables. They are usually included with a Camcorder. (If not, check your local electronics store.) • If...your camcorder is optional. • For an explanation of Component video, consult your DVD manual. Connections Note • Select Component for the Camcorder connection using the SOURCE button on the front of the LCD Display or on the remote control. • Then, start the Camcorders with a tape inserted...
... and the AV AUDIO IN [L-AUDIO-R] on the side or back of the camcorder. Connecting a Camcorder Locate the A/V output jacks on the LCD Display. Connect a set of two cables. They are usually included with a Camcorder. (If not, check your local electronics store.) • If...your camcorder is optional. • For an explanation of Component video, consult your DVD manual. Connections Note • Select Component for the Camcorder connection using the SOURCE button on the front of the LCD Display or on the remote control. • Then, start the Camcorders with a tape inserted...

User Manual (ENGLISH)
Page 44
...front of the LCD Display or on the remote control. • For an explanation of audio cables between the BNC / COMPONENT IN - Note • Select Component for the connection to an Audio System Note Connect a set of Component video, see your Set Top Box owner's manual. Connections Connecting ...a DTV Set Top Box Connect a Component cable between the COMPONENT AUDIO IN [L-AUDIOR] on the LCD Display and the AUDIO OUT jacks on the Set Top Box.
...front of the LCD Display or on the remote control. • For an explanation of audio cables between the BNC / COMPONENT IN - Note • Select Component for the connection to an Audio System Note Connect a set of Component video, see your Set Top Box owner's manual. Connections Connecting ...a DTV Set Top Box Connect a Component cable between the COMPONENT AUDIO IN [L-AUDIOR] on the LCD Display and the AUDIO OUT jacks on the Set Top Box.
User Manual (ENGLISH)
Page 67
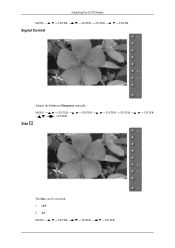
Adjusting the LCD Display MENU → , → ENTER → , → ENTER → ENTER → , → ENTER Signal Control Size Adjusts the Gain and Sharpness manually. MENU → , → ENTER → , → ENTER → , → ENTER → ENTER → , → ENTER ENTER The Size can be switched. 1. 16:9 2. 4:3 MENU → , → ENTER → , → ENTER → , → ENTER
Adjusting the LCD Display MENU → , → ENTER → , → ENTER → ENTER → , → ENTER Signal Control Size Adjusts the Gain and Sharpness manually. MENU → , → ENTER → , → ENTER → , → ENTER → ENTER → , → ENTER ENTER The Size can be switched. 1. 16:9 2. 4:3 MENU → , → ENTER → , → ENTER → , → ENTER

User Manual (ENGLISH)
Page 109
... creation tool. (For example, the HP USB Disk Storage Format Tool) A: 2) Copies the OS ghost image and executables to the Windows / Computer Manual). A: Windows XP: Set the resolution in the BIOS-SETUP of the computer. (Refer to your USB disk. A: Windows ME/2000: A: Check ...be rebooted automatically. Troubleshooting A: Check if the power is on while your USB disk is connected and boot up in the Control Panel → Display → Settings. * Contact the video card manufacturer for details.) Q: How can I Adjusts the resolution? A: Windows ME/2000: Set the ...
... creation tool. (For example, the HP USB Disk Storage Format Tool) A: 2) Copies the OS ghost image and executables to the Windows / Computer Manual). A: Windows XP: Set the resolution in the BIOS-SETUP of the computer. (Refer to your USB disk. A: Windows ME/2000: A: Check ...be rebooted automatically. Troubleshooting A: Check if the power is on while your USB disk is connected and boot up in the Control Panel → Display → Settings. * Contact the video card manufacturer for details.) Q: How can I Adjusts the resolution? A: Windows ME/2000: Set the ...

