Quick Guide (ENGLISH)
Page 3
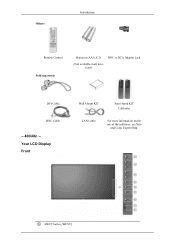
MENU button [MENU] ural Color Expert Help. Others Introduction Remote Control Sold separately Batteries (AAA X 2) (Not available in all locations) BNC to RCA Adaptor Jack DVI Cable BNC Cable -- 400UXn -Your LCD Display Front Wall Mount KIT Semi Stand KIT Calibrater LAN Cable For more information on the use of the calibrater, see Nat-
MENU button [MENU] ural Color Expert Help. Others Introduction Remote Control Sold separately Batteries (AAA X 2) (Not available in all locations) BNC to RCA Adaptor Jack DVI Cable BNC Cable -- 400UXn -Your LCD Display Front Wall Mount KIT Semi Stand KIT Calibrater LAN Cable For more information on the use of the calibrater, see Nat-
Quick Guide (ENGLISH)
Page 13
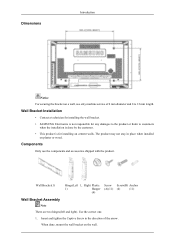
...(B) Anchor (4) (11) Wall Bracket Assembly Note There are two hinges(left and right). When done, mount the wall bracket on plaster or wood. Wall Bracket Installation • Contact a technician for installing the wall bracket. • SAMSUNG Electronics is for installing on cement walls. Components Only use only machine screws of the arrow...
...(B) Anchor (4) (11) Wall Bracket Assembly Note There are two hinges(left and right). When done, mount the wall bracket on plaster or wood. Wall Bracket Installation • Contact a technician for installing the wall bracket. • SAMSUNG Electronics is for installing on cement walls. Components Only use only machine screws of the arrow...
Quick Guide (ENGLISH)
Page 15
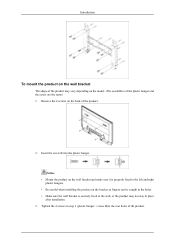
Notice • Mount the product on the wall bracket and make sure it is properly fixed to the left and right plastic hangers. • Be careful when installing ... hanger and the screw are the same) 1. Remove the 4 screws on the back of the product. Insert the screw B into the plastic hanger. Introduction To mount the product on the wall bracket The shape of the product may not stay in place after installation. 3.
Notice • Mount the product on the wall bracket and make sure it is properly fixed to the left and right plastic hangers. • Be careful when installing ... hanger and the screw are the same) 1. Remove the 4 screws on the back of the product. Insert the screw B into the plastic hanger. Introduction To mount the product on the wall bracket The shape of the product may not stay in place after installation. 3.

Quick Guide (ENGLISH)
Page 18
ural Color Expert Help. Cables D-Sub Cable Others Introduction Power Cord Remote Control Sold separately Batteries (AAA X 2) (Not available in all locations) BNC to RCA Adaptor Jack DVI Cable BNC Cable Wall Mount KIT Semi Stand KIT Calibrater LAN Cable For more information on the use of the calibrater, see Nat-
ural Color Expert Help. Cables D-Sub Cable Others Introduction Power Cord Remote Control Sold separately Batteries (AAA X 2) (Not available in all locations) BNC to RCA Adaptor Jack DVI Cable BNC Cable Wall Mount KIT Semi Stand KIT Calibrater LAN Cable For more information on the use of the calibrater, see Nat-

Quick Guide (ENGLISH)
Page 29
Use the correct one . 1. Hinge (Right) 2. When done, mount the wall bracket on the wall bracket to adjust the length. Hinge (Left) D - Before drilling into the wall, check if the length between the two ...
Use the correct one . 1. Hinge (Right) 2. When done, mount the wall bracket on the wall bracket to adjust the length. Hinge (Left) D - Before drilling into the wall, check if the length between the two ...

Quick Guide (ENGLISH)
Page 30
Fix each of the brackets and hinge holes to drill holes deeper than 35 mm. Introduction A - To mount the product on the wall bracket The shape of the product may vary depending on the model. (The assemblies of the product. Length between the two locking holes 3. Remove the 4 screws on the wall. Match each anchor in the corresponding hole. Use the 5.0 mm bit to the corresponding anchor holes and insert and tighten the 11 screws A. Check the installation diagram and mark the drill points on the back of the plastic hanger and the screw are the same) 1.
Fix each of the brackets and hinge holes to drill holes deeper than 35 mm. Introduction A - To mount the product on the wall bracket The shape of the product may vary depending on the model. (The assemblies of the product. Length between the two locking holes 3. Remove the 4 screws on the wall. Match each anchor in the corresponding hole. Use the 5.0 mm bit to the corresponding anchor holes and insert and tighten the 11 screws A. Check the installation diagram and mark the drill points on the back of the plastic hanger and the screw are the same) 1.

Quick Guide (ENGLISH)
Page 31
... wall bracket is firmly fixed to the wall, or the product may not stay in step 2 (plastic hanger + screw B)to the bracket. Introduction 2. Notice • Mount the product on the wall bracket and make sure it is securely fixed to the bracket. Make sure to re-insert and tighten the safety...
... wall bracket is firmly fixed to the wall, or the product may not stay in step 2 (plastic hanger + screw B)to the bracket. Introduction 2. Notice • Mount the product on the wall bracket and make sure it is securely fixed to the bracket. Make sure to re-insert and tighten the safety...
User Manual (ENGLISH)
Page 4
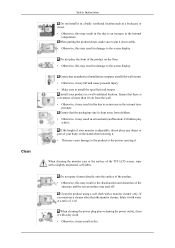
...- perature. If the height of your product in the discoloration and distortion of the TFT-LCD screen, wipe with a monitor cleaner only. When cleaning the monitor case or the surface of...than 10 cm from children. • Otherwise, it may cause damage to install the specified wall mount. Clean Safety Instructions Do not install it in a badly ventilated location such as a bookcase or closet...the front of the product. • Otherwise, this may result in damage to the screen display. Ensure that the packaging vinyl is adjustable, do not place any object or part of 1:...
...- perature. If the height of your product in the discoloration and distortion of the TFT-LCD screen, wipe with a monitor cleaner only. When cleaning the monitor case or the surface of...than 10 cm from children. • Otherwise, it may cause damage to install the specified wall mount. Clean Safety Instructions Do not install it in a badly ventilated location such as a bookcase or closet...the front of the product. • Otherwise, this may result in damage to the screen display. Ensure that the packaging vinyl is adjustable, do not place any object or part of 1:...

User Manual (ENGLISH)
Page 10
ural Color Expert Help. Others Introduction Remote Control Sold separately Batteries (AAA X 2) (Not available in all locations) BNC to RCA Adaptor Jack DVI Cable BNC Cable -- 400UXn -Your LCD Display Front Wall Mount KIT Semi Stand KIT Calibrater LAN Cable For more information on the use of the calibrater, see Nat- MENU button [MENU]
ural Color Expert Help. Others Introduction Remote Control Sold separately Batteries (AAA X 2) (Not available in all locations) BNC to RCA Adaptor Jack DVI Cable BNC Cable -- 400UXn -Your LCD Display Front Wall Mount KIT Semi Stand KIT Calibrater LAN Cable For more information on the use of the calibrater, see Nat- MENU button [MENU]

User Manual (ENGLISH)
Page 20
Wall Bracket Installation • Contact a technician for installing the wall bracket. • SAMSUNG Electronics is for any damages to the product or harm to 12 mm length. Use the correct one. 1. Dimensions Introduction Notice For securing the bracket ...on a wall, use the components and accessories shipped with the product. Components Only use only machine screws of the arrow. When done, mount the wall bracket on plaster or wood. The product may not stay in the direction of 6 mm diameter and 8 to customers when the installation is...
Wall Bracket Installation • Contact a technician for installing the wall bracket. • SAMSUNG Electronics is for any damages to the product or harm to 12 mm length. Use the correct one. 1. Dimensions Introduction Notice For securing the bracket ...on a wall, use the components and accessories shipped with the product. Components Only use only machine screws of the arrow. When done, mount the wall bracket on plaster or wood. The product may not stay in the direction of 6 mm diameter and 8 to customers when the installation is...

User Manual (ENGLISH)
Page 22
... make sure it is securely fixed to the wall, or the product may vary depending on the model. (The assemblies of the product. 2. Introduction To mount the product on the wall bracket The shape of the product may not stay in place after installation. 3. Insert the screw B into the plastic hanger...
... make sure it is securely fixed to the wall, or the product may vary depending on the model. (The assemblies of the product. 2. Introduction To mount the product on the wall bracket The shape of the product may not stay in place after installation. 3. Insert the screw B into the plastic hanger...

User Manual (ENGLISH)
Page 25
Cables D-Sub Cable Others Introduction Power Cord Remote Control Sold separately Batteries (AAA X 2) (Not available in all locations) BNC to RCA Adaptor Jack DVI Cable BNC Cable Wall Mount KIT Semi Stand KIT Calibrater LAN Cable For more information on the use of the calibrater, see Nat- ural Color Expert Help.
Cables D-Sub Cable Others Introduction Power Cord Remote Control Sold separately Batteries (AAA X 2) (Not available in all locations) BNC to RCA Adaptor Jack DVI Cable BNC Cable Wall Mount KIT Semi Stand KIT Calibrater LAN Cable For more information on the use of the calibrater, see Nat- ural Color Expert Help.

User Manual (ENGLISH)
Page 36
... and right). Use the correct one . If the length is too short or long, loosen all or some of the product is correct. When done, mount the wall bracket on the wall bracket to adjust the length. A - Before drilling into the wall, check if the length between the two locking holes...
... and right). Use the correct one . If the length is too short or long, loosen all or some of the product is correct. When done, mount the wall bracket on the wall bracket to adjust the length. A - Before drilling into the wall, check if the length between the two locking holes...

User Manual (ENGLISH)
Page 37
Remove the 4 screws on the back of the plastic hanger and the screw are the same) 1. Fix each of the brackets and hinge holes to drill holes deeper than 35 mm. To mount the product on the wall bracket The shape of the product may vary depending on the wall. Check the installation diagram and mark the drill points on the model. (The assemblies of the product. Match each anchor in the corresponding hole. Introduction A - Length between the two locking holes 3. Use the 5.0 mm bit to the corresponding anchor holes and insert and tighten the 11 screws A.
Remove the 4 screws on the back of the plastic hanger and the screw are the same) 1. Fix each of the brackets and hinge holes to drill holes deeper than 35 mm. To mount the product on the wall bracket The shape of the product may vary depending on the wall. Check the installation diagram and mark the drill points on the model. (The assemblies of the product. Match each anchor in the corresponding hole. Introduction A - Length between the two locking holes 3. Use the 5.0 mm bit to the corresponding anchor holes and insert and tighten the 11 screws A.

User Manual (ENGLISH)
Page 38
... on the bracket as fingers can be caught in the holes. • Make sure the wall bracket is firmly fixed to the bracket. Notice • Mount the product on the wall bracket and make sure it is securely fixed to the wall, or the product may not stay in step 2 (plastic...
... on the bracket as fingers can be caught in the holes. • Make sure the wall bracket is firmly fixed to the bracket. Notice • Mount the product on the wall bracket and make sure it is securely fixed to the wall, or the product may not stay in step 2 (plastic...

User Manual (ENGLISH)
Page 111
Specifications General General Model Name SyncMaster 400UXn LCD Panel Size Display area Pixel Pitch 40 " Diagonal (101 cm) 885.168 mm (H) X 497.664 mm (V) 0.648 mm (H) X 0.648 mm (V) Synchronization Horizontal Vertical 30 ~ 81 kHz 56 ~ 85 Hz Display Color 16.7 M Resolution Optimum resolution Maximum resolution 1360 x 768 @ 60 Hz depends on graphics card used 1360 x 768... (W x H x D) / Weight 914 x 118 x 526 mm / 35.9 x 4.6 x 20.7 inch (Without Stand) 914 x 311 x 585 mm / 35.9 x 12.2 x 23.0 inch (With Stand) / 22.5 kg / 49.6 lbs VESA Mounting Interface 600 x 400 mm
Specifications General General Model Name SyncMaster 400UXn LCD Panel Size Display area Pixel Pitch 40 " Diagonal (101 cm) 885.168 mm (H) X 497.664 mm (V) 0.648 mm (H) X 0.648 mm (V) Synchronization Horizontal Vertical 30 ~ 81 kHz 56 ~ 85 Hz Display Color 16.7 M Resolution Optimum resolution Maximum resolution 1360 x 768 @ 60 Hz depends on graphics card used 1360 x 768... (W x H x D) / Weight 914 x 118 x 526 mm / 35.9 x 4.6 x 20.7 inch (Without Stand) 914 x 311 x 585 mm / 35.9 x 12.2 x 23.0 inch (With Stand) / 22.5 kg / 49.6 lbs VESA Mounting Interface 600 x 400 mm

User Manual (ENGLISH)
Page 115
Specifications Synchronization Horizontal Vertical 30 ~ 81 kHz 56 ~ 85 Hz Display Color 16.7 M Resolution Optimum resolution Maximum resolution 1360 x 768 @ 60 Hz depends on graphics card used 1360 x 768 @ 60 Hz Input Signal,....7 inch (Without Stand) 1049 x 311 x 662 mm / 41.2 x 12.2 x 26.0 inch (With Stand) / 29 kg / 63.9 lbs VESA Mounting Interface 600 x 400 mm Environmental considerations Operating Temperature : 50°F ~ 104°F (10°C ~ 40°C) Storage Humidity : 10 % ~ 80 %, non-condensing Temperature : -4°F ~ 113°F (-20°C ~ 45°C) Humidity : 5 %...
Specifications Synchronization Horizontal Vertical 30 ~ 81 kHz 56 ~ 85 Hz Display Color 16.7 M Resolution Optimum resolution Maximum resolution 1360 x 768 @ 60 Hz depends on graphics card used 1360 x 768 @ 60 Hz Input Signal,....7 inch (Without Stand) 1049 x 311 x 662 mm / 41.2 x 12.2 x 26.0 inch (With Stand) / 29 kg / 63.9 lbs VESA Mounting Interface 600 x 400 mm Environmental considerations Operating Temperature : 50°F ~ 104°F (10°C ~ 40°C) Storage Humidity : 10 % ~ 80 %, non-condensing Temperature : -4°F ~ 113°F (-20°C ~ 45°C) Humidity : 5 %...


