
Quick Start Guide
Page 4
... button Use this button for turning the LCD Display on and off. Sold separately Introduction RGB to BNC Cable RGB to Component Cable Network Box (Applicable to use the TV. • A network box (sold separately) must be connected to the 400UX-3, 460UX-3 model only) Wall Mount KIT TV Tuner Box Note Accessories ... [AV] → [Component] → [HDMI1] → [HDMI2] → [DisplayPort] → [MagicInfo] → [TV] Note • A TV tuner box (sold separately) must be purchased with a 400UX-3, 460UX-3 model. Your LCD Display Front SOURCE button Switches from PC mode to...
... button Use this button for turning the LCD Display on and off. Sold separately Introduction RGB to BNC Cable RGB to Component Cable Network Box (Applicable to use the TV. • A network box (sold separately) must be connected to the 400UX-3, 460UX-3 model only) Wall Mount KIT TV Tuner Box Note Accessories ... [AV] → [Component] → [HDMI1] → [HDMI2] → [DisplayPort] → [MagicInfo] → [TV] Note • A TV tuner box (sold separately) must be purchased with a 400UX-3, 460UX-3 model. Your LCD Display Front SOURCE button Switches from PC mode to...
User Manual
Page 11
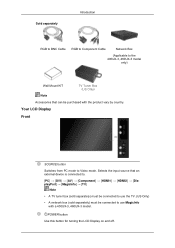
... input source that can be connected to Video mode. Your LCD Display Front SOURCE button Switches from PC mode to use MagicInfo with the product vary by country. Sold separately Introduction RGB to BNC Cable RGB to Component Cable Network Box (Applicable to the 400UX-3, 460UX-3 model only) Wall Mount KIT TV Tuner Box (US...] Note • A TV tuner box (sold separately) must be connected to use the TV. (US Only) • A network box (sold separately) must be purchased with a 400UX-3, 460UX-3 model.
... input source that can be connected to Video mode. Your LCD Display Front SOURCE button Switches from PC mode to use MagicInfo with the product vary by country. Sold separately Introduction RGB to BNC Cable RGB to Component Cable Network Box (Applicable to the 400UX-3, 460UX-3 model only) Wall Mount KIT TV Tuner Box (US...] Note • A TV tuner box (sold separately) must be connected to use the TV. (US Only) • A network box (sold separately) must be purchased with a 400UX-3, 460UX-3 model.
User Manual
Page 31
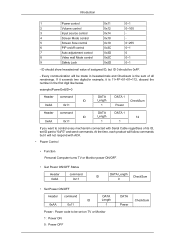
.... ID should show hexadecimal value of assigned ID, but it is the sum of its ID, set on /off control 0x3C 0~1 7 Auto adjustment control 0x3D 0 8 Video wall Mode control 0x5C 0~1 9 Safety Lock 0x5D 0~1 - Introduction 1 Power control 0x11 0~1 2 Volume control 0x12 0~100 3 Input source control 0x14 - 4 Screen Mode control 0x18 - 5 Screen Size control...
.... ID should show hexadecimal value of assigned ID, but it is the sum of its ID, set on /off control 0x3C 0~1 7 Auto adjustment control 0x3D 0 8 Video wall Mode control 0x5C 0~1 9 Safety Lock 0x5D 0~1 - Introduction 1 Power control 0x11 0~1 2 Volume control 0x12 0~100 3 Input source control 0x14 - 4 Screen Mode control 0x18 - 5 Screen Size control...
User Manual
Page 34
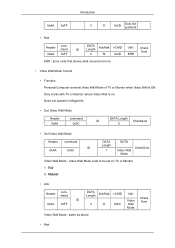
... ID CheckSum 0 • Set Picture Size Header command ID 0xAA 0x18 DATA Length 1 DATA Screen Mode Screen Mode : Screen Mode code to be controlled when Video Wall is Val1 ERR Check Sum • Screen Mode Control • Function Personal Computer changes "Screen Mode" of TV or Monitor.
... ID CheckSum 0 • Set Picture Size Header command ID 0xAA 0x18 DATA Length 1 DATA Screen Mode Screen Mode : Screen Mode code to be controlled when Video Wall is Val1 ERR Check Sum • Screen Mode Control • Function Personal Computer changes "Screen Mode" of TV or Monitor.
User Manual
Page 37
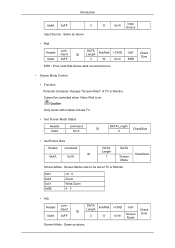
... TV or Monitor where Video Wall is ON. Does not operate in MagicInfo • Get Video Wall Mode Header 0xAA command 0x5C DATA Length ID CheckSum 0 • Set Video Wall Mode Header command ID 0xAA 0x5C DATA Length 1 DATA CheckSum Video Wall Mode Video Wall Mode : Video Wall Mode code to be set... 0x3D ERR : Error code that shows what occurred error is Val1 ERR Check Sum • Video Wall Mode Control • Function Personal Computer converts Video Wall Mode of TV or Monitor when Video Wall is on TV or Monitor 1 : Full 0 : Natural • Ack Header command 0xAA ...
... TV or Monitor where Video Wall is ON. Does not operate in MagicInfo • Get Video Wall Mode Header 0xAA command 0x5C DATA Length ID CheckSum 0 • Set Video Wall Mode Header command ID 0xAA 0x5C DATA Length 1 DATA CheckSum Video Wall Mode Video Wall Mode : Video Wall Mode code to be set... 0x3D ERR : Error code that shows what occurred error is Val1 ERR Check Sum • Video Wall Mode Control • Function Personal Computer converts Video Wall Mode of TV or Monitor when Video Wall is on TV or Monitor 1 : Full 0 : Natural • Ack Header command 0xAA ...

User Manual
Page 71
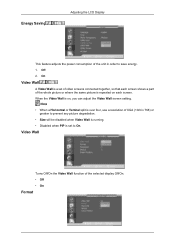
System Setup Choose display devices from the list of connected multiple display devices. Video Wall is enabled only when devices are in the group. Format Select the format to display part of a whole picture or repeat the same picture on each of sets, and select the System tab. Video Wall The Video Wall function can be used to display the split screen. 'VMM BUVSBM Video Wall Enable or disable Video Wall.
System Setup Choose display devices from the list of connected multiple display devices. Video Wall is enabled only when devices are in the group. Format Select the format to display part of a whole picture or repeat the same picture on each of sets, and select the System tab. Video Wall The Video Wall function can be used to display the split screen. 'VMM BUVSBM Video Wall Enable or disable Video Wall.

User Manual
Page 72
... if multiple sets are enabled when Video Wall is assigned to H. The range of 15 displays can be arranged in a row. A maximum of screen divider settings may differ depending on . A maximum of the selected sets. Screen Position View the layout of horizontal display devices. H Select the number of displays (configured by the screen divider) or... be assigned to V if 15 is set and drag it to on the model. To change the layout as required. V Select the number of 15 displays can be arranged in a row. A maximum of vertical...
... if multiple sets are enabled when Video Wall is assigned to H. The range of 15 displays can be arranged in a row. A maximum of screen divider settings may differ depending on . A maximum of the selected sets. Screen Position View the layout of horizontal display devices. H Select the number of displays (configured by the screen divider) or... be assigned to V if 15 is set and drag it to on the model. To change the layout as required. V Select the number of 15 displays can be arranged in a row. A maximum of vertical...
User Manual
Page 73
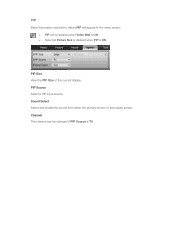
PIP Source Select a PIP input source. Sound Select Select and enable the sound from either the primary screen or secondary screen. PIP Size View the PIP Size of the current display. Channel The channel can be disabled when Video Wall is ON. z Note that Picture Size is disabled when PIP is ON. z PIP will appear in the menu screen. PIP Basic information required to adjust PIP will be changed if PIP Source is TV.
PIP Source Select a PIP input source. Sound Select Select and enable the sound from either the primary screen or secondary screen. PIP Size View the PIP Size of the current display. Channel The channel can be disabled when Video Wall is ON. z Note that Picture Size is disabled when PIP is ON. z PIP will appear in the menu screen. PIP Basic information required to adjust PIP will be changed if PIP Source is TV.

User Manual
Page 89
... the input source for the PIP. PIP Note The PIP function is not available when Video Wall is compatible with RGB (PC) and Component signals. When external AV devices such as VCRs or DVDs are connected to the LCD Display , PIP allows you select , , in a small window super-imposed on the PC... Video signal. (Off/On) Note • PIP turns off when the LCD Display is disabled if the primary screen does not receive a signal. • A ...
... the input source for the PIP. PIP Note The PIP function is not available when Video Wall is compatible with RGB (PC) and Component signals. When external AV devices such as VCRs or DVDs are connected to the LCD Display , PIP allows you select , , in a small window super-imposed on the PC... Video signal. (Off/On) Note • PIP turns off when the LCD Display is disabled if the primary screen does not receive a signal. • A ...
User Manual
Page 112
... picture is repeated on , you can adjust the Video Wall screen setting. Note • When a Horizontal or Vertical split is over four, use a resolution of the unit in order to On. Off 2. Energy Saving Adjusting the LCD Display This feature adjusts the power consumption of XGA (1024... x 768) or greater to prevent any picture degradation. • Size will be disabled when Video Wall is running. • Disabled when PIP is set of video screens connected together, so that each...
... picture is repeated on , you can adjust the Video Wall screen setting. Note • When a Horizontal or Vertical split is over four, use a resolution of the unit in order to On. Off 2. Energy Saving Adjusting the LCD Display This feature adjusts the power consumption of XGA (1024... x 768) or greater to prevent any picture degradation. • Size will be disabled when Video Wall is running. • Disabled when PIP is set of video screens connected together, so that each...


