Quick Start Guide
Page 2
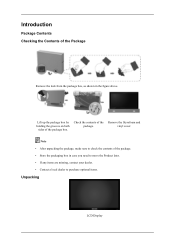
... of the package. • Store the packaging box in the figure above. Note • After unpacking the package, make sure to purchase optional items. Unpacking LCD Display Lift up the package box by holding the grooves on both sides of the Package Remove the lock from the package box, as shown in...
... of the package. • Store the packaging box in the figure above. Note • After unpacking the package, make sure to purchase optional items. Unpacking LCD Display Lift up the package box by holding the grooves on both sides of the Package Remove the lock from the package box, as shown in...
Quick Start Guide
Page 4
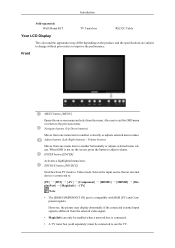
... source that an external device is connected to adjust volume. Introduction Sold separately Wall Mount KIT TV Tuner box RS232C Cable Your LCD Display The color and the appearance may display abnormally if the connected external input signal is different from the selected video signal. • MagicInfo can only be enabled when a network...
... source that an external device is connected to adjust volume. Introduction Sold separately Wall Mount KIT TV Tuner box RS232C Cable Your LCD Display The color and the appearance may display abnormally if the connected external input signal is different from the selected video signal. • MagicInfo can only be enabled when a network...

Quick Start Guide
Page 5
...this spot on and off. Power indicator Shows PowerSaver mode by blinking green Note See PowerSaver described in the manual for this LCD Display. The LCD Display's configuration at the back may vary slightly depending on -screen D.MENU. Rear Note This function does not work for further ...power saving functions. For energy conservation, turn the PIP screen On / Off. PIP button Push the PIP button to turn your LCD Display OFF when it is enabled. Brightness Sensor Automatically detects the surrounding brightness. Note See the "Connections" section for long periods. Note...
...this spot on and off. Power indicator Shows PowerSaver mode by blinking green Note See PowerSaver described in the manual for this LCD Display. The LCD Display's configuration at the back may vary slightly depending on -screen D.MENU. Rear Note This function does not work for further ...power saving functions. For energy conservation, turn the PIP screen On / Off. PIP button Push the PIP button to turn your LCD Display OFF when it is enabled. Brightness Sensor Automatically detects the surrounding brightness. Note See the "Connections" section for long periods. Note...
Quick Start Guide
Page 6
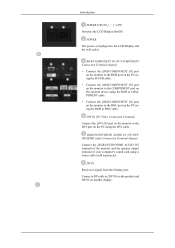
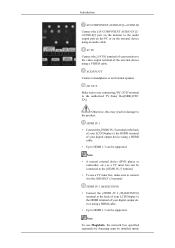
Introduction POWER S/W ON [ │ ] / OFF Switches the LCD Display On/Off. RGB/DVI/DP/HDMI AUDIO IN (PC/DVI/ DP/HDMI Audio Connection Terminal (Input)) Connect the [RGB/DVI/DP/HDMI AUDIO IN] terminal ... (PC Video Connection Terminal) Connect the [DVI IN] port on the monitor to the BNC port on another display. DP IN Receives a signal from the Display port. POWER The power cord plugs into the LCD Display and the wall outlet. RGB/COMPONENT IN (PC/COMPONENT Connection Terminal (Input)) • Connect the [RGB/COMPONENT IN...
Introduction POWER S/W ON [ │ ] / OFF Switches the LCD Display On/Off. RGB/DVI/DP/HDMI AUDIO IN (PC/DVI/ DP/HDMI Audio Connection Terminal (Input)) Connect the [RGB/DVI/DP/HDMI AUDIO IN] terminal ... (PC Video Connection Terminal) Connect the [DVI IN] port on the monitor to the BNC port on another display. DP IN Receives a signal from the Display port. POWER The power cord plugs into the LCD Display and the wall outlet. RGB/COMPONENT IN (PC/COMPONENT Connection Terminal (Input)) • Connect the [RGB/COMPONENT IN...
Quick Start Guide
Page 7
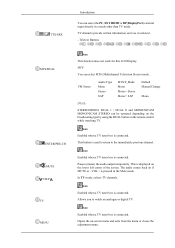
...your digital output device using a HDMI cable. • Up to HDMI 1.3 can be supported. Note To use MagicInfo, the network box specified separately by Samsung must be connected to the [HDMI IN 1] terminal. • To use connecting [DC OUT] terminal to the authorized TV-Tuner Box[SBB_DTC/ ZA]....etc.) or a TV tuner box can be supported. HDMI IN 2 (MAGICINFO) • Connect the [HDMI IN 2 (MAGICINFO)] terminal at the back of your LCD Display to the HDMI terminal of your monitor to the video output terminal of your digital output device using a HDMI cable. • Up to HDMI 1.3 can...
...your digital output device using a HDMI cable. • Up to HDMI 1.3 can be supported. Note To use MagicInfo, the network box specified separately by Samsung must be connected to the [HDMI IN 1] terminal. • To use connecting [DC OUT] terminal to the authorized TV-Tuner Box[SBB_DTC/ ZA]....etc.) or a TV tuner box can be supported. HDMI IN 2 (MAGICINFO) • Connect the [HDMI IN 2 (MAGICINFO)] terminal at the back of your LCD Display to the HDMI terminal of your monitor to the video output terminal of your digital output device using a HDMI cable. • Up to HDMI 1.3 can...
Quick Start Guide
Page 10
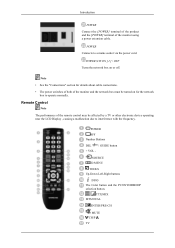
... the product and the [POWER] terminal of the monitor and the network box must be affected by a TV or other electronic device operating near the LCD Display , causing a malfunction due to interference with the frequency. POWER OFF Number Buttons DEL / GUIDE button + VOL - Note • See the "Connections" section for the network...
... the product and the [POWER] terminal of the monitor and the network box must be affected by a TV or other electronic device operating near the LCD Display , causing a malfunction due to interference with the frequency. POWER OFF Number Buttons DEL / GUIDE button + VOL - Note • See the "Connections" section for the network...
Quick Start Guide
Page 11
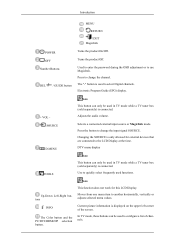
...while a TV tuner box (sold separately) is used functions. Current picture information is only allowed for this LCD Display. Used to enter the password during the OSD adjustment or to another horizontally, vertically or adjusts selected menu... values. The "-" button is connected. Changing the SOURCE is displayed on the upper left corner of channels. Use to quickly select frequently used to change the input ...box (sold separately) is connected. Press the button to the LCD Display at the time. Turns the product Off.
...while a TV tuner box (sold separately) is used functions. Current picture information is only allowed for this LCD Display. Used to enter the password during the OSD adjustment or to another horizontally, vertically or adjusts selected menu... values. The "-" button is connected. Changing the SOURCE is displayed on the upper left corner of channels. Use to quickly select frequently used to change the input ...box (sold separately) is connected. Press the button to the LCD Display at the time. Turns the product Off.
Quick Start Guide
Page 12
Teletext Buttons MTS/DUAL ENTER/PRE-CH MUTE CH/P TV MENU Note This function does not work for this LCD Display. Note Enabled when a TV tuner box is connected. Note Enabled when a TV tuner box is connected. This button is used to return to watch an ... and MONO/NICAM MONO/NICAM STEREO can be operated depending on the broadcasting type by using the DUAL button on if MUTE or - VOL + is displayed on -screen menu and exits from the menu or closes the adjustment menu. Opens the on the lower left corner of the screen. This is...
Teletext Buttons MTS/DUAL ENTER/PRE-CH MUTE CH/P TV MENU Note This function does not work for this LCD Display. Note Enabled when a TV tuner box is connected. Note Enabled when a TV tuner box is connected. This button is used to return to watch an ... and MONO/NICAM MONO/NICAM STEREO can be operated depending on the broadcasting type by using the DUAL button on if MUTE or - VOL + is displayed on -screen menu and exits from the menu or closes the adjustment menu. Opens the on the lower left corner of the screen. This is...
Quick Start Guide
Page 14
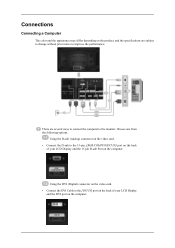
... the D-sub (Analog) connector on the video card. • Connect the D-sub to the 15-pin, [RGB/COMPONENT IN] port on the back of your LCD Display and the DVI port on the product, and the specifications are several ways to connect the computer to the [DVI IN] port on the back...
... the D-sub (Analog) connector on the video card. • Connect the D-sub to the 15-pin, [RGB/COMPONENT IN] port on the back of your LCD Display and the DVI port on the product, and the specifications are several ways to connect the computer to the [DVI IN] port on the back...
Quick Start Guide
Page 15
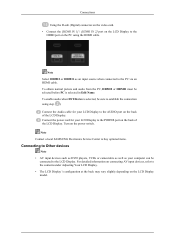
... PC using step ( ). For detailed information on connecting AV input devices, refer to the LCD Display. Note Select HDMI2 or HDMI1 as your computer can be sure to the PC via an HDMI cable. Note Contact a local SAMSUNG Electronics Service Center to buy optional items. Connecting to Other devices Note • AV input...
... PC using step ( ). For detailed information on connecting AV input devices, refer to the LCD Display. Note Select HDMI2 or HDMI1 as your computer can be sure to the PC via an HDMI cable. Note Contact a local SAMSUNG Electronics Service Center to buy optional items. Connecting to Other devices Note • AV input...

Quick Start Guide
Page 16
.... 3. Connect a video cable to a Camcorder 1. Connect a video cable between the AUDIO OUTPUT jacks on the camcorder and the [AV /COMPONENT AUDIO IN [L-AUDIO-R]] on the LCD Display . Locate the AV output jacks on the LCD Display . 2. Connecting AV Devices Connections 1. Connect a set of the camcorder.
.... 3. Connect a video cable to a Camcorder 1. Connect a video cable between the AUDIO OUTPUT jacks on the camcorder and the [AV /COMPONENT AUDIO IN [L-AUDIO-R]] on the LCD Display . Locate the AV output jacks on the LCD Display . 2. Connecting AV Devices Connections 1. Connect a set of the camcorder.
Quick Start Guide
Page 18
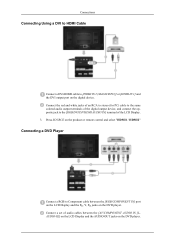
... DVD player. Connect the red and white jacks of an RCA to stereo (for PC) cable to the same colored audio output terminals of the LCD Display. 3. Connections Connecting Using a DVI to HDMI Cable Connect a DVI-HDMI cable to [HDMI IN 2 (MAGICINFO)] or [HDMI IN 1] and the DVI output port on the... AUDIO IN] terminal of the digital output device, and connect the opposite jack to Component cable between the [AV/COMPONENT AUDIO IN [LAUDIO-R]] on the LCD Display and the AUDIO OUT jacks on the digital device.
... DVD player. Connect the red and white jacks of an RCA to stereo (for PC) cable to the same colored audio output terminals of the LCD Display. 3. Connections Connecting Using a DVI to HDMI Cable Connect a DVI-HDMI cable to [HDMI IN 2 (MAGICINFO)] or [HDMI IN 1] and the DVI output port on the... AUDIO IN] terminal of the digital output device, and connect the opposite jack to Component cable between the [AV/COMPONENT AUDIO IN [LAUDIO-R]] on the LCD Display and the AUDIO OUT jacks on the digital device.
Quick Start Guide
Page 19
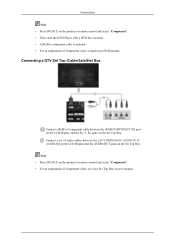
... • Then, start the DVD Player with a DVD disc inserted. • A RGB to Component cable between the [AV/COMPONENT AUDIO IN [LAUDIO-R]] on the LCD Display and the AUDIO OUT jacks on the Set Top Box. Connect a set of Component video, see your DVD manual. Note • Press SOURCE on the... product or remote control and select "Component". • For an explanation of audio cables between the [RGB/COMPONENT IN] port on the LCD Display and the PR, Y, PB jacks on the Set Top Box. Connecting a DTV Set Top (Cable/Satellite) Box Connect a RGB to component cable is ...
... • Then, start the DVD Player with a DVD disc inserted. • A RGB to Component cable between the [AV/COMPONENT AUDIO IN [LAUDIO-R]] on the LCD Display and the AUDIO OUT jacks on the Set Top Box. Connect a set of Component video, see your DVD manual. Note • Press SOURCE on the... product or remote control and select "Component". • For an explanation of audio cables between the [RGB/COMPONENT IN] port on the LCD Display and the PR, Y, PB jacks on the Set Top Box. Connecting a DTV Set Top (Cable/Satellite) Box Connect a RGB to component cable is ...
Quick Start Guide
Page 20
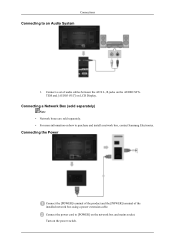
Connecting a Network Box (sold separately) Note • Network boxes are sold separately. • For more information on LCD Display. Connect a set of the installed network box using a power extension cable. Connect the power cord to [POWER] on the power switch. Turn on the network ... the AUX L, R jacks on the AUDIO SYSTEM and [AUDIO OUT] on how to an Audio System 1. Connections Connecting to purchase and install a network box, contact Samsung Electronics.
Connecting a Network Box (sold separately) Note • Network boxes are sold separately. • For more information on LCD Display. Connect a set of the installed network box using a power extension cable. Connect the power cord to [POWER] on the power switch. Turn on the network ... the AUX L, R jacks on the AUDIO SYSTEM and [AUDIO OUT] on how to an Audio System 1. Connections Connecting to purchase and install a network box, contact Samsung Electronics.
Quick Start Guide
Page 23
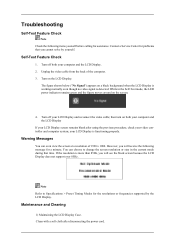
...Warning Messages You can choose to Specifications > Preset Timing Modes for assistance. Maintenance and Cleaning 1) Maintaining the LCD Display Case. Turn on both your LCD Display screen remains blank after disconnecting the power cord. You can even view the screen at a resolution of ...Service Center for a minute; Turn off both your computer and the LCD Display If your computer and the LCD Display. 2. Clean with a soft cloth after using the previous procedure, check your LCD Display is functioning properly. However, you will receive the following items yourself ...
...Warning Messages You can choose to Specifications > Preset Timing Modes for assistance. Maintenance and Cleaning 1) Maintaining the LCD Display Case. Turn on both your LCD Display screen remains blank after disconnecting the power cord. You can even view the screen at a resolution of ...Service Center for a minute; Turn off both your computer and the LCD Display If your computer and the LCD Display. 2. Clean with a soft cloth after using the previous procedure, check your LCD Display is functioning properly. However, you will receive the following items yourself ...
Quick Start Guide
Page 24
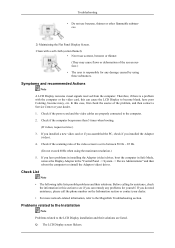
.... 2. If you have poor Coloring, become noisy, etc. Clean with the computer or the video card, this section to the LCD Display installation and their solutions. Check if the power cord and the video cables are listed. If you do need assistance, please call ... Therefore, if there is a problem with a soft cloth (cotton flannel). • Never use benzene, thinner or other flammable substances. 2) Maintaining the Flat Panel Display Screen. Troubleshooting • Do not use acetone, benzene or thinner. (They may cause flaws or deformation of the screen surface.) • The user...
.... 2. If you have poor Coloring, become noisy, etc. Clean with the computer or the video card, this section to the LCD Display installation and their solutions. Check if the power cord and the video cables are listed. If you do need assistance, please call ... Therefore, if there is a problem with a soft cloth (cotton flannel). • Never use benzene, thinner or other flammable substances. 2) Maintaining the Flat Panel Display Screen. Troubleshooting • Do not use acetone, benzene or thinner. (They may cause flaws or deformation of the screen surface.) • The user...
Quick Start Guide
Page 25
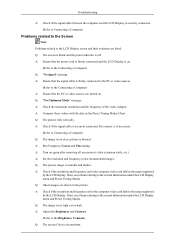
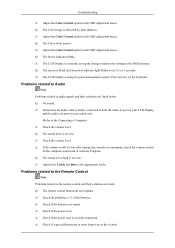
...turned on . (Refer to the Brightness, Contrast) Q: The screen Color is off. A: Ensure that the power cord is firmly connected and the LCD Display is firmly connected to the PC or video sources. (Refer to the Connecting a Computer) A: Ensure that the signal cable is on . A: ...picture image is securely connected. (Refer to Connecting a Computer) Problems related to the Screen Note Problems related to the current Information under the LCD Display menu and Preset Timing Modes. Re-connect it, if necessary. (Refer to the recommended ranges. A: Check if the resolution and frequency set ...
...turned on . (Refer to the Brightness, Contrast) Q: The screen Color is off. A: Ensure that the power cord is firmly connected and the LCD Display is firmly connected to the PC or video sources. (Refer to the Connecting a Computer) A: Ensure that the signal cable is on . A: ...picture image is securely connected. (Refer to Connecting a Computer) Problems related to the Screen Note Problems related to the current Information under the LCD Display menu and Preset Timing Modes. Re-connect it, if necessary. (Refer to the recommended ranges. A: Check if the resolution and frequency set ...
Quick Start Guide
Page 26
... a Computer) A: Check the volume level. Q: The sound is poor. A: Check if the batteries are listed below. Q: The Power Indicator blinks. A: The LCD Display is on . Press any key on your sound card. (Refer to its power management system. Q: The remote control buttons do not respond. A: Check if a... special fluorescent or neon lamp is currently saving the changes made in port on your LCD Display and the audio-out port on the keyboard. Problems related to the Remote Control Note Problems related to the OSD memory. A: Check if the...
... a Computer) A: Check the volume level. Q: The sound is poor. A: Check if the batteries are listed below. Q: The Power Indicator blinks. A: The LCD Display is on . Press any key on your sound card. (Refer to its power management system. Q: The remote control buttons do not respond. A: Check if a... special fluorescent or neon lamp is currently saving the changes made in port on your LCD Display and the audio-out port on the keyboard. Problems related to the Remote Control Note Problems related to the OSD memory. A: Check if the...
Quick Start Guide
Page 27
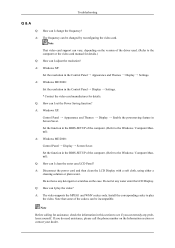
...in the BIOS-SETUP of the computer. (Refer to the Windows / Computer Manual). A: Disconnect the power cord and then clean the LCD Display with a soft cloth, using either a cleaning solution or plain water. Install the corresponding codec to see if you do need assistance, ... the resolution in this section to play the video? Q: How can I change the frequency? Do not leave any water enter the LCD Display. A: Windows ME/2000: Control Panel → Display → Screen Saver. A: The video supports the MPEG1 and WMV codecs only. Troubleshooting Q & A Q: How can I clean the...
...in the BIOS-SETUP of the computer. (Refer to the Windows / Computer Manual). A: Disconnect the power cord and then clean the LCD Display with a soft cloth, using either a cleaning solution or plain water. Install the corresponding codec to see if you do need assistance, ... the resolution in this section to play the video? Q: How can I change the frequency? Do not leave any water enter the LCD Display. A: Windows ME/2000: Control Panel → Display → Screen Saver. A: The video supports the MPEG1 and WMV codecs only. Troubleshooting Q & A Q: How can I clean the...

User Manual
Page 1
SyncMaster 400MX-3, 460MX-3, 400FP-3, 460FP-3 LCD Display User Manuals The color and the appearance may differ depending on the product, and the specifications are subject to change without prior notice to improve the performance.
SyncMaster 400MX-3, 460MX-3, 400FP-3, 460FP-3 LCD Display User Manuals The color and the appearance may differ depending on the product, and the specifications are subject to change without prior notice to improve the performance.


