Quick Start Guide
Page 6
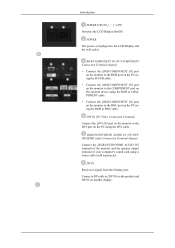
... plugs into the LCD Display and the wall outlet. RGB/COMPONENT IN (PC/COMPONENT Connection Terminal (Input)) • Connect the [RGB/COMPONENT IN] port on the monitor to the RGB port on the PC using the D-SUB cable. • Connect the [RGB/COMPONENT IN] port on the monitor to the COMPONENT... Connection Terminal (Input)) Connect the [RGB/DVI/DP/HDMI AUDIO IN] terminal of the monitor and the speaker output terminal of your computer's sound card using the RGB to [DP IN] on the product and DP IN on another display. Introduction POWER S/W ON [ │ ] / OFF Switches the LCD Display On/Off.
... plugs into the LCD Display and the wall outlet. RGB/COMPONENT IN (PC/COMPONENT Connection Terminal (Input)) • Connect the [RGB/COMPONENT IN] port on the monitor to the RGB port on the PC using the D-SUB cable. • Connect the [RGB/COMPONENT IN] port on the monitor to the COMPONENT... Connection Terminal (Input)) Connect the [RGB/DVI/DP/HDMI AUDIO IN] terminal of the monitor and the speaker output terminal of your computer's sound card using the RGB to [DP IN] on the product and DP IN on another display. Introduction POWER S/W ON [ │ ] / OFF Switches the LCD Display On/Off.
Quick Start Guide
Page 7
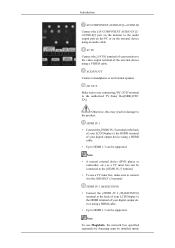
...1 • Connect the [HDMI IN 1] terminal at the back of your LCD Display to the HDMI terminal of your digital output device using a HDMI cable. • Up to the audio output port on the PC or on the monitor to HDMI 1.3 can be supported. Note • A normal external device (... Make sure to use MagicInfo, the network box specified separately by Samsung must be installed inside HDMI IN 2 (MAGICINFO) • Connect the [HDMI IN 2 (MAGICINFO)] terminal at the back of your LCD Display to the HDMI terminal of your monitor to the video output terminal of your digital output device using ...
...1 • Connect the [HDMI IN 1] terminal at the back of your LCD Display to the HDMI terminal of your digital output device using a HDMI cable. • Up to the audio output port on the PC or on the monitor to HDMI 1.3 can be supported. Note • A normal external device (... Make sure to use MagicInfo, the network box specified separately by Samsung must be installed inside HDMI IN 2 (MAGICINFO) • Connect the [HDMI IN 2 (MAGICINFO)] terminal at the back of your LCD Display to the HDMI terminal of your monitor to the video output terminal of your digital output device using ...
Quick Start Guide
Page 10
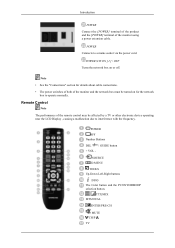
.../MIX MTS/DUAL ENTER/PRE-CH MUTE CH/P TV Remote Control Note The performance of the monitor and the network box must be affected by a TV or other electronic device operating near the LCD Display , causing a malfunction due to a mains socket via the power cord. SOURCE D.MENU TOOLS.... POWER OFF Number Buttons DEL / GUIDE button + VOL - Introduction POWER Connect the [POWER] terminal of the product and the [POWER] terminal of the monitor using a power extension cable. POWER S/W ON [ I ] / OFF Turns the network box on for details about cable connections. • The power switches...
.../MIX MTS/DUAL ENTER/PRE-CH MUTE CH/P TV Remote Control Note The performance of the monitor and the network box must be affected by a TV or other electronic device operating near the LCD Display , causing a malfunction due to a mains socket via the power cord. SOURCE D.MENU TOOLS.... POWER OFF Number Buttons DEL / GUIDE button + VOL - Introduction POWER Connect the [POWER] terminal of the product and the [POWER] terminal of the monitor using a power extension cable. POWER S/W ON [ I ] / OFF Turns the network box on for details about cable connections. • The power switches...
Quick Start Guide
Page 14
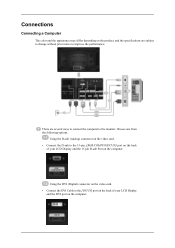
...sub (Analog) connector on the video card. • Connect the D-sub to the 15-pin, [RGB/COMPONENT IN] port on the back of your LCD Display and the 15 pin D-sub Port on the video card. • Connect the DVI Cable to improve the performance. Connections Connecting a Computer The color and... the appearance may differ depending on the product, and the specifications are several ways to connect the computer to the monitor. Using the DVI (Digital) connector on the computer. There are subject to change without prior notice to the [DVI IN] port on the...
...sub (Analog) connector on the video card. • Connect the D-sub to the 15-pin, [RGB/COMPONENT IN] port on the back of your LCD Display and the 15 pin D-sub Port on the video card. • Connect the DVI Cable to improve the performance. Connections Connecting a Computer The color and... the appearance may differ depending on the product, and the specifications are several ways to connect the computer to the monitor. Using the DVI (Digital) connector on the computer. There are subject to change without prior notice to the [DVI IN] port on the...

Quick Start Guide
Page 21
Connections Connecting to MAGICINFO OUT Connect the [MAGICINFO OUT] terminal of the network box and the [HDMI IN 2 (MAGICINFO)] terminal of the monitor using the HDMI cable. Connecting a LAN Cable Connect the LAN cable between the [LAN] port on the product and the [LAN] port on your PC.
Connections Connecting to MAGICINFO OUT Connect the [MAGICINFO OUT] terminal of the network box and the [HDMI IN 2 (MAGICINFO)] terminal of the monitor using the HDMI cable. Connecting a LAN Cable Connect the LAN cable between the [LAN] port on the product and the [LAN] port on your PC.

User Manual
Page 3
... cord while using only the power button on it. • Otherwise, this may cause fire due to contact an authorized Service Center when installing your monitor. Use only the power cord provided by our company. Safety Instructions Do not touch the power plug with wet hands when removing or plugging the...in electric shock. Be sure to overheating. Do not forcefully bend or pull the power plug and do so may cause serious damage to your monitor in fire. Make sure to connect the power cord to cut the power off completely. To disconnect the apparatus from the mains, the plug must...
... cord while using only the power button on it. • Otherwise, this may cause fire due to contact an authorized Service Center when installing your monitor. Use only the power cord provided by our company. Safety Instructions Do not touch the power plug with wet hands when removing or plugging the...in electric shock. Be sure to overheating. Do not forcefully bend or pull the power plug and do so may cause serious damage to your monitor in fire. Make sure to connect the power cord to cut the power off completely. To disconnect the apparatus from the mains, the plug must...
User Manual
Page 5
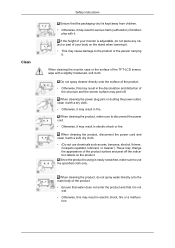
... product, make sure to disconnect the power cord. • Otherwise, it may result in electric shock or fire. tion. When cleaning the monitor case or the surface of the TFT-LCD screen, wipe with a dry cloth. • Otherwise, it may result in fire. When cleaning the product, do not place any object... or part of your monitor is adjustable, do not spray water directly onto the main body of the product. • Ensure that water ...
... product, make sure to disconnect the power cord. • Otherwise, it may result in electric shock or fire. tion. When cleaning the monitor case or the surface of the TFT-LCD screen, wipe with a dry cloth. • Otherwise, it may result in fire. When cleaning the product, do not place any object... or part of your monitor is adjustable, do not spray water directly onto the main body of the product. • Ensure that water ...

User Manual
Page 6
... by pulling only the wire or the signal cable. • Otherwise, it may result in electric shock or fire. Do not lift or move the monitor by a table or curtain. • Otherwise, it may result in electric shock or fire.
... by pulling only the wire or the signal cable. • Otherwise, it may result in electric shock or fire. Do not lift or move the monitor by a table or curtain. • Otherwise, it may result in electric shock or fire.
User Manual
Page 7
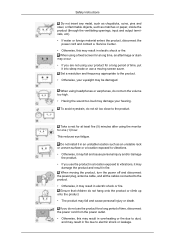
... power plug, antenna cable, and all the cables connected to the product. • Otherwise, it may result in electric shock or fire. When using the monitor for a long period of time, put it into sleep mode or use the product in a location exposed to the product. This reduces eye fatigue. Take...
... power plug, antenna cable, and all the cables connected to the product. • Otherwise, it may result in electric shock or fire. When using the monitor for a long period of time, put it into sleep mode or use the product in a location exposed to the product. This reduces eye fatigue. Take...

User Manual
Page 14
... [RGB/DVI/DP/HDMI AUDIO IN] terminal of the monitor and the speaker output terminal of your computer's sound card using the RGB to the BNC port on the monitor to BNC cable. Introduction POWER S/W ON [ │ ] / OFF Switches the LCD Display On/Off. RGB/COMPONENT IN (PC/COMPONENT Connection Terminal ...(Input)) • Connect the [RGB/COMPONENT IN] port on the monitor to the RGB port on the PC using the...
... [RGB/DVI/DP/HDMI AUDIO IN] terminal of the monitor and the speaker output terminal of your computer's sound card using the RGB to the BNC port on the monitor to BNC cable. Introduction POWER S/W ON [ │ ] / OFF Switches the LCD Display On/Off. RGB/COMPONENT IN (PC/COMPONENT Connection Terminal ...(Input)) • Connect the [RGB/COMPONENT IN] port on the monitor to the RGB port on the PC using the...

User Manual
Page 15
... 1 • Connect the [HDMI IN 1] terminal at the back of your LCD Display to the HDMI terminal of your digital output device using a HDMI cable. • Up to HDMI 1.3 can be supported. AV IN Connect the [AV IN] terminal of your monitor to the [HDMI IN 1] terminal. Note • A normal external device (DVD... damage to the audio output port on the PC or on the monitor to the product. DC OUT Make sure to use a TV tuner box (US Only), make sure to connect it to the video output terminal of your LCD Display to the HDMI terminal of the external device using an audio cable...
... 1 • Connect the [HDMI IN 1] terminal at the back of your LCD Display to the HDMI terminal of your digital output device using a HDMI cable. • Up to HDMI 1.3 can be supported. AV IN Connect the [AV IN] terminal of your monitor to the [HDMI IN 1] terminal. Note • A normal external device (DVD... damage to the audio output port on the PC or on the monitor to the product. DC OUT Make sure to use a TV tuner box (US Only), make sure to connect it to the video output terminal of your LCD Display to the HDMI terminal of the external device using an audio cable...

User Manual
Page 18
...both of the remote control may be affected by a TV or other electronic device operating near the LCD Display , causing a malfunction due to operate normally. Remote Control Note The performance of the monitor and the network box must be turned on or off. A TV tuner box (sold separately)... POWER Connect the [POWER] terminal of the product and the [POWER] terminal of the monitor using a power extension cable. Note • See the "Connections" section for the network box to interference with the frequency. Introduction RS232C (RS232C ...
...both of the remote control may be affected by a TV or other electronic device operating near the LCD Display , causing a malfunction due to operate normally. Remote Control Note The performance of the monitor and the network box must be turned on or off. A TV tuner box (sold separately)... POWER Connect the [POWER] terminal of the product and the [POWER] terminal of the monitor using a power extension cable. Note • See the "Connections" section for the network box to interference with the frequency. Introduction RS232C (RS232C ...

User Manual
Page 32
...2 Volume control 0x12 0~100 3 Input source control 0x14 - 4 Screen Mode control 0x18 - 5 Screen Size control 0x19 0~255 6 PIP on TV / Monitor 1 : Power ON 0 : Power OFF DATA Power CheckSum ID should be made in the first digit like below. example)PowerOn&ID=0 Header command ID 0xAA... Length 12 1 1 If you want to control every mechanism connected with ACK. • Power Control • Function Personal Computer turns TV / Monitor power ON/OFF. • Get Power ON/OFF Status Header 0xAA command 0x11 ID DATA Length CheckSum 0 • Set Power ON/OFF Header...
...2 Volume control 0x12 0~100 3 Input source control 0x14 - 4 Screen Mode control 0x18 - 5 Screen Size control 0x19 0~255 6 PIP on TV / Monitor 1 : Power ON 0 : Power OFF DATA Power CheckSum ID should be made in the first digit like below. example)PowerOn&ID=0 Header command ID 0xAA... Length 12 1 1 If you want to control every mechanism connected with ACK. • Power Control • Function Personal Computer turns TV / Monitor power ON/OFF. • Get Power ON/OFF Status Header 0xAA command 0x11 ID DATA Length CheckSum 0 • Set Power ON/OFF Header...

User Manual
Page 33
... Error code that shows what occurred error is Val1 ERR Check Sum • Volume Control • Function Personal Computer changes volume of TV / Monitor. • Get Volume Status Header 0xAA command 0x12 DATA Length ID CheckSum 0 • Set Volume Header command ID 0xAA 0x12 DATA Length 1 ...DATA Volume Volume : Volume value code to be set on TV / Monitor (0 ~ 100) CheckSum • Ack Header command ID 0xAA 0xFF Volume : Same as above DATA Length 3 Ack/Nak 'A' r-CMD 0x12 Val1 ...
... Error code that shows what occurred error is Val1 ERR Check Sum • Volume Control • Function Personal Computer changes volume of TV / Monitor. • Get Volume Status Header 0xAA command 0x12 DATA Length ID CheckSum 0 • Set Volume Header command ID 0xAA 0x12 DATA Length 1 ...DATA Volume Volume : Volume value code to be set on TV / Monitor (0 ~ 100) CheckSum • Ack Header command ID 0xAA 0xFF Volume : Same as above DATA Length 3 Ack/Nak 'A' r-CMD 0x12 Val1 ...

User Manual
Page 34
Introduction • Input Source Control • Function Personal Computer changes input source of TV / Monitor. • Get Input Source Status Header 0xAA command 0x14 DATA Length ID CheckSum 0 • Set Input Source Header command ID 0xAA 0x14 DATA Length 1 DATA ...CheckSum Input Source Input Source : Input Source code to be set on TV / Monitor 0x14 0x1E 0x18 0x0C 0x04 0x08 0x20 0x1F 0x30 0x40 0x21 0x22 0x23 0x24 0x25 PC BNC DVI AV S-Video Component MagicInfo DVI_VIDEO RF(TV...
Introduction • Input Source Control • Function Personal Computer changes input source of TV / Monitor. • Get Input Source Status Header 0xAA command 0x14 DATA Length ID CheckSum 0 • Set Input Source Header command ID 0xAA 0x14 DATA Length 1 DATA ...CheckSum Input Source Input Source : Input Source code to be set on TV / Monitor 0x14 0x1E 0x18 0x0C 0x04 0x08 0x20 0x1F 0x30 0x40 0x21 0x22 0x23 0x24 0x25 PC BNC DVI AV S-Video Component MagicInfo DVI_VIDEO RF(TV...

User Manual
Page 35
...to be controlled when Video Wall is Val1 ERR Check Sum • Screen Mode Control • Function Personal Computer changes "Screen Mode" of TV/Monitor. Introduction 0xAA 0xFF 3 Input Source : Same as above 'A' 0x14 Input Source • Nak Header 0xAA command 0xFF ID DATA Length Ack/Nak... r-CMD 3 'N' 0x14 ERR : Error code that shows what occurred error is on TV / Monitor 0x01 0x04 0x31 0x0B 16 : 9 Zoom Wide Zoom 4 : 3 CheckSum • Ack Header 0xAA command 0xFF ID DATA Length Ack/Nak r-CMD 3...
...to be controlled when Video Wall is Val1 ERR Check Sum • Screen Mode Control • Function Personal Computer changes "Screen Mode" of TV/Monitor. Introduction 0xAA 0xFF 3 Input Source : Same as above 'A' 0x14 Input Source • Nak Header 0xAA command 0xFF ID DATA Length Ack/Nak... r-CMD 3 'N' 0x14 ERR : Error code that shows what occurred error is on TV / Monitor 0x01 0x04 0x31 0x0B 16 : 9 Zoom Wide Zoom 4 : 3 CheckSum • Ack Header 0xAA command 0xFF ID DATA Length Ack/Nak r-CMD 3...

User Manual
Page 36
... what occurred error is Val1 ERR Check Sum • Screen Size Control • Function Personal Computer recognizes the screen size of TV / Monitor. • Get Screen Size Status Header 0xAA command 0x19 DATA Length ID CheckSum 0 • Ack Header 0xAA command 0xFF ID DATA Length... Ack/Nak r-CMD 3 'A' 0x19 Val1 Screen Size Check Sum Screen Size : Screen Size of TV / Monitor (Range : 0 ~ 255, Unit : Inch) • Nak Header 0xAA command 0xFF ID DATA Length Ack/Nak r-CMD 3 'N' 0x19 ERR : Error code ...
... what occurred error is Val1 ERR Check Sum • Screen Size Control • Function Personal Computer recognizes the screen size of TV / Monitor. • Get Screen Size Status Header 0xAA command 0x19 DATA Length ID CheckSum 0 • Ack Header 0xAA command 0xFF ID DATA Length... Ack/Nak r-CMD 3 'A' 0x19 Val1 Screen Size Check Sum Screen Size : Screen Size of TV / Monitor (Range : 0 ~ 255, Unit : Inch) • Nak Header 0xAA command 0xFF ID DATA Length Ack/Nak r-CMD 3 'N' 0x19 ERR : Error code ...

User Manual
Page 37
... the PIP ON / OFF Header command ID 0xAA 0x3C DATA Length 1 DATA PIP PIP : The PIP ON / OFF code to set for the TV or Monitor 1 : PIP ON 0 : PIP OFF CheckSum • Ack Header command ID 0xAA 0xFF PIP : Same as above DATA Length 3 Ack/Nak 'A' r-CMD 0x3C Val1 PIP Check...
... the PIP ON / OFF Header command ID 0xAA 0x3C DATA Length 1 DATA PIP PIP : The PIP ON / OFF code to set for the TV or Monitor 1 : PIP ON 0 : PIP OFF CheckSum • Ack Header command ID 0xAA 0xFF PIP : Same as above DATA Length 3 Ack/Nak 'A' r-CMD 0x3C Val1 PIP Check...

User Manual
Page 38
Only works with TV / Monitor where Video Wall is ON. Does not operate in MagicInfo • Get Video Wall Mode Header 0xAA command 0x5C DATA Length ID CheckSum 0 • Set ... occurred error is Val1 ERR Check Sum • Video Wall Mode Control • Function Personal Computer converts Video Wall Mode of TV / Monitor when Video Wall is on TV / Monitor 1 : Full 0 : Natural • Ack Header command 0xAA 0xFF DATA Length Ack/Nak r-CMD ID 3 'A' 0x5C Video Wall Mode : same as above Val1...
Only works with TV / Monitor where Video Wall is ON. Does not operate in MagicInfo • Get Video Wall Mode Header 0xAA command 0x5C DATA Length ID CheckSum 0 • Set ... occurred error is Val1 ERR Check Sum • Video Wall Mode Control • Function Personal Computer converts Video Wall Mode of TV / Monitor when Video Wall is on TV / Monitor 1 : Full 0 : Natural • Ack Header command 0xAA 0xFF DATA Length Ack/Nak r-CMD ID 3 'A' 0x5C Video Wall Mode : same as above Val1...

User Manual
Page 39
... CheckSum 0 • Set Safety Lock Enable / Disable Header command ID 0xAA 0x5D DATA Length 1 Safety Lock : Lock code to be set on TV / Monitor 1 : ON 0 : OFF DATA CheckSum Safety Lock • Ack Header 0xAA command 0xFF ID DATA Length Ack/Nak r-CMD 3 'A' 0x5D Val1 Safety Lock... shows what occurred error is Val1 ERR Check Sum • Safety Lock • Function Personal Computer turns Safety Lock function of TV / Monitor ON / OFF. Introduction Header 0xAA command 0xFF ID DATA Length Ack/Nak r-CMD 3 'N' 0x5C ERR : Error code that shows what occurred error ...
... CheckSum 0 • Set Safety Lock Enable / Disable Header command ID 0xAA 0x5D DATA Length 1 Safety Lock : Lock code to be set on TV / Monitor 1 : ON 0 : OFF DATA CheckSum Safety Lock • Ack Header 0xAA command 0xFF ID DATA Length Ack/Nak r-CMD 3 'A' 0x5D Val1 Safety Lock... shows what occurred error is Val1 ERR Check Sum • Safety Lock • Function Personal Computer turns Safety Lock function of TV / Monitor ON / OFF. Introduction Header 0xAA command 0xFF ID DATA Length Ack/Nak r-CMD 3 'N' 0x5C ERR : Error code that shows what occurred error ...

