User Manual (user Manual) (ver.1.0) (English)
Page 1
All rights reserved. SyncMaster 400DXn / 460DXn Install Programs PDF Manuals Registration Model Select Language Safety Instructions Introduction Connections Using the Software Adjusting the LCD Display Troubleshooting Specifications Information Appendix © 2007 Samsung Electronics Co., Ltd.
All rights reserved. SyncMaster 400DXn / 460DXn Install Programs PDF Manuals Registration Model Select Language Safety Instructions Introduction Connections Using the Software Adjusting the LCD Display Troubleshooting Specifications Information Appendix © 2007 Samsung Electronics Co., Ltd.
User Manual (user Manual) (ver.1.0) (English)
Page 2
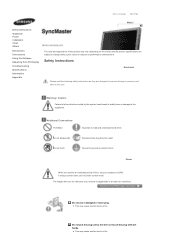
... damage to the equipment. Select Language Main Page Model Safety Instructions Notational Power Installation Clean Others Introduction Connections Using the Software Adjusting the LCD Display Troubleshooting Specifications Information Appendix The color and appearance of the product may vary depending on the model, and the product specifications are subject to change without prior notice for reasons of time, set it to the user. Warning / Caution Failure to follow directions noted...
... damage to the equipment. Select Language Main Page Model Safety Instructions Notational Power Installation Clean Others Introduction Connections Using the Software Adjusting the LCD Display Troubleshooting Specifications Information Appendix The color and appearance of the product may vary depending on the model, and the product specifications are subject to change without prior notice for reasons of time, set it to the user. Warning / Caution Failure to follow directions noted...
User Manual (user Manual) (ver.1.0) (English)
Page 11
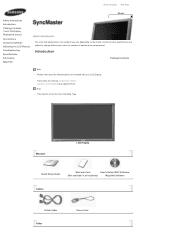
... are included with your dealer. Manuals LCD Display Quick Setup Guide Warranty Card User's Guide, MDC Software, (Not available in all locations) MagicNet Software Cables D-Sub Cable Other Power Cord Select Language Main Page Model Safety Instructions Introduction Package Contents Your LCD Display Machanical Layout Connections Using the Software Adjusting the LCD Display Troubleshooting Specifications Information Appendix The color and appearance of performance enhancement. Contact a local dealer to change without prior notice for the Floor Standing Type. If any items are...
... are included with your dealer. Manuals LCD Display Quick Setup Guide Warranty Card User's Guide, MDC Software, (Not available in all locations) MagicNet Software Cables D-Sub Cable Other Power Cord Select Language Main Page Model Safety Instructions Introduction Package Contents Your LCD Display Machanical Layout Connections Using the Software Adjusting the LCD Display Troubleshooting Specifications Information Appendix The color and appearance of performance enhancement. Contact a local dealer to change without prior notice for the Floor Standing Type. If any items are...
User Manual (user Manual) (ver.1.0) (English)
Page 14
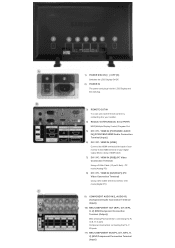
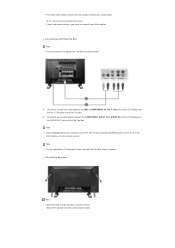
... (Analog PC) Connection: connecting the R, G, B, H, V ports Component Connection: connecting the PR, Y, PB ports 11) BNC/COMPONENT IN [R/PR, G/Y, B/PB, H, V] (BNC/Component Connection Terminal (Input)) 1) POWER S/W ON [ | ] / OFF [O] Switches the LCD Display On/Off. 2) POWER IN The power cord plugs into the LCD Display and the wall plug. 3) REMOTE OUT/IN You can use a wired remote control by connecting it to your monitor. 4) RS232C OUT/IN (RS232C Serial PORT) MDC(Multiple Display Control) Program Port 5) DVI / PC / HDMI IN [PC/DVI/BNC AUDIO IN] (PC/DVI/BNC/HDMI Audio Connection Terminal (Input...
... (Analog PC) Connection: connecting the R, G, B, H, V ports Component Connection: connecting the PR, Y, PB ports 11) BNC/COMPONENT IN [R/PR, G/Y, B/PB, H, V] (BNC/Component Connection Terminal (Input)) 1) POWER S/W ON [ | ] / OFF [O] Switches the LCD Display On/Off. 2) POWER IN The power cord plugs into the LCD Display and the wall plug. 3) REMOTE OUT/IN You can use a wired remote control by connecting it to your monitor. 4) RS232C OUT/IN (RS232C Serial PORT) MDC(Multiple Display Control) Program Port 5) DVI / PC / HDMI IN [PC/DVI/BNC AUDIO IN] (PC/DVI/BNC/HDMI Audio Connection Terminal (Input...
User Manual (user Manual) (ver.1.0) (English)
Page 15
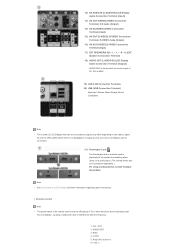
... [S-VIDEO] (S-VIDEO Connection Terminal): S-VIDEO mode (Output) 16) AV IN [S-VIDEO] (S-VIDEO Connection Terminal) (Input) 17) EXT SPEAKER(8 Ω)[- - MDC 4. MagicNet buttons 6.+100 -/-- MAGICNET 3. L - +, - - Note • The number of PC, DVI or BNC. 19) LAN (LAN Connection Terminal) 20) USB (USB Connection Terminal) Keyboard / Mouse, Mass Storage Device Compatible. R - +] (EXT Speaker Connection Terminal) 18) AUDIO OUT [L-AUDIO-R] (LCD Display Audio Connection Terminal (Output)) AUDIO OUT is a device used to physically fix the system to something when using a locking device...
... [S-VIDEO] (S-VIDEO Connection Terminal): S-VIDEO mode (Output) 16) AV IN [S-VIDEO] (S-VIDEO Connection Terminal) (Input) 17) EXT SPEAKER(8 Ω)[- - MDC 4. MagicNet buttons 6.+100 -/-- MAGICNET 3. L - +, - - Note • The number of PC, DVI or BNC. 19) LAN (LAN Connection Terminal) 20) USB (USB Connection Terminal) Keyboard / Mouse, Mass Storage Device Compatible. R - +] (EXT Speaker Connection Terminal) 18) AUDIO OUT [L-AUDIO-R] (LCD Display Audio Connection Terminal (Output)) AUDIO OUT is a device used to physically fix the system to something when using a locking device...
User Manual (user Manual) (ver.1.0) (English)
Page 16
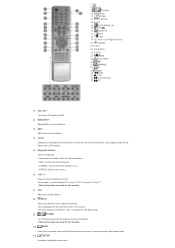
... not work for this monitor. 7) VOL Adjusts the audio volume. 8) MUTE Pauses (mutes) the audio output temporarily. SOURCE 17. EXIT 19. SRS 25. The audio resumes if MUTE or - VOL + is displayed on -screen menu and exits from the menu screen or closes the screen adjustment menu. 11) ENTER Activates a highlighted menu item. ENTER/PRE-CH 15 . This is pressed in the Mute mode. 9) TTX/MIX TV channels provide text information services...
... not work for this monitor. 7) VOL Adjusts the audio volume. 8) MUTE Pauses (mutes) the audio output temporarily. SOURCE 17. EXIT 19. SRS 25. The audio resumes if MUTE or - VOL + is displayed on -screen menu and exits from the menu screen or closes the screen adjustment menu. 11) ENTER Activates a highlighted menu item. ENTER/PRE-CH 15 . This is pressed in the Mute mode. 9) TTX/MIX TV channels provide text information services...
User Manual (user Manual) (ver.1.0) (English)
Page 33
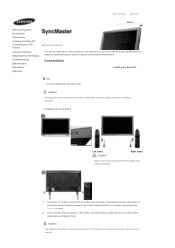
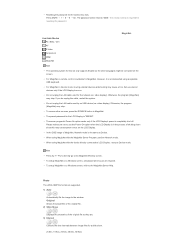
... supplied bolts should be responsible for damages caused by using a base other than those specified. Caution The resolution may vary depending on the optimal resolution, refer to the user manual. Caution Samsung Electronics will not be used. This protects the hole at the bottom of the monitor. Select Language Main Page Model Safety Instructions Introduction Connections Installing the Stand KIT Connecting the LCD Display Using the Software Adjusting the LCD Display Troubleshooting Specifications Information Appendix The color...
... supplied bolts should be responsible for damages caused by using a base other than those specified. Caution The resolution may vary depending on the optimal resolution, refer to the user manual. Caution Samsung Electronics will not be used. This protects the hole at the bottom of the monitor. Select Language Main Page Model Safety Instructions Introduction Connections Installing the Stand KIT Connecting the LCD Display Using the Software Adjusting the LCD Display Troubleshooting Specifications Information Appendix The color...

User Manual (user Manual) (ver.1.0) (English)
Page 34
... connect the D-sub to the power port on the video card. Connect the DVI Cable to the DVI(HDCP) port on the back of your LCD Display to your LCD Display and the 15 pin D-sub Port on the back of the following: 2-1) Using the D-sub (Analog) connector on connecting AV input devices, refer to wire the earth lead in advance. Choose one of your LCD Display. Connecting the LCD Display Using a Power cord...
... connect the D-sub to the power port on the video card. Connect the DVI Cable to the DVI(HDCP) port on the back of your LCD Display to your LCD Display and the 15 pin D-sub Port on the back of the following: 2-1) Using the D-sub (Analog) connector on connecting AV input devices, refer to wire the earth lead in advance. Choose one of your LCD Display. Connecting the LCD Display Using a Power cord...
User Manual (user Manual) (ver.1.0) (English)
Page 37
... Set Top Box owner's manual. Connecting Speakers Note • Fasten the SET and the speaker using the SOURCE button on the Set Top Box. PR, Y, PB port on the LCD Display and the PR, Y, PB jacks on the remote control. Connecting a DTV Set Top Box Note • The connections for the connection to connect a set of the LCD Display or on the Set Top Box. 2) Connect a set without the speaker stand. • The audio-video cables shown here are shown below. 1) Connect a Component cable between the COMPONENT AUDIO IN [L-AUDIO-R] on the LCD Display...
... Set Top Box owner's manual. Connecting Speakers Note • Fasten the SET and the speaker using the SOURCE button on the Set Top Box. PR, Y, PB port on the LCD Display and the PR, Y, PB jacks on the remote control. Connecting a DTV Set Top Box Note • The connections for the connection to connect a set of the LCD Display or on the Set Top Box. 2) Connect a set without the speaker stand. • The audio-video cables shown here are shown below. 1) Connect a Component cable between the COMPONENT AUDIO IN [L-AUDIO-R] on the LCD Display...

User Manual (user Manual) (ver.1.0) (English)
Page 39
... the monitor using the HDMI cable. Connecting HDMI Note • Input devices such as digital DVD are connected to receive remote control signals from other devices through the REMOTE OUT terminal. • You can control your monitor by allowing it to receive the remote control signals of other devices through the REMOTE IN terminal. Note • You can control a device by allowing it to the HDMI IN terminal of the monitor using a DVI to HDMI cable. 2) Connect the red and white...
... the monitor using the HDMI cable. Connecting HDMI Note • Input devices such as digital DVD are connected to receive remote control signals from other devices through the REMOTE OUT terminal. • You can control your monitor by allowing it to receive the remote control signals of other devices through the REMOTE IN terminal. Note • You can control a device by allowing it to the HDMI IN terminal of the monitor using a DVI to HDMI cable. 2) Connect the red and white...
User Manual (user Manual) (ver.1.0) (English)
Page 43
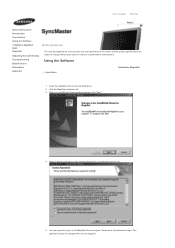
... accept the terms of use. 5. Select Language Main Page Model Safety Instructions Introduction Connections Using the Software Installation MagicNet MDC MagicNet Adjusting the LCD Display Troubleshooting Specifications Information Appendix The color and appearance of the product may vary depending on the model, and the product specifications are subject to login. Select "I agree to the terms of the license agreement" to the MagicNet Server program. Using the Software Installation Installation MagicNet 1.
... accept the terms of use. 5. Select Language Main Page Model Safety Instructions Introduction Connections Using the Software Installation MagicNet MDC MagicNet Adjusting the LCD Display Troubleshooting Specifications Information Appendix The color and appearance of the product may vary depending on the model, and the product specifications are subject to login. Select "I agree to the terms of the license agreement" to the MagicNet Server program. Using the Software Installation Installation MagicNet 1.
User Manual (user Manual) (ver.1.0) (English)
Page 140
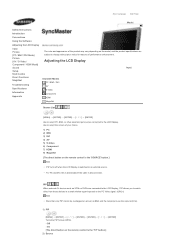
... Model Safety Instructions Introduction Connections Using the Software Adjusting the LCD Display Input Picture [PC / BNC /DVI Mode] Picture [AV / S-Video / Component / HDMI Mode] Sound Setup Multi Control Direct Functions MagicNet Troubleshooting Specifications Information Appendix The color and appearance of performance enhancement. PIP When external AV devices such as BNC and the component use the same terminal. 1) PIP [MENU] → [ENTER ENTER] → [ENTER ENTER] Turns the PIP Screen Off/On. - On [The direct button on screen as VCRs or DVDs are subject to change...
... Model Safety Instructions Introduction Connections Using the Software Adjusting the LCD Display Input Picture [PC / BNC /DVI Mode] Picture [AV / S-Video / Component / HDMI Mode] Sound Setup Multi Control Direct Functions MagicNet Troubleshooting Specifications Information Appendix The color and appearance of performance enhancement. PIP When external AV devices such as BNC and the component use the same terminal. 1) PIP [MENU] → [ENTER ENTER] → [ENTER ENTER] Turns the PIP Screen Off/On. - On [The direct button on screen as VCRs or DVDs are subject to change...
User Manual (user Manual) (ver.1.0) (English)
Page 153
... this set only supports English so the other sources, press the SOURCE button in the process of MagicNet, Network mode is required for MagicNet. • Resetting the password for this may cause system errors on . • Do not unplug the LAN cable used by an USB device (ex: video display). MagicNet Available Modes PC / BNC / DVI AV S-Video Component HDMI MagicNet Note • The operating system for the function key lock.
... this set only supports English so the other sources, press the SOURCE button in the process of MagicNet, Network mode is required for MagicNet. • Resetting the password for this may cause system errors on . • Do not unplug the LAN cable used by an USB device (ex: video display). MagicNet Available Modes PC / BNC / DVI AV S-Video Component HDMI MagicNet Note • The operating system for the function key lock.
User Manual (user Manual) (ver.1.0) (English)
Page 156
... The color and appearance of the product may vary depending on the model, and the product specifications are subject to change the screen resolution or stay in the Self-Test mode, the LED power indicator remains green and the figure moves around on the screen. 4) Turn off both your computer and the LCD Display If your LCD Display screen remains blank after using the previous procedure, check your video controller...
... The color and appearance of the product may vary depending on the model, and the product specifications are subject to change the screen resolution or stay in the Self-Test mode, the LED power indicator remains green and the figure moves around on the screen. 4) Turn off both your computer and the LCD Display If your LCD Display screen remains blank after using the previous procedure, check your video controller...

User Manual (user Manual) (ver.1.0) (English)
Page 157
... reinstall the Adaptor (video) driver. Maintenance and Cleaning 1) Maintaining the LCD Display Case. Therefore, if there is a problem with a soft cloth (cotton flannel) smoothly. • Never use benzene, thinner or other flammable substances, or a wet cloth. • We recommend that a Samsung cleansing agent is set to the screen. 2) Maintaining the Flat Panel Display Screen. If you have poor coloring, become noisy, and video mode not supported, etc.
... reinstall the Adaptor (video) driver. Maintenance and Cleaning 1) Maintaining the LCD Display Case. Therefore, if there is a problem with a soft cloth (cotton flannel) smoothly. • Never use benzene, thinner or other flammable substances, or a wet cloth. • We recommend that a Samsung cleansing agent is set to the screen. 2) Maintaining the Flat Panel Display Screen. If you have poor coloring, become noisy, and video mode not supported, etc.
User Manual (user Manual) (ver.1.0) (English)
Page 160
... The video supports the MPEG1 and WMV codecs only. How can I play the video. How can be incompatible. © 1995~2007 SAMSUNG. z Windows ME/2000: Set the resolution in the Control Panel → Display → Settings. * Contact the video card manufacturer for details. z Windows ME/2000: Set the resolution at the Control Panel → Display → Screen Saver. Disconnect the power cord and then clean the LCD Display with a soft cloth, using either...
... The video supports the MPEG1 and WMV codecs only. How can I play the video. How can be incompatible. © 1995~2007 SAMSUNG. z Windows ME/2000: Set the resolution in the Control Panel → Display → Settings. * Contact the video card manufacturer for details. z Windows ME/2000: Set the resolution at the Control Panel → Display → Screen Saver. Disconnect the power cord and then clean the LCD Display with a soft cloth, using either...
User Manual (user Manual) (ver.1.0) (English)
Page 161
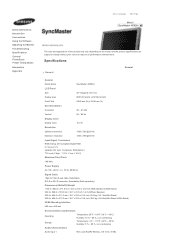
...; 2.0 V, V low ≤ 0.8 V) Maximum Pixel Clock 140 MHz Power Supply AC 100 - 240 V~ (+/- 10 %), 50/60 Hz Signal Cable 15pin to 15pin D-sub cable, Detachable DVI-D to change without prior notice for reasons of performance enhancement. Safety Instructions Introduction Connections Using the Software Adjusting the Monitor Troubleshooting Specifications General PowerSaver Preset Timing Modes Information Appendix Select Language Main Page Model SyncMaster 400DXn The color and appearance of the product may vary...
...; 2.0 V, V low ≤ 0.8 V) Maximum Pixel Clock 140 MHz Power Supply AC 100 - 240 V~ (+/- 10 %), 50/60 Hz Signal Cable 15pin to 15pin D-sub cable, Detachable DVI-D to change without prior notice for reasons of performance enhancement. Safety Instructions Introduction Connections Using the Software Adjusting the Monitor Troubleshooting Specifications General PowerSaver Preset Timing Modes Information Appendix Select Language Main Page Model SyncMaster 400DXn The color and appearance of the product may vary...

User Manual (user Manual) (ver.1.0) (English)
Page 165
... Stand) VESA Mounting Interface 600 mm x 400 mm Environmental considerations Operating Temperature: 50°F ~ 104°F (10°C ~ 40°C) Humidity: 10 % ~ 80 %, non-condensing Storage Temperature: -4°F ~ 113°F (-20°C ~ 45°C) Humidity: 5 % ~ 95 %, non-condensing Audio Characteristics Safety Instructions Introduction Connections Using the Software Adjusting the Monitor Troubleshooting Specifications General PowerSaver Preset Timing Modes Information Appendix Select Language Main Page Model SyncMaster 460DXn The color and...
... Stand) VESA Mounting Interface 600 mm x 400 mm Environmental considerations Operating Temperature: 50°F ~ 104°F (10°C ~ 40°C) Humidity: 10 % ~ 80 %, non-condensing Storage Temperature: -4°F ~ 113°F (-20°C ~ 45°C) Humidity: 5 % ~ 95 %, non-condensing Audio Characteristics Safety Instructions Introduction Connections Using the Software Adjusting the Monitor Troubleshooting Specifications General PowerSaver Preset Timing Modes Information Appendix Select Language Main Page Model SyncMaster 460DXn The color and...
User Manual (user Manual) (ver.1.0) (English)
Page 169
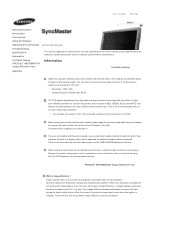
... continuously changing video patterns. You can use the FINE/COARSE adjustment function. Do not force the LCD area but rub softly. If excessive force is operated under normal conditions. Information For Better Display Adjust the computer resolution and screen inection rate (refresh rate) on screen if the best picture quality is not provided for reasons of RED, GREEN, BLUE and WHITE color seem to polish. When cleaning the monitor...
... continuously changing video patterns. You can use the FINE/COARSE adjustment function. Do not force the LCD area but rub softly. If excessive force is operated under normal conditions. Information For Better Display Adjust the computer resolution and screen inection rate (refresh rate) on screen if the best picture quality is not provided for reasons of RED, GREEN, BLUE and WHITE color seem to polish. When cleaning the monitor...
User Manual (user Manual) (ver.1.0) (English)
Page 171
... . Select method . Instruction Guide : OSD Menu -> Set Up -> Safety Screen -> Pixel . z The best way to protect your monitor from Image retention is to turn Power off, or set your PC, or System to operate a Screen Saver program when you are not using it. Time Interval : 1 ~ 10 hours ( Recommend : 1 ) . z Every 30 minutes, change the characters with Logo periodically. - z All area display Moving image together with movement. Time Period : 10...
... . Select method . Instruction Guide : OSD Menu -> Set Up -> Safety Screen -> Pixel . z The best way to protect your monitor from Image retention is to turn Power off, or set your PC, or System to operate a Screen Saver program when you are not using it. Time Interval : 1 ~ 10 hours ( Recommend : 1 ) . z Every 30 minutes, change the characters with Logo periodically. - z All area display Moving image together with movement. Time Period : 10...


