
Quick Guide (easy Manual) (ver.1.0) (Korean)
Page 11
... is displayed for 1 minute. However, if the same image is not covered by a Display Logo or moving image is to demonstrate correct usage of a LCD panel, pixel image retention doesn't occur. All display products, including LCD,are subject to build up of characters and background color with Logo or Moving image...
... is displayed for 1 minute. However, if the same image is not covered by a Display Logo or moving image is to demonstrate correct usage of a LCD panel, pixel image retention doesn't occur. All display products, including LCD,are subject to build up of characters and background color with Logo or Moving image...
Quick Guide (easy Manual) (ver.1.0) (Korean)
Page 12
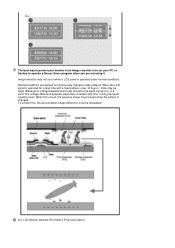
Ex) The best way to protect your monitor from Image retention is to set your PC or System to lean. When the LCD panel is operated for a long time with time, forcing the liquid crystal to operate a Screen Saver program when you are defined as continuously changing ...video patterns. Normal conditions are not using it. To prevent this occurs, the previous image may not occur when a LCD panel is changed. Image retention may be seen when the pattern is operated under normal conditions. The voltage difference between electrodes that work the liquid crystal...
Ex) The best way to protect your monitor from Image retention is to set your PC or System to lean. When the LCD panel is operated for a long time with time, forcing the liquid crystal to operate a Screen Saver program when you are defined as continuously changing ...video patterns. Normal conditions are not using it. To prevent this occurs, the previous image may not occur when a LCD panel is changed. Image retention may be seen when the pattern is operated under normal conditions. The voltage difference between electrodes that work the liquid crystal...

Quick Guide (easy Manual) (ver.1.0) (Korean)
Page 13
...) Package Contents Please make sure the following items are missing, contact your monitor. Features RTA Monitor RTA (Response Time Accelerator) A function that the panel operates at a higher response speed than its original response speed. If any items are included with your dealer. Contact a local dealer to provide a... sharper and more natural video display. RTA OFF Deactivates the RTA function so that accelerates the response speed of the panel so as to buy optional items. Unpacking Without Stand With Stand Monitor RTA On Activates the RTA function so that the...
...) Package Contents Please make sure the following items are missing, contact your monitor. Features RTA Monitor RTA (Response Time Accelerator) A function that the panel operates at a higher response speed than its original response speed. If any items are included with your dealer. Contact a local dealer to provide a... sharper and more natural video display. RTA OFF Deactivates the RTA function so that accelerates the response speed of the panel so as to buy optional items. Unpacking Without Stand With Stand Monitor RTA On Activates the RTA function so that the...
Quick Guide (easy Manual) (ver.1.0) (Korean)
Page 20
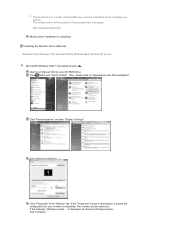
Then, double-click on Samsung Monitor homepage http://www.samsung.com/ Monitor driver installation is deactivated, it means the configuration for your CD-ROM drive. Click "Properties" in the figure below, click "Continue". is under ... 2000 | Windows ME | Windows NT | Linux Microsoft® Windows Vista™ Operating System Insert your Manual CD into your monitor is . Click (Start) and "Control Panel". This monitor driver is displayed, as is completed. If the message "Windows needs..." Click "Personalization" and then "Display Settings".
Then, double-click on Samsung Monitor homepage http://www.samsung.com/ Monitor driver installation is deactivated, it means the configuration for your CD-ROM drive. Click "Properties" in the figure below, click "Continue". is under ... 2000 | Windows ME | Windows NT | Linux Microsoft® Windows Vista™ Operating System Insert your Manual CD into your monitor is . Click (Start) and "Control Panel". This monitor driver is displayed, as is completed. If the message "Windows needs..." Click "Personalization" and then "Display Settings".

Quick Guide (easy Manual) (ver.1.0) (Korean)
Page 22
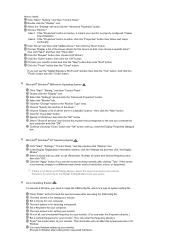
Click "Display" icon and choose the "Settings" tab then click "Advanced." Microsoft® Windows® XP Operating System Insert the CD into the CD-ROM drive. Click "Close"→ "Close" → "OK" → "OK" on the following screens displayed in sequence. Click "Start" → "Control Panel" then click the "Appearance and Themes" icon.
Click "Display" icon and choose the "Settings" tab then click "Advanced." Microsoft® Windows® XP Operating System Insert the CD into the CD-ROM drive. Click "Close"→ "Close" → "OK" → "OK" on the following screens displayed in sequence. Click "Start" → "Control Panel" then click the "Appearance and Themes" icon.
Quick Guide (easy Manual) (ver.1.0) (Korean)
Page 25
...frequency directly.) Set a vertical frequency for setting your monitor is not normal, change to install Click "Start," "Setting," and then "Control Panel." Continue choosing "Close" button and "OK" button until you wish to the one you see the "Digital Signature Not Found" window then ...click the "Yes" button. Microsoft® Windows® NT Operating System Click "Start," "Settings," "Control Panel," and then double-click "Display" icon. In the Display Registration Information window, click the Settings tab and then click "All Display Modes". Select...
...frequency directly.) Set a vertical frequency for setting your monitor is not normal, change to install Click "Start," "Setting," and then "Control Panel." Continue choosing "Close" button and "OK" button until you wish to the one you see the "Digital Signature Not Found" window then ...click the "Yes" button. Microsoft® Windows® NT Operating System Click "Start," "Settings," "Control Panel," and then double-click "Display" icon. In the Display Registration Information window, click the Settings tab and then click "All Display Modes". Select...

Quick Guide (easy Manual) (ver.1.0) (Korean)
Page 26
... to Help (F1) in the startup window to install the Natural Color software. Installing the Natural Color Software Insert the CD included with the Samsung monitor into the CD-ROM Drive, click the Windows [Start] button, select [Run...] . To install the program manually, insert the CD included...One of the recent problems in using a computer is not D:\, enter the applicable drive.) Uninstalling the Natural Color Software Program Select "Settings" / "Control Panel" from the "Start" menu and then double-click "Add/Delete a program" Select Natural Color from the list and then click the "Add/Delete" ...
... to Help (F1) in the startup window to install the Natural Color software. Installing the Natural Color Software Insert the CD included with the Samsung monitor into the CD-ROM Drive, click the Windows [Start] button, select [Run...] . To install the program manually, insert the CD included...One of the recent problems in using a computer is not D:\, enter the applicable drive.) Uninstalling the Natural Color Software Program Select "Settings" / "Control Panel" from the "Start" menu and then double-click "Add/Delete a program" Select Natural Color from the list and then click the "Add/Delete" ...

Quick Guide (easy Manual) (ver.1.0) (Korean)
Page 27
... installation of MagicTune™ can be affected by using MagicTune™ in the menu. Click on specification of the Windows™ Control Panel. Wait until the "Uninstall Complete" dialog box appears. System Requirements OS z Windows 2000 z Windows XP Home Edition z Windows XP ...Professional z Windows Vista™ It is complete, the MagicTune™ executable icon appears on Windows™ XP, go to [Control Panel] in Control Panel. 3. Go to highlight it. 4. Hardware z 32MB Memory above z 60MB Hard disk space above * For more information, visit the MagicTune...
... installation of MagicTune™ can be affected by using MagicTune™ in the menu. Click on specification of the Windows™ Control Panel. Wait until the "Uninstall Complete" dialog box appears. System Requirements OS z Windows 2000 z Windows XP Home Edition z Windows XP ...Professional z Windows Vista™ It is complete, the MagicTune™ executable icon appears on Windows™ XP, go to [Control Panel] in Control Panel. 3. Go to highlight it. 4. Hardware z 32MB Memory above z 60MB Hard disk space above * For more information, visit the MagicTune...

Quick Guide (easy Manual) (ver.1.0) (Korean)
Page 29
... the automatic adjustment function sharper, execute the 'AUTO' function while the AUTO PATTERN is pressed, the Auto Adjustment screen appears as shown in the control panel, auto function will be executed automatically. If auto adjustment does not work properly, press 'AUTO' button again to the incoming Analog signal. Auto adjustment allows...
... the automatic adjustment function sharper, execute the 'AUTO' function while the AUTO PATTERN is pressed, the Auto Adjustment screen appears as shown in the control panel, auto function will be executed automatically. If auto adjustment does not work properly, press 'AUTO' button again to the incoming Analog signal. Auto adjustment allows...

Quick Guide (easy Manual) (ver.1.0) (Korean)
Page 36
RTA Off : Deactivates the RTA function so that the panel operates at its original speed. You can set the amount of time the menu will be ...Time Accelerator) A function that accelerates the response speed of the OSD. RTA On : Activates the RTA function so that the panel operates at a higher response speed than its original response speed. If you turn the power off and on again after switching RTA... default values. Transparency Display Time MENU , , , MENU Change the transparency of the background of the panel so as to automatically select the signal source.
RTA Off : Deactivates the RTA function so that the panel operates at its original speed. You can set the amount of time the menu will be ...Time Accelerator) A function that accelerates the response speed of the OSD. RTA On : Activates the RTA function so that the panel operates at a higher response speed than its original response speed. If you turn the power off and on again after switching RTA... default values. Transparency Display Time MENU , , , MENU Change the transparency of the background of the panel so as to automatically select the signal source.
Quick Guide (easy Manual) (ver.1.0) (Korean)
Page 39
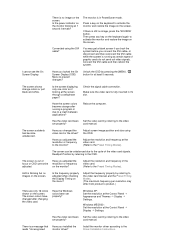
...Has the video card been Set the video card by referring to the video set properly? Adjust the resolution and frequency at the Control Panel Appearance and Themes Display Settings. Have you locked the On Screen Display (OSD) Menu to the monitor? Windows XP : Set the...through a cellophane paper? Adjust the frequency properly by referring to activate the monitor and restore the image on the monitor blinking at the Control Panel Display Settings. Reboot the computer. The screen can be adjusted. Windows ME/2000 : Set the resolution at 1 second intervals? There is ...
...Has the video card been Set the video card by referring to the video set properly? Adjust the resolution and frequency at the Control Panel Appearance and Themes Display Settings. Have you locked the On Screen Display (OSD) Menu to the monitor? Windows XP : Set the...through a cellophane paper? Adjust the frequency properly by referring to activate the monitor and restore the image on the monitor blinking at the Control Panel Display Settings. Reboot the computer. The screen can be adjusted. Windows ME/2000 : Set the resolution at 1 second intervals? There is ...
Quick Guide (easy Manual) (ver.1.0) (Korean)
Page 40
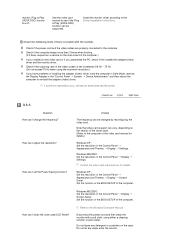
...I adjust the resolution? Windows ME/2000 : Set the resolution in the BIOS-SETUP of the computer. Set the function in the Control Panel Settings. Do not leave any water enter the monitor. Do not let any detergent or scratches on the version of the computer. If ... If you assembled the PC, check if the installed the adapter(video) driver and the monitor driver. Windows XP : Set the resolution in the Control Panel Appearance and Themes Display Settings. Q & A Question How can I change the frequency? Answer The frequency can vary, depending on the case. monitor, Plug...
...I adjust the resolution? Windows ME/2000 : Set the resolution in the BIOS-SETUP of the computer. Set the function in the Control Panel Settings. Do not leave any water enter the monitor. Do not let any detergent or scratches on the version of the computer. If ... If you assembled the PC, check if the installed the adapter(video) driver and the monitor driver. Windows XP : Set the resolution in the Control Panel Appearance and Themes Display Settings. Q & A Question How can I change the frequency? Answer The frequency can vary, depending on the case. monitor, Plug...

Quick Guide (easy Manual) (ver.1.0) (Korean)
Page 44
... / 18.7 x 15.6 x 8.6 inch (With Stand) / 6.1 kg / 13.4 lbs VESA Mounting Interface 100 mm x 100 mm (for use it without prior notice. Dot Acceptable TFT LCD panels manufactured by switching your monitor OFF when it is not from bad quality and you press a key on any problelms. For example, the number of...
... / 18.7 x 15.6 x 8.6 inch (With Stand) / 6.1 kg / 13.4 lbs VESA Mounting Interface 100 mm x 100 mm (for use it without prior notice. Dot Acceptable TFT LCD panels manufactured by switching your monitor OFF when it is not from bad quality and you press a key on any problelms. For example, the number of...

Quick Guide (easy Manual) (ver.1.0) (Korean)
Page 48
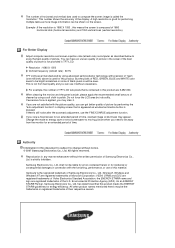
... and the computer systems will proceed automatically, unless the user wishes to select alternate settings. Design and specifications are 5,292,000. Dot Acceptable TFT LCD panels manufactured by switching your monitor to low-power mode when it is not from bad quality and you press a key on the keyboard. For energy...
... and the computer systems will proceed automatically, unless the user wishes to select alternate settings. Design and specifications are 5,292,000. Dot Acceptable TFT LCD panels manufactured by switching your monitor to low-power mode when it is not from bad quality and you press a key on the keyboard. For energy...
Quick Guide (easy Manual) (ver.1.0) (Korean)
Page 54
... and Windows NT are registered trademarks of horizontal and vertical dots used for this material. As an ENERGY STAR® Partner, Samsung Electronics Co., Ltd. A high resolution is subject to be the trademarks or registered trademarks of the display. Authority Information in ...you can be bright sometimes or some of picture. Resolution : 1680 X 1050 Vertical frequency (refresh rate) : 60 Hz TFT LCD panel manufactured by performing the "auto adjustment function" in connection with the furnishing, performance, or use of cleaner by using advanced semiconductor technology...
... and Windows NT are registered trademarks of horizontal and vertical dots used for this material. As an ENERGY STAR® Partner, Samsung Electronics Co., Ltd. A high resolution is subject to be the trademarks or registered trademarks of the display. Authority Information in ...you can be bright sometimes or some of picture. Resolution : 1680 X 1050 Vertical frequency (refresh rate) : 60 Hz TFT LCD panel manufactured by performing the "auto adjustment function" in connection with the furnishing, performance, or use of cleaner by using advanced semiconductor technology...

Service Manual
Page 4
...-1 11-2 Reassembly ...11-3 12. Reference Infomation ...14-1 14-1 Technical Terms ...14-1 14-2 Pin Assignments ...14-4 14-3 Timing Chart ...14-5 14-4 Preset Timing Modes ...14-6 14-5 Panel Description ...14-7 Contents 8. Wiring Diagram ...8-1 9. PCB Diagram ...12-1 13. Circuit Descriptions ...13-1 13-1 Block description ...13-1 13-2 Block operating ...13-2 14.
...-1 11-2 Reassembly ...11-3 12. Reference Infomation ...14-1 14-1 Technical Terms ...14-1 14-2 Pin Assignments ...14-4 14-3 Timing Chart ...14-5 14-4 Preset Timing Modes ...14-6 14-5 Panel Description ...14-7 Contents 8. Wiring Diagram ...8-1 9. PCB Diagram ...12-1 13. Circuit Descriptions ...13-1 13-1 Block description ...13-1 13-2 Block operating ...13-2 14.
Service Manual
Page 7
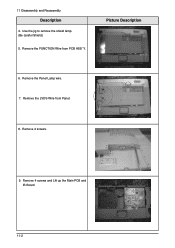
Remove the FUNCTION Wire from Panel. 8. Remove the Panel Lamp wire. 7. Remove 4 screws. 9. Picture Description 6. Remove the LVDS Wire from PCB ASS'Y. 11 Disassembly and Reassembly Description 4. Use the jig to remove the shield lamp. (Be careful Shield.) 5. Remove 4 screws and Lift up the Main PCB and IB Board. 11-2
Remove the FUNCTION Wire from Panel. 8. Remove the Panel Lamp wire. 7. Remove 4 screws. 9. Picture Description 6. Remove the LVDS Wire from PCB ASS'Y. 11 Disassembly and Reassembly Description 4. Use the jig to remove the shield lamp. (Be careful Shield.) 5. Remove 4 screws and Lift up the Main PCB and IB Board. 11-2

Service Manual
Page 14
Inverter Device that convert various input resolution to other resolution.(ex. 640* 480 to LCD panel lamp. Actually TFT-LCD panel require 60 pcs of frame for one second. so,this interface is primarily forcused at providing a connection between a computer and.... - 14 Reference Infomation 14 Reference Infomation 14-1 Technical Terms - FRC(Frame Rate Controller) Technology that is needed to convert input image to Panel. - DVI (Digital Visual Interface) This provides a high speed digital connection for Digital. this technology is display technology independent. It can control...
Inverter Device that convert various input resolution to other resolution.(ex. 640* 480 to LCD panel lamp. Actually TFT-LCD panel require 60 pcs of frame for one second. so,this interface is primarily forcused at providing a connection between a computer and.... - 14 Reference Infomation 14 Reference Infomation 14-1 Technical Terms - FRC(Frame Rate Controller) Technology that is needed to convert input image to Panel. - DVI (Digital Visual Interface) This provides a high speed digital connection for Digital. this technology is display technology independent. It can control...

Service Manual
Page 20
...E3 "Panel B-level panel code for 22"" TV Panel " BN07-00108A E4 "Panel for AMLCD 32"" TV" BN07-00124A E5 NARROW BEZEL 21 " PANEL BN07-00129A E6 "HIGHLAND 17"" LOW PANEL (Panel only for TCO03)" BN07-00088A E7 LTM190E1-L01 ZPD panel BN07-00137A E8 15" Narrow & Slim panel BN07-00139A E9 "17"" Panel for ...SL - BN07-00039A SW PVA BN07-00045A SX ZPD BN07-00046A SY New panel with high brightness BN07-00047A SZ Panel for TV BN07-00053A EA Panel for TV/ High luminance for 450cd _ SONY&EOS Team Panel for TCO03)" 14-7 BN07-00032A SQ DELL(ZPD) BN07-00034A SR PVA...
...E3 "Panel B-level panel code for 22"" TV Panel " BN07-00108A E4 "Panel for AMLCD 32"" TV" BN07-00124A E5 NARROW BEZEL 21 " PANEL BN07-00129A E6 "HIGHLAND 17"" LOW PANEL (Panel only for TCO03)" BN07-00088A E7 LTM190E1-L01 ZPD panel BN07-00137A E8 15" Narrow & Slim panel BN07-00139A E9 "17"" Panel for ...SL - BN07-00039A SW PVA BN07-00045A SX ZPD BN07-00046A SY New panel with high brightness BN07-00047A SZ Panel for TV BN07-00053A EA Panel for TV/ High luminance for 450cd _ SONY&EOS Team Panel for TCO03)" 14-7 BN07-00032A SQ DELL(ZPD) BN07-00034A SR PVA...

Service Manual
Page 21
..." NEW panel 21.3" Narrow PANEL ZPD Panel derivation AMLCD EU-L11 Pb free panel code derivation AMLCD EU-L11 Pb free panel ZPD code derivation 24" A-DCC new panel development 24" A-DCC panel ZPD code derivation AMLCD 19" TN new Panel AMLCD 19" TN new Panel ZPD derivation AMLCD 23" 16:9 new Panel AMLCD 26" 16:9 new Panel 24" panel with high...
..." NEW panel 21.3" Narrow PANEL ZPD Panel derivation AMLCD EU-L11 Pb free panel code derivation AMLCD EU-L11 Pb free panel ZPD code derivation 24" A-DCC new panel development 24" A-DCC panel ZPD code derivation AMLCD 19" TN new Panel AMLCD 19" TN new Panel ZPD derivation AMLCD 23" 16:9 new Panel AMLCD 26" 16:9 new Panel 24" panel with high...


