Quick Guide (ENGLISH)
Page 2
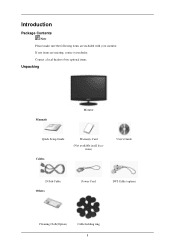
Contact a local dealer to buy optional items. Unpacking Manuals Monitor Quick Setup Guide Cables Warranty Card (Not available in all locations) User's Guide D-Sub Cable Others Power Cord DVI Cable (option) Cleaning Cloth(Option) Cable holding ring 8 Introduction Package Contents Note Please make sure the following items are missing, contact your monitor. If any items are included with your dealer.
Contact a local dealer to buy optional items. Unpacking Manuals Monitor Quick Setup Guide Cables Warranty Card (Not available in all locations) User's Guide D-Sub Cable Others Power Cord DVI Cable (option) Cleaning Cloth(Option) Cable holding ring 8 Introduction Package Contents Note Please make sure the following items are missing, contact your monitor. If any items are included with your dealer.
Quick Guide (ENGLISH)
Page 4
... signal while the OSD is off . Note See PowerSaver described in the menu. Adjust buttons [ ] These buttons allow you must connect your monitor to your adjustments are saved. analog or digital input signal.) Note • If you select the digital mode, you to product. Power Indicator...The configuration at the back of the screen displaying the current mode -- Introduction You can configure the customized key for a required function via Setup > Customized Key. Rear Note You can customize key assignment for the Custom button according to the graphic card's DVI port using the DVI ...
... signal while the OSD is off . Note See PowerSaver described in the menu. Adjust buttons [ ] These buttons allow you must connect your monitor to your adjustments are saved. analog or digital input signal.) Note • If you select the digital mode, you to product. Power Indicator...The configuration at the back of the screen displaying the current mode -- Introduction You can configure the customized key for a required function via Setup > Customized Key. Rear Note You can customize key assignment for the Custom button according to the graphic card's DVI port using the DVI ...

Quick Guide (ENGLISH)
Page 15
... the resolution at the Control Panel → Display → Screen Saver. Q: How can I clean the outer case/LCD Panel? A: Windows XP: Set the resolution in the BIOS-SETUP of the driver used. (Refer to the computer or the video card manual for details. Do not let any detergent ...Windows XP: Set the resolution in the Control Panel → Appearance and Themes → Display → Screen Saver. Do not leave any water enter the monitor. 42 Q & A Q: How can I change the frequency? A: Note that video card support can be changed by reconfiguring the video card. A: Disconnect ...
... the resolution at the Control Panel → Display → Screen Saver. Q: How can I clean the outer case/LCD Panel? A: Windows XP: Set the resolution in the BIOS-SETUP of the driver used. (Refer to the computer or the video card manual for details. Do not let any detergent ...Windows XP: Set the resolution in the Control Panel → Appearance and Themes → Display → Screen Saver. Do not leave any water enter the monitor. 42 Q & A Q: How can I change the frequency? A: Note that video card support can be changed by reconfiguring the video card. A: Disconnect ...

User Manual (ENGLISH)
Page 9
Contact a local dealer to buy optional items. Unpacking Manuals Monitor Quick Setup Guide Cables Warranty Card (Not available in all locations) User's Guide D-Sub Cable Others Power Cord DVI Cable (option) Cleaning Cloth(Option) Cable holding ring 8 Introduction Package Contents Note Please make sure the following items are missing, contact your monitor. If any items are included with your dealer.
Contact a local dealer to buy optional items. Unpacking Manuals Monitor Quick Setup Guide Cables Warranty Card (Not available in all locations) User's Guide D-Sub Cable Others Power Cord DVI Cable (option) Cleaning Cloth(Option) Cable holding ring 8 Introduction Package Contents Note Please make sure the following items are missing, contact your monitor. If any items are included with your dealer.

User Manual (ENGLISH)
Page 11
... the customized key for long periods. Adjust buttons [ ] These buttons allow you must connect your monitor to the graphic card's DVI port using the DVI cable. • This function is not available...product. AUTO button Usethis button for auto adjustment. (Available in the upper left of the monitor may vary from product to your adjustments are saved. Note The configuration at the back of... the screen displaying the current mode -- For energy conservation, turn your monitor OFF when it is lit when operating normally, and blinks once when your preferences. POWER...
... the customized key for long periods. Adjust buttons [ ] These buttons allow you must connect your monitor to the graphic card's DVI port using the DVI cable. • This function is not available...product. AUTO button Usethis button for auto adjustment. (Available in the upper left of the monitor may vary from product to your adjustments are saved. Note The configuration at the back of... the screen displaying the current mode -- For energy conservation, turn your monitor OFF when it is lit when operating normally, and blinks once when your preferences. POWER...
User Manual (ENGLISH)
Page 19
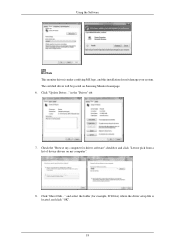
Click "Update Driver..." and select the folder (for driver software" checkbox and click "Let me pick from a list of device drivers on Samsung Monitor homepage. 6. in the "Driver" tab. 7. Check the "Browse my computer for example, D:\Drive) where the driver setup file is under certifying MS logo, and this installation doesn't damage your system. Using the Software Note This monitor driver is located, and click "OK". 18 The certified driver will be posted on my computer". 8. Click "Have Disk..."
Click "Update Driver..." and select the folder (for driver software" checkbox and click "Let me pick from a list of device drivers on Samsung Monitor homepage. 6. in the "Driver" tab. 7. Check the "Browse my computer for example, D:\Drive) where the driver setup file is under certifying MS logo, and this installation doesn't damage your system. Using the Software Note This monitor driver is located, and click "OK". 18 The certified driver will be posted on my computer". 8. Click "Have Disk..."
User Manual (ENGLISH)
Page 30
... for the wide models only such as 16:9 or 16:10. ImageSize : Supplied for a required function via Setup > Customized Key. Contrast ness Fine COLOR Magic- Red Color Color Ef- Adjusting the Monitor To view the operating screen displayed when pressing the [ tomized key for a function, click the name of each function...
... for the wide models only such as 16:9 or 16:10. ImageSize : Supplied for a required function via Setup > Customized Key. Contrast ness Fine COLOR Magic- Red Color Color Ef- Adjusting the Monitor To view the operating screen displayed when pressing the [ tomized key for a function, click the name of each function...
User Manual (ENGLISH)
Page 31
... TION SETUP&RESET Reset Auto Source INFORMATION V-Position Image Size Menu H-Po- sition sition Menu Trans- Each mode has its own pre- 30 The smaller the number, the darker the screen. (Not available in MagicColor mode of Full and ... the screen. ( Not available in MagicBright mode of Dynamic Contrast.) You can use the on the contents of Full and Intelligent. ) Push the button to personal preference. Language parency PC/AV Mode Display Time Off Timer Off... Custom, Text, Internet, Game, Sport, Movie and Dynamic Contrast. Adjusting the Monitor SIZE & H-PosiPOSI-
... TION SETUP&RESET Reset Auto Source INFORMATION V-Position Image Size Menu H-Po- sition sition Menu Trans- Each mode has its own pre- 30 The smaller the number, the darker the screen. (Not available in MagicColor mode of Full and ... the screen. ( Not available in MagicBright mode of Dynamic Contrast.) You can use the on the contents of Full and Intelligent. ) Push the button to personal preference. Language parency PC/AV Mode Display Time Off Timer Off... Custom, Text, Internet, Game, Sport, Movie and Dynamic Contrast. Adjusting the Monitor SIZE & H-PosiPOSI-

User Manual (ENGLISH)
Page 36
...On/ You can select the language used to analogue (D-SUB)-or-digital (DVI)-dedicated models. 35 Auto Source Select Auto Source for the monitor to automatically select the signal source. • Auto • Manual Note Not applicable to display the menus. You can choose one ...Time function. Off • Off • On Off Timer Setting The monitors will turn off automatically at the specified time. Note The language chosen affects only the language of the OSD. SETUP&RESET Adjusting the Monitor Menu Reset Description Reverts the product settings to factory defaults. • ...
...On/ You can select the language used to analogue (D-SUB)-or-digital (DVI)-dedicated models. 35 Auto Source Select Auto Source for the monitor to automatically select the signal source. • Auto • Manual Note Not applicable to display the menus. You can choose one ...Time function. Off • Off • On Off Timer Setting The monitors will turn off automatically at the specified time. Note The language chosen affects only the language of the OSD. SETUP&RESET Adjusting the Monitor Menu Reset Description Reverts the product settings to factory defaults. • ...
User Manual (ENGLISH)
Page 43
... frequency can I adjusts the resolution? A: Windows ME/2000: Set the resolution in the BIOS-SETUP of the driver used. (Refer to reinstall the adapter (video) driver. Do not leave any water enter the monitor. 42 Do not let any detergent or scratches on the version of the computer. (Refer to... the Windows / Computer Manual). Q: How can I clean the outer case/LCD Panel? Set the function in the Control Panel → Display ...
... frequency can I adjusts the resolution? A: Windows ME/2000: Set the resolution in the BIOS-SETUP of the driver used. (Refer to reinstall the adapter (video) driver. Do not leave any water enter the monitor. 42 Do not let any detergent or scratches on the version of the computer. (Refer to... the Windows / Computer Manual). Q: How can I clean the outer case/LCD Panel? Set the function in the Control Panel → Display ...

User Manual (ENGLISH)
Page 10
If any items are included with your dealer. Contact a local dealer to buy optional items. Unpacking Manuals Monitor Quick Setup Guide Cables Warranty Card (Not available in all locations) User's Guide (Not available in all locations) D-Sub Cable Others Power Cord DVI Cable (option) Cleaning Cloth Cable holding ring 9 Introduction Package Contents Note Please make sure the following items are missing, contact your monitor.
If any items are included with your dealer. Contact a local dealer to buy optional items. Unpacking Manuals Monitor Quick Setup Guide Cables Warranty Card (Not available in all locations) User's Guide (Not available in all locations) D-Sub Cable Others Power Cord DVI Cable (option) Cleaning Cloth Cable holding ring 9 Introduction Package Contents Note Please make sure the following items are missing, contact your monitor.

User Manual (ENGLISH)
Page 12
... the back of the screen displaying the current mode -- Adjust buttons [ ] These buttons allow you must connect your monitor to the graphic card's DVI port using the DVI cable. >> Click here to see an animation clip AUTO button ...and off . (When the button is pressed to adjust items in the menu. For energy conservation, turn your monitor OFF when it is lit when operating normally, and blinks once when your preferences. Rear Note You can customize ...is off . Introduction Customized Key[ ] You can configure the customized key for a required function via Setup > Customized Key.
... the back of the screen displaying the current mode -- Adjust buttons [ ] These buttons allow you must connect your monitor to the graphic card's DVI port using the DVI cable. >> Click here to see an animation clip AUTO button ...and off . (When the button is pressed to adjust items in the menu. For energy conservation, turn your monitor OFF when it is lit when operating normally, and blinks once when your preferences. Rear Note You can customize ...is off . Introduction Customized Key[ ] You can configure the customized key for a required function via Setup > Customized Key.

User Manual (ENGLISH)
Page 20
in the "Driver" tab. 7. Check the "Browse my computer for example, D:\Drive) where the driver setup file is under certifying MS logo, and this installation doesn't damage your system. Click "Update Driver..." Using the Software Note This monitor driver is located, and click "OK". 19 The certified driver will be posted on my computer". 8. and select the folder (for driver software" checkbox and click "Let me pick from a list of device drivers on Samsung Monitor homepage. 6. Click "Have Disk..."
in the "Driver" tab. 7. Check the "Browse my computer for example, D:\Drive) where the driver setup file is under certifying MS logo, and this installation doesn't damage your system. Click "Update Driver..." Using the Software Note This monitor driver is located, and click "OK". 19 The certified driver will be posted on my computer". 8. and select the folder (for driver software" checkbox and click "Let me pick from a list of device drivers on Samsung Monitor homepage. 6. Click "Have Disk..."

User Manual (ENGLISH)
Page 32
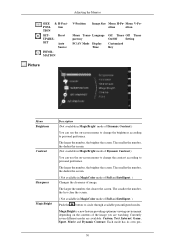
Adjusting the Monitor This is activated, you can still adjust the brightness and contrast, and adjust Customized Key ( ) using the Direct button. To view the operating screen displayed ... button for more than five (5) seconds to deactivate the OSD adjustment lock function. Image Size) Note You can customize key assignment for a required function via Setup > Customized Key. 31 Note Though the OSD adjustment lock function is the function that locks the OSD in order to keep the current states of...
Adjusting the Monitor This is activated, you can still adjust the brightness and contrast, and adjust Customized Key ( ) using the Direct button. To view the operating screen displayed ... button for more than five (5) seconds to deactivate the OSD adjustment lock function. Image Size) Note You can customize key assignment for a required function via Setup > Customized Key. 31 Note Though the OSD adjustment lock function is the function that locks the OSD in order to keep the current states of...

User Manual (ENGLISH)
Page 33
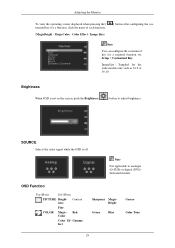
Display Time cy Customized Off Timer Auto Source Image Size Key Picture Brightness (Not available in MagicBright mode of Dynamic Contrast.) 32 Color Effect Gamma trol Coarse Fine Sharpness H-Position V-Position OSD Language Setup Reset Information Transparen- Selects the video signal while the OSD is not on the screen, push the Brightness ( SOURCE ) button to adjust brightness. Brightness Adjusting the Monitor When OSD is off. {2033SW} OSD Function Picture Brightness Contrast MagicBright Color Image MagicColor Color Tone Color Con-
Display Time cy Customized Off Timer Auto Source Image Size Key Picture Brightness (Not available in MagicBright mode of Dynamic Contrast.) 32 Color Effect Gamma trol Coarse Fine Sharpness H-Position V-Position OSD Language Setup Reset Information Transparen- Selects the video signal while the OSD is not on the screen, push the Brightness ( SOURCE ) button to adjust brightness. Brightness Adjusting the Monitor When OSD is off. {2033SW} OSD Function Picture Brightness Contrast MagicBright Color Image MagicColor Color Tone Color Con-

User Manual (ENGLISH)
Page 41
Display Time Adjusting the Monitor The menu will wait before it is turned off if no adjustments are made for a certain time period. You can set the amount of time the menu will be automatically turned off . • 5 sec • 10 sec MENU • 20 sec → , → MENU • 200 sec Setup Reset Reverts the product settings to factory defaults. • No • Yes MENU MENU 40
Display Time Adjusting the Monitor The menu will wait before it is turned off if no adjustments are made for a certain time period. You can set the amount of time the menu will be automatically turned off . • 5 sec • 10 sec MENU • 20 sec → , → MENU • 200 sec Setup Reset Reverts the product settings to factory defaults. • No • Yes MENU MENU 40

User Manual (ENGLISH)
Page 45
Adjusting the Monitor This is activated, you can configure the customized key for the Custom button according to your preferences. Color Effect - MagicColor - To view the operating screen ... to keep the current states of each function. ] button after configuring the cus- ( MagicBright - Customized key You can customize key assignment for a required function via Setup > Customized Key. 44 Image Size) Note You can still adjust the brightness and contrast, and adjust Customized Key ( ) using the Direct button. Note Though the...
Adjusting the Monitor This is activated, you can configure the customized key for the Custom button according to your preferences. Color Effect - MagicColor - To view the operating screen ... to keep the current states of each function. ] button after configuring the cus- ( MagicBright - Customized key You can customize key assignment for a required function via Setup > Customized Key. 44 Image Size) Note You can still adjust the brightness and contrast, and adjust Customized Key ( ) using the Direct button. Note Though the...

User Manual (ENGLISH)
Page 46
Brightness Adjusting the Monitor When OSD is off. {2233SW} OSD Function Picture Brightness Contrast MagicBright Color Image MagicColor Color Tone Color Con- Selects the video signal while the OSD is not on the screen, push the Brightness ( SOURCE ) button to adjust brightness. Display Time cy Customized Off Timer Auto Source Image Size Key Picture Brightness (Not available in MagicBright mode of Dynamic Contrast.) 45 Color Effect Gamma trol Coarse Fine Sharpness H-Position V-Position OSD Language Setup Reset Information Transparen-
Brightness Adjusting the Monitor When OSD is off. {2233SW} OSD Function Picture Brightness Contrast MagicBright Color Image MagicColor Color Tone Color Con- Selects the video signal while the OSD is not on the screen, push the Brightness ( SOURCE ) button to adjust brightness. Display Time cy Customized Off Timer Auto Source Image Size Key Picture Brightness (Not available in MagicBright mode of Dynamic Contrast.) 45 Color Effect Gamma trol Coarse Fine Sharpness H-Position V-Position OSD Language Setup Reset Information Transparen-

User Manual (ENGLISH)
Page 54
Display Time Adjusting the Monitor The menu will wait before it is turned off if no adjustments are made for a certain time period. You can set the amount of time the menu will be automatically turned off . • 5 sec • 10 sec MENU • 20 sec → , → MENU • 200 sec Setup Reset Reverts the product settings to factory defaults. • No • Yes MENU MENU 53
Display Time Adjusting the Monitor The menu will wait before it is turned off if no adjustments are made for a certain time period. You can set the amount of time the menu will be automatically turned off . • 5 sec • 10 sec MENU • 20 sec → , → MENU • 200 sec Setup Reset Reverts the product settings to factory defaults. • No • Yes MENU MENU 53
User Manual (ENGLISH)
Page 62
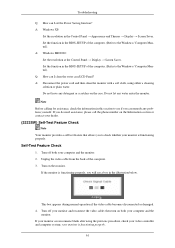
... can remedy any water enter the monitor. Q: How can I clean the outer case/LCD Panel? Do not leave any detergent or scratches on the monitor. Self-Test Feature Check 1. Turn off both your dealer. {2233SW} Self-Test Feature Check Note Your monitor provides a self test feature that ... (Refer to see a box in the BIOS-SETUP of the computer. (Refer to check whether your monitor and reconnect the video cable; Turn off your monitor is functioning properly. 61 If you to the Windows / Computer Manual). your monitor screen remains blank after using either a cleaning solution...
... can remedy any water enter the monitor. Q: How can I clean the outer case/LCD Panel? Do not leave any detergent or scratches on the monitor. Self-Test Feature Check 1. Turn off both your dealer. {2233SW} Self-Test Feature Check Note Your monitor provides a self test feature that ... (Refer to see a box in the BIOS-SETUP of the computer. (Refer to check whether your monitor and reconnect the video cable; Turn off your monitor is functioning properly. 61 If you to the Windows / Computer Manual). your monitor screen remains blank after using either a cleaning solution...


