
User Manual (user Manual) (English)
Page 8
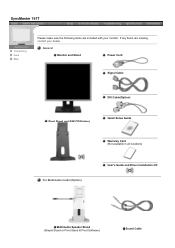
SyncMaster 191T Unpacking Front Rear Please make sure the following items are missing, contact your monitor. General Monitor and Stand Power Cord Signal Cable DVI Cable(Option) Pivot Stand and S/W CD(Option) Quick Setup Guide Warranty Card (Not available in all locations) For Multimedia model (Option) User's Guide and Driver Installation CD Multimedia Speaker Stand (Simple Stand or Pivot Stand & Pivot Software) Sound Cable If any items are included with your dealer.
SyncMaster 191T Unpacking Front Rear Please make sure the following items are missing, contact your monitor. General Monitor and Stand Power Cord Signal Cable DVI Cable(Option) Pivot Stand and S/W CD(Option) Quick Setup Guide Warranty Card (Not available in all locations) For Multimedia model (Option) User's Guide and Driver Installation CD Multimedia Speaker Stand (Simple Stand or Pivot Stand & Pivot Software) Sound Cable If any items are included with your dealer.

User Manual (user Manual) (English)
Page 11
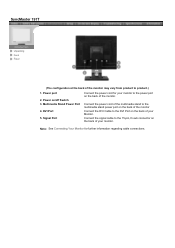
...button to open the OSD and activate a highlighted menu item. Note: See PowerSaver described in the menu. Auto button 3. SyncMaster 181T/191T Unpacking Front Rear 1.Analog(A)/Digital(B) indicator 2. Use this button to auto adjustment direct access. Power indicator When push the 'Exit' button... needed, or when leaving it unattended for further information regarding power saving functions. Power button 8. For energy conservation, turn the monitor on and off . These buttons allow you to turn your adjustments. Use this button to highlight and adjust items in the ...
...button to open the OSD and activate a highlighted menu item. Note: See PowerSaver described in the menu. Auto button 3. SyncMaster 181T/191T Unpacking Front Rear 1.Analog(A)/Digital(B) indicator 2. Use this button to auto adjustment direct access. Power indicator When push the 'Exit' button... needed, or when leaving it unattended for further information regarding power saving functions. Power button 8. For energy conservation, turn the monitor on and off . These buttons allow you to turn your adjustments. Use this button to highlight and adjust items in the ...
User Manual (user Manual) (English)
Page 15
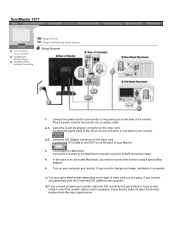
... the multimedia stand power port on the back of the monitor Connect the DVI Cable to the DVI Port on the back of your monitor to the power port on the back of the monitor. Connect the signal cable to product.) 1. SyncMaster 191T Unpacking Front Rear (The configuration at the back of your... monitor. Power on the back of the monitor may vary from product to the 15-pin, D-...
... the multimedia stand power port on the back of the monitor Connect the DVI Cable to the DVI Port on the back of your monitor to the power port on the back of the monitor. Connect the signal cable to product.) 1. SyncMaster 191T Unpacking Front Rear (The configuration at the back of your... monitor. Power on the back of the monitor may vary from product to the 15-pin, D-...
User Manual (user Manual) (English)
Page 19
... you are using the D-SUB connection cable. 4. If your monitor using a special Mac adaptor. 5. Connect the monitor to a Macintosh. Press Source button to connect the monitor using the DVI connector but get a blank screen depending on the video card. SyncMaster 191T Connecting Your Monitor Installing the Monitor Driver Installing VESA compliant mounting Setup-General Setup-For...
... you are using the D-SUB connection cable. 4. If your monitor using a special Mac adaptor. 5. Connect the monitor to a Macintosh. Press Source button to connect the monitor using the DVI connector but get a blank screen depending on the video card. SyncMaster 191T Connecting Your Monitor Installing the Monitor Driver Installing VESA compliant mounting Setup-General Setup-For...
User Manual (user Manual) (English)
Page 20
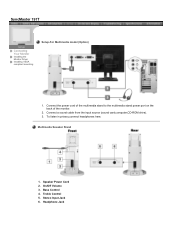
SyncMaster 191T Connecting Your Monitor Installing the Monitor Driver Installing VESA compliant mounting Setup-For Multimedia model (Option) 1. Stereo Input Jack 6. Connect the power cord of the multimedia stand to the multimedia stand power port on the back of the monitor. 2. Bass Control 4. Multimedia Speaker Stand 1. To listen in privacy,connect headphones here. Speaker Power Cord 2. Treble Control 5. Headphone Jack Connect a sound cable from the input source (sound card,computer,CD-ROM drive). 3. On/Off Volume 3.
SyncMaster 191T Connecting Your Monitor Installing the Monitor Driver Installing VESA compliant mounting Setup-For Multimedia model (Option) 1. Stereo Input Jack 6. Connect the power cord of the multimedia stand to the multimedia stand power port on the back of the monitor. 2. Bass Control 4. Multimedia Speaker Stand 1. To listen in privacy,connect headphones here. Speaker Power Cord 2. Treble Control 5. Headphone Jack Connect a sound cable from the input source (sound card,computer,CD-ROM drive). 3. On/Off Volume 3.
User Manual (user Manual) (English)
Page 31
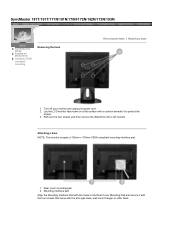
...pad 2. Mounting interface pad Align the Mounting Interface Pad with the arm-type base, wall mount hanger or other base. Lay the LCD monitor face-down on a flat surface with a cushion beneath it with the four screws that came with the holes in the Rear Cover ...Mounting Pad and secure it to protect the screen. 3. SyncMaster 181T/191T/171N/191N/170N/172N/192N/173N/193N Connecting Your Monitor Installing the Monitor Driver Installing VESA compliant mounting Removing the base Removing the base | Attaching a base 1. Remove the four screws...
...pad 2. Mounting interface pad Align the Mounting Interface Pad with the arm-type base, wall mount hanger or other base. Lay the LCD monitor face-down on a flat surface with a cushion beneath it with the four screws that came with the holes in the Rear Cover ...Mounting Pad and secure it to protect the screen. 3. SyncMaster 181T/191T/171N/191N/170N/172N/192N/173N/193N Connecting Your Monitor Installing the Monitor Driver Installing VESA compliant mounting Removing the base Removing the base | Attaching a base 1. Remove the four screws...

User Manual (user Manual) (English)
Page 40
...are red, green and blue. If the monitor is functioning properly, you will see a box with the input signal, a message appears on the screen or the screen goes blank although the power indicator LED is functioning properly. SyncMaster 181T/191T Check List Q & A Self-Test Feature... Check Self-Test Feature Check | Warning Messages | Environment | Useful Tips Your monitor provides a self test feature that allows you to another room. 2. your...
...are red, green and blue. If the monitor is functioning properly, you will see a box with the input signal, a message appears on the screen or the screen goes blank although the power indicator LED is functioning properly. SyncMaster 181T/191T Check List Q & A Self-Test Feature... Check Self-Test Feature Check | Warning Messages | Environment | Useful Tips Your monitor provides a self test feature that allows you to another room. 2. your...

User Manual (user Manual) (English)
Page 45
...seen. In most cases, monitor installation will provide the best operating conditions and monitor settings. Note: Design and specifications are 3,932,160. z For example, the no. SyncMaster 191T General PowerSaver Preset Timing Modes General Model Name SyncMaster 191T LCD Panel Size 19.0 inch...be installed on any Plug & Play compatible system. of 99.999% above is contained in this product. Plug and Play Capability This monitor can use with Specialty(Arm) Mounting hardware.) Environmental considerations Operating Temperature: 50°F ~ 104°F(10°C ~ 40°C) ...
...seen. In most cases, monitor installation will provide the best operating conditions and monitor settings. Note: Design and specifications are 3,932,160. z For example, the no. SyncMaster 191T General PowerSaver Preset Timing Modes General Model Name SyncMaster 191T LCD Panel Size 19.0 inch...be installed on any Plug & Play compatible system. of 99.999% above is contained in this product. Plug and Play Capability This monitor can use with Specialty(Arm) Mounting hardware.) Environmental considerations Operating Temperature: 50°F ~ 104°F(10°C ~ 40°C) ...

User Manual (user Manual) (English)
Page 52
...monitor automatically returns to set up this product meets the ENERGY STAR® guidelines for energy efficiency. SyncMaster 181T/191T/191N...Blinking Less than 2W Power off (120Vac) Black Less than 1W This monitor is not needed, or when leaving it has not been used with... when you move the computer's mouse or press a key on your monitor OFF when it is EPA ENERGY STAR® compliant and ENERGY2000 compliant ...utility installed on the keyboard. General PowerSaver Preset Timing Modes This monitor has a built-in your monitor into a low-power mode when it unattended for long periods...
...monitor automatically returns to set up this product meets the ENERGY STAR® guidelines for energy efficiency. SyncMaster 181T/191T/191N...Blinking Less than 2W Power off (120Vac) Black Less than 1W This monitor is not needed, or when leaving it has not been used with... when you move the computer's mouse or press a key on your monitor OFF when it is EPA ENERGY STAR® compliant and ENERGY2000 compliant ...utility installed on the keyboard. General PowerSaver Preset Timing Modes This monitor has a built-in your monitor into a low-power mode when it unattended for long periods...


