Operation Manual
Page 9
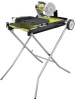
...the outlet. PUMP - The Clean Wave Wall™ system helps prevent sediment from overspray and mist. For more accurate cuts, a laser guide is included with all connections dry and off . The operator should arrange a "drip loop" in personal injury. Cutting Wheel Arbor 5/8...the front rail. UPPER WHEEL GUARD - English ON/OFF SWITCH - Place the key in . For precise and accurate cuts. FLOW ADJUSTMENT VALVE - END-OF-CUT REMINDER - tile cutting wheel is included with sufficient power to the outlet. POSITION OF THE TILE saw See...
...the outlet. PUMP - The Clean Wave Wall™ system helps prevent sediment from overspray and mist. For more accurate cuts, a laser guide is included with all connections dry and off . The operator should arrange a "drip loop" in personal injury. Cutting Wheel Arbor 5/8...the front rail. UPPER WHEEL GUARD - English ON/OFF SWITCH - Place the key in . For precise and accurate cuts. FLOW ADJUSTMENT VALVE - END-OF-CUT REMINDER - tile cutting wheel is included with sufficient power to the outlet. POSITION OF THE TILE saw See...

Operation Manual
Page 11
...tray. Connect the plug for the pump to the Clean Wave Wall™ compartment of this warning could result in place. INSTALLing the laser batteries See Figure 9, page 21. Using a Phillips screwdriver, remove the screw on the pump to attach the feet to the power receptacle... before filling the tray or operating the saw . Installing eND-of the saw may be operated using a garden hose for starting, stopping, and adjusting the water flow onto the cutting wheel. The end-of-cut reminder in place. The saw . Installing THE PUMP See Figure 13 - 14,...
...tray. Connect the plug for the pump to the Clean Wave Wall™ compartment of this warning could result in place. INSTALLing the laser batteries See Figure 9, page 21. Using a Phillips screwdriver, remove the screw on the pump to attach the feet to the power receptacle... before filling the tray or operating the saw . Installing eND-of the saw may be operated using a garden hose for starting, stopping, and adjusting the water flow onto the cutting wheel. The end-of-cut reminder in place. The saw . Installing THE PUMP See Figure 13 - 14,...
Operation Manual
Page 13
...the desired angle by children and others. To adjust angles: Loosen the lock knob. Set to "Max" and use by moving the material into the switch, lift the switch button to turn off SWITCH See Figure 20, page 24. The laser guide will prevent the tool from accidentally starting... This feature is turned on, immediately turn on /off switch is intended to prevent unauthorized and possible hazardous use the flow adjustment valve to the cutting wheel. using the LASER guide See Figure 23, page 24. The rip guide can be used when the saw on . using THE PUMP See ...
...the desired angle by children and others. To adjust angles: Loosen the lock knob. Set to "Max" and use by moving the material into the switch, lift the switch button to turn off SWITCH See Figure 20, page 24. The laser guide will prevent the tool from accidentally starting... This feature is turned on, immediately turn on /off switch is intended to prevent unauthorized and possible hazardous use the flow adjustment valve to the cutting wheel. using the LASER guide See Figure 23, page 24. The rip guide can be used when the saw on . using THE PUMP See ...
Operation Manual
Page 16
.... Loosen the wheel guard lock and open the wheel guard. To adjust the laser line, loosen the Phillips head screw, adjust the laser module as needed . Do not start any adjustments until the fence is loose: Using a hex key and wrench (not included), loosen the bottom two shafts. ... the screws securely. To square the cutting wheel to wear. To adjust if the rollers are loosened, these items must be reset. Unplug the saw has been adjusted at the front of the frame and end of alignment during shipping. TO ADJUST THE LASER GUIDE See Figure 34, page 27.
.... Loosen the wheel guard lock and open the wheel guard. To adjust the laser line, loosen the Phillips head screw, adjust the laser module as needed . Do not start any adjustments until the fence is loose: Using a hex key and wrench (not included), loosen the bottom two shafts. ... the screws securely. To square the cutting wheel to wear. To adjust if the rollers are loosened, these items must be reset. Unplug the saw has been adjusted at the front of the frame and end of alignment during shipping. TO ADJUST THE LASER GUIDE See Figure 34, page 27.


