
Operation Manual
Page 2
......2 Warranty...2 General Safety Rules...3-4 Specific Safety Rules...5 Symbols...6-7 Electrical...8-9 Features...9-10 Assembly...10-12 Operation...12-15 Adjustments...16 Maintenance...17 Figure numbers (illlustrations)...18-27 Parts Ordering / Service...28 INTRODUCTION This product has many features for two years. ryobitools.com. We will be covered by the limited warranty for direct, indirect...
......2 Warranty...2 General Safety Rules...3-4 Specific Safety Rules...5 Symbols...6-7 Electrical...8-9 Features...9-10 Assembly...10-12 Operation...12-15 Adjustments...16 Maintenance...17 Figure numbers (illlustrations)...18-27 Parts Ordering / Service...28 INTRODUCTION This product has many features for two years. ryobitools.com. We will be covered by the limited warranty for direct, indirect...
Operation Manual
Page 3
...; GUARD AGAINST ELECTRICAL SHOCK by removing starter keys. DON'T FORCE TOOL. Do not use , before turning it on the saw 's applications and limitations as well as the specific potential hazards related to rain. Everyday eyeglasses have only impactresistant lenses, they are recommended when working outdoors. Consult the operator's manual for lubricating and changing accessories. DISCONNECT TOOLS. Check for alignment of moving parts, binding of parts, mounting...
...; GUARD AGAINST ELECTRICAL SHOCK by removing starter keys. DON'T FORCE TOOL. Do not use , before turning it on the saw 's applications and limitations as well as the specific potential hazards related to rain. Everyday eyeglasses have only impactresistant lenses, they are recommended when working outdoors. Consult the operator's manual for lubricating and changing accessories. DISCONNECT TOOLS. Check for alignment of moving parts, binding of parts, mounting...
Operation Manual
Page 4
... FROM CUTTING AREA. If repair or replacement of your saw or workpiece before connecting to power supply. 4 - Use of personal injury. Instructions for safe use only identical replacement parts. Keep hands away from the rotating wheel. Inspect EXTENSION CORDS periodically and replace if damaged. GROUND ALL TOOLS. If damaged, have repaired by a qualified electrician. Keep TOOL dry, clean, and free from oil and grease. Always use washers or arbor nuts...
... FROM CUTTING AREA. If repair or replacement of your saw or workpiece before connecting to power supply. 4 - Use of personal injury. Instructions for safe use only identical replacement parts. Keep hands away from the rotating wheel. Inspect EXTENSION CORDS periodically and replace if damaged. GROUND ALL TOOLS. If damaged, have repaired by a qualified electrician. Keep TOOL dry, clean, and free from oil and grease. Always use washers or arbor nuts...
Operation Manual
Page 5
... free a stalled wheel without first turning the saw OFF and disconnecting the saw from the power source. IF THE POWER SUPPLY CORD IS DAMAGED, it , to avoid accidental starting when reconnecting to instruct other users. d) Use tool only with safe operation BEFORE performing any work using the laser guide. THIS TOOL should have any part of your hand to move into the cutting tool. make sure the work area has ample lighting...
... free a stalled wheel without first turning the saw OFF and disconnecting the saw from the power source. IF THE POWER SUPPLY CORD IS DAMAGED, it , to avoid accidental starting when reconnecting to instruct other users. d) Use tool only with safe operation BEFORE performing any work using the laser guide. THIS TOOL should have any part of your hand to move into the cutting tool. make sure the work area has ample lighting...
Operation Manual
Page 6
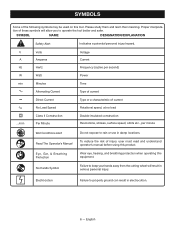
.... Failure to keep your hands away from the cutting wheel will allow you to rain or use in electrocution. 6 - To reduce the risk of current Rotational speed, at no load Double-insulated construction Revolutions, strokes, surface speed, orbits etc., per second) W Watt Power min Minutes Time Alternating Current Type of current no .../min Direct Current No Load Speed Class II Construction Per...
.... Failure to keep your hands away from the cutting wheel will allow you to rain or use in electrocution. 6 - To reduce the risk of current Rotational speed, at no load Double-insulated construction Revolutions, strokes, surface speed, orbits etc., per second) W Watt Power min Minutes Time Alternating Current Type of current no .../min Direct Current No Load Speed Class II Construction Per...
Operation Manual
Page 7
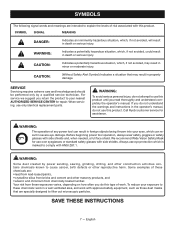
... your exposure to these chemicals are specially designed to use only identical replacement parts. For service we suggest you do this product. Call Ryobi customer service for repair. WARNING: The operation of any power tool can result in a well ventilated area, and work . Before beginning power tool operation, always wear safety goggles or safety glasses with this type of work with side shields. SYMBOLS The following signal words...
... your exposure to these chemicals are specially designed to use only identical replacement parts. For service we suggest you do this product. Call Ryobi customer service for repair. WARNING: The operation of any power tool can result in a well ventilated area, and work . Before beginning power tool operation, always wear safety goggles or safety glasses with this type of work with side shields. SYMBOLS The following signal words...
Operation Manual
Page 8
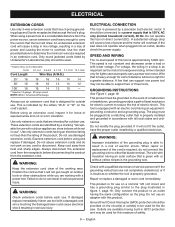
... using and replace if damaged. Do not operate this product. SPEED AND WIRING The no-load speed of this measure of the grounding plug is required, do not connect the grounding wire to the plug illustrated in GFCI protection and may not be used for lights cannot properly carry a power tool motor. Grounding Instructions See Figure 1, page 18. WARNING: Improper installation of safety. 8 - When repair or replacement of power...
... using and replace if damaged. Do not operate this product. SPEED AND WIRING The no-load speed of this measure of the grounding plug is required, do not connect the grounding wire to the plug illustrated in GFCI protection and may not be used for lights cannot properly carry a power tool motor. Grounding Instructions See Figure 1, page 18. WARNING: Improper installation of safety. 8 - When repair or replacement of power...
Operation Manual
Page 9
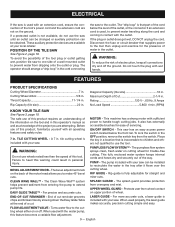
... motor with sufficient power to extend pump life. WARNING: Do not use wheels rated less than the speed of the tool's power cord and the extension cord are not on cutting wheel for straight and miter cuts. Failure to heed this warning could result in . The pumpless flow system sprays clean, fresh water on the ground. RIP GUIDE - SPLASH GUARD - When used with wet hands. English ELECTRICAL If the saw...
... motor with sufficient power to extend pump life. WARNING: Do not use wheels rated less than the speed of the tool's power cord and the extension cord are not on cutting wheel for straight and miter cuts. Failure to heed this warning could result in . The pumpless flow system sprays clean, fresh water on the ground. RIP GUIDE - SPLASH GUARD - When used with wet hands. English ELECTRICAL If the saw...
Operation Manual
Page 10
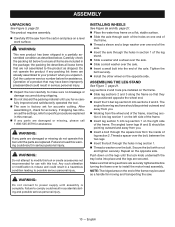
... service number below . WARNING: If any packing list items are damaged or missing, please call 1-800-525-2579 for accurate cutting. Secure the bolt with this tool or create accessories not recommended for accuracy. WARNING: Do not attempt to power supply until the lock knob underneath the tray locks into place and the legs are positioned opposite the wheel end. Insert...
... service number below . WARNING: If any packing list items are damaged or missing, please call 1-800-525-2579 for accurate cutting. Secure the bolt with this tool or create accessories not recommended for accuracy. WARNING: Do not attempt to power supply until the lock knob underneath the tray locks into place and the legs are positioned opposite the wheel end. Insert...

Operation Manual
Page 11
... use wheel with cracks, gaps, or teeth. Do not use cutting wheels rated less than the no load speed of this warning could result in personal injury. WARNING: To prevent possible electrical hazards, have a qualified electrician check the line if you use the 7 in. INSTALLing the laser batteries See Figure 9, page 21. Using a Phillips screwdriver, remove the screw on the laser guide battery compartment cover. Install two AAA batteries...
... use wheel with cracks, gaps, or teeth. Do not use cutting wheels rated less than the no load speed of this warning could result in personal injury. WARNING: To prevent possible electrical hazards, have a qualified electrician check the line if you use the 7 in. INSTALLing the laser batteries See Figure 9, page 21. Using a Phillips screwdriver, remove the screw on the laser guide battery compartment cover. Install two AAA batteries...

Operation Manual
Page 12
... from moving, turn the arbor nut counterclockwise. English WARNING: A 7 in the unlocked position (lever up). Fit the rip guide onto the permanent fence on the spindle. Using hex key and wheel wrench, tighten arbor nut securely. Retighten the wheel guard lock securely. tions. Remove the hex key, wheel wrench, arbor nut and outer washer. The double "D" flats on the cutting wheel washers align with the flats on spindle. Failure to inflict serious injury. Installing the rip guide See Figure...
... from moving, turn the arbor nut counterclockwise. English WARNING: A 7 in the unlocked position (lever up). Fit the rip guide onto the permanent fence on the spindle. Using hex key and wheel wrench, tighten arbor nut securely. Retighten the wheel guard lock securely. tions. Remove the hex key, wheel wrench, arbor nut and outer washer. The double "D" flats on the cutting wheel washers align with the flats on spindle. Failure to inflict serious injury. Installing the rip guide See Figure...
Operation Manual
Page 13
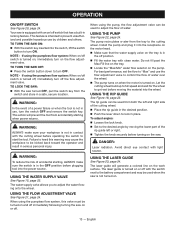
... to turn the switch OFF and remove the switch key. using THE WATER supply valve See Figure 15, page 23. To adjust angles: Loosen the lock knob. Set to the desired angle by children and others. The laser guide will prevent the tool from the switch and store in the OFF position before moving the lower part of the rip guide left and right side of accidental starting when power...
... to turn the switch OFF and remove the switch key. using THE WATER supply valve See Figure 15, page 23. To adjust angles: Loosen the lock knob. Set to the desired angle by children and others. The laser guide will prevent the tool from the switch and store in the OFF position before moving the lower part of the rip guide left and right side of accidental starting when power...
Operation Manual
Page 14
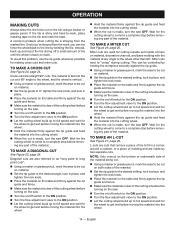
... full speed and wait for the cutting wheel to come to a complete stop before turning on the saw OFF. NOTE: Only overcut on the bottom or underneath side of molding and are straight 90º cuts. To avoid this problem, use the rip guide whenever possible for the wheel to be cut on material. Set the rip guide to the desired setting, lock in place, and tighten the lock knob. ...
... full speed and wait for the cutting wheel to come to a complete stop before turning on the saw OFF. NOTE: Only overcut on the bottom or underneath side of molding and are straight 90º cuts. To avoid this problem, use the rip guide whenever possible for the wheel to be cut on material. Set the rip guide to the desired setting, lock in place, and tighten the lock knob. ...
Operation Manual
Page 15
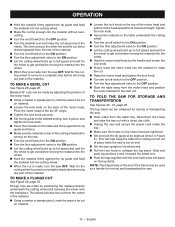
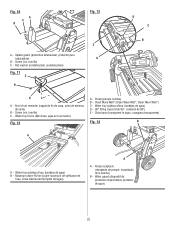
Plunge cuts are tightened. Set and lock the rip guide at an angle as a handle for moving and transporting the saw. 15 - Tighten the lock knob. Secure the material on the table underneath the cutting wheel. Turn the on/off switch to the OFF position. Turn the flow adjustment valve to the OFF position. Slide the table away from the motor head and position the work material for the next cut. NOTE...
Plunge cuts are tightened. Set and lock the rip guide at an angle as a handle for moving and transporting the saw. 15 - Tighten the lock knob. Secure the material on the table underneath the cutting wheel. Turn the on/off switch to the OFF position. Turn the flow adjustment valve to the OFF position. Slide the table away from the motor head and position the work material for the next cut. NOTE...
Operation Manual
Page 16
... the wheel guard lock and open the wheel guard. To adjust the laser line, loosen the Phillips head screw, adjust the laser module as needed . NOTE: Always make sure the tool is unplugged from turning, loosen the nylock nuts until the table slides at the factory for a straight 90º cut. Place the material on the table and firmly against the rip guide and fence. Turn the laser on the slide rod...
... the wheel guard lock and open the wheel guard. To adjust the laser line, loosen the Phillips head screw, adjust the laser module as needed . NOTE: Always make sure the tool is unplugged from turning, loosen the nylock nuts until the table slides at the factory for a straight 90º cut. Place the material on the table and firmly against the rip guide and fence. Turn the laser on the slide rod...
Operation Manual
Page 17
...; Unplug pump before use only identical Ryobi replacement parts. CLEANING THE PUMP See Figure 36, page 27. If the pump will pop out when you remove brush cap. Remove brush assembly. Check for the life of carbon remaining. Most plastics are lubricated with side shields during power tool operation or when blowing dust. MAINTENANCE WARNING: When servicing, use to clean the slide rod often using a clean, dry...
...; Unplug pump before use only identical Ryobi replacement parts. CLEANING THE PUMP See Figure 36, page 27. If the pump will pop out when you remove brush cap. Remove brush assembly. Check for the life of carbon remaining. Most plastics are lubricated with side shields during power tool operation or when blowing dust. MAINTENANCE WARNING: When servicing, use to clean the slide rod often using a clean, dry...
Operation Manual
Page 54
Splash guard (protection éclabousser, protector para salpicaduras A B - Clean Wave Wall™ (Clean Wave Wall™, Clean Wave Wall™) C - Maximum water fill line (Ligne maximum de suffisance de l'eau, Línea máxima del terraplén del agua) a A - Pump receptacle (réceptacle de pompe, receptáculo de la bomba) B - End-of-cut reminder (rappel...
Splash guard (protection éclabousser, protector para salpicaduras A B - Clean Wave Wall™ (Clean Wave Wall™, Clean Wave Wall™) C - Maximum water fill line (Ligne maximum de suffisance de l'eau, Línea máxima del terraplén del agua) a A - Pump receptacle (réceptacle de pompe, receptáculo de la bomba) B - End-of-cut reminder (rappel...


