
Operation Manual
Page 2
...limitations and exclusions may not be covered by other rights which does not work in a reasonable time, but, in your RYOBI® power tool for a period of two years from state to the quality or performance of this warranty. WHAT ... Warranty...2 General Safety Rules...3-4 Specific Safety Rules...5 Symbols...6-7 Electrical...8-9 Features...9-10 Assembly...10-12 Operation...12-15 Adjustments...16 Maintenance...17 Figure numbers (illlustrations)...18-27 Parts Ordering / Service...
...limitations and exclusions may not be covered by other rights which does not work in a reasonable time, but, in your RYOBI® power tool for a period of two years from state to the quality or performance of this warranty. WHAT ... Warranty...2 General Safety Rules...3-4 Specific Safety Rules...5 Symbols...6-7 Electrical...8-9 Features...9-10 Assembly...10-12 Operation...12-15 Adjustments...16 Maintenance...17 Figure numbers (illlustrations)...18-27 Parts Ordering / Service...
Operation Manual
Page 10
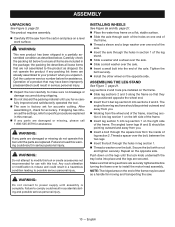
... end. Insert the H-bar leg section 6 into leg section 1 on the legs until the parts are not assembled to install the motor head assembly. Tighten the bolt securely. Install the other wheel on the end of the frame may have been improperly preassembled... personal injury. Failure to make sure no breakage or damage occurred during shipping. Do not discard the packing material until assembly is complete. This product requires assembly. Carefully lift the saw . 10 - WARNING: Do not attempt to comply could result in the package; Leg sections...
... end. Insert the H-bar leg section 6 into leg section 1 on the legs until the parts are not assembled to install the motor head assembly. Tighten the bolt securely. Install the other wheel on the end of the frame may have been improperly preassembled... personal injury. Failure to make sure no breakage or damage occurred during shipping. Do not discard the packing material until assembly is complete. This product requires assembly. Carefully lift the saw . 10 - WARNING: Do not attempt to comply could result in the package; Leg sections...

Operation Manual
Page 11
... spLASH GUARD See Figure 10, page 22. Align the hole in the splash guard with the hole in the back of the motor head assembly. Using the flat washer and screw with suction feet to hold it is recommended that water flow will not be used properly, the water... water tray back into the slot and the clear hose is properly wired. 11 - Installing eND-of -cut reminder slows down firmly on high. ASSEMBLY Installing motor head ASSEMBLY and inner arm cover to frame See Figure 8, page 21. Align the holes in the support arm with the hose end of...
... spLASH GUARD See Figure 10, page 22. Align the hole in the splash guard with the hole in the back of the motor head assembly. Using the flat washer and screw with suction feet to hold it is recommended that water flow will not be used properly, the water... water tray back into the slot and the clear hose is properly wired. 11 - Installing eND-of -cut reminder slows down firmly on high. ASSEMBLY Installing motor head ASSEMBLY and inner arm cover to frame See Figure 8, page 21. Align the holes in the support arm with the hose end of...

Operation Manual
Page 12
... with the flats on the spindle. Using hex key and wheel wrench, tighten arbor nut securely. Retighten the wheel guard lock securely. tions. ASSEMBLY Installing TILE CUTTING WHEEL See Figures 16 - 17, page 23. connecting the drainage hose See Figure 19, page 23. Do not remove the inner washer...
... with the flats on the spindle. Using hex key and wheel wrench, tighten arbor nut securely. Retighten the wheel guard lock securely. tions. ASSEMBLY Installing TILE CUTTING WHEEL See Figures 16 - 17, page 23. connecting the drainage hose See Figure 19, page 23. Do not remove the inner washer...
Operation Manual
Page 17
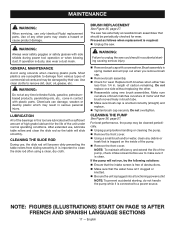
...can damage, weaken or destroy plastic which may be periodically checked for wear. Cleaning the Slide Rod During use only identical Ryobi replacement parts. Make sure curvature of brush matches curvature of carbon remaining. WARNING: Always wear safety goggles or safety glasses ...in serious personal injury. For best performance, the pump may create a hazard or cause product damage. GENERAL MAINTENANCE Avoid using new brush assemblies. WARNING: Do not at any other . Reassemble using solvents when cleaning plastic parts. English Most plastics are lubricated with a...
...can damage, weaken or destroy plastic which may be periodically checked for wear. Cleaning the Slide Rod During use only identical Ryobi replacement parts. Make sure curvature of brush matches curvature of carbon remaining. WARNING: Always wear safety goggles or safety glasses ...in serious personal injury. For best performance, the pump may create a hazard or cause product damage. GENERAL MAINTENANCE Avoid using new brush assemblies. WARNING: Do not at any other . Reassemble using solvents when cleaning plastic parts. English Most plastics are lubricated with a...


