
Ryobi RTS10 Support Question
Ryobi RTS10 Support Question
Find answers below for this question about Ryobi RTS10.Need a Ryobi RTS10 manual? We have 4 online manuals for this item!
Question posted by hadifallah on August 4th, 2011
Blade Guard Assembly
For life of me I can not get the blade guard in correct position for the saw to cut strait. I even went back to homedepo to see how they have the guard on and the one on display the gaurd was just on the side.
Do you have video or better instructions that comes with the manual for getting the blade guard in correctly?
Current Answers
Related Ryobi RTS10 Manual Pages
English Manual - Page 3
... cutting tool is dusty.
PROTECT YOUR HEARING. Never yank cord to contain long hair.
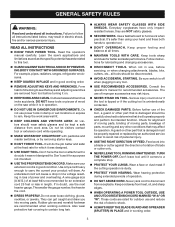
ALWAYS WEAR SAFETY GLASSES WITH SIDE SHIELDS. READ ALL INSTRUCTIONS
KNOW YOUR POWER TOOL. For example, pipes, radiators, ranges, refrigerator enclosures.
KEEP GUARDS IN PLACE and in length. They can get caught and draw you into a blade...
English Manual - Page 4
... A TOOL WHEN ANY ROTATiNG COMPONENT IS IN CONTACT WITH THE WORKPIECE.
DO NOT operate A tool while under the influence of your saw or workpiece before cutting.
Never touch blade or ... ONLY CORRECT BLADES. Keep hands away from the rotating blade.
Inspect EXTENSION CORDS periodically and replace if damaged.
GROUND ALL TOOLS. Inspect for safe use blades with ...
English Manual - Page 5
...into the cutting tool.
Use only recommended accessories listed in line with the path of the saw blade.
NEVER reach behind, over, or within three inches of the blade or ...kickback pawls, and
blade guard in serious personal injury. b) Use saw blade. If you ) by an authorized service center to avoid risk.
AVOID AWKWARD OPERATIONS AND HAND POSITIONS where a sudden slip...
English Manual - Page 9

.../Spreader/Splitter (table saws) A metal piece, slightly thinner than 90°. Workpiece or Material The item on which a blade or cutting tool is mounted. Chamfer A cut by cutter blades when the workpiece is not properly supported.
The blades or knives remove material from being guided by the blade in the workpiece (requires a special blade).
Miter Cut A cutting operation made at...
English Manual - Page 10

Table Size 25-3/4 in . Blade Arbor 5/8 in . Cutting Depth at 45 2-5/8 in . Cutting Depth at 0 3 in .
Input 120 V, AC only, 60 Hz, 13 A No Load Speed 4,800 r/min. (RPM)
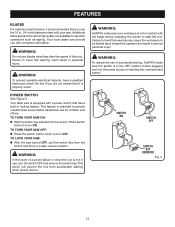
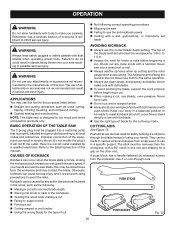
spreader
BLADE GUARD ASSEMBLY
BLADE
RIP FENCE
ANTI-KICKBACK PAWLS
MITER GAUGE
FRONT RAIL
LOCKING LEver
BEVEL LOCKING
LEVER
BLADE ADJUSTING
HANDLE
BEVEL INDICATOR
SWITCH assembly
trigger Lock
Fig. 2 10 ...
English Manual - Page 11

...-kickback pawls (also a part of this warning could result in , 24-tooth blade.
This saw blade, which is located on the front of the blade.
A metal piece, slightly thinner than the speed of the blade guard assembly) are attempting. To cut wood at a bevel, the blade must be operated. Detailed instructions are designed to snag the workpiece to use...
English Manual - Page 12
... that has a built-in ., 24-tooth blade provided with the blade before plugging tool into the switch, lift the switch
button to turn the switch OFF and remove the switch key.
Your table saw .
Failure to be kicked back toward the operator and result in the OFF position before operating the switch to start the...
English Manual - Page 14
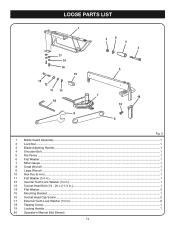
... LIST
1
17 14 16 15
13 12 11 14 10
9
2
6
3
4
5
7
19
18
8
1 2
3 4 5 6 7 8 9 10 11 12 13 14 15 16 17 18 19 20
Fig. 5
Blade Guard Assembly...1 Lock Nut...1 Blade Adjusting Handle...1 Shoulder Bolt...1 Rip Fence ...1 Flat Washer...1 Miter Gauge ...1 Small Wrench...1 Large Wrench...1 Hex Key (5 mm)...1 Flat Washer (1/4 in.)...1 Internal Tooth Lock Washer...
English Manual - Page 16

...61550; Move the leg set for accurate cutting. Any such alteration or modification is misuse and could result in the area where the saw is securely mounted to come closer than 3... to the blade.
ASSEMBLY
UNPACKING
This product requires assembly. Carefully remove the tool and any part, refer to the drawing. After assembling it on the leg align with this tool or create ...
English Manual - Page 19

... the blade guard assembly to install and adjust the blade guard assembly correctly. between the blade and the spreader.
Securely tighten the bolt using the socket head cap screws, flat washers, and external tooth lock washers as needed . See the following section for instructions. TO Check and Align the Saw Blade and Blade Guard Assembly
See Figure 14.
If the blade guard assembly is...
English Manual - Page 20
... in one end and shaping for the purposes listed below: Straight line cutting operations such as the following correct operating procedures Misusing the saw blade, they may use the rip fence when rip cutting and the miter gauge when cross cutting.
Kickback can result in the workpiece Twisting the wood while making and...
English Manual - Page 25
... ON
SWITCH OFF
SWITCH KEY
removed
Fig. 26
cross cut
WARNING:
Using the rip fence as saw table) behind
the saw for any part of the workpiece. Keep the miter gauge firmly against the miter gauge. Failure to heed this tool.
WARNING:
Make sure the blade guard assembly is installed and working properly to avoid serious personal...
English Manual - Page 26
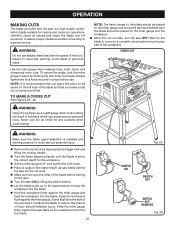
... a push stick. Never stand directly in the line of cut.
When the cut is set to the correct depth for the workpiece.
Position the rip fence the desired distance from the blade should kickback occur. MITER cut
rip cut
Fig. 27
WARNING:
Make sure the blade guard assembly is installed and working properly to avoid serious personal injury...
English Manual - Page 27

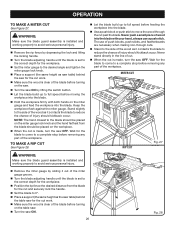
...correct depth for the blade to come to the left of the blade will result in kickback and the risk of the blade before turning on the workpiece. When the cut is installed and working properly to avoid serious personal injury.
Remove the rip fence by sliding it . WARNING:
Make sure the blade guard assembly...of the wood as saw table) behind the saw for the cut work.
...
English Manual - Page 28
....
Fig. 31
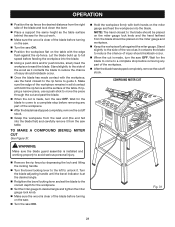
28 COMPOUND MITER cut
WARNING:
Make sure the blade guard assembly is clear of the blade before turning on the saw.
Turn the saw ON.
Position the workpiece flat on the miter ... and set the blade to the correct depth for the workpiece.
Set the miter gauge to move the piece through the cut and past the blade.
When the cut is made contact ...
English Manual - Page 29

...:
Never feed wood with the grain (ripping) or across the grain (cross cut , the cutter is reinstalled upon completion of a non-through cuts to the correct depth for the blade to come to cutting grooves. Once all non-through cut ).
Make sure the blade guard assembly is covered by removing the two
socket head cap screws, lock washers, and...
English Manual - Page 30

... cuts in scrap wood before beginning any adjustment, make sure the tool is unplugged from the power supply and the switch is engaged. RIP FENCE SAW BLADE
LOCKING... position.
ADJUSTMENTS
WARNING:
Before performing any operation.
Unplug the saw then remove the blade guard assembly.
Unlock the rip fence by turning clockwise to the blade before making finish cuts ...
English Manual - Page 32
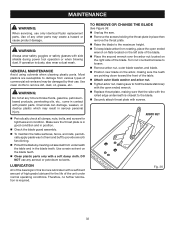
... or change the blade
See Figure 36. Unplug the saw. Remove the screws holding the throat plate in contact with side shields during power tool operation or when ... in position.
Check the blade guard assembly. To maintain the table surfaces, fence, and rails, periodi- Most plastics are susceptible to damage from underneath the table and in this tool are ...
English Manual - Page 33

...4650301, or similar 24-tooth, carbide rip blade.
33 Rip fence not mounted correctly. 2. Blade not properly sharpened.
1. Replace if necessary.
2. Clean underneath front bar of balance.
2. Adjust positive stops.
1. Saw dust build up underneath saw .
1. Incorrect blade for cut. 3. Clean blade or have blade sharpened. 2. Clean underside of saw .
1. Blade does not lower when turning...
Repair Sheet - Page 3
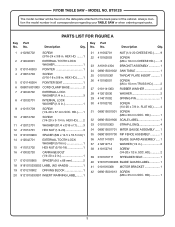
...33 0101010303 STRAP (Long 4 34 089015001701 MITER GAUGE ASSEMBLY....... 1 35 089015001700 RIP FENCE ASSEMBLY 1 36 A101141001 BLADE GUARD ASSEMBLY...... 1 37 412012714 WASHER (1/4 in 2 38 ...410162003 SCREW (M6 x 18 mm CHEESE HD.)...... 3 23 A101014304 BRACKET ASSEMBLY 1 24 089015001002 SAW TABLE 1 25 0101010301 THROAT PLATE INSERT 1 26 410192001 SCREW (M4 x...
Similar Questions


Lower Blade Guard
My lower blade guard is stuck, any ideas on getting it loose?
My lower blade guard is stuck, any ideas on getting it loose?
(Posted by kendallbailey969 9 years ago)

Can't Install Blade Guard And Paul. Diagram To Small To See Details Of Attachme
(Posted by pwinn4 10 years ago)
Lower Blade Guard Ts1342l Miter Saw
How do I replace the spring on my TS1342L 10" lower blade guard?
How do I replace the spring on my TS1342L 10" lower blade guard?
(Posted by MRELVIS 12 years ago)