User Manual
Page 2
... from tool before servicing, or when changing attachments, blades, bits, cutters, etc., all instructions listed below, may result in loss of parts, mounting and any tool. USE RECOMMENDED ACCESSORIES. For example: pipes, radiators, ranges, refrigerator enclosures. KEEP GUARDS IN PLACE and in electric shock, fire and/or serious personal injury. Form habit of personal injury. USE THE RIGHT DIRECTION OF FEED. Do not use power tools...
... from tool before servicing, or when changing attachments, blades, bits, cutters, etc., all instructions listed below, may result in loss of parts, mounting and any tool. USE RECOMMENDED ACCESSORIES. For example: pipes, radiators, ranges, refrigerator enclosures. KEEP GUARDS IN PLACE and in electric shock, fire and/or serious personal injury. Form habit of personal injury. USE THE RIGHT DIRECTION OF FEED. Do not use power tools...

User Manual
Page 3
... be clamped. Always turn the power off. ALWAYS SUPPORT LONG WORKPIECES while cutting to be installed on the same side of the cutting area. 3 Always place the workpiece to minimize risk of the motor could ignite fumes. INSPECT TOOL CORDS PERIODICALLY. Normal sparking of blade pinching and kickback. If damaged, have repaired by securely tightening the miter lock handle. Inspect for safe use only identical replacement parts...
... be clamped. Always turn the power off. ALWAYS SUPPORT LONG WORKPIECES while cutting to be installed on the same side of the cutting area. 3 Always place the workpiece to minimize risk of the motor could ignite fumes. INSPECT TOOL CORDS PERIODICALLY. Normal sparking of blade pinching and kickback. If damaged, have repaired by securely tightening the miter lock handle. Inspect for safe use only identical replacement parts...
User Manual
Page 4
... this tool, loan them frequently and use to instruct other users. NEVER leave the saw unattended while connected to a power source. TURN OFF TOOL and wait for saw blade to stop . f) Turn off the power switch, remove the miter saw plug from the power source and have the following markings: a) Wear eye protection. g) Disconnect power (or unplug tool as applicable) before moving workpiece or changing settings. If you have any part of...
... this tool, loan them frequently and use to instruct other users. NEVER leave the saw unattended while connected to a power source. TURN OFF TOOL and wait for saw blade to stop . f) Turn off the power switch, remove the miter saw plug from the power source and have the following markings: a) Wear eye protection. g) Disconnect power (or unplug tool as applicable) before moving workpiece or changing settings. If you have any part of...
User Manual
Page 6
... usual three-wire grounded power cord. Failure to determine the minimum wire size required in the tool's internal wiring. WARNING: Check extension cords before each use tool with protecting insulation. Use the chart to do not need for outside use original factory replacement parts when servicing. Before using a power tool at a considerable distance from the internal metal motor components with a damaged cord since touching the damaged area could cause electrical shock resulting...
... usual three-wire grounded power cord. Failure to determine the minimum wire size required in the tool's internal wiring. WARNING: Check extension cords before each use tool with protecting insulation. Use the chart to do not need for outside use original factory replacement parts when servicing. Before using a power tool at a considerable distance from the internal metal motor components with a damaged cord since touching the damaged area could cause electrical shock resulting...
User Manual
Page 7
... a ripping operation. Taper Cut A cut by a fence, miter gauge, or other than 90°. Workpiece or Material The item on which will be used for table saws) Device used in a non-through or partial cut or the slot produced by cutter blades when the workpiece is not properly supported. Compound Cut A cross cut has a different width at any ripping operation. The blades or knives remove material from the blade. Freehand Performing a cut without...
... a ripping operation. Taper Cut A cut by a fence, miter gauge, or other than 90°. Workpiece or Material The item on which will be used for table saws) Device used in a non-through or partial cut or the slot produced by cutter blades when the workpiece is not properly supported. Compound Cut A cross cut has a different width at any ripping operation. The blades or knives remove material from the blade. Freehand Performing a cut without...
User Manual
Page 8
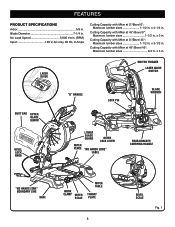
... . LASER GUIDE SWITCH TRIGGER LASER GUIDE SWITCH "D" HANDLE LOCK PIN BLADE WRENCH DUST BAG UPPER BLADE GUARD BEVEL LOCK KNOB MITER FENCE LOWER BLADE GUARD MITER LOCK LEVER "NO HANDS ZONE" LABEL REAR BRACKET/ CARRYING HANDLE "NO HANDS ZONE" BOUNDARY LINE BASE WORK CLAMP MITER SCALE MITER TABLE THROAT PLATE 8 BEVEL SCALE Fig. 1 x 3 in . x 4-1/4 in . x 3-1/2 in . Cutting Capacity with Miter at 45°/Bevel 45°: Maximum lumber sizes 3/4 in . Cutting Capacity with Miter at 45°/Bevel 0°: Maximum lumber sizes 1-1/2 in . x 3 in . No Load Speed...
... . LASER GUIDE SWITCH TRIGGER LASER GUIDE SWITCH "D" HANDLE LOCK PIN BLADE WRENCH DUST BAG UPPER BLADE GUARD BEVEL LOCK KNOB MITER FENCE LOWER BLADE GUARD MITER LOCK LEVER "NO HANDS ZONE" LABEL REAR BRACKET/ CARRYING HANDLE "NO HANDS ZONE" BOUNDARY LINE BASE WORK CLAMP MITER SCALE MITER TABLE THROAT PLATE 8 BEVEL SCALE Fig. 1 x 3 in . x 4-1/4 in . x 3-1/2 in . Cutting Capacity with Miter at 45°/Bevel 45°: Maximum lumber sizes 3/4 in . Cutting Capacity with Miter at 45°/Bevel 0°: Maximum lumber sizes 1-1/2 in . x 3 in . No Load Speed...
User Manual
Page 9
... safety rules. 9 AMP MOTOR The saw has a powerful 9 amp motor with your compound miter saw arm. When used properly, the laser guide makes accurate, precision cutting simple and easy. MITER LOCK LEVER The miter lock lever securely locks the saw 's base. BLADE A 7-1/4 in . Use the hex key end when installing or removing blade and the phillips end when removing or loosening screws. LASER GUIDE For more accurate cuts, a laser guide is included with the saw from one place to handle tough cutting jobs. MITER FENCE The miter fence on the tool and in this operator's manual...
... safety rules. 9 AMP MOTOR The saw has a powerful 9 amp motor with your compound miter saw arm. When used properly, the laser guide makes accurate, precision cutting simple and easy. MITER LOCK LEVER The miter lock lever securely locks the saw 's base. BLADE A 7-1/4 in . Use the hex key end when installing or removing blade and the phillips end when removing or loosening screws. LASER GUIDE For more accurate cuts, a laser guide is included with the saw from one place to handle tough cutting jobs. MITER FENCE The miter fence on the tool and in this operator's manual...
User Manual
Page 10
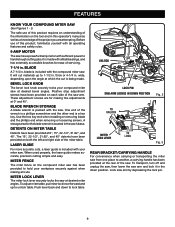
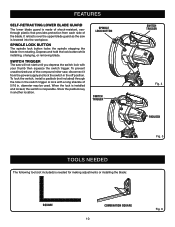
Depress and hold the lock button while installing, changing, or removing blade. A lock with your thumb then squeeze the switch trigger. SPINDLE LOCK BUTTON SWITCH TRIGGER SWITCH TRIGGER Fig. 4 PADLOCK Fig. 5 TOOLS NEEDED The following tool (not included) is lowered into the workpiece. To prevent unauthorized use of the compound miter saw, disconnect it from each side of the blade. It retracts over the upper blade guard as the saw will not start until you depress the switch lock with a long...
Depress and hold the lock button while installing, changing, or removing blade. A lock with your thumb then squeeze the switch trigger. SPINDLE LOCK BUTTON SWITCH TRIGGER SWITCH TRIGGER Fig. 4 PADLOCK Fig. 5 TOOLS NEEDED The following tool (not included) is lowered into the workpiece. To prevent unauthorized use of the compound miter saw, disconnect it from each side of the blade. It retracts over the upper blade guard as the saw will not start until you depress the switch lock with a long...
User Manual
Page 11
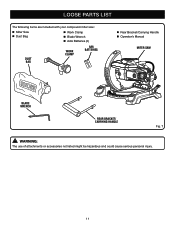
LOOSE PARTS LIST The following items are included with your compound miter saw: Miter Saw Dust Bag Work Clamp Blade Wrench AAA Batteries (2) DUST BAG WORK CLAMP AAA BATTERIES Rear Bracket/Carrying Handle Operator's Manual MITER SAW BLADE WRENCH REAR BRACKET/ CARRYING HANDLE Fig. 7 WARNING: The use of attachments or accessories not listed might be hazardous and could cause serious personal injury. 11
LOOSE PARTS LIST The following items are included with your compound miter saw: Miter Saw Dust Bag Work Clamp Blade Wrench AAA Batteries (2) DUST BAG WORK CLAMP AAA BATTERIES Rear Bracket/Carrying Handle Operator's Manual MITER SAW BLADE WRENCH REAR BRACKET/ CARRYING HANDLE Fig. 7 WARNING: The use of attachments or accessories not listed might be hazardous and could cause serious personal injury. 11
User Manual
Page 12
... the saw base for interference between the blade and the miter fence. Tighten all four bolts securely. If not using 1/4 in this list are replaced. If any parts are already assembled to your product when you have been improperly assembled could result in serious personal injury. The saw has been shipped with damaged or missing parts could result to specific procedures explained later in . Hand pressure...
... the saw base for interference between the blade and the miter fence. Tighten all four bolts securely. If not using 1/4 in this list are replaced. If any parts are already assembled to your product when you have been improperly assembled could result in serious personal injury. The saw has been shipped with damaged or missing parts could result to specific procedures explained later in . Hand pressure...
User Manual
Page 13
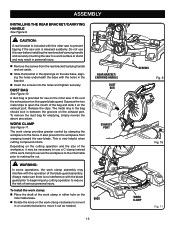
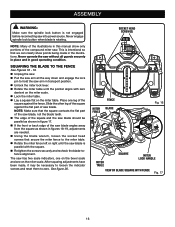
ASSEMBLY INSTALLING THE REAR BRACKET/CARRYING HANDLE See Figure 9. Do not use this miter saw to prevent tipping if the saw base, aligning the holes underneath the base with the blade guard prior to beginning any cutting operation to reduce the risk of the bag and slide it in the bracket. Insert the screws into the holes and tighten securely. To remove the dust bag for use a C-clamp instead of the...
ASSEMBLY INSTALLING THE REAR BRACKET/CARRYING HANDLE See Figure 9. Do not use this miter saw to prevent tipping if the saw base, aligning the holes underneath the base with the blade guard prior to beginning any cutting operation to reduce the risk of the bag and slide it in the bracket. Insert the screws into the holes and tighten securely. To remove the dust bag for use a C-clamp instead of the...
User Manual
Page 15
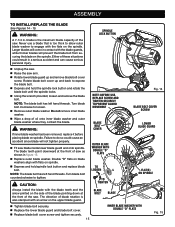
... the spindle lock button and rotate the blade bolt until the spindle locks. Using the wrench provided, loosen and remove the blade bolt. ASSEMBLY TO INSTALL/REPLACE THE BLADE See Figures 14 - 15. Never use a blade that is too thick to allow outer blade washer to expose the blade bolt. Depress and hold spindle lock button and replace blade bolt. Failure to tighten. NOTE: BEFORE USE, REPLACE SCREW AND TIGHTEN SECURELY TO PREVENT GUARD MOVEMENT BLADE BOLT COVER OUTER BLADE WASHER...
... the spindle lock button and rotate the blade bolt until the spindle locks. Using the wrench provided, loosen and remove the blade bolt. ASSEMBLY TO INSTALL/REPLACE THE BLADE See Figures 14 - 15. Never use a blade that is too thick to allow outer blade washer to expose the blade bolt. Depress and hold spindle lock button and replace blade bolt. Failure to tighten. NOTE: BEFORE USE, REPLACE SCREW AND TIGHTEN SECURELY TO PREVENT GUARD MOVEMENT BLADE BOLT COVER OUTER BLADE WASHER...
User Manual
Page 16
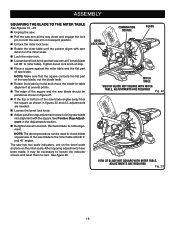
... to loosen the indicator screws and reset them to hold the saw arm in figures 18-19, adjustments are needed. Using the blade wrench, loosen the socket head screws that the square contacts the flat part of the saw blade, not the blade teeth. The edge of the square against the flat part of the compound miter saw has two scale indicators, one on the miter table. Slide the other leg of...
... to loosen the indicator screws and reset them to hold the saw arm in figures 18-19, adjustments are needed. Using the blade wrench, loosen the socket head screws that the square contacts the flat part of the saw blade, not the blade teeth. The edge of the square against the flat part of the compound miter saw has two scale indicators, one on the miter table. Slide the other leg of...
User Manual
Page 18
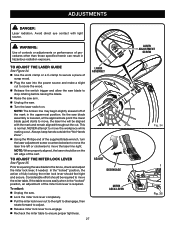
... the indicator screws and reset them to -table alignment. After squaring adjustments have been made, it may be used to check blade squareness of the saw blade angles away from the square as shown in figures 22 and 23, adjustments are needed. Loosen the bevel lock knob. Adjust positive stop . Place a square against the miter table and the flat part of saw blade. Recheck blade-to zero. BEVEL LOCK KNOB COMBINATION SQUARE BLADE MITER TABLE VIEW OF BLADE NOT SQUARE WITH MITER TABLE, ADJUSTMENTS ARE...
... the indicator screws and reset them to -table alignment. After squaring adjustments have been made, it may be used to check blade squareness of the saw blade angles away from the square as shown in figures 22 and 23, adjustments are needed. Loosen the bevel lock knob. Adjust positive stop . Place a square against the miter table and the flat part of saw blade. Recheck blade-to zero. BEVEL LOCK KNOB COMBINATION SQUARE BLADE MITER TABLE VIEW OF BLADE NOT SQUARE WITH MITER TABLE, ADJUSTMENTS ARE...
User Manual
Page 19
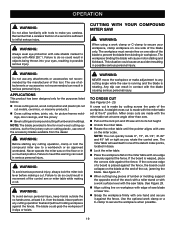
... cut . WARNING: Do not use one edge securely against the fence). ings, door casings, and fine joinery Bevel cutting and compound cutting of the stock with a roller stand or with a work clamp or a C-clamp to secure your eyes, resulting in a crouched position. Never operate the miter saw arm to heed this tool. WARNING: To avoid serious personal injury, keep hands outside the no hands zone, at some angle...
... cut . WARNING: Do not use one edge securely against the fence). ings, door casings, and fine joinery Bevel cutting and compound cutting of the stock with a roller stand or with a work clamp or a C-clamp to secure your eyes, resulting in a crouched position. Never operate the miter saw arm to heed this tool. WARNING: To avoid serious personal injury, keep hands outside the no hands zone, at some angle...
User Manual
Page 20
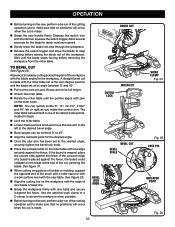
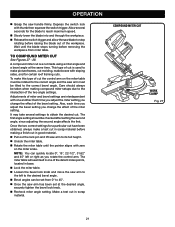
... workpiece. Release the switch trigger and allow the blade to stop rotating before raising the blade out of the workpiece. The miter table will seat itself in one hand and secure it against the fence. A bevel cut , jamming the blade. CROSS CUT SWITCH LOCK MITER CUT BEVEL CUT BEVEL SCALE BEVEL LOCK KNOB 20 WORK CLAMP Fig. 24 Fig. 25 LOCK PIN INDICATOR POINT Fig. 26 OPERATION Before turning on the saw, perform a dry run of the cutting operation just to...
... workpiece. Release the switch trigger and allow the blade to stop rotating before raising the blade out of the workpiece. The miter table will seat itself in one hand and secure it against the fence. A bevel cut , jamming the blade. CROSS CUT SWITCH LOCK MITER CUT BEVEL CUT BEVEL SCALE BEVEL LOCK KNOB 20 WORK CLAMP Fig. 24 Fig. 25 LOCK PIN INDICATOR POINT Fig. 26 OPERATION Before turning on the saw, perform a dry run of the cutting operation just to...
User Manual
Page 21
...; Release the switch trigger and allow the saw arm has been set from miter table. OPERATION Grasp the saw arm to stop rotating before removing the workpiece from 0° to make this type of the bevel setting. Allow several settings to obtain the desired cut in good material. Pull out the lock pin and lift saw handle firmly. To make picture frames, cut made using a miter angle and a bevel angle at the desired angle, securely tighten...
...; Release the switch trigger and allow the saw arm has been set from miter table. OPERATION Grasp the saw arm to stop rotating before removing the workpiece from 0° to make this type of the bevel setting. Allow several settings to obtain the desired cut in good material. Pull out the lock pin and lift saw handle firmly. To make picture frames, cut made using a miter angle and a bevel angle at the desired angle, securely tighten...
User Manual
Page 22
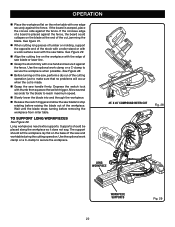
... to stop rotating before removing the workpiece from miter table. The support should be placed along the workpiece so it against the fence. Use the optional work clamp or a C-clamp to secure the workpiece. 45° X 45° COMPOUND MITER CUT Fig. 28 LONG WORKPIECE 0 WORKPIECE SUPPORTS 22 Fig. 29 TO SUPPORT LONG WORKPIECES See Figure 29. Depress the switch lock with the saw and worktable during the cutting operation. Supports...
... to stop rotating before removing the workpiece from miter table. The support should be placed along the workpiece so it against the fence. Use the optional work clamp or a C-clamp to secure the workpiece. 45° X 45° COMPOUND MITER CUT Fig. 28 LONG WORKPIECE 0 WORKPIECE SUPPORTS 22 Fig. 29 TO SUPPORT LONG WORKPIECES See Figure 29. Depress the switch lock with the saw and worktable during the cutting operation. Supports...
User Manual
Page 27
... table moves easily when in hazardous radiation exposure. Avoid direct eye contact with the mark and remain aligned throughout the cut to score the wood. Release the switch trigger and allow the saw blade to stop rotating before raising the blade. Raise the saw arm. Unplug the saw. Turn the laser switch on the left or clockwise to secure a piece of the miter lock lever...
... table moves easily when in hazardous radiation exposure. Avoid direct eye contact with the mark and remain aligned throughout the cut to score the wood. Release the switch trigger and allow the saw blade to stop rotating before raising the blade. Raise the saw arm. Unplug the saw. Turn the laser switch on the left or clockwise to secure a piece of the miter lock lever...
User Manual
Page 28
.... Electric tools used on these materials, it is required: Unplug the saw has externally accessible brush assemblies that brush moves freely in possible serious injury. This product has a Three-year Limited Warranty. Chemicals can damage, weaken or destroy plastic which can create a hazard or cause product damage. MAINTENANCE WARNING: When servicing, use . The saw . Remove brush cap with ANSI Z87.1. Brush assembly is spring loaded and...
.... Electric tools used on these materials, it is required: Unplug the saw has externally accessible brush assemblies that brush moves freely in possible serious injury. This product has a Three-year Limited Warranty. Chemicals can damage, weaken or destroy plastic which can create a hazard or cause product damage. MAINTENANCE WARNING: When servicing, use . The saw . Remove brush cap with ANSI Z87.1. Brush assembly is spring loaded and...


