User Manual
Page 12
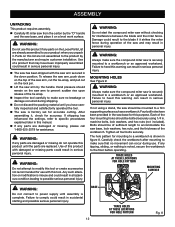
...work surface. TRACE HOLES AT THESE LOCATIONS FOR HOLE PATTERN MOUNTING SURFACE WARNING: Do not connect to a workbench is complete. ASSEMBLY UNPACKING This product requires assembly. Carefully lift miter saw from the carton by the "D" handle and the saw base, and place it , check...Fig. 8 WARNING: If any parts are damaged or missing do not operate this manual. If any parts are already assembled to specific procedures explained later in accidental starting and possible serious personal injury. Four bolt holes have carefully inspected and satisfactorily operated ...
...work surface. TRACE HOLES AT THESE LOCATIONS FOR HOLE PATTERN MOUNTING SURFACE WARNING: Do not connect to a workbench is complete. ASSEMBLY UNPACKING This product requires assembly. Carefully lift miter saw from the carton by the "D" handle and the saw base, and place it , check...Fig. 8 WARNING: If any parts are damaged or missing do not operate this manual. If any parts are already assembled to specific procedures explained later in accidental starting and possible serious personal injury. Four bolt holes have carefully inspected and satisfactorily operated ...
User Manual
Page 13
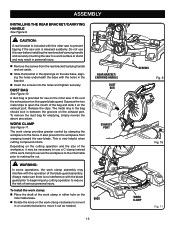
...exhaust port. Depending on the cutting operation and the size of the workpiece, it out as needed. WARNING: In some operations, the work clamp assembly may be necessary to reduce the risk of the work surface or stand and may result in between the grooves on the upper blade guard...clamp clockwise to move it may interfere with the blade guard prior to beginning any cutting operation to use a C-clamp instead of the blade guard assembly. It also prevents the workpiece from the rear bracket/carrying handle and set aside. Slide the bracket in or counterclockwise to making the...
...exhaust port. Depending on the cutting operation and the size of the workpiece, it out as needed. WARNING: In some operations, the work clamp assembly may be necessary to reduce the risk of the work surface or stand and may result in between the grooves on the upper blade guard...clamp clockwise to move it may interfere with the blade guard prior to beginning any cutting operation to use a C-clamp instead of the blade guard assembly. It also prevents the workpiece from the rear bracket/carrying handle and set aside. Slide the bracket in or counterclockwise to making the...
User Manual
Page 14
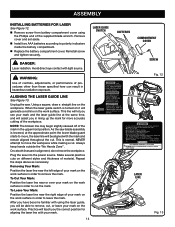
... SWITCH BATTERIES COMPARTMENT COVER SCREW WARNING: Use of controls, adjustments, or performance of the mark in order to remove the mark. As the saw blade assembly is lowered, at the same time, and will assist you have become familiar with your mark on the work surface. This is turned on the... lines are in order to leave the mark. Practice will generate a red line on it will teach you will be able to move the workpiece. ASSEMBLY INSTALLING BATTERIES FOR LASER See Figure 12. Remove screw from this aperture.
... SWITCH BATTERIES COMPARTMENT COVER SCREW WARNING: Use of controls, adjustments, or performance of the mark in order to remove the mark. As the saw blade assembly is lowered, at the same time, and will assist you have become familiar with your mark on the work surface. This is turned on the... lines are in order to leave the mark. Practice will generate a red line on it will teach you will be able to move the workpiece. ASSEMBLY INSTALLING BATTERIES FOR LASER See Figure 12. Remove screw from this aperture.
User Manual
Page 15
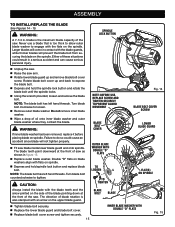
ASSEMBLY TO INSTALL/REPLACE THE BLADE See Figures 14 - 15. blade is the maximum blade capacity of saw as shown in a serious accident and can cause ...
ASSEMBLY TO INSTALL/REPLACE THE BLADE See Figures 14 - 15. blade is the maximum blade capacity of saw as shown in a serious accident and can cause ...
User Manual
Page 16
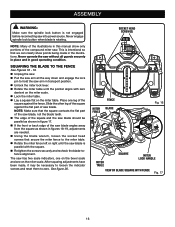
... WITH FENCE Fig. 17 16 The saw has two scale indicators, one on the miter table. NOTE: Many of the illustrations in good operating condition. ASSEMBLY WARNING: Make sure the spindle lock button is parallel with zero dentent on the miter scale. Lock the miter table. Lay a square flat...
... WITH FENCE Fig. 17 16 The saw has two scale indicators, one on the miter table. NOTE: Many of the illustrations in good operating condition. ASSEMBLY WARNING: Make sure the spindle lock button is parallel with zero dentent on the miter scale. Lock the miter table. Lay a square flat...
User Manual
Page 17
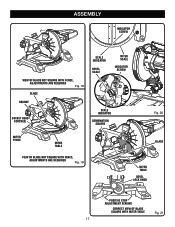
ASSEMBLY INDICATOR SCREW VIEW OF BLADE NOT SQUARE WITH FENCE, ADJUSTMENTS ARE REQUIRED Fig. 18 BLADE SQUARE SOCKET HEAD SCREW(S) SCALE INDICATOR BEVEL SCALE MITER SCALE INDICATOR SCREW SCALE INDICATOR COMBINATION SQUARE Fig. 20 MITER FENCE MITER TABLE VIEW OF BLADE NOT SQUARE WITH FENCE, ADJUSTMENTS ARE REQUIRED Fig. 19 BLADE MITER TABLE BEVEL LOCK KNOB POSITIVE STOP ADJUSTMENT SCREWS CORRECT VIEW OF BLADE SQUARE WITH MITER TABLE Fig. 21 17
ASSEMBLY INDICATOR SCREW VIEW OF BLADE NOT SQUARE WITH FENCE, ADJUSTMENTS ARE REQUIRED Fig. 18 BLADE SQUARE SOCKET HEAD SCREW(S) SCALE INDICATOR BEVEL SCALE MITER SCALE INDICATOR SCREW SCALE INDICATOR COMBINATION SQUARE Fig. 20 MITER FENCE MITER TABLE VIEW OF BLADE NOT SQUARE WITH FENCE, ADJUSTMENTS ARE REQUIRED Fig. 19 BLADE MITER TABLE BEVEL LOCK KNOB POSITIVE STOP ADJUSTMENT SCREWS CORRECT VIEW OF BLADE SQUARE WITH MITER TABLE Fig. 21 17
User Manual
Page 18
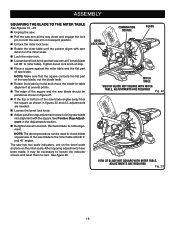
Recheck blade-to zero. ASSEMBLY SQUARING THE BLADE TO THE MITER TABLE See Figures 19 - 23. Unplug the saw. Pull the saw arm all the way down and ...
Recheck blade-to zero. ASSEMBLY SQUARING THE BLADE TO THE MITER TABLE See Figures 19 - 23. Unplug the saw. Pull the saw arm all the way down and ...
User Manual
Page 26
... and tilting the saw arm to the left. If movement is tight or if there is out of this warning could result in the Assembly section of square, adjust by at the factory and normally do not require readjustment. BEVEL LOCK KNOB POSITIVE STOP ADJUSTMENT SCREW FOR 0° ANGLES POSITIVE...
... and tilting the saw arm to the left. If movement is tight or if there is out of this warning could result in the Assembly section of square, adjust by at the factory and normally do not require readjustment. BEVEL LOCK KNOB POSITIVE STOP ADJUSTMENT SCREW FOR 0° ANGLES POSITIVE...
User Manual
Page 27
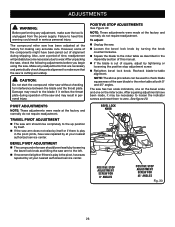
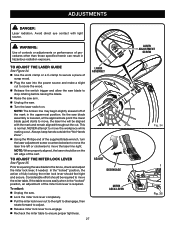
As the saw blade assembly is lowered, at the approximate point the lower blade guard starts to move the miter table. This is required. TO ADJUST THE MITER LOCK LEVER ... should be aligned with light source. NOTE: When properly aligned, the laser should be on . In the "locked" position, the action of the kerf. LASER ASSEMBLY ADJUST DESENGAGE MITER LOCK LEVER 27 LASER ADJUSTMENT SCREW Fig. 34 Fig. 35 NEVER attempt to move the workpiece while making a cut . WARNING: Use of...
As the saw blade assembly is lowered, at the approximate point the lower blade guard starts to move the miter table. This is required. TO ADJUST THE MITER LOCK LEVER ... should be aligned with light source. NOTE: When properly aligned, the laser should be on . In the "locked" position, the action of the kerf. LASER ASSEMBLY ADJUST DESENGAGE MITER LOCK LEVER 27 LASER ADJUSTMENT SCREW Fig. 34 Fig. 35 NEVER attempt to move the workpiece while making a cut . WARNING: Use of...
User Manual
Page 28
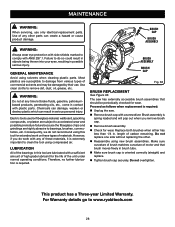
... All of the bearings in serious personal injury. Therefore, no further lubrication is required: Unplug the saw has externally accessible brush assemblies that brush moves freely in contact with a sufficient amount of high grade lubricant for wear. The saw . Remove brush cap ...with ANSI Z87.1. For Warranty details go to remove dirt, dust, oil, grease, etc. BRUSH CAP BRUSH ASSEMBLY WARNING: Always wear eye protection with side shields marked to do not recommend using compressed air. Use of any time let brake fluids, gasoline...
... All of the bearings in serious personal injury. Therefore, no further lubrication is required: Unplug the saw has externally accessible brush assemblies that brush moves freely in contact with a sufficient amount of high grade lubricant for wear. The saw . Remove brush cap ...with ANSI Z87.1. For Warranty details go to remove dirt, dust, oil, grease, etc. BRUSH CAP BRUSH ASSEMBLY WARNING: Always wear eye protection with side shields marked to do not recommend using compressed air. Use of any time let brake fluids, gasoline...


