Quick Setup Guide (English)
Page 1
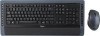
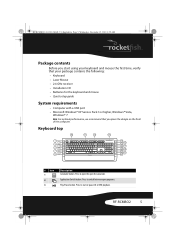
... Wireless Combo Package contents • Keyboard • 2.4G Receiver • Installation CD including User Guide • Laser mouse • AA batteries (4) • Quick Setup Guide Features Keyboard • 104-key design • Connect button • LED showing pairing and battery status • 18 hot-keys • Power switch • Soft palm rest Mouse • Three mouse buttons (left, right, and middle) • Tilt/scroll wheel • Two hot-key buttons • Power saving mode • Excellent performance • Working range...
... Wireless Combo Package contents • Keyboard • 2.4G Receiver • Installation CD including User Guide • Laser mouse • AA batteries (4) • Quick Setup Guide Features Keyboard • 104-key design • Connect button • LED showing pairing and battery status • 18 hot-keys • Power switch • Soft palm rest Mouse • Three mouse buttons (left, right, and middle) • Tilt/scroll wheel • Two hot-key buttons • Power saving mode • Excellent performance • Working range...
User Guide (English)
Page 3
... Using the combo driver 14 Installing the combo driver 14 Configuring the mouse 14 Uninstalling the combo driver 19 Maintaining 20 Troubleshooting 20 Specifications 21 Legal notices 22 One-year limited warranty 25 Important safety instructions 1 Read these instructions. 2 Keep these instructions. 3 Heed all warnings. 4 Follow all instructions. 5 Do not use this device to rain, moisture, dripping, or splashing, and no objects filled with the same or equivalent type. Replace...
... Using the combo driver 14 Installing the combo driver 14 Configuring the mouse 14 Uninstalling the combo driver 19 Maintaining 20 Troubleshooting 20 Specifications 21 Legal notices 22 One-year limited warranty 25 Important safety instructions 1 Read these instructions. 2 Keep these instructions. 3 Heed all warnings. 4 Follow all instructions. 5 Do not use this device to rain, moisture, dripping, or splashing, and no objects filled with the same or equivalent type. Replace...
User Guide (English)
Page 4
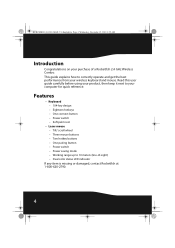
.... Features • Keyboard • 104-key design • Eighteen hotkeys • One connect button • Power switch • Soft palm rest • Laser mouse • Tilt/ scroll wheel • Three mouse buttons • Two hotkey buttons • One pairing button • Power switch • Power saving mode • Working range up to correctly operate and get the best performance from your wireless keyboard and mouse. This guide explains how to 10 meters (line-of a Rocketfish 2.4 GHz Wireless Combo.
.... Features • Keyboard • 104-key design • Eighteen hotkeys • One connect button • Power switch • Soft palm rest • Laser mouse • Tilt/ scroll wheel • Three mouse buttons • Two hotkey buttons • One pairing button • Power switch • Power saving mode • Working range up to correctly operate and get the best performance from your wireless keyboard and mouse. This guide explains how to 10 meters (line-of a Rocketfish 2.4 GHz Wireless Combo.
User Guide (English)
Page 5
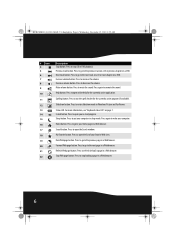
... open programs. Play/Pause button. Backspace \ [ { A S D F G H J K L : " Caps Lock ; ' Enter Shift Z X C V B N M < > ? Application Switch button. Press to start using your keyboard and mouse the first time, verify that your package contains the following: • Keyboard • Laser Mouse • 2.4 GHz receiver • Installation CD • Batteries for the keyboard and mouse • Quick setup guide System requirements • Computer with a USB port • Microsoft Windows® XP Service Pack 3 or higher, Windows® Vista, Windows®...
... open programs. Play/Pause button. Backspace \ [ { A S D F G H J K L : " Caps Lock ; ' Enter Shift Z X C V B N M < > ? Application Switch button. Press to start using your keyboard and mouse the first time, verify that your package contains the following: • Keyboard • Laser Mouse • 2.4 GHz receiver • Installation CD • Batteries for the keyboard and mouse • Quick setup guide System requirements • Computer with a USB port • Microsoft Windows® XP Service Pack 3 or higher, Windows® Vista, Windows®...
User Guide (English)
Page 6
... the Search window. Next track button. Decrease volume button. Press again to the previous track on a CD or previous chapter on a DVD. Press to wake your e-mail program. For more information, see "Keyboard status LED" on a DVD. Press again to run the spell checker for the currently active application. Search button. My Favorite button. Stop Web page button. Press to open online help for...
... the Search window. Next track button. Decrease volume button. Press again to the previous track on a CD or previous chapter on a DVD. Press to wake your e-mail program. For more information, see "Keyboard status LED" on a DVD. Press again to run the spell checker for the currently active application. Search button. My Favorite button. Stop Web page button. Press to open online help for...
User Guide (English)
Page 7
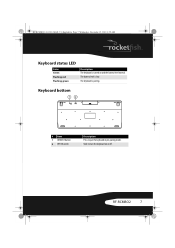
Keyboard bottom CONN EC T OF F ON # Item 1 CONNECT button 2 OFF ON switch Description Press to turn the keyboard on and the battery level normal. RF-RCMBO2 7 Slide to put the keyboard in pre-pairing mode. The keyboard is low. RF-RCMBO2_10-1280_MAN_V1_English.fm Page 7 Wednesday, December 15, 2010 8:59 AM Keyboard status LED Color Green Flashing red Flashing green Description The keyboard is turned on or off. The battery level is pairing.
Keyboard bottom CONN EC T OF F ON # Item 1 CONNECT button 2 OFF ON switch Description Press to turn the keyboard on and the battery level normal. RF-RCMBO2 7 Slide to put the keyboard in pre-pairing mode. The keyboard is low. RF-RCMBO2_10-1280_MAN_V1_English.fm Page 7 Wednesday, December 15, 2010 8:59 AM Keyboard status LED Color Green Flashing red Flashing green Description The keyboard is turned on or off. The battery level is pairing.

User Guide (English)
Page 8
... and the battery level normal. Status LED. The mouse is low. If you press down , left or right. Press to perform standard right-mouse actions such as opening programs. Press to go to the previous page in a Web browser. Mouse status LED Color Green Flashing red Flashing green Description The mouse is turned on page 8. Move the mouse up, down on the scroll wheel, a four...
... and the battery level normal. Status LED. The mouse is low. If you press down , left or right. Press to perform standard right-mouse actions such as opening programs. Press to go to the previous page in a Web browser. Mouse status LED Color Green Flashing red Flashing green Description The mouse is turned on page 8. Move the mouse up, down on the scroll wheel, a four...
User Guide (English)
Page 9
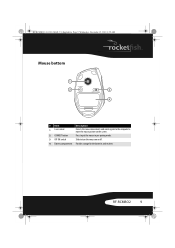
RF-RCMBO2 9 RF-RCMBO2_10-1280_MAN_V1_English.fm Page 9 Wednesday, December 15, 2010 8:59 AM Mouse bottom CONNECT OFF ON # Item 1 Laser sensor Description Detects the mouse movements and sends signals to the computer to move the mouse pointer on the screen. 2 CONNECT button Press to put the mouse in pre-pairing mode. 3 OFF ON switch Slide to turn the mouse on or off. 4 Battery compartment Provides storage for the batteries and receiver.
RF-RCMBO2 9 RF-RCMBO2_10-1280_MAN_V1_English.fm Page 9 Wednesday, December 15, 2010 8:59 AM Mouse bottom CONNECT OFF ON # Item 1 Laser sensor Description Detects the mouse movements and sends signals to the computer to move the mouse pointer on the screen. 2 CONNECT button Press to put the mouse in pre-pairing mode. 3 OFF ON switch Slide to turn the mouse on or off. 4 Battery compartment Provides storage for the batteries and receiver.
User Guide (English)
Page 13
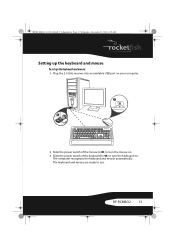
The computer recognizes the keyboard and mouse automatically. The keyboard and mouse are ready to turn the mouse on . RF-RCMBO2 13 RF-RCMBO2_10-1280_MAN_V1_English.fm Page 13 Wednesday, December 15, 2010 8:59 AM Setting up the keyboard and mouse To set up the keyboard and mouse: 1 Plug the 2.4 GHz receiver into an available USB port on your computer. 2 Slide the power switch of the mouse to ON, to turn the keyboard on . 3 Slide the power switch of the keyboard to ON, to use.
The computer recognizes the keyboard and mouse automatically. The keyboard and mouse are ready to turn the mouse on . RF-RCMBO2 13 RF-RCMBO2_10-1280_MAN_V1_English.fm Page 13 Wednesday, December 15, 2010 8:59 AM Setting up the keyboard and mouse To set up the keyboard and mouse: 1 Plug the 2.4 GHz receiver into an available USB port on your computer. 2 Slide the power switch of the mouse to ON, to turn the keyboard on . 3 Slide the power switch of the keyboard to ON, to use.
User Guide (English)
Page 14
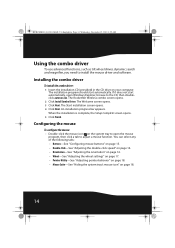
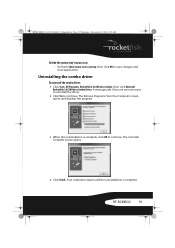
... page 18. 14 An installation progress bar appears. The Rocketfish Wireless combo screen opens. 2 Click Install Combo Driver. The Welcome screen opens. 3 Click Next. When the installation is complete, the Setup Complete screen opens. 5 Click Finish. RF-RCMBO2_10-1280_MAN_V1_English.fm Page 14 Wednesday, December 15, 2010 8:59 AM Using the combo driver To use advanced functions, such as tilt wheel driver, dynamic search and magnifier, you need to the CD, then...
... page 18. 14 An installation progress bar appears. The Rocketfish Wireless combo screen opens. 2 Click Install Combo Driver. The Welcome screen opens. 3 Click Next. When the installation is complete, the Setup Complete screen opens. 5 Click Finish. RF-RCMBO2_10-1280_MAN_V1_English.fm Page 14 Wednesday, December 15, 2010 8:59 AM Using the combo driver To use advanced functions, such as tilt wheel driver, dynamic search and magnifier, you need to the CD, then...
User Guide (English)
Page 15
... open the list of functions, then click the function you want to assign to save your selections and close the program. The default settings for the mouse buttons are: Button Left button Right button Wheel button Button A Button B Function Primary mouse button Context menu Quick/Auto scroll Forward Back 4 Click other tabs to make more adjustments, or click OK to the button. 3 To restore default button functions, click Use Default.
... open the list of functions, then click the function you want to assign to save your selections and close the program. The default settings for the mouse buttons are: Button Left button Right button Wheel button Button A Button B Function Primary mouse button Context menu Quick/Auto scroll Forward Back 4 Click other tabs to make more adjustments, or click OK to the button. 3 To restore default button functions, click Use Default.
User Guide (English)
Page 16
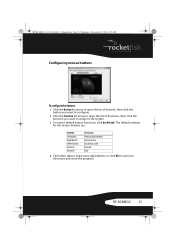
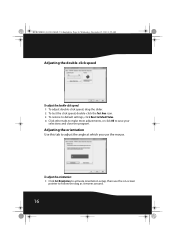
...the orientation: 1 Click Set Orientation to activate orientation setup, then use the mouse. Adjusting the orientation Use this tab to adjust the angle at which you use the on-screen pointer to save your selections and close the program. RF-RCMBO2_10-1280_MAN_V1_English.fm Page 16... Wednesday, December 15, 2010 8:59 AM Adjusting the double-click speed To adjust the double-click speed: 1 To adjust double-click speed, drag the slider. 2 To test the click speed, double-click the Test Area icon. 3 To restore to default settings, click Reset...
...the orientation: 1 Click Set Orientation to activate orientation setup, then use the mouse. Adjusting the orientation Use this tab to adjust the angle at which you use the on-screen pointer to save your selections and close the program. RF-RCMBO2_10-1280_MAN_V1_English.fm Page 16... Wednesday, December 15, 2010 8:59 AM Adjusting the double-click speed To adjust the double-click speed: 1 To adjust double-click speed, drag the slider. 2 To test the click speed, double-click the Test Area icon. 3 To restore to default settings, click Reset...

User Guide (English)
Page 17
RF-RCMBO2 17 RF-RCMBO2_10-1280_MAN_V1_English.fm Page 17 Wednesday, December 15, 2010 8:59 AM 2 To restore the default orientation settings, click Reset Orientation. 3 Click other tabs to make more adjustments, or click OK to save your selections and close the program. Click the up or down arrow keys to specify the number of lines to save your selections...
RF-RCMBO2 17 RF-RCMBO2_10-1280_MAN_V1_English.fm Page 17 Wednesday, December 15, 2010 8:59 AM 2 To restore the default orientation settings, click Reset Orientation. 3 Click other tabs to make more adjustments, or click OK to save your selections and close the program. Click the up or down arrow keys to specify the number of lines to save your selections...
User Guide (English)
Page 19
... Wednesday, December 15, 2010 8:59 AM To hide the system tray's mouse icon: • Uncheck Show mouse icon in systray, then click OK to save changes and close application. Your computer restarts and the uninstallation is complete, click OK to continue. Uninstalling the combo driver To uninstall the combo driver: 1 Click Start, All Programs, Rocketfish 2.4G Wireless Combo, then click Uninstall Rocketfish 2.4G Wireless Combo Driver.
... Wednesday, December 15, 2010 8:59 AM To hide the system tray's mouse icon: • Uncheck Show mouse icon in systray, then click OK to save changes and close application. Your computer restarts and the uninstallation is complete, click OK to continue. Uninstalling the combo driver To uninstall the combo driver: 1 Click Start, All Programs, Rocketfish 2.4G Wireless Combo, then click Uninstall Rocketfish 2.4G Wireless Combo Driver.
User Guide (English)
Page 20
... default settings. Also, do not use less battery power. RF-RCMBO2_10-1280_MAN_V1_English.fm Page 20 Wednesday, December 15, 2010 8:59 AM Maintaining To clean your keyboard and mouse, wipe them with a soft, lint-free cloth slightly moistened with the + and - symbols inside the keyboard and mouse battery compartments. • When the mouse LED is red, battery power is low. Troubleshooting If you may have any problems with...
... default settings. Also, do not use less battery power. RF-RCMBO2_10-1280_MAN_V1_English.fm Page 20 Wednesday, December 15, 2010 8:59 AM Maintaining To clean your keyboard and mouse, wipe them with a soft, lint-free cloth slightly moistened with the + and - symbols inside the keyboard and mouse battery compartments. • When the mouse LED is red, battery power is low. Troubleshooting If you may have any problems with...
User Guide (English)
Page 21
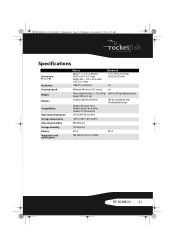
...) n/a Maximum 30 inch/sec (76.2 cm/sec) n/a Mouse (without battery): 3.17 oz. (90 g) Dongle: 0.09 oz. (2.5 g) 5 buttons with tilt scroll wheel Windows XP Service Pack 3 Windows Vista 32-bit or 64-bit Windows 7 32-bit or 64-bit 32ºF to 104ºF (0ºC to 40ºC) 30.69 oz. (870 g) (without battery) 104-key standard key with 18-multimedia hot keys -40ºF to 140ºF (-40ºC to...
...) n/a Maximum 30 inch/sec (76.2 cm/sec) n/a Mouse (without battery): 3.17 oz. (90 g) Dongle: 0.09 oz. (2.5 g) 5 buttons with tilt scroll wheel Windows XP Service Pack 3 Windows Vista 32-bit or 64-bit Windows 7 32-bit or 64-bit 32ºF to 104ºF (0ºC to 40ºC) 30.69 oz. (870 g) (without battery) 104-key standard key with 18-multimedia hot keys -40ºF to 140ºF (-40ºC to...
User Guide (English)
Page 22
... radio/TV technician for help. If this device must accept any interference received, including interference that to which can radiate radio frequency energy and, if not installed and used in accordance with the instructions, may cause undesired operation. This equipment generates, uses, and can be determined by turning the equipment off and on, the user is encouraged to try...
... radio/TV technician for help. If this device must accept any interference received, including interference that to which can radiate radio frequency energy and, if not installed and used in accordance with the instructions, may cause undesired operation. This equipment generates, uses, and can be determined by turning the equipment off and on, the user is encouraged to try...

User Guide (English)
Page 23
... Power Max 0dB RF carrier frequency 2.402G ~2.479G HZ RF-RCMBO2 23 Cet appareil numérique de la classe (B) est conforme à la norme NMB-003 du Canada." This Category II radio communication device complies with FDA Radiation Performance Standards 21 CFR Subchapter J. RSS 310 statement To reduce potential radio interference to other users, the antenna type...
... Power Max 0dB RF carrier frequency 2.402G ~2.479G HZ RF-RCMBO2 23 Cet appareil numérique de la classe (B) est conforme à la norme NMB-003 du Canada." This Category II radio communication device complies with FDA Radiation Performance Standards 21 CFR Subchapter J. RSS 310 statement To reduce potential radio interference to other users, the antenna type...
User Guide (English)
Page 25
... not cover: • Customer instruction • Installation • Set up adjustments • Cosmetic damage RF-RCMBO2 25 The Warranty Period lasts for one year (365 days), beginning on the date you purchased the Product. RF-RCMBO2_10-1280_MAN_V1_English.fm Page 25 Wednesday, December 15, 2010 8:59 AM One-year limited warranty Rocketfish Products ("Rocketfish") warrants to you, the original purchaser of this new RF-RCMBO2 ("Product...
... not cover: • Customer instruction • Installation • Set up adjustments • Cosmetic damage RF-RCMBO2 25 The Warranty Period lasts for one year (365 days), beginning on the date you purchased the Product. RF-RCMBO2_10-1280_MAN_V1_English.fm Page 25 Wednesday, December 15, 2010 8:59 AM One-year limited warranty Rocketfish Products ("Rocketfish") warrants to you, the original purchaser of this new RF-RCMBO2 ("Product...
User Guide (English)
Page 26
... Rocketfish: For customer service please call 1-800-620-2790 www.rocketfishproducts.com Distributed by Best Buy Purchasing, LLC 7601 Penn Avenue South, Richfield, Minnesota, U.S.A. 55423-3645 © 2010 BBY Solutions, Inc. ROCKETFISH is or with all faults • Consumables, such as fuses or batteries • Products where the factory applied serial number has been altered or removed REPAIR REPLACEMENT...
... Rocketfish: For customer service please call 1-800-620-2790 www.rocketfishproducts.com Distributed by Best Buy Purchasing, LLC 7601 Penn Avenue South, Richfield, Minnesota, U.S.A. 55423-3645 © 2010 BBY Solutions, Inc. ROCKETFISH is or with all faults • Consumables, such as fuses or batteries • Products where the factory applied serial number has been altered or removed REPAIR REPLACEMENT...


