
AirPrint Guide
Page 3
Information about AirPrint Printing with AirPrint...3 2. Contents How to Read the Manuals...2 Symbols Used in the Manuals...2 Disclaimer...2 1. Appendix Troubleshooting...5 Connection Problems...5 Confirm the settings of AirPrint for the machine...5 Changing the Machine Certificate...6 Creating a Self Certificate...6 Importing an Already Created Certificate...7 1 Printing Printing Files Using OS X...4 Printing Files Using iOS...4 3.
Information about AirPrint Printing with AirPrint...3 2. Contents How to Read the Manuals...2 Symbols Used in the Manuals...2 Disclaimer...2 1. Appendix Troubleshooting...5 Connection Problems...5 Confirm the settings of AirPrint for the machine...5 Changing the Machine Certificate...6 Creating a Self Certificate...6 Importing an Already Created Certificate...7 1 Printing Printing Files Using OS X...4 Printing Files Using iOS...4 3.

AirPrint Guide
Page 4
... damages whatsoever arising out of failures or malfunctions of this product, function, and operation manuals provided with it. Make sure that , to originals, or loss of data. How to Read the Manuals Symbols Used in the Manuals This manual uses the following symbols: Indicates points to pay attention to when using the machine, and...
... damages whatsoever arising out of failures or malfunctions of this product, function, and operation manuals provided with it. Make sure that , to originals, or loss of data. How to Read the Manuals Symbols Used in the Manuals This manual uses the following symbols: Indicates points to pay attention to when using the machine, and...

AirPrint Guide
Page 6
...:] list. For details, see Setup Guide to print. 222 Tap (Share). 333 Tap (Printer) or [Print]. 444 Tap [Printer]. Printing starts. 4 If not, see OS X manuals or Help. Printing starts. •• Procedures for opening the printing preferences dialog box vary depending on the back of the machine. •• Confirm...
...:] list. For details, see Setup Guide to print. 222 Tap (Share). 333 Tap (Printer) or [Print]. 444 Tap [Printer]. Printing starts. 4 If not, see OS X manuals or Help. Printing starts. •• Procedures for opening the printing preferences dialog box vary depending on the back of the machine. •• Confirm...
Google Cloud Print Guide
Page 3
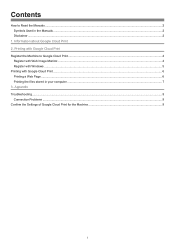
Appendix Troubleshooting...9 Connection Problems...9 Confirm the Settings of Google Cloud Print for the Machine 9 1 Contents How to Google Cloud Print...4 Register with Web Image Monitor...4 Register with Windows...5 Printing with Google Cloud Print...6 Printing a Web Page...6 Printing the files stored in the Manuals...2 Disclaimer...2 1. Printing with Google Cloud Print Register the Machine to Read the Manuals...2 Symbols Used in your computer...7 3. Information about Google Cloud Print 2.
Appendix Troubleshooting...9 Connection Problems...9 Confirm the Settings of Google Cloud Print for the Machine 9 1 Contents How to Google Cloud Print...4 Register with Web Image Monitor...4 Register with Windows...5 Printing with Google Cloud Print...6 Printing a Web Page...6 Printing the files stored in the Manuals...2 Disclaimer...2 1. Printing with Google Cloud Print Register the Machine to Read the Manuals...2 Symbols Used in your computer...7 3. Information about Google Cloud Print 2.

Google Cloud Print Guide
Page 4
...Displayed contents and illustrations on the screen vary depending on resolving user errors. [ ] Indicates the names of this product, function, and operation manuals provided with it. Make sure that , to your operational errors or malfunctions of your documents, data or registered contents, or the use or ...data, and registered contents. Documents or data might be erased due to the maximum extent permitted by applicable laws, in the Manuals This manual uses the following symbols: Indicates supplementary explanations of the machine's functions, and instructions on models or options. 2
...Displayed contents and illustrations on the screen vary depending on resolving user errors. [ ] Indicates the names of this product, function, and operation manuals provided with it. Make sure that , to your operational errors or malfunctions of your documents, data or registered contents, or the use or ...data, and registered contents. Documents or data might be erased due to the maximum extent permitted by applicable laws, in the Manuals This manual uses the following symbols: Indicates supplementary explanations of the machine's functions, and instructions on models or options. 2
Setup Guide
Page 8
...". When communicating using a PIN code, see page 6 "Attaching the wireless LAN option" and go to page 9 "Easy Setup Using a PIN Code". • To set up manually, see page 11 "Easy Setup Using the CD-ROM".
...". When communicating using a PIN code, see page 6 "Attaching the wireless LAN option" and go to page 9 "Easy Setup Using a PIN Code". • To set up manually, see page 11 "Easy Setup Using the CD-ROM".
Setup Guide
Page 10
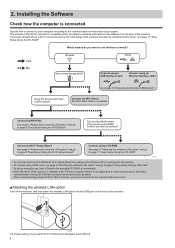
... 63 ASCII characters (0x20-0x7e) or 64 hexadecimal digits (0-9, A-F, a-f). •• For details about the SSID and Encryption key, refer to the router (access point) manual. Configuring Settings Using the Control Panel ●● Make sure the Ethernet cable is complete. 13. Press the [Menu] key. Connection has succeeded: Encryption key...
... 63 ASCII characters (0x20-0x7e) or 64 hexadecimal digits (0-9, A-F, a-f). •• For details about the SSID and Encryption key, refer to the router (access point) manual. Configuring Settings Using the Control Panel ●● Make sure the Ethernet cable is complete. 13. Press the [Menu] key. Connection has succeeded: Encryption key...

Setup Guide
Page 11
... select "The machine's IP address has been already configured." Network Settings 2 4 Wired (Ethernet) Wireless (Wi-Fi) IPv4 Configuration DYG205 7. Press the [ ] or [ ] key to the manuals for the router (access point), then try the connection again. 12. WPS Type 12 PBC PIN DSG092 9. Check the result. Make sure the wireless LAN...
... select "The machine's IP address has been already configured." Network Settings 2 4 Wired (Ethernet) Wireless (Wi-Fi) IPv4 Configuration DYG205 7. Press the [ ] or [ ] key to the manuals for the router (access point), then try the connection again. 12. WPS Type 12 PBC PIN DSG092 9. Check the result. Make sure the wireless LAN...
Setup Guide
Page 13
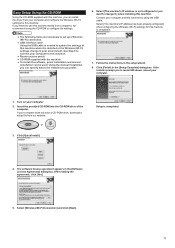
Using the manual installation, you can be installed as you prefer. 6. Insert the provided CD-ROM into the CD-ROM drive of this machine when it .] when installing ... to this machine. ●● Router (access point) ●● CD-ROM supplied with the machine ●● To install the software, quick installation and manual installation can specify data to be used. After reading the agreement, click [Yes]. 5. See Step 6 to connect your computer and configure the Wireless (Wi-Fi...
Using the manual installation, you can be installed as you prefer. 6. Insert the provided CD-ROM into the CD-ROM drive of this machine when it .] when installing ... to this machine. ●● Router (access point) ●● CD-ROM supplied with the machine ●● To install the software, quick installation and manual installation can specify data to be used. After reading the agreement, click [Yes]. 5. See Step 6 to connect your computer and configure the Wireless (Wi-Fi...

Setup Guide
Page 14
...cable or Ethernet interface cable ●● CD-ROM supplied with the machine ●● To install the software for network connection, quick installation and manual installation can specify data to be used. Turn on the screen. 1. Insert the provided CD-ROM into the CD-ROM drive of the computer. After... are instructed to do so on your computer. 2. If the installer prompt you can be installed as you prefer. Click [Quick Install]. 4. Using the manual installation, you to restart Windows, reboot your computer. Click [Finish] in the [Setup Complete] dialog box.
...cable or Ethernet interface cable ●● CD-ROM supplied with the machine ●● To install the software for network connection, quick installation and manual installation can specify data to be used. Turn on the screen. 1. Insert the provided CD-ROM into the CD-ROM drive of the computer. After... are instructed to do so on your computer. 2. If the installer prompt you can be installed as you prefer. Click [Quick Install]. 4. Using the manual installation, you to restart Windows, reboot your computer. Click [Finish] in the [Setup Complete] dialog box.
Setup Guide
Page 16
... used under license. Microsoft®, Windows®, Windows Server® and Windows Vista® are either registered trademarks or trademarks of Microsoft Corporation in this manual are trademarks of Red Hat, Inc., registered in the United States and other countries. SUSE and openSUSE are reprinted with permission from the Microsoft Corporation...
... used under license. Microsoft®, Windows®, Windows Server® and Windows Vista® are either registered trademarks or trademarks of Microsoft Corporation in this manual are trademarks of Red Hat, Inc., registered in the United States and other countries. SUSE and openSUSE are reprinted with permission from the Microsoft Corporation...
Wi-Fi Direct Guide
Page 3
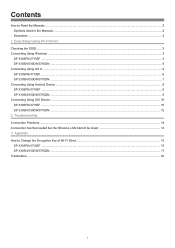
... to Read the Manuals...2 Symbols Used in the Manuals...2 Disclaimer...2 1. Easy Setup Using Wi-Fi Direct Checking the SSID...3 Connecting Using Windows...3 SP 330SFN/3710SF...3 SP 330SN/330DN/3710DN...5 Connecting Using OS X...6 SP 330SFN/3710SF...6 SP 330SN/330DN/3710DN...7 Connecting Using Android Device...8 SP 330SFN/3710SF...8 SP 330SN/330DN/3710DN...9 Connecting Using iOS Device...10 SP 330SFN/3710SF...10 SP 330SN/330DN/3710DN...12 2.
... to Read the Manuals...2 Symbols Used in the Manuals...2 Disclaimer...2 1. Easy Setup Using Wi-Fi Direct Checking the SSID...3 Connecting Using Windows...3 SP 330SFN/3710SF...3 SP 330SN/330DN/3710DN...5 Connecting Using OS X...6 SP 330SFN/3710SF...6 SP 330SN/330DN/3710DN...7 Connecting Using Android Device...8 SP 330SFN/3710SF...8 SP 330SN/330DN/3710DN...9 Connecting Using iOS Device...10 SP 330SFN/3710SF...10 SP 330SN/330DN/3710DN...12 2.

Wi-Fi Direct Guide
Page 4
.... 2 Some illustrations in no event will the manufacturer be erased due to read these explanations. [ ] Indicates the names of this product and operation manuals provided with it. In no event will the manufacturer be slightly different from the data executed by you using the machine, and explanations of likely... be liable for any documents created by you always copy or have backups of the data registered in the Manuals This manual uses the following symbols: Indicates points to pay attention to when using this machine or any damages whatsoever arising out of failures of ...
.... 2 Some illustrations in no event will the manufacturer be erased due to read these explanations. [ ] Indicates the names of this product and operation manuals provided with it. In no event will the manufacturer be slightly different from the data executed by you using the machine, and explanations of likely... be liable for any documents created by you always copy or have backups of the data registered in the Manuals This manual uses the following symbols: Indicates points to pay attention to when using this machine or any damages whatsoever arising out of failures of ...

Wi-Fi Direct Guide
Page 5
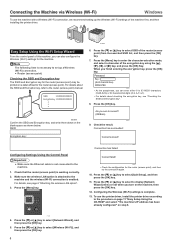
... Write down the SSID of the machine. •• Before doing the following procedure, install the printer driver. If you are configured. 1. Connecting Using Windows SP 330SFN/3710SF •• Before doing the following procedure, enable the Wi-Fi Direct function on the configuration page. Tools Lock] under [Administrator Tools] menu..., insert the wireless LAN option into the USB port on the back of Wi-Fi Direct shown on your computer. If not, see the computer manual. •• In Steps 4 to configure the settings. 111 Print the configuration page.
... Write down the SSID of the machine. •• Before doing the following procedure, install the printer driver. If you are configured. 1. Connecting Using Windows SP 330SFN/3710SF •• Before doing the following procedure, enable the Wi-Fi Direct function on the configuration page. Tools Lock] under [Administrator Tools] menu..., insert the wireless LAN option into the USB port on the back of Wi-Fi Direct shown on your computer. If not, see the computer manual. •• In Steps 4 to configure the settings. 111 Print the configuration page.
Wi-Fi Direct Guide
Page 7
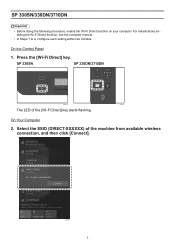
For details about enabling the Wi-Fi Direct function, see the computer manual. •• In Steps 1 to 4, configure each setting within two minutes. SP 330SN SP 330DN/3710DN DYG612 DYG613 The LED of the machine from available wireless connection, and then click [Connect]. On Your Computer 222 Select the SSID (DIRECT-XXXXXX) of the [Wi-Fi Direct] key starts flashing. SP 330SN/330DN/3710DN •• Before doing the following procedure, enable the Wi-Fi Direct function on your computer. On the Control Panel 111 Press the [Wi-Fi Direct] key. DYG620 5
For details about enabling the Wi-Fi Direct function, see the computer manual. •• In Steps 1 to 4, configure each setting within two minutes. SP 330SN SP 330DN/3710DN DYG612 DYG613 The LED of the machine from available wireless connection, and then click [Connect]. On Your Computer 222 Select the SSID (DIRECT-XXXXXX) of the [Wi-Fi Direct] key starts flashing. SP 330SN/330DN/3710DN •• Before doing the following procedure, enable the Wi-Fi Direct function on your computer. On the Control Panel 111 Press the [Wi-Fi Direct] key. DYG620 5


