Quick Use Guide
Page 8
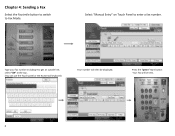
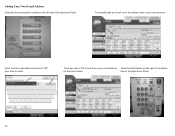
Select "Manual Entry" on Touch Panel to Fax Mode. Press the "green" Start button Your Fax will then be Sent. 8 Chapter 4: Sending a Fax Select the Facsimile button to switch to enter a fax number. Type your fax number including 9 to get an outside line, select "OK" at the top . (You can use the Touch panel or the Numerical keyboard) Your number will be displayed.
Select "Manual Entry" on Touch Panel to Fax Mode. Press the "green" Start button Your Fax will then be Sent. 8 Chapter 4: Sending a Fax Select the Facsimile button to switch to enter a fax number. Type your fax number including 9 to get an outside line, select "OK" at the top . (You can use the Touch panel or the Numerical keyboard) Your number will be displayed.
Quick Use Guide
Page 14
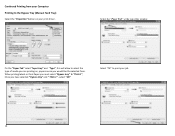
Select the "Paper Tab" at the top of the window On the "Paper Tab" select "Input tray" and "Type", this will allow to select the type of media you are printing on your print driver. When printing labels or thick Paper you must select "Bypass tray" & "Thick 1", Once you have selected " Bypass tray" and " Thick 1" , select "OK" Select "OK" to print your job 14 Continued Printing from your Computer Printing to the Bypass Tray (Manual Feed Tray) Select the "Properties" button on , paper source you would like the selected from.
Select the "Paper Tab" at the top of the window On the "Paper Tab" select "Input tray" and "Type", this will allow to select the type of media you are printing on your print driver. When printing labels or thick Paper you must select "Bypass tray" & "Thick 1", Once you have selected " Bypass tray" and " Thick 1" , select "OK" Select "OK" to print your job 14 Continued Printing from your Computer Printing to the Bypass Tray (Manual Feed Tray) Select the "Properties" button on , paper source you would like the selected from.
Quick Use Guide
Page 15
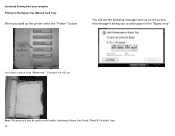
Note: This process is also be used to place paper in the "Bypass tray" Once paper is placed in the "Bypass tray" Your print job will see the following message come up on the screen, this message is asking you walk up the printer select the "Printer" button You will start. Continued Printing from your computer Printing to the Bypass Tray (Manual Feed Tray) When you to print Lables, letterhead, Heavy Card Stock (Think) & Printable Tabs 15
Note: This process is also be used to place paper in the "Bypass tray" Once paper is placed in the "Bypass tray" Your print job will see the following message come up on the screen, this message is asking you walk up the printer select the "Printer" button You will start. Continued Printing from your computer Printing to the Bypass Tray (Manual Feed Tray) When you to print Lables, letterhead, Heavy Card Stock (Think) & Printable Tabs 15
Quick Use Guide
Page 19
side of the Operations Panel 19 To manually add an e‐mail not in the address book, select manual entry Enter the full e‐mail address and press "OK" your e‐mail address Press the Start Button on the right To complete on the left sideof the Operation Panel. Once you select "OK' you will see your scan to email. Adding Your Own E-mail Address Select the Scanner button located on the main screen.
side of the Operations Panel 19 To manually add an e‐mail not in the address book, select manual entry Enter the full e‐mail address and press "OK" your e‐mail address Press the Start Button on the right To complete on the left sideof the Operation Panel. Once you select "OK' you will see your scan to email. Adding Your Own E-mail Address Select the Scanner button located on the main screen.
Manuals
Page 1
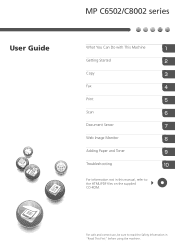
User Guide What You Can Do with This Machine Getting Started Copy Fax Print Scan Document Server Web Image Monitor Adding Paper and Toner Troubleshooting For information not in this manual, refer to read the Safety Information in "Read This First" before using the machine. For safe and correct use, be sure to the HTML/PDF files on the supplied CD-ROM.
User Guide What You Can Do with This Machine Getting Started Copy Fax Print Scan Document Server Web Image Monitor Adding Paper and Toner Troubleshooting For information not in this manual, refer to read the Safety Information in "Read This First" before using the machine. For safe and correct use, be sure to the HTML/PDF files on the supplied CD-ROM.

Manuals
Page 2
... 17 16 15 14 13 12 21 22 111[Home] key Press to the function keys as a factory default. When the machine is in this manual may be different from Low Power mode or Sleep mode. See "Checking Inquiry Using the User Tools", Maintenance and Specifications . See "How to Use the...
... 17 16 15 14 13 12 21 22 111[Home] key Press to the function keys as a factory default. When the machine is in this manual may be different from Low Power mode or Sleep mode. See "Checking Inquiry Using the User Tools", Maintenance and Specifications . See "How to Use the...

Manuals
Page 11
...the Machine without Fax Unit Installed 23 Using the Facsimile and the Scanner in a Network Environment 24 Embedding Text Information in the Manuals...6 Model-Specific Information...7 Names of the Machine's External Options 35 Changing the Display Language...37 How to Use the [Home] ...Screen...38 Adding Icons to Read the Manuals...6 Symbols Used in Scanned Files 25 Preventing Information Leakage (Security Functions 26 Centrally Controlling Scan Conditions and Distribution 27 Monitoring and Setting...
...the Machine without Fax Unit Installed 23 Using the Facsimile and the Scanner in a Network Environment 24 Embedding Text Information in the Manuals...6 Model-Specific Information...7 Names of the Machine's External Options 35 Changing the Display Language...37 How to Use the [Home] ...Screen...38 Adding Icons to Read the Manuals...6 Symbols Used in Scanned Files 25 Preventing Information Leakage (Security Functions 26 Centrally Controlling Scan Conditions and Distribution 27 Monitoring and Setting...

Manuals
Page 13
... Basic Procedure for Sending Scan Files by E-mail 107 Registering an E-mail Destination...108 Deleting an E-mail Destination...110 Entering an E-mail Address Manually...110 3 Print Quick Install...89 Displaying the Printer Driver Properties...90 Standard Printing...91 When Using the PCL 6 Printer Driver...91 Printing on Both Sides ... While the Original Is Being Scanned 83 Canceling a Transmission After the Original Is Scanned 84 Storing a Document...85 Sending Stored Documents...86 Printing the Journal Manually...88 5.
... Basic Procedure for Sending Scan Files by E-mail 107 Registering an E-mail Destination...108 Deleting an E-mail Destination...110 Entering an E-mail Address Manually...110 3 Print Quick Install...89 Displaying the Printer Driver Properties...90 Standard Printing...91 When Using the PCL 6 Printer Driver...91 Printing on Both Sides ... While the Original Is Being Scanned 83 Canceling a Transmission After the Original Is Scanned 84 Storing a Document...85 Sending Stored Documents...86 Printing the Journal Manually...88 5.
Manuals
Page 16
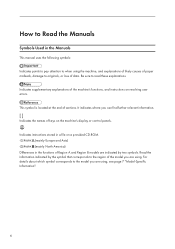
..., or loss of data. For details about which symbol corresponds to the region of the model you are using. How to Read the Manuals Symbols Used in the Manuals This manual uses the following symbols: Indicates points to pay attention to when using the machine, and explanations of likely causes of paper misfeeds...
..., or loss of data. For details about which symbol corresponds to the region of the model you are using. How to Read the Manuals Symbols Used in the Manuals This manual uses the following symbols: Indicates points to pay attention to when using the machine, and explanations of likely causes of paper misfeeds...
Manuals
Page 17
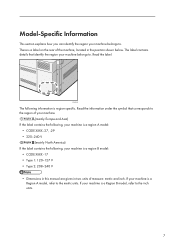
... the label contains the following information is a region B model: • CODE XXXX -17 • Type 1: 120-127 V • Type 2: 208-240 V • Dimensions in this manual are given in the position shown below. If your machine is a Region B model, refer to the inch units. 7 The label contains details that corresponds to...
... the label contains the following information is a region B model: • CODE XXXX -17 • Type 1: 120-127 V • Type 2: 208-240 V • Dimensions in this manual are given in the position shown below. If your machine is a Region B model, refer to the inch units. 7 The label contains details that corresponds to...

Manuals
Page 18
Names of Major Features In this manual, major features of the machine are referred to as follows: • Auto Document Feeder ADF • LCIT RT4020 Large Capacity Tray (LCT) • LCIT RT4030 Wide Large Capacity Tray (Wide LCT) • Multi-Folding Unit FD4000 Multi-folding unit 8
Names of Major Features In this manual, major features of the machine are referred to as follows: • Auto Document Feeder ADF • LCIT RT4020 Large Capacity Tray (LCT) • LCIT RT4030 Wide Large Capacity Tray (Wide LCT) • Multi-Folding Unit FD4000 Multi-folding unit 8
Manuals
Page 21
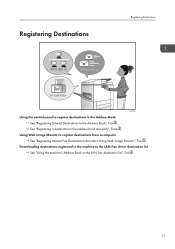
Downloading destinations registered in the machine to register destinations from a computer See "Registering Internet Fax Destination Information Using Web Image Monitor", Fax . See "Registering a destination in the Address Book See "Registering Entered Destinations to the Address Book", Fax . Using Web Image Monitor to the LAN-Fax driver destination list See "Using the machine's Address Book as the LAN-Fax destination list", Fax . 11 Registering Destinations Registering Destinations BRL060S Using the control panel to register destinations in the address book manually", Scan .
Downloading destinations registered in the machine to register destinations from a computer See "Registering Internet Fax Destination Information Using Web Image Monitor", Fax . See "Registering a destination in the Address Book See "Registering Entered Destinations to the Address Book", Fax . Using Web Image Monitor to the LAN-Fax driver destination list See "Using the machine's Address Book as the LAN-Fax destination list", Fax . 11 Registering Destinations Registering Destinations BRL060S Using the control panel to register destinations in the address book manually", Scan .

Manuals
Page 31
...To send a document, specify an IP address or host name instead of a fax number (IP-Fax Transmission). See "Receiving E-mail by Entering It Manually", Fax . • This machine can receive email messages via Internet Fax or from computers (Internet Fax Reception and Mail to Print", Fax . ... This machine converts scanned document images to the public switched telephone network (PSTN). 21 See "Specifying an Internet Fax Destination by Entering It Manually", Fax . • This machine can send to G3 facsimiles connected to e-mail format, and transmits and receives the e-mail data over...
...To send a document, specify an IP address or host name instead of a fax number (IP-Fax Transmission). See "Receiving E-mail by Entering It Manually", Fax . • This machine can receive email messages via Internet Fax or from computers (Internet Fax Reception and Mail to Print", Fax . ... This machine converts scanned document images to the public switched telephone network (PSTN). 21 See "Specifying an Internet Fax Destination by Entering It Manually", Fax . • This machine can send to G3 facsimiles connected to e-mail format, and transmits and receives the e-mail data over...

Manuals
Page 95
... correctly. The following information can specify a name for the stored documents as a password. File Name You can be selected from the Address Book or entered manually.
... correctly. The following information can specify a name for the stored documents as a password. File Name You can be selected from the Address Book or entered manually.
Manuals
Page 96
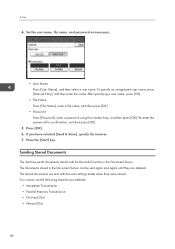
... documents stored in the Document Server. You cannot use the following transmission methods: • Immediate Transmission • Parallel Memory Transmission • On Hook Dial • Manual Dial 86 If you have selected [Send & Store], specify the receiver. 7. After specifying a user name, press [OK]. • File Name Press [File Name], enter a file... Press [User Name], and then select a user name. Re-enter the password for confirmation, and then press [OK]. 5. To specify an unregistered user name, press [Manual Entry], and then enter the name. Press [OK]. 6. Fax 4.
... documents stored in the Document Server. You cannot use the following transmission methods: • Immediate Transmission • Parallel Memory Transmission • On Hook Dial • Manual Dial 86 If you have selected [Send & Store], specify the receiver. 7. After specifying a user name, press [OK]. • File Name Press [File Name], enter a file... Press [User Name], and then select a user name. Re-enter the password for confirmation, and then press [OK]. 5. To specify an unregistered user name, press [Manual Entry], and then enter the name. Press [OK]. 6. Fax 4.
Manuals
Page 98
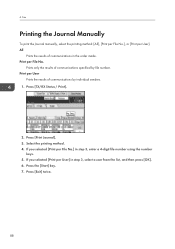
Fax Printing the Journal Manually To print the Journal manually, select the printing method: [All], [Print per File No.], or [Print per File No. Print per User]. Print per User Prints the results of communications ...
Fax Printing the Journal Manually To print the Journal manually, select the printing method: [All], [Print per File No.], or [Print per File No. Print per User]. Print per User Prints the results of communications ...
Manuals
Page 99
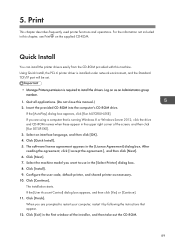
... in this chapter, see Print on as necessary. 10. Quick Install You can install the printer drivers easily from the CD-ROM provided with this manual.) 2. Click [Quick Install]. 5. Click [Install]. 9. If the [User Account Control] dialog box appears, and then click [Yes] or [Continue]. 11. Click [Continue]. Log on the...
... in this chapter, see Print on as necessary. 10. Quick Install You can install the printer drivers easily from the CD-ROM provided with this manual.) 2. Click [Quick Install]. 5. Click [Install]. 9. If the [User Account Control] dialog box appears, and then click [Yes] or [Continue]. 11. Click [Continue]. Log on the...
Manuals
Page 113
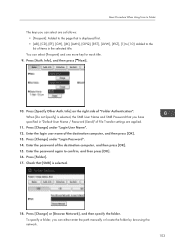
... to confirm, and then press [OK]. 16. Info], and then press [ Next]. 10. Press [Change] under "Login Password". 14. You can either enter the path manually or locate the folder by browsing the network. 103
... to confirm, and then press [OK]. 16. Info], and then press [ Next]. 10. Press [Change] under "Login Password". 14. You can either enter the path manually or locate the folder by browsing the network. 103
Manuals
Page 114
... [OK]. 22. Press the [User Tools/Counter] key. Press [OK]. The client computers sharing the same network as the machine appear. Locating the SMB folder manually 1. If the connection test fails, check the settings, and then try again. 21. Select the group that contains the destination computer. 104 Press [Exit], and...
... [OK]. 22. Press the [User Tools/Counter] key. Press [OK]. The client computers sharing the same network as the machine appear. Locating the SMB folder manually 1. If the connection test fails, check the settings, and then try again. 21. Select the group that contains the destination computer. 104 Press [Exit], and...

Manuals
Page 116
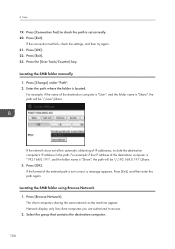
6. Press [Connection Test]. Press [OK]. 106 Press [OK]. 6. A connection test is "desk01": \\desk01\user 5. Press [Manual Entry] on the right side of the user name field to display the soft keyboard. 7. Depending on the destination setting, enter the password for ...to the computer. Press [SMB]. 3. In the following example path, the shared folder name is "user" and the computer name is performed to the Destination Manually 1. Check the connection test result, and then press [Exit]. 10. Enter the path for the password to the right of the path field. 4. Press...
6. Press [Connection Test]. Press [OK]. 106 Press [OK]. 6. A connection test is "desk01": \\desk01\user 5. Press [Manual Entry] on the right side of the user name field to display the soft keyboard. 7. Depending on the destination setting, enter the password for ...to the computer. Press [SMB]. 3. In the following example path, the shared folder name is "user" and the computer name is performed to the Destination Manually 1. Check the connection test result, and then press [Exit]. 10. Enter the path for the password to the right of the path field. 4. Press...


