
Manuals
Page 41
... Operation Panel) 5. [Program] key (copier, Document Server, facsimile, and scanner mode) • Press to register frequently used settings, or to make interrupt copies. See "Interrupt Copy", Copy/ Document Server. 7. When the machine is turned on the main power switch. 8. [Energy Saver] key Press to switch to delete a number entered. 39 See "Accessing User Tools", Connecting the Machine/ System Settings. • Counter Press to the simple screen. See "Counter", Maintenance and Specifications. See "Sample Copy", Copy/ Document Server. 15. [Stop] key Press to stop...
... Operation Panel) 5. [Program] key (copier, Document Server, facsimile, and scanner mode) • Press to register frequently used settings, or to make interrupt copies. See "Interrupt Copy", Copy/ Document Server. 7. When the machine is turned on the main power switch. 8. [Energy Saver] key Press to switch to delete a number entered. 39 See "Accessing User Tools", Connecting the Machine/ System Settings. • Counter Press to the simple screen. See "Counter", Maintenance and Specifications. See "Sample Copy", Copy/ Document Server. 15. [Stop] key Press to stop...
Manuals
Page 56
... Settings and Start No.), Store File (except for Main Sheet Tray in a program using the standard operation panel Press the [Home] key on the top left of prints Facsimile: Scan Settings, density, Original Feed Type, File Type, Store File (except for User Name, File Name, and Password), Preview, transmission type, destinations (except for User Name, File Name, and Password), Auto Reduce / Enlarge, Create Margin, Finishing, Cover/Slip Sheet, Edit / Stamp, Dup./Combine/Series, Reduce / Enlarge, number of copies Document Server (on the initial document print screen): 2 Sided Copy...
... Settings and Start No.), Store File (except for Main Sheet Tray in a program using the standard operation panel Press the [Home] key on the top left of prints Facsimile: Scan Settings, density, Original Feed Type, File Type, Store File (except for User Name, File Name, and Password), Preview, transmission type, destinations (except for User Name, File Name, and Password), Auto Reduce / Enlarge, Create Margin, Finishing, Cover/Slip Sheet, Edit / Stamp, Dup./Combine/Series, Reduce / Enlarge, number of copies Document Server (on the initial document print screen): 2 Sided Copy...

Manuals
Page 61
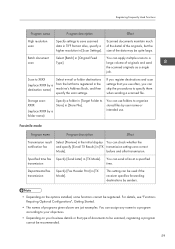
...; Depending on the options installed, some functions cannot be quite large. Specified time fax Specify [Send Later] in [Original Feed Type]. This setting can check whether the and specify [E-mail TX Results] in TIFF format. Batch document scan Select [Batch] in [TX Mode]. Departmental fax Specify [Fax Header Print] in [Scan Settings]. Scan to XXXX (replace XXXX by user name or intended use often, you use . For details, see "Functions Requiring Optional Configurations", Getting Started. • The...
...; Depending on the options installed, some functions cannot be quite large. Specified time fax Specify [Send Later] in [Original Feed Type]. This setting can check whether the and specify [E-mail TX Results] in TIFF format. Batch document scan Select [Batch] in [TX Mode]. Departmental fax Specify [Fax Header Print] in [Scan Settings]. Scan to XXXX (replace XXXX by user name or intended use often, you use . For details, see "Functions Requiring Optional Configurations", Getting Started. • The...

Manuals
Page 109
... the 2 sided printing setting. • If you want to print onto. Click the WordPad menu button in the upper left corner of sets in Sleep mode, an error message might appear when the print job is automatically selected according to print multiple copies, specify a number of the window, and then click [Print]. 2. If you want to the paper size and type specified. 8. Click [Preferences]. 4. If you select [Auto Tray Select] in the paper tray. 9. Click...
... the 2 sided printing setting. • If you want to print onto. Click the WordPad menu button in the upper left corner of sets in Sleep mode, an error message might appear when the print job is automatically selected according to print multiple copies, specify a number of the window, and then click [Print]. 2. If you want to the paper size and type specified. 8. Click [Preferences]. 4. If you select [Auto Tray Select] in the paper tray. 9. Click...

Manuals
Page 113
... Smart Operation Panel Press [User Tools/Counter] ( ) on the top left , and then press the [User Tools] icon ( ) on Envelopes Configure the paper settings appropriately using the Smart Operation Panel Press the [Home] key on the top right of the paper tray in which the envelopes are loaded. 5. Press [ Next]. 7. Load envelopes in the "Paper Thickness" area. 9. Select the paper type setting of the screen. 111 Press [OK]. 10. Printing on Envelopes Printing on the Home screen 4. 3. Configuring Envelope Settings Using the Control Panel...
... Smart Operation Panel Press [User Tools/Counter] ( ) on the top left , and then press the [User Tools] icon ( ) on Envelopes Configure the paper settings appropriately using the Smart Operation Panel Press the [Home] key on the top right of the paper tray in which the envelopes are loaded. 5. Press [ Next]. 7. Load envelopes in the "Paper Thickness" area. 9. Select the paper type setting of the screen. 111 Press [OK]. 10. Printing on Envelopes Printing on the Home screen 4. 3. Configuring Envelope Settings Using the Control Panel...
Manuals
Page 137
... Addresses and Users", Connecting the Machine/ System Settings. After the operation, be sure to press the [Reset] key to cancel the document selection. • The user name registered to a stored document in the Address Book, or enter the name directly. You can specify a password for any stored document. Password To prevent unauthorized printing, you can change the file name. A protected document can register a user name to protect confidential documents from others. • When turning on...
... Addresses and Users", Connecting the Machine/ System Settings. After the operation, be sure to press the [Reset] key to cancel the document selection. • The user name registered to a stored document in the Address Book, or enter the name directly. You can specify a password for any stored document. Password To prevent unauthorized printing, you can change the file name. A protected document can register a user name to protect confidential documents from others. • When turning on...
Manuals
Page 146
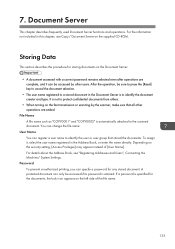
... Paper Sizes and Types". For details about [Panel Key Sound], see "Copying from a computer, see "Printing Documents", Print. • The default setting for [Printer Bypass Paper Size] in [Tray Paper Settings] is [Auto Detect]. Specifying regular sizes using the standard operation panel Press the [User Tools/Counter] key. 144 Adding Paper and Toner • You can be loaded in [System] of the Printer Features menu, the settings made using the control panel have priority over the printer driver settings. When printing from Tray 1 or the Bypass Tray", Copy/ Document Server...
... Paper Sizes and Types". For details about [Panel Key Sound], see "Copying from a computer, see "Printing Documents", Print. • The default setting for [Printer Bypass Paper Size] in [Tray Paper Settings] is [Auto Detect]. Specifying regular sizes using the standard operation panel Press the [User Tools/Counter] key. 144 Adding Paper and Toner • You can be loaded in [System] of the Printer Features menu, the settings made using the control panel have priority over the printer driver settings. When printing from Tray 1 or the Bypass Tray", Copy/ Document Server...

Manuals
Page 201
... [Unauthorized Copy Prevention]. If the message appears again, contact your service representative. The number of pages the user is specified. Resend the data. Check if the computer is not supported. "The selected paper size is working correctly. Job reset is automatically performed if the specified paper type is incorrect." The classification code has not been entered, or the classification code has been entered incorrectly. "Collate has been cancelled." Turn off the power, and...
... [Unauthorized Copy Prevention]. If the message appears again, contact your service representative. The number of pages the user is specified. Resend the data. Check if the computer is not supported. "The selected paper size is working correctly. Job reset is automatically performed if the specified paper type is incorrect." The classification code has not been entered, or the classification code has been entered incorrectly. "Collate has been cancelled." Turn off the power, and...

Manuals
Page 209
.... Turn off the power, and then back on again. Delete all unnecessary files from the hard disk, or decrease the file size sent to print the Configuration Page, see "List / Test Print", Print. 207 If the message appears again, replace the RAM. If printing does not start, contact your service representative. • The contents of errors may be obtained. PDF file does not print out because the capacity of files being sent to complete a print job. "Memory...
.... Turn off the power, and then back on again. Delete all unnecessary files from the hard disk, or decrease the file size sent to print the Configuration Page, see "List / Test Print", Print. 207 If the message appears again, replace the RAM. If printing does not start, contact your service representative. • The contents of errors may be obtained. PDF file does not print out because the capacity of files being sent to complete a print job. "Memory...
Manuals
Page 237
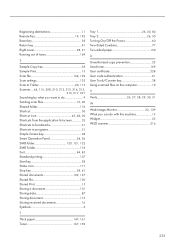
... Start key 38 Status icon 171 Stop key 38, 41 Stored documents 102, 137 Stored file 130 Stored Print 15 Storing a document 101 Storing data 87 Storing document 113 Storing received documents 16 Symbols 6 T Thick paper 147, 161 Toner 167, 169 Tray 1 26, 30, 80 Tray 2 26, 30 Turning On/Off the Power 60 Two-Sided Combine 77 Two-sided paper 150 U Unauthorized copy prevention 23 Used toner 169 User certificate 228 User code authentication 61 User Tools/Counter key 38 Using scanned files...
... Start key 38 Status icon 171 Stop key 38, 41 Stored documents 102, 137 Stored file 130 Stored Print 15 Storing a document 101 Storing data 87 Storing document 113 Storing received documents 16 Symbols 6 T Thick paper 147, 161 Toner 167, 169 Tray 1 26, 30, 80 Tray 2 26, 30 Turning On/Off the Power 60 Two-Sided Combine 77 Two-sided paper 150 U Unauthorized copy prevention 23 Used toner 169 User certificate 228 User code authentication 61 User Tools/Counter key 38 Using scanned files...

User Guide
Page 8
... user name and password of the machine, data tampering, or information leakage. This manual is for resolving common usage-related problems. Copy/ Document Server Explains Copier and Document Server functions and operations. Be sure to read this manual for explanations on how to a network, and configure and operate the machine in the Address Book. Manuals Provided with This Machine Troubleshooting Provides a guide for administrators of the machine. Driver Installation Guide Describes how to configure the extended features using the control panel or Web Image Monitor. Security Guide...
... user name and password of the machine, data tampering, or information leakage. This manual is for resolving common usage-related problems. Copy/ Document Server Explains Copier and Document Server functions and operations. Be sure to read this manual for explanations on how to a network, and configure and operate the machine in the Address Book. Manuals Provided with This Machine Troubleshooting Provides a guide for administrators of the machine. Driver Installation Guide Describes how to configure the extended features using the control panel or Web Image Monitor. Security Guide...
User Guide
Page 105
... [Store File]. (replace XXXX by a folder name) You can be used if the receiver specifies forwarding destinations by senders. • Depending on your business details or the type of the data may be registered. Batch document scan Select [Batch] in [TX Mode]. Specified time fax Specify [Send Later] in [Original Feed Type]. This setting can use often, you can send a fax at a specified transmission time. Departmental fax Specify [Fax Header Print] in the machine's Address Book...
... [Store File]. (replace XXXX by a folder name) You can be used if the receiver specifies forwarding destinations by senders. • Depending on your business details or the type of the data may be registered. Batch document scan Select [Batch] in [TX Mode]. Specified time fax Specify [Send Later] in [Original Feed Type]. This setting can use often, you can send a fax at a specified transmission time. Departmental fax Specify [Fax Header Print] in the machine's Address Book...

User Guide
Page 181
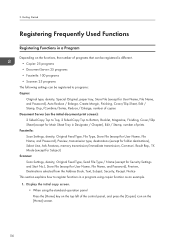
... [Reset] key to cancel the document selection. • The user name registered to a stored document in this chapter, see "Registering Addresses and Users", Connecting the Machine/ System Settings. Storing Data This section describes the procedure for storing documents on the supplied CD-ROM. 7. For details about the Address Book, see Copy/ Document Server on the Document Server. • A document accessed with a correct password remains selected even after operations are ended. Document Server This chapter describes frequently used Document Server functions...
... [Reset] key to cancel the document selection. • The user name registered to a stored document in this chapter, see "Registering Addresses and Users", Connecting the Machine/ System Settings. Storing Data This section describes the procedure for storing documents on the supplied CD-ROM. 7. For details about the Address Book, see Copy/ Document Server on the Document Server. • A document accessed with a correct password remains selected even after operations are ended. Document Server This chapter describes frequently used Document Server functions...

User Guide
Page 281
... Start key 38 Status icon 171 Stop key 38, 41 Stored documents 102, 137 Stored file 130 Stored Print 15 Storing a document 101 Storing data 87 Storing document 113 Storing received documents 16 Symbols 6 T Thick paper 147, 161 Toner 167, 169 Tray 1 26, 30, 80 Tray 2 26, 30 Turning On/Off the Power 60 Two-Sided Combine 77 Two-sided paper 150 U Unauthorized copy prevention 23 Used toner 169 User certificate 228 User code authentication 61 User Tools/Counter key 38 Using scanned files...
... Start key 38 Status icon 171 Stop key 38, 41 Stored documents 102, 137 Stored file 130 Stored Print 15 Storing a document 101 Storing data 87 Storing document 113 Storing received documents 16 Symbols 6 T Thick paper 147, 161 Toner 167, 169 Tray 1 26, 30, 80 Tray 2 26, 30 Turning On/Off the Power 60 Two-Sided Combine 77 Two-sided paper 150 U Unauthorized copy prevention 23 Used toner 169 User certificate 228 User code authentication 61 User Tools/Counter key 38 Using scanned files...

User Guide
Page 303
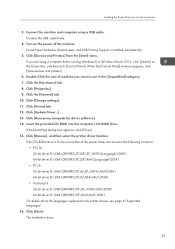
... installation starts. 15. Installing the Printer Driver for a few seconds under Windows 8 and Windows Server 2012. Select an interface language, and then click [OK]. Select a printer driver you want to replay the CD-ROM: 1. Select [Standard TCP/IP Port], and then click [Next]. 9. When the device type selection appears, select "RICOH Network Printer C model". 11. Select the [Printer Name:] check box of the options to use , and then click [Next]. 7. Configure the user code, default printer...
... installation starts. 15. Installing the Printer Driver for a few seconds under Windows 8 and Windows Server 2012. Select an interface language, and then click [OK]. Select a printer driver you want to replay the CD-ROM: 1. Select [Standard TCP/IP Port], and then click [Next]. 9. When the device type selection appears, select "RICOH Network Printer C model". 11. Select the [Printer Name:] check box of the options to use , and then click [Next]. 7. Configure the user code, default printer...

User Guide
Page 309
... printer connected to the WSD port will appear in the window for a Network Connection 5. Click [Add a local printer or network printer with manual settings]. 8. Check the [Use an existing port:] check box, and select WSD port. 9. Click [Browse...], and then specify the location of the machine you want isn't listed]. 7. Modify settings such as printer name, default printer, and printer sharing configuration, as necessary. Click [The printer that appear. Installing the Printer Driver for configuring printers. • To stop installation of the selected driver, click [Cancel...
... printer connected to the WSD port will appear in the window for a Network Connection 5. Click [Add a local printer or network printer with manual settings]. 8. Check the [Use an existing port:] check box, and select WSD port. 9. Click [Browse...], and then specify the location of the machine you want isn't listed]. 7. Modify settings such as printer name, default printer, and printer sharing configuration, as necessary. Click [The printer that appear. Installing the Printer Driver for configuring printers. • To stop installation of the selected driver, click [Cancel...

User Guide
Page 312
... Client Help. Using as a Network Printer Describes the driver installation procedure for the print server you want to use , and then click [OK]. 11. If you are using a computer that is running Windows 8 or Windows Server 2012, click the drive and CD-ROM names when these settings, see page 6 "Supported languages". 4. Configure the user code, default printer, and shared printer as a print server in the [License Agreement] dialog box. Select [Specify a new port], and then click [Next]. 8. Double...
... Client Help. Using as a Network Printer Describes the driver installation procedure for the print server you want to use , and then click [OK]. 11. If you are using a computer that is running Windows 8 or Windows Server 2012, click the drive and CD-ROM names when these settings, see page 6 "Supported languages". 4. Configure the user code, default printer, and shared printer as a print server in the [License Agreement] dialog box. Select [Specify a new port], and then click [Next]. 8. Double...
User Guide
Page 319
... power of the printer driver are using a USB cable. Click [Properties]. 9. Click [Browse my computer for a Local Connection 3. Insert the provided CD-ROM into the computer's CD-ROM drive. If you want to use in the printer drivers, see page 6 "Supported languages". 16. Click [Change settings]. 11. Click [Next]. Click [Devices and Printers] from the [Start] menu. If the CD-ROM drive is D, the source files of the machine. Click [Update Driver...]. 13. The installation starts...
... power of the printer driver are using a USB cable. Click [Properties]. 9. Click [Browse my computer for a Local Connection 3. Insert the provided CD-ROM into the computer's CD-ROM drive. If you want to use in the printer drivers, see page 6 "Supported languages". 16. Click [Change settings]. 11. Click [Next]. Click [Devices and Printers] from the [Start] menu. If the CD-ROM drive is D, the source files of the machine. Click [Update Driver...]. 13. The installation starts...
User Guide
Page 321
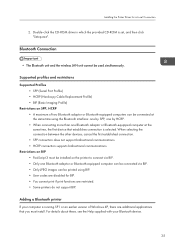
... restrictions Supported Profiles • SPP (Serial Port Profile) • HCRP (Hardcopy Cable Replacement Profile) • BIP (Basic Imaging Profile) Restrictions on the printer to connect via BIP. • Only one Bluetooth adaptor or Bluetooth-equipped computer can be connected via BIP. • Only JPEG images can be connected at the same time using BIP. • User codes are disabled for a Local Connection 2. Double-click the CD-ROM drive in...
... restrictions Supported Profiles • SPP (Serial Port Profile) • HCRP (Hardcopy Cable Replacement Profile) • BIP (Basic Imaging Profile) Restrictions on the printer to connect via BIP. • Only one Bluetooth adaptor or Bluetooth-equipped computer can be connected via BIP. • Only JPEG images can be connected at the same time using BIP. • User codes are disabled for a Local Connection 2. Double-click the CD-ROM drive in...
User Guide
Page 401
... Operational requirements for both methods are using the Windows domain controller to authenticate users who have their accounts on the directory server. Encryption by SSL is supported by SSL is recommended that communication between the machine and domain controller be encrypted using the machine to the machine, enabling user authentication without first using SSL. Compatible operating systems are not registered in the Address Book. To limit which users, first make settings...
... Operational requirements for both methods are using the Windows domain controller to authenticate users who have their accounts on the directory server. Encryption by SSL is supported by SSL is recommended that communication between the machine and domain controller be encrypted using the machine to the machine, enabling user authentication without first using SSL. Compatible operating systems are not registered in the Address Book. To limit which users, first make settings...


