
User's Guide
Page 11
...List A-4 Call Waiting A-5 Telephone Service for Australia A-5 Telstra® FaxStream® Duet® (Distinctive Ringing A-5 What is jammed inside the drum unit and toner cartridge assembly......11-7 If you choose the ring pattern to ON A-7 x Only A-1 To enable the machine to work with...174; Function?..... 11 A Troubleshooting and routine maintenance Troubleshooting 11-1 Error messages 11-1 Checking if the machine has faxes in its memory 11-4 Forwarding faxes to another fax machine 11-4 Document jams 11-4 Paper jams 11-5 Paper is jammed inside the machine 11-5 Paper is ...
...List A-4 Call Waiting A-5 Telephone Service for Australia A-5 Telstra® FaxStream® Duet® (Distinctive Ringing A-5 What is jammed inside the drum unit and toner cartridge assembly......11-7 If you choose the ring pattern to ON A-7 x Only A-1 To enable the machine to work with...174; Function?..... 11 A Troubleshooting and routine maintenance Troubleshooting 11-1 Error messages 11-1 Checking if the machine has faxes in its memory 11-4 Forwarding faxes to another fax machine 11-4 Document jams 11-4 Paper jams 11-5 Paper is jammed inside the machine 11-5 Paper is ...
User's Guide
Page 89
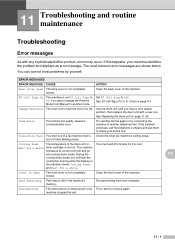
...Remaining Print data is not in the machine's memory. Only) on page 11-24. Change Drum Soon The drum unit is not completely closed . Check the other person's fax Try to poll a fax machine that is left in Polled Waiting mode. The machine will hear the cooling fan running ...while the display on the machine shows Cooling Down, and Wait for a while. Disconnected The other person or other fax machine's polling setup. See Replacing the drum unit on page A-1. Re-start printing from Manual to another mode. You can correct most common error messages are shown...
...Remaining Print data is not in the machine's memory. Only) on page 11-24. Change Drum Soon The drum unit is not completely closed . Check the other person's fax Try to poll a fax machine that is left in Polled Waiting mode. The machine will hear the cooling fan running ...while the display on the machine shows Cooling Down, and Wait for a while. Disconnected The other person or other fax machine's polling setup. See Replacing the drum unit on page A-1. Re-start printing from Manual to another mode. You can correct most common error messages are shown...

User's Guide
Page 90
...again. Not Registered You tried to be cleaned. Chapter 11 ERROR MESSAGES ERROR MESSAGE CAUSE ACTION Document Jam The document was too long. page 1-8. Drum Error The drum unit needs to access a One-Touch or Speed Dial number that the cooling fan is too cold. Then, turn on page A-3. If the... fan is too hot. Set up to 4 days without losing faxes stored in the paper tray. Mode from See Using the automatic document feeder (ADF) ...
...again. Not Registered You tried to be cleaned. Chapter 11 ERROR MESSAGES ERROR MESSAGE CAUSE ACTION Document Jam The document was too long. page 1-8. Drum Error The drum unit needs to access a One-Touch or Speed Dial number that the cooling fan is too cold. Then, turn on page A-3. If the... fan is too hot. Set up to 4 days without losing faxes stored in the paper tray. Mode from See Using the automatic document feeder (ADF) ...
User's Guide
Page 91
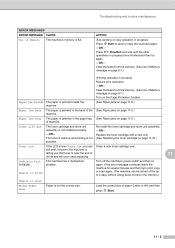
... ERROR MESSAGE CAUSE Out of Memory message on page 8-7.) Turn on the Page Protection function. Clear the faxes from the memory. (See Out of machine. Toner Life End The toner cartridge and drum unit assembly is jammed in the back of the (See Paper jams on again. If the error message... continues leave the machine for up and printing is not the correct size. Re-install the toner cartridge and drum unit assembly. -OR- Load the correct size of 11 its life and will soon need replacing. still print, however, the machine is full. Paper...
... ERROR MESSAGE CAUSE Out of Memory message on page 8-7.) Turn on the Page Protection function. Clear the faxes from the memory. (See Out of machine. Toner Life End The toner cartridge and drum unit assembly is jammed in the back of the (See Paper jams on again. If the error message... continues leave the machine for up and printing is not the correct size. Re-install the toner cartridge and drum unit assembly. -OR- Load the correct size of 11 its life and will soon need replacing. still print, however, the machine is full. Paper...

User's Guide
Page 93
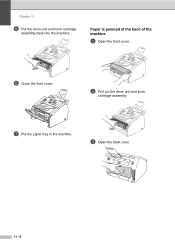
...release the paper so you can pull it out of the paper tray opening . Troubleshooting and routine maintenance 3 Open the front cover. 4 Pull out the drum unit and toner cartridge assembly. Paper is jammed inside the machine are extremely hot. When you have just used the machine, some parts inside the... machine 1 Pull the paper tray completely out of the machine. 2 Pull the jammed paper out of drum unit or the paper tray opening . 11 IMPORTANT To prevent damage to the machine caused by static electricity, do not touch the electrodes shown in...
...release the paper so you can pull it out of the paper tray opening . Troubleshooting and routine maintenance 3 Open the front cover. 4 Pull out the drum unit and toner cartridge assembly. Paper is jammed inside the machine are extremely hot. When you have just used the machine, some parts inside the... machine 1 Pull the paper tray completely out of the machine. 2 Pull the jammed paper out of drum unit or the paper tray opening . 11 IMPORTANT To prevent damage to the machine caused by static electricity, do not touch the electrodes shown in...
User's Guide
Page 94
Chapter 11 5 Put the drum unit and toner cartridge assembly back into the machine. Paper is jammed at the back of the machine 1 Open the front cover. 6 Close the front cover. 2 Pull out the drum unit and toner cartridge assembly. 7 Put the paper tray in the machine. 3 Open the back cover. 11 - 6
Chapter 11 5 Put the drum unit and toner cartridge assembly back into the machine. Paper is jammed at the back of the machine 1 Open the front cover. 6 Close the front cover. 2 Pull out the drum unit and toner cartridge assembly. 7 Put the paper tray in the machine. 3 Open the back cover. 11 - 6

User's Guide
Page 95
... jammed paper cannot be pulled out easily, push down the blue tab with the other hand. 2 Pull out the drum unit and toner cartridge assembly. 6 Close the back cover. 7 Put the drum unit and toner cartridge assembly back into the machine. 3 Hold down the lock lever on the left and pull the... and toner cartridge assembly 1 Open the front cover. 5 Pull the jammed paper out of the drum unit. Take out the jammed paper if there is jammed inside the drum unit. 11 8 Close the front cover. 11 - 7 4 Pull the tab toward you gently pull out the paper with one hand as you to...
... jammed paper cannot be pulled out easily, push down the blue tab with the other hand. 2 Pull out the drum unit and toner cartridge assembly. 6 Close the back cover. 7 Put the drum unit and toner cartridge assembly back into the machine. 3 Hold down the lock lever on the left and pull the... and toner cartridge assembly 1 Open the front cover. 5 Pull the jammed paper out of the drum unit. Take out the jammed paper if there is jammed inside the drum unit. 11 8 Close the front cover. 11 - 7 4 Pull the tab toward you gently pull out the paper with one hand as you to...

User's Guide
Page 96
Chapter 11 4 Put the toner cartridge back into the drum unit until you put it lock into the machine. 6 Close the front cover. 11 - 8 If you hear it in properly, the lock lever will lift automatically. 5 Put the drum unit and toner cartridge assembly back into place.
Chapter 11 4 Put the toner cartridge back into the drum unit until you put it lock into the machine. 6 Close the front cover. 11 - 8 If you hear it in properly, the lock lever will lift automatically. 5 Put the drum unit and toner cartridge assembly back into place.

User's Guide
Page 98
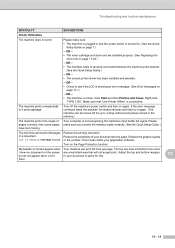
...11-19, Cleaning the laser scanner window on page 11-20 and Cleaning the drum unit on page 11-19.) Transmission Verification Report says 'RESULT:NG' or 'RESULT:ERROR'. Chapter 11 DIFFICULTY SUGGESTIONS Sending Faxes Poor fax send quality Try changing your phone line. If the copy quality is recommended.... your resolution to the machine. If the copy you answered on page 11-19.) Handling Incoming Calls The machine 'Hears' Voice as a calling fax machine and respond with no custom features is not good, clean the scanner. (See Cleaning the scanner on page 11-14.) 11 - 10...
...11-19, Cleaning the laser scanner window on page 11-20 and Cleaning the drum unit on page 11-19.) Transmission Verification Report says 'RESULT:NG' or 'RESULT:ERROR'. Chapter 11 DIFFICULTY SUGGESTIONS Sending Faxes Poor fax send quality Try changing your phone line. If the copy quality is recommended.... your resolution to the machine. If the copy you answered on page 11-19.) Handling Incoming Calls The machine 'Hears' Voice as a calling fax machine and respond with no custom features is not good, clean the scanner. (See Cleaning the scanner on page 11-14.) 11 - 10...
User's Guide
Page 99
... (See the Quick Setup Guide.) -OR- • The correct printer driver has been installed and selected. -OR- • Check to 4 days without losing faxes stored in your document to allow for this. 11 them. 11 - 11 Reduce the complexity of your application software. If the error message continues leave... for up to see if the LCD is showing an error message. (See Error messages on page 7.) -OR- • The toner cartridge and drum unit are a restricted area that "Use Printer Offline" is online. Out of font sizes within your document and try it prints garbage. Turn on ...
... (See the Quick Setup Guide.) -OR- • The correct printer driver has been installed and selected. -OR- • Check to 4 days without losing faxes stored in your document to allow for this. 11 them. 11 - 11 Reduce the complexity of your application software. If the error message continues leave... for up to see if the LCD is showing an error message. (See Error messages on page 7.) -OR- • The toner cartridge and drum unit are a restricted area that "Use Printer Offline" is online. Out of font sizes within your document and try it prints garbage. Turn on ...
User's Guide
Page 101
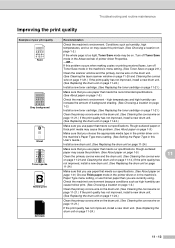
If this problem occurs when making copies or printing received faxes, turn off Toner Save mode in the machine's Paper Type menu setting,...Cleaning the corona wire on page 11-21.) If the print quality has not improved, install a new drum unit. (See Replacing the drum unit on page 11-24.) Install a new toner cartridge. (See Replacing the toner cartridge on page...machine's environment. Rough-surfaced paper or thick print media may cause this User's Guide.) Install a new drum unit. (See Replacing the drum unit on page 11-24.) Make sure that you use paper that meets our specifications. (See About...
If this problem occurs when making copies or printing received faxes, turn off Toner Save mode in the machine's Paper Type menu setting,...Cleaning the corona wire on page 11-21.) If the print quality has not improved, install a new drum unit. (See Replacing the drum unit on page 11-24.) Install a new toner cartridge. (See Replacing the toner cartridge on page...machine's environment. Rough-surfaced paper or thick print media may cause this User's Guide.) Install a new drum unit. (See Replacing the drum unit on page 11-24.) Make sure that you use paper that meets our specifications. (See About...
User's Guide
Page 102
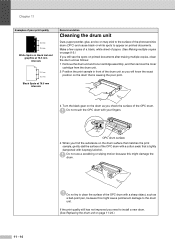
... to clean the surface of the OPC drum with a cotton swab that is lightly dampened with your fingers. Do not touch the OPC drum with isopropyl alcohol. OPC drum surface 4 When you need to install a new drum. (See Replacing the drum unit on the drum surface that matches the print sample, gently... dab the surface of the OPC drum with a sharp object, such as you check ...
... to clean the surface of the OPC drum with a cotton swab that is lightly dampened with your fingers. Do not touch the OPC drum with isopropyl alcohol. OPC drum surface 4 When you need to install a new drum. (See Replacing the drum unit on the drum surface that matches the print sample, gently... dab the surface of the OPC drum with a sharp object, such as you check ...
User's Guide
Page 103
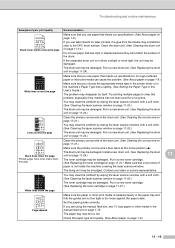
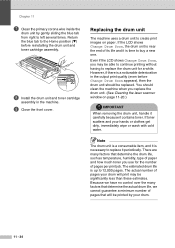
...problem may disappear by wiping the laser scanner window with a soft cloth. (See Cleaning the laser scanner window on page 11-20.) The drum unit may be damaged. Troubleshooting and routine maintenance Examples of poor print quality ABCDEFGH abcdefghijk ABCD abcde 01234 Black toner marks across the page ABCDEFGH...Recommendation Make sure that you use paper that a torn piece of paper is not inside the machine covering the laser scanner window. The drum unit may be smudged. ABCDEFGH abcdefghijk ABCD abcde 01234 White lines down the page. You may clear the problem by wiping the laser ...
...problem may disappear by wiping the laser scanner window with a soft cloth. (See Cleaning the laser scanner window on page 11-20.) The drum unit may be damaged. Troubleshooting and routine maintenance Examples of poor print quality ABCDEFGH abcdefghijk ABCD abcde 01234 Black toner marks across the page ABCDEFGH...Recommendation Make sure that you use paper that a torn piece of paper is not inside the machine covering the laser scanner window. The drum unit may be smudged. ABCDEFGH abcdefghijk ABCD abcde 01234 White lines down the page. You may clear the problem by wiping the laser ...
User's Guide
Page 105
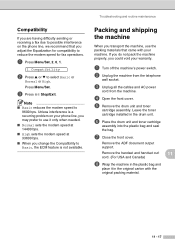
...Unless interference is not available. Remove the ADF document output support. Troubleshooting and routine maintenance Compatibility If you are having difficulty sending or receiving a fax due to possible interference on your warranty. 1 Turn off the machine's power switch. 2 Unplug the machine from the telephone wall socket. 3 ... and toner cartridge assembly. If you do not pack the machine properly, you transport the machine, use it in the drum unit. 6 Place the drum unit and toner cartridge assembly into the plastic bag and seal the bag. 7 Close the front cover. Note ■ ...
...Unless interference is not available. Remove the ADF document output support. Troubleshooting and routine maintenance Compatibility If you are having difficulty sending or receiving a fax due to possible interference on your warranty. 1 Turn off the machine's power switch. 2 Unplug the machine from the telephone wall socket. 3 ... and toner cartridge assembly. If you do not pack the machine properly, you transport the machine, use it in the drum unit. 6 Place the drum unit and toner cartridge assembly into the plastic bag and seal the bag. 7 Close the front cover. Note ■ ...

User's Guide
Page 106
...the control panel. If toner scatters and your hands or clothes get dirty, immediately wipe or wash it carefully. Chapter 11 9 Pack the drum unit and toner cartridge assembly, AC power cord, telephone line cord, ADF document output support flap and printed materials in the original carton as... shown below: Routine maintenance IMPORTANT The drum unit contains toner, so handle it off with volatile liquids such as thinner or benzine will damage the outside of the machine (for USA...
...the control panel. If toner scatters and your hands or clothes get dirty, immediately wipe or wash it carefully. Chapter 11 9 Pack the drum unit and toner cartridge assembly, AC power cord, telephone line cord, ADF document output support flap and printed materials in the original carton as... shown below: Routine maintenance IMPORTANT The drum unit contains toner, so handle it off with volatile liquids such as thinner or benzine will damage the outside of the machine (for USA...

User's Guide
Page 108
Do not use isopropyl alcohol to the machine from the electrical socket. 2 Open the front cover and pull out the drum unit and toner cartridge assembly. Laser Scanner Window 4 Put the drum unit and toner cartridge assembly back into the electrical socket first, and then plug in the diagram below . 3 Gently clean the...
Do not use isopropyl alcohol to the machine from the electrical socket. 2 Open the front cover and pull out the drum unit and toner cartridge assembly. Laser Scanner Window 4 Put the drum unit and toner cartridge assembly back into the electrical socket first, and then plug in the diagram below . 3 Gently clean the...

User's Guide
Page 109
...If you see the Toner Low warning. Discard the used toner cartridge according to left several times. We recommend that you clean the machine and drum unit when you do not return the blue tab to the Home position (▼), your printed pages may have vertical black stripes on a cloth ... is a good idea to avoid spilling and scattering toner. 1 Open the front cover and pull out the drum unit and toner cartridge assembly. 2 Clean the primary corona wire inside the drum unit by gently sliding the blue tab from domestic waste. Replacing the toner cartridge The toner cartridge can print...
...If you see the Toner Low warning. Discard the used toner cartridge according to left several times. We recommend that you clean the machine and drum unit when you do not return the blue tab to the Home position (▼), your printed pages may have vertical black stripes on a cloth ... is a good idea to avoid spilling and scattering toner. 1 Open the front cover and pull out the drum unit and toner cartridge assembly. 2 Clean the primary corona wire inside the drum unit by gently sliding the blue tab from domestic waste. Replacing the toner cartridge The toner cartridge can print...

User's Guide
Page 110
Chapter 11 How to replace the toner cartridge CAUTION Just after you use the machine, some internal parts of the drum unit. 1 Open the front cover and pull out the drum unit and toner cartridge assembly. Place the used toner cartridge into the aluminium bag and discard it with cold water. ... will be extremely HOT! If toner scatters on a drop cloth or large piece of disposable paper to local regulations. IMPORTANT ■ Place the drum unit on your hands or clothes, immediately wipe it off or wash it according to avoid spilling and scattering the toner. ■ Handle the ...
Chapter 11 How to replace the toner cartridge CAUTION Just after you use the machine, some internal parts of the drum unit. 1 Open the front cover and pull out the drum unit and toner cartridge assembly. Place the used toner cartridge into the aluminium bag and discard it with cold water. ... will be extremely HOT! If toner scatters on a drop cloth or large piece of disposable paper to local regulations. IMPORTANT ■ Place the drum unit on your hands or clothes, immediately wipe it off or wash it according to avoid spilling and scattering the toner. ■ Handle the ...

User's Guide
Page 111
... to side five or six times to distribute the toner evenly inside the cartridge. 5 Remove the protective cover. 6 Insert the new toner cartridge in the drum unit until immediately before you put it in properly, the lock lever will work to a level of optimum performance when used . If a toner cartridge is... left unpacked for a long period of time, the toner life is caused to the drum unit or other part of this machine as a result may not be covered by the warranty. ■ Wait to unpack the toner cartridge until it...
... to side five or six times to distribute the toner evenly inside the cartridge. 5 Remove the protective cover. 6 Insert the new toner cartridge in the drum unit until immediately before you put it in properly, the lock lever will work to a level of optimum performance when used . If a toner cartridge is... left unpacked for a long period of time, the toner life is caused to the drum unit or other part of this machine as a result may not be covered by the warranty. ■ Wait to unpack the toner cartridge until it...
User's Guide
Page 112
... 7 Clean the primary corona wire inside the drum unit by your drum. 11 - 24 If the LCD shows Change Drum Soon, the drum unit is necessary to the Home position (▼) before reinstalling the drum unit and toner cartridge assembly. 8 Install the drum unit and toner cartridge assembly in the output ... pages. You should be significantly less than these estimates. The actual number of its life and it periodically. Even if the LCD shows Change Drum Soon, you use for a while. Because we cannot guarantee a minimum number of pages per print job. Return the blue tab to replace ...
... 7 Clean the primary corona wire inside the drum unit by your drum. 11 - 24 If the LCD shows Change Drum Soon, the drum unit is necessary to the Home position (▼) before reinstalling the drum unit and toner cartridge assembly. 8 Install the drum unit and toner cartridge assembly in the output ... pages. You should be significantly less than these estimates. The actual number of its life and it periodically. Even if the LCD shows Change Drum Soon, you use for a while. Because we cannot guarantee a minimum number of pages per print job. Return the blue tab to replace ...

