Product Guide
Page 1
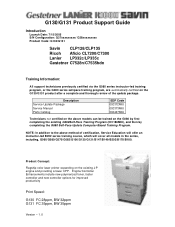
...Code 002372MIU 002373MIU 002447MIU Technicians not certified on the above method of the update package. Product Concept: Flagship color laser printer expanding on the G080 by first completing the existing G060Self-Pace Training Program (001186MIU), and then by ...toner, faster controller and new controller options for improved productivity Print Speed: G130 FC 28ppm, BW 32ppm G131 FC 35ppm, BW 35ppm Version - 1.0 G130/G131 Product Support Guide Introduction Launch Date: 7/15/2005 S/N Configuration: Q37xxxxxxxxx/ Q38xxxxxxxxx Product Code: G130/G131 Savin CLP128/CLP135 Ricoh Aficio CL7200...
...Code 002372MIU 002373MIU 002447MIU Technicians not certified on the above method of the update package. Product Concept: Flagship color laser printer expanding on the G080 by first completing the existing G060Self-Pace Training Program (001186MIU), and then by ...toner, faster controller and new controller options for improved productivity Print Speed: G130 FC 28ppm, BW 32ppm G131 FC 35ppm, BW 35ppm Version - 1.0 G130/G131 Product Support Guide Introduction Launch Date: 7/15/2005 S/N Configuration: Q37xxxxxxxxx/ Q38xxxxxxxxx Product Code: G130/G131 Savin CLP128/CLP135 Ricoh Aficio CL7200...
Product Guide
Page 7
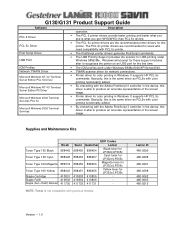
...It supports HP PCL 5c commands. NOTE: Toner is not compatible with the Adobe PostScript 3 controller in the device, this driver is able to produce an accurate representation of the screen image. • Printer driver for color printing in Windows. Basically, this is the... same driver as PCL5e with color printing functionality added. • By interacting with previous models. Supplies and Maintenance Kits Toner Type 160 Black Ricoh 888442 Toner Type 160 Cyan 888445 Toner Type 160 Magenta 885374 Toner Type ...
...It supports HP PCL 5c commands. NOTE: Toner is not compatible with the Adobe PostScript 3 controller in the device, this driver is able to produce an accurate representation of the screen image. • Printer driver for color printing in Windows. Basically, this is the... same driver as PCL5e with color printing functionality added. • By interacting with previous models. Supplies and Maintenance Kits Toner Type 160 Black Ricoh 888442 Toner Type 160 Cyan 888445 Toner Type 160 Magenta 885374 Toner Type ...
Product Guide
Page 8
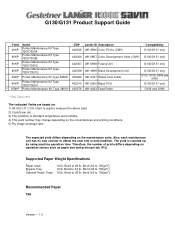
... Kit Type 3800E 400662 481-0347 Waste toner bottle G130, G106, G080 and G060 40KP Printer Maintenance Kit Type 7200/7300 F 402310 481-0900 Black PCU G130/G131 only * 150KP Printer Maintenance Kit Type 3800 H 400576 481-0423 Feed Roller G106 and G080 * 50% Color ratio The indicated Yields are based on: 1) A4 (8.5"x11...
... Kit Type 3800E 400662 481-0347 Waste toner bottle G130, G106, G080 and G060 40KP Printer Maintenance Kit Type 7200/7300 F 402310 481-0900 Black PCU G130/G131 only * 150KP Printer Maintenance Kit Type 3800 H 400576 481-0423 Feed Roller G106 and G080 * 50% Color ratio The indicated Yields are based on: 1) A4 (8.5"x11...

Product Guide
Page 15
... Filter Fusing Unit Waste Toner Bottle Toner Black PCU/ Development Unit Color PCU's/ Development Units User Maintenance Table Main Unit Item Prints or Developments 30K 40K 80K 150K Remarks Black PCU Prints R Included in maintenance kit F Color (Y/M/C) PCU Prints R ...in maintenance kit A Black Development Unit Prints R Included in maintenance kit D Color (C/M/Y) Development Unit Prints R Included in maintenance kit B Fusing Unit Prints R Included in maintenance kit C Waste Toner Bottle Dust Filter Prints R R Included in maintenance kit E Included in maintenance...
... Filter Fusing Unit Waste Toner Bottle Toner Black PCU/ Development Unit Color PCU's/ Development Units User Maintenance Table Main Unit Item Prints or Developments 30K 40K 80K 150K Remarks Black PCU Prints R Included in maintenance kit F Color (Y/M/C) PCU Prints R ...in maintenance kit A Black Development Unit Prints R Included in maintenance kit D Color (C/M/Y) Development Unit Prints R Included in maintenance kit B Fusing Unit Prints R Included in maintenance kit C Waste Toner Bottle Dust Filter Prints R R Included in maintenance kit E Included in maintenance...

Product Guide
Page 17
...:120V:1100W B1804246 Thermofuse: Ass'y AW100103 Thermistor: Pressure AD042081 Cleaning Blade: Ass'y G1311854 Imaging Unit AX060286 Ploygon Mirror Motor B1803301 Air Pump:Toner Supply:Ass'y G0803301 Air Pump:Toner Supply Items in Red = PM Part Description AE040042 Oil Supply Roller:Pressure:DIA16 AE044066 Stripper Pawls:pFa AE044050 Stripper Pawl B1804101 Fusing Belt...
...:120V:1100W B1804246 Thermofuse: Ass'y AW100103 Thermistor: Pressure AD042081 Cleaning Blade: Ass'y G1311854 Imaging Unit AX060286 Ploygon Mirror Motor B1803301 Air Pump:Toner Supply:Ass'y G0803301 Air Pump:Toner Supply Items in Red = PM Part Description AE040042 Oil Supply Roller:Pressure:DIA16 AE044066 Stripper Pawls:pFa AE044050 Stripper Pawl B1804101 Fusing Belt...

Maintenance Manual
Page 1
... Recommendations 13 Loading Paper...13 Storing Paper ...13 Types of Paper and Other Media 13 Paper not supported by this printer 17 Print Area ...18 Loading Paper ...20 Loading Paper in Tray 1/2 and the optional paper feed unit 20 Loading Paper in the Bypass Tray 28 ... the Options 37 Detaching the SR960 (2 Tray Finisher 37 Detaching the SR950 (Booklet Finisher 38 Opening and Closing the Duplex Reversal Unit 38 Replacing the Toner Cartridge 40 Replacing the Photoconductor Unit 45 G1307528_1.00 EN USA G130-7509 Copyright © 2005 1
... Recommendations 13 Loading Paper...13 Storing Paper ...13 Types of Paper and Other Media 13 Paper not supported by this printer 17 Print Area ...18 Loading Paper ...20 Loading Paper in Tray 1/2 and the optional paper feed unit 20 Loading Paper in the Bypass Tray 28 ... the Options 37 Detaching the SR960 (2 Tray Finisher 37 Detaching the SR950 (Booklet Finisher 38 Opening and Closing the Duplex Reversal Unit 38 Replacing the Toner Cartridge 40 Replacing the Photoconductor Unit 45 G1307528_1.00 EN USA G130-7509 Copyright © 2005 1
Maintenance Manual
Page 2
... Replacing the Waste Toner Bottle 65 Replacing the Paper Feed Roller 68 Cleaning Cautions to Take When Cleaning 72 Cleaning the Registration Roller 73 Cleaning the DustProof Glass 75 Checking the Earth Leakage Breaker 77 Adjusting the Printer Adjusting the Color Registration 79 Auto ...Adjust...79 Adjusting the Fuser for Thick Paper 80 Test Sheet Samples 83 Correcting the Color Gradation 84 Set the Gradation Correction Value 84 Viewing the Color Calibration Sample Sheet and Gradation Correction ...
... Replacing the Waste Toner Bottle 65 Replacing the Paper Feed Roller 68 Cleaning Cautions to Take When Cleaning 72 Cleaning the Registration Roller 73 Cleaning the DustProof Glass 75 Checking the Earth Leakage Breaker 77 Adjusting the Printer Adjusting the Color Registration 79 Auto ...Adjust...79 Adjusting the Fuser for Thick Paper 80 Test Sheet Samples 83 Correcting the Color Gradation 84 Set the Gradation Correction Value 84 Viewing the Color Calibration Sample Sheet and Gradation Correction ...

Maintenance Manual
Page 3
When "Remove Misfeed B:Fusing Unit" Appears 139 When "Remove Misfeed R:Finisher" Appears 142 When "Remove Misfeed R1" Appears 146 When "Remove Misfeed R2-4" Appears 148 When "Remove Misfeed Y:Paper Tray" Appears 150 When "Remove Misfeed Z1:Duplex Unit" Appears 151 When "Remove Misfeed Z2:Dup.Feed Unit" Appears 153 Appendix When the Front Cover Does Not Close 157 Moving and Transporting the Printer 159 Moving the Printer 159 Consumables ...161 Toner Cartridge ...161 Staple Cartridge ...161 Other consumables 162 Specifications...163 Mainframe ...163 Options ...166 3
When "Remove Misfeed B:Fusing Unit" Appears 139 When "Remove Misfeed R:Finisher" Appears 142 When "Remove Misfeed R1" Appears 146 When "Remove Misfeed R2-4" Appears 148 When "Remove Misfeed Y:Paper Tray" Appears 150 When "Remove Misfeed Z1:Duplex Unit" Appears 151 When "Remove Misfeed Z2:Dup.Feed Unit" Appears 153 Appendix When the Front Cover Does Not Close 157 Moving and Transporting the Printer 159 Moving the Printer 159 Consumables ...161 Toner Cartridge ...161 Staple Cartridge ...161 Other consumables 162 Specifications...163 Mainframe ...163 Options ...166 3
Maintenance Manual
Page 40
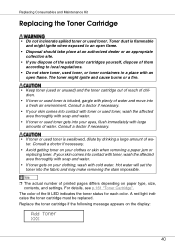
... on paper type, size, contents, and settings. Consult a doctor if necessary. • Avoid getting toner on the display: Add Toner XXX 40 For details, see p.161 "Toner Cartridge". The color of children. • If toner or used toner. The toner might ignite when exposed to an open flame. • Disposal should take place at an authorized dealer...
... on paper type, size, contents, and settings. Consult a doctor if necessary. • Avoid getting toner on the display: Add Toner XXX 40 For details, see p.161 "Toner Cartridge". The color of children. • If toner or used toner. The toner might ignite when exposed to an open flame. • Disposal should take place at an authorized dealer...
Maintenance Manual
Page 41
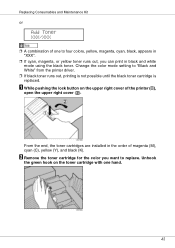
...yellow (Y), and black (K). B Remove the toner cartridge for the color you can print in the order of the printer ( ), open the upper right cover ( ). From the end, the toner cartridges are installed in black and white mode using the black toner. Change the color mode setting to replace. A While pushing ...the lock button on the toner cartridge with one to four colors, yellow, magenta, cyan, black, appears in "XXX". ❒ If cyan, magenta, or yellow toner runs out, you want to "Black and White" from the printer driver. ❒ If black toner runs out, printing is not ...
...yellow (Y), and black (K). B Remove the toner cartridge for the color you can print in the order of the printer ( ), open the upper right cover ( ). From the end, the toner cartridges are installed in black and white mode using the black toner. Change the color mode setting to replace. A While pushing ...the lock button on the toner cartridge with one to four colors, yellow, magenta, cyan, black, appears in "XXX". ❒ If cyan, magenta, or yellow toner runs out, you want to "Black and White" from the printer driver. ❒ If black toner runs out, printing is not ...

Maintenance Manual
Page 42
In such cases, reinstall the toner cartridge. Remaining toner might scatter. ❒ Depending on the setting up and out. ❒ Do not shake the removed toner cartridge. E Shake the toner cartridge back and forth five or six times. 42 D Take the new toner cartridge out of the box. ❒ The black toner cartridge contains more than the other hand, slowly pull it up environment, toner might be left in a toner car- Replacing Consumables and Maintenance Kit C Holding the toner cartridge with the other toner cartridges. tridge.
In such cases, reinstall the toner cartridge. Remaining toner might scatter. ❒ Depending on the setting up and out. ❒ Do not shake the removed toner cartridge. E Shake the toner cartridge back and forth five or six times. 42 D Take the new toner cartridge out of the box. ❒ The black toner cartridge contains more than the other hand, slowly pull it up environment, toner might be left in a toner car- Replacing Consumables and Maintenance Kit C Holding the toner cartridge with the other toner cartridges. tridge.

Maintenance Manual
Page 43
G Slowly insert the toner cartridge, until the green hook clips over the met- This could result in the direction of the arrow. ❒ Do not touch the metal contact area with your fingers. H Close the upper right cover. al contact area. ❒ Do not install and remove toner cartridges repeatedly. Replacing Consumables and Maintenance Kit F Holding the toner cartridge with the metal contact area in front, insert in toner leak. Please wait while the toner loads. 43
G Slowly insert the toner cartridge, until the green hook clips over the met- This could result in the direction of the arrow. ❒ Do not touch the metal contact area with your fingers. H Close the upper right cover. al contact area. ❒ Do not install and remove toner cartridges repeatedly. Replacing Consumables and Maintenance Kit F Holding the toner cartridge with the metal contact area in front, insert in toner leak. Please wait while the toner loads. 43

Maintenance Manual
Page 44
Replacing Consumables and Maintenance Kit The following message appears on the display. 44 appears on the display: Loading Toner... ❒ To avoid malfunction, do not turn off the power while "Loading Toner..."
Replacing Consumables and Maintenance Kit The following message appears on the display. 44 appears on the display: Loading Toner... ❒ To avoid malfunction, do not turn off the power while "Loading Toner..."

Maintenance Manual
Page 65
Replace Waste Toner (Type E) A Turn off the power, and then unplug the power cable. Replacing Consumables and Maintenance Kit Replacing the Waste Toner Bottle If "Replace Waste Toner (Type E)" appears on the left and right. 65 C Slowly open the front cover by pulling down from the two areas on the display, replace the waste toner bottle. B Take the new waste toner bottle out of the bag.
Replace Waste Toner (Type E) A Turn off the power, and then unplug the power cable. Replacing Consumables and Maintenance Kit Replacing the Waste Toner Bottle If "Replace Waste Toner (Type E)" appears on the left and right. 65 C Slowly open the front cover by pulling down from the two areas on the display, replace the waste toner bottle. B Take the new waste toner bottle out of the bag.

Maintenance Manual
Page 66
G Insert the new waste toner bottle as shown. 66 F Put the used waste toner bottle from inside the printer. ❒ Be sure to handle the bottle carefully so waste toner does not spill. E Remove the lid ( ), and then put it in the position shown in the illustra- Replacing Consumables and Maintenance Kit D Slowly remove the used waste toner bottle into the bag that contained the new waste toner bottle, and then seal the bag. ❒ Be sure to remove the waste toner bottle horizontally. tion ( ).
G Insert the new waste toner bottle as shown. 66 F Put the used waste toner bottle from inside the printer. ❒ Be sure to handle the bottle carefully so waste toner does not spill. E Remove the lid ( ), and then put it in the position shown in the illustra- Replacing Consumables and Maintenance Kit D Slowly remove the used waste toner bottle into the bag that contained the new waste toner bottle, and then seal the bag. ❒ Be sure to remove the waste toner bottle horizontally. tion ( ).

Maintenance Manual
Page 67
J Plug in until it stops. ❒ Be sure to firmly insert the waste toner bottle to avoid toner leakage inside the printer. I Slowly close the front cover by pushing the two areas on the power. 67 Replacing Consumables and Maintenance Kit H Push it in the power cable, and then turn on the left and right.
J Plug in until it stops. ❒ Be sure to firmly insert the waste toner bottle to avoid toner leakage inside the printer. I Slowly close the front cover by pushing the two areas on the power. 67 Replacing Consumables and Maintenance Kit H Push it in the power cable, and then turn on the left and right.

Maintenance Manual
Page 80
... Return to make the adjustment. The initial screen appears. Automatic color adjustment takes about paper sizes the bypass tray can handle and paper loading procedure, see p.6 "Paper and Other Media Supported by This Printer". 80 Use the thick paper you have made all settings, press... the {Online} key. G When you nor- Carry out this adjustment after changing the toner cartridge. ❒ Thick paper is not possible if the toner has almost run out. Adjusting the Printer Automatic color adjustment begins, and the following message appears. appears on the display.
... Return to make the adjustment. The initial screen appears. Automatic color adjustment takes about paper sizes the bypass tray can handle and paper loading procedure, see p.6 "Paper and Other Media Supported by This Printer". 80 Use the thick paper you have made all settings, press... the {Online} key. G When you nor- Carry out this adjustment after changing the toner cartridge. ❒ Thick paper is not possible if the toner has almost run out. Adjusting the Printer Automatic color adjustment begins, and the following message appears. appears on the display.

Maintenance Manual
Page 81
...Printer B Press the {Menu} key. D Press the {U} or {T} key to exit G Check the following message appears on the display. Menu: Maintenance The maintenance menu appears. Press # to display "Color Regist.", and then press the {# Enter} key. E Press the {U} or {T} key to adjust 81 For details about changing the toner... cartridge, see p.40 "Replacing the Toner Cartridge".) Failed. The [Menu] screen appears on...
...Printer B Press the {Menu} key. D Press the {U} or {T} key to exit G Check the following message appears on the display. Menu: Maintenance The maintenance menu appears. Press # to display "Color Regist.", and then press the {# Enter} key. E Press the {U} or {T} key to adjust 81 For details about changing the toner... cartridge, see p.40 "Replacing the Toner Cartridge".) Failed. The [Menu] screen appears on...

Maintenance Manual
Page 84
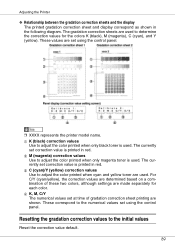
Set the Gradation Correction Value During printing, you print the same file repeatedly or toner was recently replaced, changes may not be corrected, although it is used, corrections may occur in color tones. Adjusting the Printer Correcting the Color Gradation Color gradation during color printing various slightly depending on a number of paper is not usually necessary to...
Set the Gradation Correction Value During printing, you print the same file repeatedly or toner was recently replaced, changes may not be corrected, although it is used, corrections may occur in color tones. Adjusting the Printer Correcting the Color Gradation Color gradation during color printing various slightly depending on a number of paper is not usually necessary to...
Maintenance Manual
Page 89
... values set at time of these two colors, although settings are used . A K (black) correction values Use to adjust the color printed when only black toner is used to adjust the color printed when only magenta toner is used . The currently set correction ...value is printed in red. B M (magenta) correction values Use to determine the correction values for each color. D K, M, C/Y The numerical values set using the control panel. ❒ XXXX represents the printer...
... values set at time of these two colors, although settings are used . A K (black) correction values Use to adjust the color printed when only black toner is used to adjust the color printed when only magenta toner is used . The currently set correction ...value is printed in red. B M (magenta) correction values Use to determine the correction values for each color. D K, M, C/Y The numerical values set using the control panel. ❒ XXXX represents the printer...


