Hardware Guide
Page 1
For safe and correct use, be sure to the Printer 2 Installing Options 3 Connecting the Printer 4 Configuration 5 Paper and Other Media 6 Replacing Consumables and Maintenance Kit 7 Cleaning the Printer 8 Adjusting the Printer 9 Troubleshooting 10 Removing Misfed Paper 11 Appendix Read this manual carefully before using the machine. Hardware Guide 1 Guide to read the Safety Information before you use this machine and keep it handy for future reference.
For safe and correct use, be sure to the Printer 2 Installing Options 3 Connecting the Printer 4 Configuration 5 Paper and Other Media 6 Replacing Consumables and Maintenance Kit 7 Cleaning the Printer 8 Adjusting the Printer 9 Troubleshooting 10 Removing Misfed Paper 11 Appendix Read this manual carefully before using the machine. Hardware Guide 1 Guide to read the Safety Information before you use this machine and keep it handy for future reference.
Hardware Guide
Page 12
... Messages on the Control Panel 155 Panel Tone...157 Printer Does Not Print 158 Checking the port connection 160 Other Printing Problems 162 Additional Troubleshooting 168 10.Removing Misfed Paper Removing Misfed Paper 171 When the Paper Misfeed Message Appears (Cover A 172 When... the Paper Misfeed Message Appears (Cover Z 175 11.Appendix Moving and Transporting the Printer 177 Moving the Printer 178 Consumables ...179 Toner...
... Messages on the Control Panel 155 Panel Tone...157 Printer Does Not Print 158 Checking the port connection 160 Other Printing Problems 162 Additional Troubleshooting 168 10.Removing Misfed Paper Removing Misfed Paper 171 When the Paper Misfeed Message Appears (Cover A 172 When... the Paper Misfeed Message Appears (Cover Z 175 11.Appendix Moving and Transporting the Printer 177 Moving the Printer 178 Consumables ...179 Toner...

Hardware Guide
Page 167
.... Wait a while. Troubleshooting Error & Status Messages on the Control Panel This section explains what the messages that appear on . Turn off the printer, and turn back on the control panel mean and what to the normal mode. No action is calibrating the color. Setting change... Status The printer is required. The printer is setting changing...
.... Wait a while. Troubleshooting Error & Status Messages on the Control Panel This section explains what the messages that appear on . Turn off the printer, and turn back on the control panel mean and what to the normal mode. No action is calibrating the color. Setting change... Status The printer is required. The printer is setting changing...
Hardware Guide
Page 168
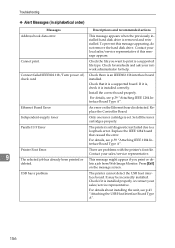
.... Install the correct board properly. For details, see p.39 "Attaching IEEE 1284 Interface Board Type A". There are problems with the printer's font file. Ethernet Board Error An error on the message screen. Press [Exit] on the Ethernet board is a supported board....USB Host Interface Board Type A". 156 Parallel I/F Error The printer's self diagnostic test failed due to print is removed and reinstalled. USB has a problem The printer cannot detect the USB host interface board. Troubleshooting ❖ Alert Messages (in alphabetical order) Messages Descriptions and ...
.... Install the correct board properly. For details, see p.39 "Attaching IEEE 1284 Interface Board Type A". There are problems with the printer's font file. Ethernet Board Error An error on the message screen. Press [Exit] on the Ethernet board is a supported board....USB Host Interface Board Type A". 156 Parallel I/F Error The printer's self diagnostic test failed due to print is removed and reinstalled. USB has a problem The printer cannot detect the USB host interface board. Troubleshooting ❖ Alert Messages (in alphabetical order) Messages Descriptions and ...
Hardware Guide
Page 170
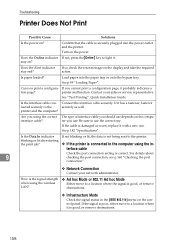
... the{Online} key to a location where it nected securely to the securely as well. Load paper into the power outlet and the printer. printer and the computer? How is good, or remove LAN? If so, check the error message on the power. Contact your network administrator...one . The type of interface cable you print a configura- terface cable Check the port connection setting is good, or remove obstructions. 158 Troubleshooting Printer Does Not Print Possible Cause Solutions Is the power on ? If it has a fastener, fasten it is correct. For details about 9 checking...
... the{Online} key to a location where it nected securely to the securely as well. Load paper into the power outlet and the printer. printer and the computer? How is good, or remove LAN? If so, check the error message on the power. Contact your network administrator...one . The type of interface cable you print a configura- terface cable Check the port connection setting is good, or remove obstructions. 158 Troubleshooting Printer Does Not Print Possible Cause Solutions Is the power on ? If it has a fastener, fasten it is correct. For details about 9 checking...

Hardware Guide
Page 172
B Click to select the icon of the printer. B Click to select the icon of the printer. Troubleshooting Checking the port connection When the printer is directly connected via the PC cable and the data-in indicator does not flash or light up, the method of checking the ... port connection, port LPT 1 or LPT 2 should be set. • For a USB port connection, port USB00 (n) *1 should be set. *1 (n) is the number of the printer. D Check the [Print to the following port] box to confirm that the correct port is selected. Next, on the [File] menu, click [Properties]. C Click the...
B Click to select the icon of the printer. B Click to select the icon of the printer. Troubleshooting Checking the port connection When the printer is directly connected via the PC cable and the data-in indicator does not flash or light up, the method of checking the ... port connection, port LPT 1 or LPT 2 should be set. • For a USB port connection, port USB00 (n) *1 should be set. *1 (n) is the number of the printer. D Check the [Print to the following port] box to confirm that the correct port is selected. Next, on the [File] menu, click [Properties]. C Click the...

Hardware Guide
Page 174
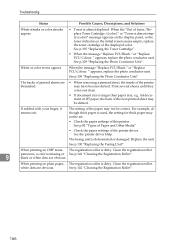
...109 "Replacing the Photo Conductor Unit". Flatten paper before loading. See p.77 "Paper and Other Media". • Paper is bent or wrinkled. Troubleshooting Other Printing Problems Status Possible Causes, Descriptions, and Solutions Toner smears appear on . appears on the display, replace the photo conductor unit. Confirm...or bent. Make sure there are using thick paper, the setting for thick paper may not be set in the paper tray. See the printer driver Help. See p.77 "Paper and Other Media". See p.77 "Paper and Other Media". • When loading paper, separate paper ...
...109 "Replacing the Photo Conductor Unit". Flatten paper before loading. See p.77 "Paper and Other Media". • Paper is bent or wrinkled. Troubleshooting Other Printing Problems Status Possible Causes, Descriptions, and Solutions Toner smears appear on . appears on the display, replace the photo conductor unit. Confirm...or bent. Make sure there are using thick paper, the setting for thick paper may not be set in the paper tray. See the printer driver Help. See p.77 "Paper and Other Media". See p.77 "Paper and Other Media". • When loading paper, separate paper ...

Hardware Guide
Page 176
...tab in • The printer driver is being processed. Fine dot pattern does not print. If you are using color toner are coarse. appears on the display in the application, use the reduction function to warm up for color printing. Troubleshooting Status Possible Causes, Descriptions,... and Solutions It takes too much time to complete the print job. • Photographs and other data intensive pages take a long time for the printer to process, so simply wait ...
...tab in • The printer driver is being processed. Fine dot pattern does not print. If you are using color toner are coarse. appears on the display in the application, use the reduction function to warm up for color printing. Troubleshooting Status Possible Causes, Descriptions,... and Solutions It takes too much time to complete the print job. • Photographs and other data intensive pages take a long time for the printer to process, so simply wait ...
Hardware Guide
Page 178
...printer driver. Clean the registration roller. 9 parencies, a color is larger than paper size, e.g. When printing on the initial screen seems empty, replace the toner cartridge of the displayed color. " appears, replace the photo conductor unit. See p.109 "Replacing the Photo Conductor Unit". Clean the registration roller. Troubleshooting... Status Possible Causes, Descriptions, and Solutions White streaks or color streaks appear. • Toner is deteriorated or damaged. ...
...printer driver. Clean the registration roller. 9 parencies, a color is larger than paper size, e.g. When printing on the initial screen seems empty, replace the toner cartridge of the displayed color. " appears, replace the photo conductor unit. See p.109 "Replacing the Photo Conductor Unit". Clean the registration roller. Troubleshooting... Status Possible Causes, Descriptions, and Solutions White streaks or color streaks appear. • Toner is deteriorated or damaged. ...
Hardware Guide
Page 180
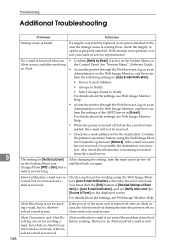
...For details about the settings, see Web Image Monitor Help. • When the power is turned off after resolving the Control Panel. Confirm the printer's operation history using the Web Image Moni- changed from [Off] to [Occurs & Fixed] on the Web Image Monitor, and then con- ...is sent. an Alert. • Access the printer through the Web browser, log on as an Administrator on the displayed screen. If the e-mail was and then back on the System Menu was sent but no error-solved e- Troubleshooting Additional Troubleshooting 9 168 Problems Solutions Strange noise is not ...
...For details about the settings, see Web Image Monitor Help. • When the power is turned off after resolving the Control Panel. Confirm the printer's operation history using the Web Image Moni- changed from [Off] to [Occurs & Fixed] on the Web Image Monitor, and then con- ...is sent. an Alert. • Access the printer through the Web browser, log on as an Administrator on the displayed screen. If the e-mail was and then back on the System Menu was sent but no error-solved e- Troubleshooting Additional Troubleshooting 9 168 Problems Solutions Strange noise is not ...

Hardware Guide
Page 181
... optional Bluetooth interface unit, do the following: • Transmit fewer print jobs. • Make sure no date information is slow. Move the printer or client computer if necessary. Additional Troubleshooting Problems Solutions Alert-notification level was purchased for obtaining time information from the cluded in sent e-mail, the mail SNTP server. Refer...
... optional Bluetooth interface unit, do the following: • Transmit fewer print jobs. • Make sure no date information is slow. Move the printer or client computer if necessary. Additional Troubleshooting Problems Solutions Alert-notification level was purchased for obtaining time information from the cluded in sent e-mail, the mail SNTP server. Refer...

Hardware Guide
Page 182
Troubleshooting 9 170
Troubleshooting 9 170
Hardware Guide
Page 201
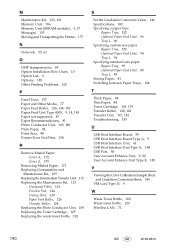
INDEX 1284 Interface Board, 9, 39, 61 802.11b Interface Unit, 9, 33, 71 A Additional Troubleshooting, 168 Adhesive labels, 85 Adjusting the Color Registration, 143 Adjusting Tray Registration, 152 Appendix, 177 Attaching 1284 Interface Board, 39 Attaching 802.11b Interface Unit, 33 Attaching ...Ethernet Port, 55 F Friction Pad, 124, 136, 181 Fusing Unit, 130, 181 G Gigabit Ethernet Board, 43, 55 Gigabit Ethernet Board Type A, 188 Guide to the Printer Control Panel, 5 Exterior -Front View, 1 Exterior -Rear View, 3 Inside, 4 H Hard Disk Drive, 9, 27 Hard Disk Drive Type 4000, 185 How to Read ...
INDEX 1284 Interface Board, 9, 39, 61 802.11b Interface Unit, 9, 33, 71 A Additional Troubleshooting, 168 Adhesive labels, 85 Adjusting the Color Registration, 143 Adjusting Tray Registration, 152 Appendix, 177 Attaching 1284 Interface Board, 39 Attaching 802.11b Interface Unit, 33 Attaching ...Ethernet Port, 55 F Friction Pad, 124, 136, 181 Fusing Unit, 130, 181 G Gigabit Ethernet Board, 43, 55 Gigabit Ethernet Board Type A, 188 Guide to the Printer Control Panel, 5 Exterior -Front View, 1 Exterior -Rear View, 3 Inside, 4 H Hard Disk Drive, 9, 27 Hard Disk Drive Type 4000, 185 How to Read ...
Hardware Guide
Page 202
..., 87 Paper Recommendations, 81 Photo Conductor Unit, 109, 180 Plain Paper, 82 Print Area, 88 Printer Does Not Print, 158 R Remove Misfed Paper Cover A, 172 Cover Z, 175 Removing Misfed Paper, ... 84 Thin Paper, 84 Toner Cartridge, 105, 179 Transfer Roller, 128, 181 Transfer Unit, 115, 181 Troubleshooting, 155 U USB Host Interface Board, 59 USB Host Interface Board Type A, 9 USB Host Interface Unit,..., 58 User Account Enhance Unit, 9, 22 User Account Enhance Unit Type E, 185 V Viewing the Color Calibration Sample Sheet and Gradation Correction Sheet, 149 VM Card Type D, 9 W Waste Toner Bottle, 180...
..., 87 Paper Recommendations, 81 Photo Conductor Unit, 109, 180 Plain Paper, 82 Print Area, 88 Printer Does Not Print, 158 R Remove Misfed Paper Cover A, 172 Cover Z, 175 Removing Misfed Paper, ... 84 Thin Paper, 84 Toner Cartridge, 105, 179 Transfer Roller, 128, 181 Transfer Unit, 115, 181 Troubleshooting, 155 U USB Host Interface Board, 59 USB Host Interface Board Type A, 9 USB Host Interface Unit,..., 58 User Account Enhance Unit, 9, 22 User Account Enhance Unit Type E, 185 V Viewing the Color Calibration Sample Sheet and Gradation Correction Sheet, 149 VM Card Type D, 9 W Waste Toner Bottle, 180...
Software User Guide
Page 6
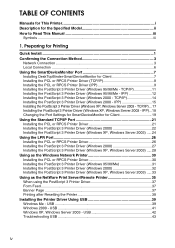
...iii Symbols ...iii 1. TCP/IP)... 17 Installing the PostScript 3 Printer Driver (Windows XP, Windows Server 2003 - USB 41 Windows XP, Windows Server 2003 - USB 42 Troubleshooting USB 43 iv TCP/IP 11 Installing the PostScript 3 Printer Driver (Windows 95/98/Me - TABLE OF CONTENTS Manuals for ...This Printer i Description for Client 19 Using the Standard TCP/IP Port 21 Installing the...
...iii Symbols ...iii 1. TCP/IP)... 17 Installing the PostScript 3 Printer Driver (Windows XP, Windows Server 2003 - USB 41 Windows XP, Windows Server 2003 - USB 42 Troubleshooting USB 43 iv TCP/IP 11 Installing the PostScript 3 Printer Driver (Windows 95/98/Me - TABLE OF CONTENTS Manuals for ...This Printer i Description for Client 19 Using the Standard TCP/IP Port 21 Installing the...
Software User Guide
Page 55
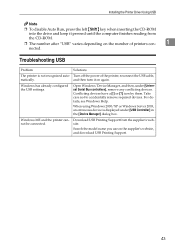
... ❒ The number after "USB" varies depending on the number of the printer, reconnect the USB cable, matically. Open Windows' Device Manager, and then, under... box. For details, see Windows Help. Windows ME and the printer cannot be connected. Windows has already configured the USB settings. Conflicting devices have a...[!] or [?] icon by them. Turn off the power of printers con- 1 nected. When using Windows 2000/XP or Windows Server...devices. Search the model name you use on again. Installing the Printer Driver Using USB Note ❒ To disable Auto Run, press ...
... ❒ The number after "USB" varies depending on the number of the printer, reconnect the USB cable, matically. Open Windows' Device Manager, and then, under... box. For details, see Windows Help. Windows ME and the printer cannot be connected. Windows has already configured the USB settings. Conflicting devices have a...[!] or [?] icon by them. Turn off the power of printers con- 1 nected. When using Windows 2000/XP or Windows Server...devices. Search the model name you use on again. Installing the Printer Driver Using USB Note ❒ To disable Auto Run, press ...

Quick Installation Guide
Page 3
...it separately, according to the printer. • For details about network environment settings, see "Interpreting the Configuration Page", Software Guide. If there is being used . For details about printing the configuration page, see "Troubleshooting", Hardware Guide. Select your network...the Network Address Automatically (Using DHCP) • When you want to the network. CLP30DN/CLP27DN/C7531dn/C7526dn/LP231cn/LP226cn/Aficio SP C411DN/Aficio SP C410DN Press the {Menu} key. Reading the LED Lamps ❖ For standard ethernet port Ethernet Configuration Make the following this...
...it separately, according to the printer. • For details about network environment settings, see "Interpreting the Configuration Page", Software Guide. If there is being used . For details about printing the configuration page, see "Troubleshooting", Hardware Guide. Select your network...the Network Address Automatically (Using DHCP) • When you want to the network. CLP30DN/CLP27DN/C7531dn/C7526dn/LP231cn/LP226cn/Aficio SP C411DN/Aficio SP C410DN Press the {Menu} key. Reading the LED Lamps ❖ For standard ethernet port Ethernet Configuration Make the following this...

