Operating Instructions
Page 8
... Bottle 56 vi Paper and Other Media Paper and Other Media Supported by This Printer 23 Paper Recommendations 25 Loading Paper...25 Storing Paper ...25 Types of RWARNING and RCAUTION labels i Manuals for This Printer ii How to Put the Printer 5 Unpacking ...7 Turning the Power On 13 Installing Options 14...14 Attaching Memory Unit Type F 256MB (DDR-SDRAM Module 16 3. TABLE OF CONTENTS Positions of Paper and Other Media 26 Paper Not Supported by This Printer 31 Print Area ...32 Loading Paper ...34 Loading Paper in Tray 1 34 Loading Paper in the Optional Paper Feed Unit 46 Loading ...
... Bottle 56 vi Paper and Other Media Paper and Other Media Supported by This Printer 23 Paper Recommendations 25 Loading Paper...25 Storing Paper ...25 Types of RWARNING and RCAUTION labels i Manuals for This Printer ii How to Put the Printer 5 Unpacking ...7 Turning the Power On 13 Installing Options 14...14 Attaching Memory Unit Type F 256MB (DDR-SDRAM Module 16 3. TABLE OF CONTENTS Positions of Paper and Other Media 26 Paper Not Supported by This Printer 31 Print Area ...32 Loading Paper ...34 Loading Paper in Tray 1 34 Loading Paper in the Optional Paper Feed Unit 46 Loading ...
Operating Instructions
Page 11
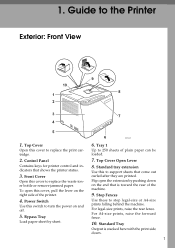
...stop legal-size or A4-size prints falling behind the machine. Stop Fences 4. Front Cover Open this switch to the Printer Exterior: Front View ASH022S 1. Use these to replace the waste toner bottle or remove jammed paper. Standard tray extension Use this cover to... support sheets that shows the printer status. 3. Tray 1 Open this to replace the print cartridge. Top Cover Open Lever Contains keys for printer control and indicators that come out curled after they are printed. Standard ...
...stop legal-size or A4-size prints falling behind the machine. Stop Fences 4. Front Cover Open this switch to the Printer Exterior: Front View ASH022S 1. Use these to replace the waste toner bottle or remove jammed paper. Standard tray extension Use this cover to... support sheets that shows the printer status. 3. Tray 1 Open this to replace the print cartridge. Top Cover Open Lever Contains keys for printer control and indicators that come out curled after they are printed. Standard ...
Operating Instructions
Page 12
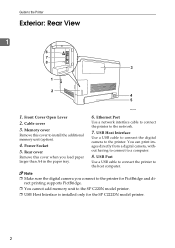
... Remove this cover when you connect to the SP C220N model printer. ❒ USB Host Interface is installed only for PictBridge and di- USB Port Use a USB cable to connect the printer to a computer. 8. Rear cover Remove this cover to the Printer Exterior: Rear View 1 ASH023S 1. Note &#...USB cable to connect the digital camera to the network. 7. Ethernet Port Use a network interface cable to connect the printer to the printer. rect printing supports PictBridge. ❒ You cannot add memory unit to the printer for the SP C222DN model printer. 2 Cable cover 3.
... Remove this cover when you connect to the SP C220N model printer. ❒ USB Host Interface is installed only for PictBridge and di- USB Port Use a USB cable to connect the printer to a computer. 8. Rear cover Remove this cover to the Printer Exterior: Rear View 1 ASH023S 1. Note &#...USB cable to connect the digital camera to the network. 7. Ethernet Port Use a network interface cable to connect the printer to the printer. rect printing supports PictBridge. ❒ You cannot add memory unit to the printer for the SP C222DN model printer. 2 Cable cover 3.
Operating Instructions
Page 33
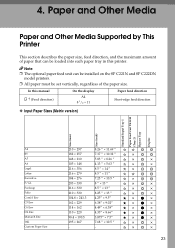
... ❒ The optional paper feed unit can be set vertically, regardless of paper that can be installed on the SP C221N and SP C222DN model printers. ❒ All paper must be loaded into each paper tray in this manual K ↑ (Feed direction) On the display A4 8 1/2 × 11 Paper feed ... 4.25" × 9.5" 6.38" × 9.02" 4.49" × 6.38" 4.33" × 8.66" 3.875" × 7.5" 7.68 " × 10.5 " - 23 4. Paper and Other Media Paper and Other Media Supported by This Printer This section describes the paper size, feed direction, and the maximum amount of the paper size.
... ❒ The optional paper feed unit can be set vertically, regardless of paper that can be installed on the SP C221N and SP C222DN model printers. ❒ All paper must be loaded into each paper tray in this manual K ↑ (Feed direction) On the display A4 8 1/2 × 11 Paper feed ... 4.25" × 9.5" 6.38" × 9.02" 4.49" × 6.38" 4.33" × 8.66" 3.875" × 7.5" 7.68 " × 10.5 " - 23 4. Paper and Other Media Paper and Other Media Supported by This Printer This section describes the paper size, feed direction, and the maximum amount of the paper size.
Operating Instructions
Page 34
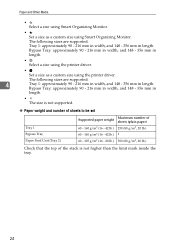
... - 216 mm in width, and 148 - 356 mm in length. The following sizes are supported: 4 Tray 1: approximately 90 - 216 mm in width, and 148 - 356 mm in length. • The size is not supported. ❖ Paper weight and number of sheets to be set Tray 1 Bypass Tray Paper Feed... the limit mark inside the tray. 24 The following sizes are supported: Tray 1: approximately 90 - 216 mm in width, and 148 - 356 mm in length. • Select a size using the printer driver. • Set a size as a custom size using the printer driver. Paper and Other Media • Select a size using...
... - 216 mm in width, and 148 - 356 mm in length. The following sizes are supported: 4 Tray 1: approximately 90 - 216 mm in width, and 148 - 356 mm in length. • The size is not supported. ❖ Paper weight and number of sheets to be set Tray 1 Bypass Tray Paper Feed... the limit mark inside the tray. 24 The following sizes are supported: Tray 1: approximately 90 - 216 mm in width, and 148 - 356 mm in length. • Select a size using the printer driver. • Set a size as a custom size using the printer driver. Paper and Other Media • Select a size using...
Operating Instructions
Page 36
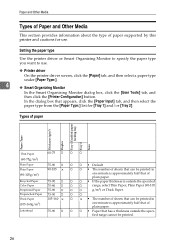
...; The number of sheets that can be printed in one minute is approximately half that of paper supported by this printer and cautions for [Tray 1] and/or [Tray 2]. Setting the paper type Use the printer driver or Smart Organizing Monitor to specify the paper type you want to use . Types of paper... Paper Type Thickness (g/m2) Duplex Tray 1 Enabled paper feeding tray Tray 2 Note Thin Paper (60-75g/m2) Plain Paper Plain Paper (90-105g/m2) Recycled Paper Color Paper Preprinted ...
...; The number of sheets that can be printed in one minute is approximately half that of paper supported by this printer and cautions for [Tray 1] and/or [Tray 2]. Setting the paper type Use the printer driver or Smart Organizing Monitor to specify the paper type you want to use . Types of paper... Paper Type Thickness (g/m2) Duplex Tray 1 Enabled paper feeding tray Tray 2 Note Thin Paper (60-75g/m2) Plain Paper Plain Paper (90-105g/m2) Recycled Paper Color Paper Preprinted ...

Operating Instructions
Page 41
monochrome and color copiers, ink-jet printers, etc.) • Special paper, such as they are not supported by other than the limitation • Paper with clips or staples 31 Paper Recommendations Paper Not Supported by This Printer Avoid using paper printed on which glue or base paper is dry enough to emit static electricity • Paper... likely when using the following paper as thermal paper, aluminum foil, carbon paper and conductive paper • Paper whose weight is heavier or lighter than 4 a laser printer (e.g.
monochrome and color copiers, ink-jet printers, etc.) • Special paper, such as they are not supported by other than the limitation • Paper with clips or staples 31 Paper Recommendations Paper Not Supported by This Printer Avoid using paper printed on which glue or base paper is dry enough to emit static electricity • Paper... likely when using the following paper as thermal paper, aluminum foil, carbon paper and conductive paper • Paper whose weight is heavier or lighter than 4 a laser printer (e.g.

Operating Instructions
Page 48
ASH037S To avoid paper jams, make sure the tray is securely inserted. 4 Note ❒ The upper limit differs depending on paper type; per. For details about paper types supported by the printer, see Software Guide. 38 thin paper or thick pa- Reference For details about the paper settings, see p.25 "Paper Recommendations". Check the label inside the tray to confirm the upper limit. Paper and Other Media G Carefully push Tray 1 straight into the printer.
ASH037S To avoid paper jams, make sure the tray is securely inserted. 4 Note ❒ The upper limit differs depending on paper type; per. For details about paper types supported by the printer, see Software Guide. 38 thin paper or thick pa- Reference For details about the paper settings, see p.25 "Paper Recommendations". Check the label inside the tray to confirm the upper limit. Paper and Other Media G Carefully push Tray 1 straight into the printer.

Operating Instructions
Page 53
Note ❒ To reinsert the extender, you might not feed in the example below, the paper might have to push it with moderate force. For details about paper types supported by the printer, see Software Guide. 43 Loading Paper If there is securely inserted. ASH119S I Carefully push Tray 1 straight into the printer. 4 ASH037S To avoid paper jams, make sure the tray is a gap between the paper and the front end paper guide, as in correctly. Reference For details about the paper settings, see p.25 "Paper Recommendations".
Note ❒ To reinsert the extender, you might not feed in the example below, the paper might have to push it with moderate force. For details about paper types supported by the printer, see Software Guide. 43 Loading Paper If there is securely inserted. ASH119S I Carefully push Tray 1 straight into the printer. 4 ASH037S To avoid paper jams, make sure the tray is a gap between the paper and the front end paper guide, as in correctly. Reference For details about the paper settings, see p.25 "Paper Recommendations".
Operating Instructions
Page 59
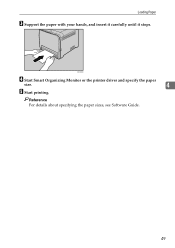
Reference For details about specifying the paper sizes, see Software Guide. 49 ASH060S D Start Smart Organizing Monitor or the printer driver and specify the paper size. 4 E Start printing. Loading Paper C Support the paper with your hands, and insert it carefully until it stops.
Reference For details about specifying the paper sizes, see Software Guide. 49 ASH060S D Start Smart Organizing Monitor or the printer driver and specify the paper size. 4 E Start printing. Loading Paper C Support the paper with your hands, and insert it carefully until it stops.
Operating Instructions
Page 81
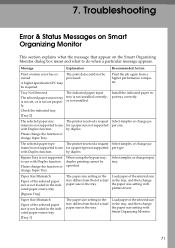
...Monitor dialog box mean and what to use for a paper size not supported by duplex Bypass Tray is not supported to do when a particular message appears. The printer received a request for a paper type not supported per type. Message Explanation Recommended Action Print overrun error has occurred. ...the tray differs from that of the selected paper size is not supported to use with printer driver. The selected paper type The printer received a request Select simplex or change pa- (name) is not supported to use with Duplex function. Please change the function or change...
...Monitor dialog box mean and what to use for a paper size not supported by duplex Bypass Tray is not supported to do when a particular message appears. The printer received a request for a paper type not supported per type. Message Explanation Recommended Action Print overrun error has occurred. ...the tray differs from that of the selected paper size is not supported to use with printer driver. The selected paper type The printer received a request Select simplex or change pa- (name) is not supported to use with Duplex function. Please change the function or change...
Operating Instructions
Page 116
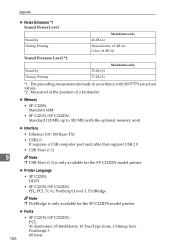
...fonts 106 Appendix ❖ Noise Emission *1 Sound Power Level Stand-by During Printing Mainframe only 43 dB (A) Monochrome: 63 dB (A) Color: 64 dB (A) Sound Pressure Level *2 Stand-by During Printing 35 dB (A) 57 dB (A) Mainframe only *1 : The preceding ... • USB2.0 It requires a USB computer port and cable that support USB 2.0. • USB Host (1.1) 9 Note ❒ USB Host (1.1) is only available for the SP C222DN model printer. ❖ Printer Language • SP C220N: DDST • SP C221N/SP C222DN: PJL, PCL 5c/6, PostScript Level 3, PictBridge Note ❒ ...
...fonts 106 Appendix ❖ Noise Emission *1 Sound Power Level Stand-by During Printing Mainframe only 43 dB (A) Monochrome: 63 dB (A) Color: 64 dB (A) Sound Pressure Level *2 Stand-by During Printing 35 dB (A) 57 dB (A) Mainframe only *1 : The preceding ... • USB2.0 It requires a USB computer port and cable that support USB 2.0. • USB Host (1.1) 9 Note ❒ USB Host (1.1) is only available for the SP C222DN model printer. ❖ Printer Language • SP C220N: DDST • SP C221N/SP C222DN: PJL, PCL 5c/6, PostScript Level 3, PictBridge Note ❒ ...

Operating Instructions
Page 118
... instructions, v L Loading paper, 25 optional paper feed unit, 34, 46 tray 1, 34 108 M Memory Unit Type F 256MB, 16, 107 Moving and transporting the printer, 100 N Network, 19 O Options, 107 Other printing problems, 82 P Paper and other media, 23 Paper feed roller, 66 Paper Feed Unit TK1010, 14, 107... Paper not supported, 31 Paper recommendations, 25 Print area, 32 Print cartridge, 51, 102 Printer does not print, 78 R Registration roller, 69 Remove misfed paper fusing unit, 90 optional paper feed unit, 92 ...
... instructions, v L Loading paper, 25 optional paper feed unit, 34, 46 tray 1, 34 108 M Memory Unit Type F 256MB, 16, 107 Moving and transporting the printer, 100 N Network, 19 O Options, 107 Other printing problems, 82 P Paper and other media, 23 Paper feed roller, 66 Paper Feed Unit TK1010, 14, 107... Paper not supported, 31 Paper recommendations, 25 Print area, 32 Print cartridge, 51, 102 Printer does not print, 78 R Registration roller, 69 Remove misfed paper fusing unit, 90 optional paper feed unit, 92 ...
Operating Instructions
Page 8
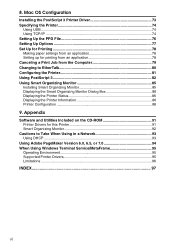
... Installing Smart Organizing Monitor 85 Displaying the Smart Organizing Monitor Dialog Box 86 Displaying the Printer Status 86 Displaying the Printer Information 86 Printer Configuration 88 9. 8. Mac OS Configuration Installing the PostScript 3 Printer Driver 73 Specifying the Printer 74 Using USB...74 Using TCP/IP ...74 Setting Up the PPD File 76 Setting...When Using in a Network 93 Using DHCP...93 Using Adobe PageMaker Version 6.0, 6.5, or 7.0 94 When Using Windows Terminal Service/MetaFrame 95 Operating Environment 95 Supported Printer Drivers 95 Limitations ...96 INDEX...97 vi
... Installing Smart Organizing Monitor 85 Displaying the Smart Organizing Monitor Dialog Box 86 Displaying the Printer Status 86 Displaying the Printer Information 86 Printer Configuration 88 9. 8. Mac OS Configuration Installing the PostScript 3 Printer Driver 73 Specifying the Printer 74 Using USB...74 Using TCP/IP ...74 Setting Up the PPD File 76 Setting...When Using in a Network 93 Using DHCP...93 Using Adobe PageMaker Version 6.0, 6.5, or 7.0 94 When Using Windows Terminal Service/MetaFrame 95 Operating Environment 95 Supported Printer Drivers 95 Limitations ...96 INDEX...97 vi

Operating Instructions
Page 9
1. Before installing the printer driver, check how the printer is appropriate to use this printer as a Windows printing port or network printer. Follow the driver installation procedure that is connected. ASH100S ❖ Operating system Windows 2000/XP/Vista, and ...Standard TCP/IP Reference For details about how to the connection method. Using this printer as the Windows printing port, see p.3 "Installing the Printer Driver in a Network Environment". 1 Network Connection This printer can be used as the Windows printing port Network connections can be established via ...
1. Before installing the printer driver, check how the printer is appropriate to use this printer as a Windows printing port or network printer. Follow the driver installation procedure that is connected. ASH100S ❖ Operating system Windows 2000/XP/Vista, and ...Standard TCP/IP Reference For details about how to the connection method. Using this printer as the Windows printing port, see p.3 "Installing the Printer Driver in a Network Environment". 1 Network Connection This printer can be used as the Windows printing port Network connections can be established via ...

Operating Instructions
Page 20
...install it pressed until the computer finishes reading from the CD-ROM provided. If the CD-ROM drive is installed automatically. B Connect the printer and computer using other ports (such as an administrator or Power Users group member. The Plug and Play is enabled and the [Found New... Hardware Wizard] dialog box appears, and USB Printing Support is D, the source files of the printer connected to the "USB" port is installed first. Log on . J Click [Finish]. To install additional drivers for this...
...install it pressed until the computer finishes reading from the CD-ROM provided. If the CD-ROM drive is installed automatically. B Connect the printer and computer using other ports (such as an administrator or Power Users group member. The Plug and Play is enabled and the [Found New... Hardware Wizard] dialog box appears, and USB Printing Support is D, the source files of the printer connected to the "USB" port is installed first. Log on . J Click [Finish]. To install additional drivers for this...

Operating Instructions
Page 21
...stored. Connect the USB cable firmly. The Plug and Play is enabled and the [Found New Hardware Wizard] dialog box appears, and USB Printing Support is added to the [Printers] window. E Select the [Specify location] check box, and then click [Next >]. If the CD-ROM drive is D, the source files of... to on. Note ❒ To disable Auto Run, press the {Shift} key when inserting the CD-ROM into the CD-ROM drive. A Check the printer's power switch is installed first. F Insert the CD-ROM into the drive and keep it from a list or specific location (Advanced)], and then click [...
...stored. Connect the USB cable firmly. The Plug and Play is enabled and the [Found New Hardware Wizard] dialog box appears, and USB Printing Support is added to the [Printers] window. E Select the [Specify location] check box, and then click [Next >]. If the CD-ROM drive is D, the source files of... to on. Note ❒ To disable Auto Run, press the {Shift} key when inserting the CD-ROM into the CD-ROM drive. A Check the printer's power switch is installed first. F Insert the CD-ROM into the drive and keep it from a list or specific location (Advanced)], and then click [...
Operating Instructions
Page 25
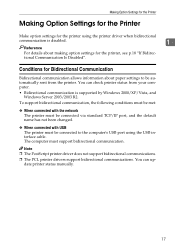
... default name has not been changed. ❖ When connected with USB The printer must support bidirectional communication. You can check printer status from the printer. The computer must be connected to the computer's USB port using the printer driver when bidirectional communication is supported by Windows 2000/XP/Vista, and Windows Server 2003/2003 R2. date...
... default name has not been changed. ❖ When connected with USB The printer must support bidirectional communication. You can check printer status from the printer. The computer must be connected to the computer's USB port using the printer driver when bidirectional communication is supported by Windows 2000/XP/Vista, and Windows Server 2003/2003 R2. date...
Operating Instructions
Page 26
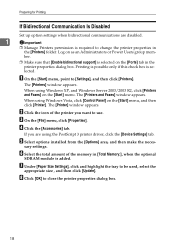
... change the printer properties in the [Printers] folder. F Select the total amount of the printer you are disabled. 1 Important ❒ Manage Printers permission is required to [Settings], and then click [Printers]. The [Printer] window appears. The [Printers] window appears. Log on as an Administrators or Power Users group member. ❒ Make sure that [Enable bidirectional support] is selected...
... change the printer properties in the [Printers] folder. F Select the total amount of the printer you are disabled. 1 Important ❒ Manage Printers permission is required to [Settings], and then click [Printers]. The [Printer] window appears. The [Printers] window appears. Log on as an Administrators or Power Users group member. ❒ Make sure that [Enable bidirectional support] is selected...
Operating Instructions
Page 39
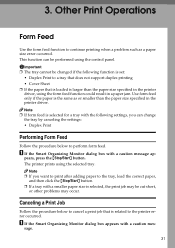
...correct paper, and then click the {Stop/Start} button. ❒ If a tray with the following function is set: • Duplex Print to the printer error occurred. A If the Smart Organizing Monitor dialog box with a caution mes- Note ❒ If you can be performed using the selected tray. ...Note ❒ If form feed is selected for a tray with a smaller paper size is related to a tray that does not support duplex printing • Cover Sheet ❒ If the paper that is selected, the print job may occur. 3. Other Print Operations Form Feed Use...
...correct paper, and then click the {Stop/Start} button. ❒ If a tray with the following function is set: • Duplex Print to the printer error occurred. A If the Smart Organizing Monitor dialog box with a caution mes- Note ❒ If you can be performed using the selected tray. ...Note ❒ If form feed is selected for a tray with a smaller paper size is related to a tray that does not support duplex printing • Cover Sheet ❒ If the paper that is selected, the print job may occur. 3. Other Print Operations Form Feed Use...


