Hardware Guide
Page 1
For safe and correct use this manual carefully before using the machine. Operating Instructions Hardware Guide 1 Guide to read the Safety Information before you use , be sure to the Printer 2 Installing Options 3 Connecting the Printer Cables 4 Configuration 5 Paper and Other Media 6 Replacing Consumables 7 Cleaning the Printer 8 Adjusting the Printer 9 Troubleshooting 10 Removing Misfed Paper 11 Appendix Read this machine and keep it handy for future reference.
For safe and correct use this manual carefully before using the machine. Operating Instructions Hardware Guide 1 Guide to read the Safety Information before you use , be sure to the Printer 2 Installing Options 3 Connecting the Printer Cables 4 Configuration 5 Paper and Other Media 6 Replacing Consumables 7 Cleaning the Printer 8 Adjusting the Printer 9 Troubleshooting 10 Removing Misfed Paper 11 Appendix Read this machine and keep it handy for future reference.
Hardware Guide
Page 3
...Host Interface Board...54 Installing a Camera Direct Print Card or Security Card 56 3. Guide to Read This Manual...8 Description for This Printer...7 How to the Printer Exterior: Front View...11 Exterior: Rear View...13 Interior...15 Control Panel...17 Display Panel...19 Reading the Display and Using Keys... Options...21 Order of WARNING and CAUTION Labels 5 Manuals for the Specified Model...9 Installing the Operating Instructions...10 1. Connecting the Printer Cables Ethernet Cable Connection...59 Reading the LED Lamps...61 USB Cable Connection...62 Digital Camera Connection...63 1
...Host Interface Board...54 Installing a Camera Direct Print Card or Security Card 56 3. Guide to Read This Manual...8 Description for This Printer...7 How to the Printer Exterior: Front View...11 Exterior: Rear View...13 Interior...15 Control Panel...17 Display Panel...19 Reading the Display and Using Keys... Options...21 Order of WARNING and CAUTION Labels 5 Manuals for the Specified Model...9 Installing the Operating Instructions...10 1. Connecting the Printer Cables Ethernet Cable Connection...59 Reading the LED Lamps...61 USB Cable Connection...62 Digital Camera Connection...63 1
Hardware Guide
Page 4
... 3)...83 Bypass Tray...83 Paper Recommendations...86 Loading Paper...86 Storing Paper...86 Types of Paper and Other Media...86 Paper Not Supported by This Printer...95 Print Area...95 Loading Paper...97 Loading Paper into the Paper Tray, 500/1000-sheet Paper Feed Unit 97 Loading Paper into the 2000...
... 3)...83 Bypass Tray...83 Paper Recommendations...86 Loading Paper...86 Storing Paper...86 Types of Paper and Other Media...86 Paper Not Supported by This Printer...95 Print Area...95 Loading Paper...97 Loading Paper into the Paper Tray, 500/1000-sheet Paper Feed Unit 97 Loading Paper into the 2000...
Hardware Guide
Page 5
...Unit 152 2000-sheet Paper Feed Unit...153 Cleaning the Registration Roller...155 Cleaning the Dustproof Glass...157 8. Adjusting the Printer Adjusting the Color Registration...159 Correcting the Color Gradation...161 Setting the Gradation Correction Value 161 Viewing the Color Calibration Sample ...Value 165 Adjusting Printing Position...167 9. Troubleshooting Error and Status Messages Appears on the Control Panel 171 Panel Tones...174 Printer Does Not Print...175 Checking the Port Connection...177 Printing Problems...178 Additional Troubleshooting...186 Removing Jammed Staples...188 When the...
...Unit 152 2000-sheet Paper Feed Unit...153 Cleaning the Registration Roller...155 Cleaning the Dustproof Glass...157 8. Adjusting the Printer Adjusting the Color Registration...159 Correcting the Color Gradation...161 Setting the Gradation Correction Value 161 Viewing the Color Calibration Sample ...Value 165 Adjusting Printing Position...167 9. Troubleshooting Error and Status Messages Appears on the Control Panel 171 Panel Tones...174 Printer Does Not Print...175 Checking the Port Connection...177 Printing Problems...178 Additional Troubleshooting...186 Removing Jammed Staples...188 When the...
Hardware Guide
Page 6
... Finisher is Installed...213 Paper Misfeed Message (Y)...217 Paper Misfeed Message (Z)...218 Duplex Print Always Misfeeds...220 11. Appendix Moving and Transporting the Printer...223 Moving the Printer...223 Consumables...226 Toner...226 Photo Conductor Unit...227 Waste Toner Bottle...227 Staple Cartridge...227 Intermediate Transfer Unit...228 Fusing Unit...228 Specifications...
... Finisher is Installed...213 Paper Misfeed Message (Y)...217 Paper Misfeed Message (Z)...218 Duplex Print Always Misfeeds...220 11. Appendix Moving and Transporting the Printer...223 Moving the Printer...223 Consumables...226 Toner...226 Photo Conductor Unit...227 Waste Toner Bottle...227 Staple Cartridge...227 Intermediate Transfer Unit...228 Fusing Unit...228 Specifications...
Hardware Guide
Page 9
... authentication. 7 It explains security functions that the administrators can use of the machine. Security Guide Contains information for administrators of the machine. Manuals for This Printer Refer to a computer, and installing its driver. Also refer to error messages, and resolving jams. Software Guide Contains information about using this . Hardware Guide (this...
... authentication. 7 It explains security functions that the administrators can use of the machine. Security Guide Contains information for administrators of the machine. Manuals for This Printer Refer to a computer, and installing its driver. Also refer to error messages, and resolving jams. Software Guide Contains information about using this . Hardware Guide (this...
Hardware Guide
Page 11
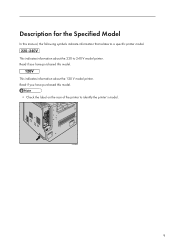
This indicates information about the 120 V model printer. Read if you have purchased this model. • Check the label on the rear of the printer to 240 V model printer. This indicates information about the 220 to identify the printer's model. ATU088S 9 Description for the Specified Model In this model. Read if you have purchased this manual, the following symbols indicate information that relates to a specific printer model.
This indicates information about the 120 V model printer. Read if you have purchased this model. • Check the label on the rear of the printer to 240 V model printer. This indicates information about the 220 to identify the printer's model. ATU088S 9 Description for the Specified Model In this model. Read if you have purchased this manual, the following symbols indicate information that relates to a specific printer model.

Hardware Guide
Page 12
...the Operating Instructions The CD-ROM "Manuals" provided with this case, launch "Setup.exe" in the [Start] menu, select this printer driver, and then click [Uninstall]. Follow the instructions on "index.htm". 10 Click [Finish] when the installation is not automatically ...Web browser and the simplified version of the manuals: a standard version and a simpler version. Click [Install manuals]. 5. In this printer contains HTML version Operating Instructions. Follow the instructions below to complete the installation. 6. Select the appropriate version for your operating environment....
...the Operating Instructions The CD-ROM "Manuals" provided with this case, launch "Setup.exe" in the [Start] menu, select this printer driver, and then click [Uninstall]. Follow the instructions on "index.htm". 10 Click [Finish] when the installation is not automatically ...Web browser and the simplified version of the manuals: a standard version and a simpler version. Click [Install manuals]. 5. In this printer contains HTML version Operating Instructions. Follow the instructions below to complete the installation. 6. Select the appropriate version for your operating environment....
Hardware Guide
Page 13
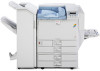
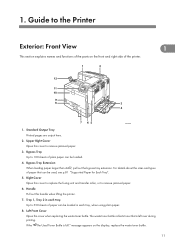
..., or to 550 sheets of paper can be loaded in each tray, when using plain paper. 8. Left Front Cover Open this handle when lifting the printer. 7. 1. If the " The Used Toner Bottle is left over during printing. message appears on the front and right side of plain paper can be ...loaded. 4. Bypass Tray Up to 100 sheets of the printer. Handle Pull out this cover when replacing the waste toner bottle. ATU093S 1. Bypass Tray Extension When loading paper larger than A4 , pull out the ...
..., or to 550 sheets of paper can be loaded in each tray, when using plain paper. 8. Left Front Cover Open this handle when lifting the printer. 7. 1. If the " The Used Toner Bottle is left over during printing. message appears on the front and right side of plain paper can be ...loaded. 4. Bypass Tray Up to 100 sheets of the printer. Handle Pull out this cover when replacing the waste toner bottle. ATU093S 1. Bypass Tray Extension When loading paper larger than A4 , pull out the ...
Hardware Guide
Page 14
Front Cover 1 Open this switch to turn the power on or off. 10. Control Panel Contains keys for Each Tray". 12 Paper Support Extend the paper support when printing to the Printer 9. 1. Power Switch Use this when replacing the toner, photo conductor units or intermediate transfer unit. 11. Guide to paper larger than A3 . • p.81 "Supported Paper for printer control and a display that shows printer status. 12.
Front Cover 1 Open this switch to turn the power on or off. 10. Control Panel Contains keys for Each Tray". 12 Paper Support Extend the paper support when printing to the Printer 9. 1. Power Switch Use this when replacing the toner, photo conductor units or intermediate transfer unit. 11. Guide to paper larger than A3 . • p.81 "Supported Paper for printer control and a display that shows printer status. 12.
Hardware Guide
Page 15
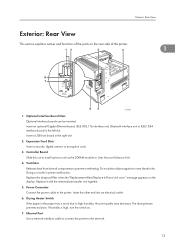
... other end into an electrical outlet. 6. Insert a USB host board in printer malfunction. Doing so results in the right slot. 2. Ethernet Port Use a network interface cable to connect the printer to install options such as the SDRAM module or User Account Enhance Unit. ...the print quality may decrease. Replace it with the intermediate transfer unit together. 5. Ventilator Releases heat from internal components to the printer. Power Connector Connect the power cable to prevent overheating. The drying heater prevents moisture. Exterior: Rear View Exterior: Rear View ...
... other end into an electrical outlet. 6. Insert a USB host board in printer malfunction. Doing so results in the right slot. 2. Ethernet Port Use a network interface cable to connect the printer to install options such as the SDRAM module or User Account Enhance Unit. ...the print quality may decrease. Replace it with the intermediate transfer unit together. 5. Ventilator Releases heat from internal components to the printer. Power Connector Connect the power cable to prevent overheating. The drying heater prevents moisture. Exterior: Rear View Exterior: Rear View ...

Hardware Guide
Page 16
USB Port Use a USB cable to connect the printer to the Printer 8. Guide to a host computer. 1 14 1.
USB Port Use a USB cable to connect the printer to the Printer 8. Guide to a host computer. 1 14 1.
Hardware Guide
Page 17
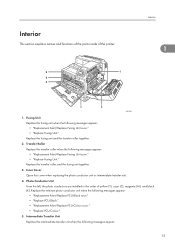
... (K). Replace the transfer roller and the fusing unit together. 3. Photo Conductor Unit From the left, the photo conductors are installed in the order of the printer. Replace the fusing unit and the transfer roller together. 2.
... (K). Replace the transfer roller and the fusing unit together. 3. Photo Conductor Unit From the left, the photo conductors are installed in the order of the printer. Replace the fusing unit and the transfer roller together. 2.

Hardware Guide
Page 18
Replace the relevant toner when the following messages appear: • " Out of black (K), yellow (Y), cyan (C), and magenta (M). 1. Guide to the Printer • "Replacement Alert/Replace IntTrans Unit soon." • "Replace IntTrans Unit." 6. Toner 1 From the left, the toner is installed in the order of toner." • " Add toner." 16
Replace the relevant toner when the following messages appear: • " Out of black (K), yellow (Y), cyan (C), and magenta (M). 1. Guide to the Printer • "Replacement Alert/Replace IntTrans Unit soon." • "Replace IntTrans Unit." 6. Toner 1 From the left, the toner is installed in the order of toner." • " Add toner." 16

Hardware Guide
Page 19
...1. When the keys appear in each direction. For details about energy saver mode, see Software Guide. 2. The Data In indicator lights up when a printer error occurs. Follow the instructions that appear on . It is unlit when the power is online, press this key to cancel an ongoing print job...to confirm settings, or setting values, or move the cursor in this manual, press the scroll key of the control panel. Display Displays current printer status and error messages. Selection Keys Correspond to the function items shown on the bottom line of the display. 3. [Escape] Key Press this...
...1. When the keys appear in each direction. For details about energy saver mode, see Software Guide. 2. The Data In indicator lights up when a printer error occurs. Follow the instructions that appear on . It is unlit when the power is online, press this key to cancel an ongoing print job...to confirm settings, or setting values, or move the cursor in this manual, press the scroll key of the control panel. Display Displays current printer status and error messages. Selection Keys Correspond to the function items shown on the bottom line of the display. 3. [Escape] Key Press this...

Hardware Guide
Page 20
When the lamp is lit, the printer is online, enabling data reception from connected computers. 1 When the lamp is unlit, the printer is online or offline. Guide to the Printer 11. [Online] Key Indicates whether the printer is offline, disabling data reception from the connected computers. Press this to the initial screen. 18 While configuring settings, press the [Online] key to return to switch between online and offline status. 1.
When the lamp is lit, the printer is online, enabling data reception from connected computers. 1 When the lamp is unlit, the printer is online or offline. Guide to the Printer 11. [Online] Key Indicates whether the printer is offline, disabling data reception from the connected computers. Press this to the initial screen. 18 While configuring settings, press the [Online] key to return to switch between online and offline status. 1.
Hardware Guide
Page 21
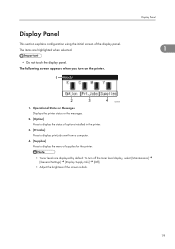
... Panel 1 AQC060S 1. Operational Status or Messages Displays the printer status or the messages. 2. [Option] Press to display the status of options installed in the printer. 3. [Prt.Jobs] Press to display print jobs sent from a computer. 4. [Supplies] Press to display the menu of the ...display panel. Display Panel This section explains configuration using the initial screen of supplies for the printer. • Toner levels are highlighted when selected. • Do not touch the display panel. The items are displayed by default. The ...
... Panel 1 AQC060S 1. Operational Status or Messages Displays the printer status or the messages. 2. [Option] Press to display the status of options installed in the printer. 3. [Prt.Jobs] Press to display print jobs sent from a computer. 4. [Supplies] Press to display the menu of the ...display panel. Display Panel This section explains configuration using the initial screen of supplies for the printer. • Toner levels are highlighted when selected. • Do not touch the display panel. The items are displayed by default. The ...
Hardware Guide
Page 22
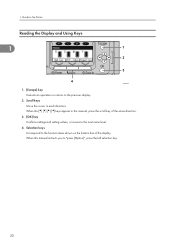
1. Selection keys Correspond to the function items shown on the bottom line of the same direction. 3. [OK] key Confirms settings and setting values, or moves to the next menu level. 4. Guide to the Printer Reading the Display and Using Keys 1 ATU051S 1. [Escape] key Cancels an operation or returns to "press [Option]", press the left selection key. 20 When the keys appear in each direction. Scroll keys Move the cursor in this manual instructs you to the previous display. 2. When this manual, press the scroll key of the display.
1. Selection keys Correspond to the function items shown on the bottom line of the same direction. 3. [OK] key Confirms settings and setting values, or moves to the next menu level. 4. Guide to the Printer Reading the Display and Using Keys 1 ATU051S 1. [Escape] key Cancels an operation or returns to "press [Option]", press the left selection key. 20 When the keys appear in each direction. Scroll keys Move the cursor in this manual instructs you to the previous display. 2. When this manual, press the scroll key of the display.

Hardware Guide
Page 23
... specifications of the options listed below, contact your sales or service representative. 21 Components inside the machine become very hot, and can improve printer performance and expand the available features. Option List Description Tray Unit TK3000 500-sheet paper feed unit Paper Feed Unit PB3000 1000-sheet paper feed... installation of each option, see p.229 "Specifications". 2 • Before installing options, the machine should be turned off and unplugged for this printer. Installing Options Available Options By installing options, you can cause a burn if touched.
... specifications of the options listed below, contact your sales or service representative. 21 Components inside the machine become very hot, and can improve printer performance and expand the available features. Option List Description Tray Unit TK3000 500-sheet paper feed unit Paper Feed Unit PB3000 1000-sheet paper feed... installation of each option, see p.229 "Specifications". 2 • Before installing options, the machine should be turned off and unplugged for this printer. Installing Options Available Options By installing options, you can cause a burn if touched.

Hardware Guide
Page 24
In this case, attach the 500-sheet paper feed unit to the 1000-sheet paper feed unit before attaching to the printer. 2. Install a camera direct print card or security card Insert the camera direct print card or security card in combination with the 1000-sheet paper feed ...
In this case, attach the 500-sheet paper feed unit to the 1000-sheet paper feed unit before attaching to the printer. 2. Install a camera direct print card or security card Insert the camera direct print card or security card in combination with the 1000-sheet paper feed ...


