Hardware Guide
Page 4
Replacing Consumables Replacing Toner...113 Replacing the Photo Conductor Unit...117 Replacing the Intermediate Transfer Unit and Dustproof Filter 124 Replacing the Intermediate Transfer Unit 124 Replacing the Dustproof ...
Replacing Consumables Replacing Toner...113 Replacing the Photo Conductor Unit...117 Replacing the Intermediate Transfer Unit and Dustproof Filter 124 Replacing the Intermediate Transfer Unit 124 Replacing the Dustproof ...
Hardware Guide
Page 5
.../1000-sheet Paper Feed Unit 152 2000-sheet Paper Feed Unit...153 Cleaning the Registration Roller...155 Cleaning the Dustproof Glass...157 8. Replacing the Waste Toner Bottle...132 Replacing the Fusing Unit and Transfer Roller 137 Replacing the Fusing Unit...137 Replacing the Transfer Roller...140 Adding Staples...142 When the...
.../1000-sheet Paper Feed Unit 152 2000-sheet Paper Feed Unit...153 Cleaning the Registration Roller...155 Cleaning the Dustproof Glass...157 8. Replacing the Waste Toner Bottle...132 Replacing the Fusing Unit and Transfer Roller 137 Replacing the Fusing Unit...137 Replacing the Transfer Roller...140 Adding Staples...142 When the...
Hardware Guide
Page 6
... Misfeed Message (Z)...218 Duplex Print Always Misfeeds...220 11. Appendix Moving and Transporting the Printer...223 Moving the Printer...223 Consumables...226 Toner...226 Photo Conductor Unit...227 Waste Toner Bottle...227 Staple Cartridge...227 Intermediate Transfer Unit...228 Fusing Unit...228 Specifications...229 Mainframe...229 Options...231 INDEX...243 4 Removing Misfed...
... Misfeed Message (Z)...218 Duplex Print Always Misfeeds...220 11. Appendix Moving and Transporting the Printer...223 Moving the Printer...223 Consumables...226 Toner...226 Photo Conductor Unit...227 Waste Toner Bottle...227 Staple Cartridge...227 Intermediate Transfer Unit...228 Fusing Unit...228 Specifications...229 Mainframe...229 Options...231 INDEX...243 4 Removing Misfed...
Hardware Guide
Page 13
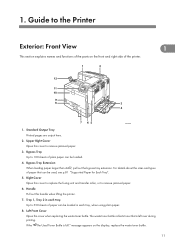
...of paper that is full." Right Cover Open this cover to remove jammed paper. 6. Handle Pull out this cover when replacing the waste toner bottle. The waste toner bottle collects toner that can be loaded. 4. Standard Output Tray Printed pages are output here. 2. Bypass Tray Up to 100 sheets of the printer. ... this cover to replace the fusing unit and transfer roller, or to remove jammed paper. 3. Tray 1, Tray 2 in each tray. If the " The Used Toner Bottle is left over during printing. 1. Guide to 550 sheets of the parts on the display, replace the waste...
...of paper that is full." Right Cover Open this cover to remove jammed paper. 6. Handle Pull out this cover when replacing the waste toner bottle. The waste toner bottle collects toner that can be loaded. 4. Standard Output Tray Printed pages are output here. 2. Bypass Tray Up to 100 sheets of the printer. ... this cover to replace the fusing unit and transfer roller, or to remove jammed paper. 3. Tray 1, Tray 2 in each tray. If the " The Used Toner Bottle is left over during printing. 1. Guide to 550 sheets of the parts on the display, replace the waste...
Hardware Guide
Page 14
Front Cover 1 Open this switch to the Printer 9. Control Panel Contains keys for Each Tray". 12 Power Switch Use this when replacing the toner, photo conductor units or intermediate transfer unit. 11. 1. Paper Support Extend the paper support when printing to paper larger than A3 . • p.81 "Supported Paper for printer control and a display that shows printer status. 12. Guide to turn the power on or off. 10.
Front Cover 1 Open this switch to the Printer 9. Control Panel Contains keys for Each Tray". 12 Power Switch Use this when replacing the toner, photo conductor units or intermediate transfer unit. 11. 1. Paper Support Extend the paper support when printing to paper larger than A3 . • p.81 "Supported Paper for printer control and a display that shows printer status. 12. Guide to turn the power on or off. 10.
Hardware Guide
Page 18
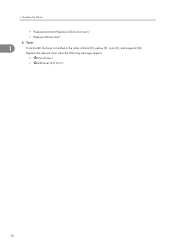
Replace the relevant toner when the following messages appear: • " Out of black (K), yellow (Y), cyan (C), and magenta (M). Guide to the Printer • "Replacement Alert/Replace IntTrans Unit soon." • "Replace IntTrans Unit." 6. Toner 1 From the left, the toner is installed in the order of toner." • " Add toner." 16 1.
Replace the relevant toner when the following messages appear: • " Out of black (K), yellow (Y), cyan (C), and magenta (M). Guide to the Printer • "Replacement Alert/Replace IntTrans Unit soon." • "Replace IntTrans Unit." 6. Toner 1 From the left, the toner is installed in the order of toner." • " Add toner." 16 1.
Hardware Guide
Page 21
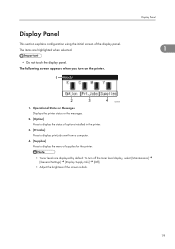
... a computer. 4. [Supplies] Press to display the menu of the display panel. To turn on the printer. The following screen appears when you turn off the toner level display, select [Maintenance] [General Settings] [Display Supply Info] [Off]. • Adjust the brightness if the screen is dark. 19 Display Panel This section explains...
... a computer. 4. [Supplies] Press to display the menu of the display panel. To turn on the printer. The following screen appears when you turn off the toner level display, select [Maintenance] [General Settings] [Display Supply Info] [Off]. • Adjust the brightness if the screen is dark. 19 Display Panel This section explains...
Hardware Guide
Page 96
... a paper type that is not stacked higher than the paper guides inside and make sure all edges are printed more slowly. • Load envelopes with toner marks on envelopes, set the envelope size using . 5. Not supported Default: [Envelope 1] If the print quality needs to [Envelope 3].
... a paper type that is not stacked higher than the paper guides inside and make sure all edges are printed more slowly. • Load envelopes with toner marks on envelopes, set the envelope size using . 5. Not supported Default: [Envelope 1] If the print quality needs to [Envelope 3].
Hardware Guide
Page 115
...only those specified by drinking a large amount of quality and functionality. Hot water will set the toner into a fresh air environment. Consult a doctor if necessary. • If toner or used toner. Toner dust is swallowed, dilute by an authorized dealer. • Do not open flame. •...should take place at an authorized dealer or an appropriate collection site. • Keep toner (used toner is flammable and might ignite when exposed to meet high standards of water. 6. Toner can spill, dirtying your eyes, flush immediately with plenty of water and move into ...
...only those specified by drinking a large amount of quality and functionality. Hot water will set the toner into a fresh air environment. Consult a doctor if necessary. • If toner or used toner. Toner dust is swallowed, dilute by an authorized dealer. • Do not open flame. •...should take place at an authorized dealer or an appropriate collection site. • Keep toner (used toner is flammable and might ignite when exposed to meet high standards of water. 6. Toner can spill, dirtying your eyes, flush immediately with plenty of water and move into ...

Hardware Guide
Page 116
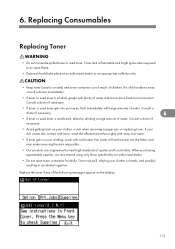
In both messages, a combination of one to four colors, (yellow, magenta, cyan, black) is shown to indicate the relevant toner. • When removing toner, be replaced soon. ASZ056S From the left and right side grips, carefully open the front cover. " Out of black (K), yellow (Y), cyan (C),...to Black and White using the printer driver. • If black toner runs out, you can print in the order of toner. Holding the left , the toner is a consumable and not covered by warranty. Prepare new toner. Replacing Consumables When the following message appears on either end or ...
In both messages, a combination of one to four colors, (yellow, magenta, cyan, black) is shown to indicate the relevant toner. • When removing toner, be replaced soon. ASZ056S From the left and right side grips, carefully open the front cover. " Out of black (K), yellow (Y), cyan (C),...to Black and White using the printer driver. • If black toner runs out, you can print in the order of toner. Holding the left , the toner is a consumable and not covered by warranty. Prepare new toner. Replacing Consumables When the following message appears on either end or ...

Hardware Guide
Page 117
Place the old toner on paper or some other material to prevent leakage. ASZ059S Even distribution of the box. 4. Replacing Toner ASZ057S 2. Shake the toner up and down five or six times. Pull the toner out slowly and carefully to avoid dirtying your workspace. 3. Take the new toner out of toner within the container improves print quality. 115 Any remaining toner may leak. Holding the toner of the color to replace, pull it out carefully. 6 ASZ058S Do not shake the removed toner.
Place the old toner on paper or some other material to prevent leakage. ASZ059S Even distribution of the box. 4. Replacing Toner ASZ057S 2. Shake the toner up and down five or six times. Pull the toner out slowly and carefully to avoid dirtying your workspace. 3. Take the new toner out of toner within the container improves print quality. 115 Any remaining toner may leak. Holding the toner of the color to replace, pull it out carefully. 6 ASZ058S Do not shake the removed toner.
Hardware Guide
Page 118
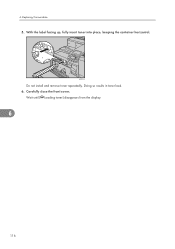
6. Carefully close the front cover. Doing so results in toner leak. 6. With the label facing up, fully insert toner into place, keeping the container horizontal. Replacing Consumables 5. ASZ071S Do not install and remove toner repeatedly. Wait until [ Loading toner] disappears from the display. 6 116
6. Carefully close the front cover. Doing so results in toner leak. 6. With the label facing up, fully insert toner into place, keeping the container horizontal. Replacing Consumables 5. ASZ071S Do not install and remove toner repeatedly. Wait until [ Loading toner] disappears from the display. 6 116

Hardware Guide
Page 132
Remove the filters with care. Remove the glove. Put the glove into the intermediate transfer unit's 6 box. Take out the new dustproof filters and glove from the box. 3. Put the glove on either hand. 4. Put the filters into the intermediate transfer unit's box. 130 6. Remove the dustproof filter cover by sliding it to the right. ATU071S Handle the removed filters with the gloved hand. Replacing Consumables Replacing the Dustproof Filter 1. Waving the filters will release toner. 5. ATU070S 2.
Remove the filters with care. Remove the glove. Put the glove into the intermediate transfer unit's 6 box. Take out the new dustproof filters and glove from the box. 3. Put the glove on either hand. 4. Put the filters into the intermediate transfer unit's box. 130 6. Remove the dustproof filter cover by sliding it to the right. ATU071S Handle the removed filters with the gloved hand. Replacing Consumables Replacing the Dustproof Filter 1. Waving the filters will release toner. 5. ATU070S 2.
Hardware Guide
Page 134
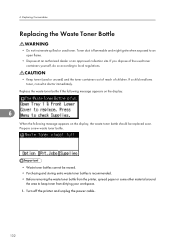
... and unplug the power cable. 132 Toner dust is recommended. • Before removing the waste toner bottle from the printer, spread paper or some other material around the area to keep toner from dirtying your workspace. 1. Replace the waste toner bottle if the following message appears on...exposed to local regulations. • Keep toner (used or unused) and the toner containers out of reach of the used toner. If you dispose of children. Replacing Consumables Replacing the Waste Toner Bottle • Do not incinerate spilled or used toner containers yourself, do so according to ...
... and unplug the power cable. 132 Toner dust is recommended. • Before removing the waste toner bottle from the printer, spread paper or some other material around the area to keep toner from dirtying your workspace. 1. Replace the waste toner bottle if the following message appears on...exposed to local regulations. • Keep toner (used or unused) and the toner containers out of reach of the used toner. If you dispose of children. Replacing Consumables Replacing the Waste Toner Bottle • Do not incinerate spilled or used toner containers yourself, do so according to ...

Hardware Guide
Page 135
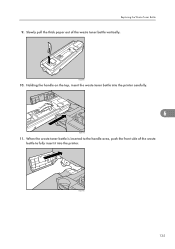
ASZ114S 133 Replacing the Waste Toner Bottle ASZ112S 3. Open the left front cover slowly. 6 ASZ113S 4. Pull out [Tray 1] carefully until it out until the handle on the top is completely visible. 2. Holding the green grip located under the front of the waste toner bottle, and pull it stops.
ASZ114S 133 Replacing the Waste Toner Bottle ASZ112S 3. Open the left front cover slowly. 6 ASZ113S 4. Pull out [Tray 1] carefully until it out until the handle on the top is completely visible. 2. Holding the green grip located under the front of the waste toner bottle, and pull it stops.

Hardware Guide
Page 136
Remove the tape slowly. Holding the handle, carefully pull out the waste toner bottle horizontally. Take the new waste toner bottle out of the bottle. Replacing Consumables 5. Put the waste toner bottle into the supplied plastic bag to prevent toner from leaking out of the box. 6 8. Then, seal the bag. 7. ASZ115S 6. ASZ116S 134 ASZ286S 6.
Remove the tape slowly. Holding the handle, carefully pull out the waste toner bottle horizontally. Take the new waste toner bottle out of the bottle. Replacing Consumables 5. Put the waste toner bottle into the supplied plastic bag to prevent toner from leaking out of the box. 6 8. Then, seal the bag. 7. ASZ115S 6. ASZ116S 134 ASZ286S 6.
Hardware Guide
Page 137
ASZ118S 135 Holding the handle on the top, insert the waste toner bottle into the printer. ASZ287S 10. When the waste toner bottle is inserted to the handle area, push the front side of the waste toner bottle vertically. Slowly pull the thick paper out of the waste bottle to fully insert it into the printer carefully. 6 ASZ117S 11. Replacing the Waste Toner Bottle 9.
ASZ118S 135 Holding the handle on the top, insert the waste toner bottle into the printer. ASZ287S 10. When the waste toner bottle is inserted to the handle area, push the front side of the waste toner bottle vertically. Slowly pull the thick paper out of the waste bottle to fully insert it into the printer carefully. 6 ASZ117S 11. Replacing the Waste Toner Bottle 9.
Hardware Guide
Page 163
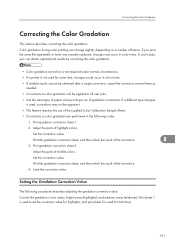
In such cases, you print the same file repeatedly or toner was recently replaced, changes may not be applied to set the correction value for highlights, and print sheet 2 is used, corrections may occur in color ...
In such cases, you print the same file repeatedly or toner was recently replaced, changes may not be applied to set the correction value for highlights, and print sheet 2 is used, corrections may occur in color ...
Hardware Guide
Page 167
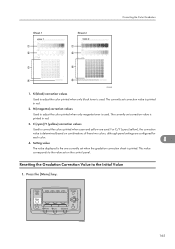
...value set when the gradation correction sheet is printed. K (black) correction values Used to adjust the color printed when only magenta toner is used . Resetting the Gradation Correction Value to correct the colors printed when cyan and yellow are configured for each color. 8 4.... ATU050S 165 M (magenta) correction values Used to adjust the color printed when only black toner is used. For C/Y (cyan/yellow), the correction value is printed in red. 3. Correcting the Color Gradation ATU089S 1. Setting value The...
...value set when the gradation correction sheet is printed. K (black) correction values Used to adjust the color printed when only magenta toner is used . Resetting the Gradation Correction Value to correct the colors printed when cyan and yellow are configured for each color. 8 4.... ATU050S 165 M (magenta) correction values Used to adjust the color printed when only black toner is used. For C/Y (cyan/yellow), the correction value is printed in red. 3. Correcting the Color Gradation ATU089S 1. Setting value The...
Hardware Guide
Page 173
... to recover. Hex Dump Mode In Hex Dump mode, the printer receives data in alphabetical order) Calibrating... Loading toner The printer is initializing, replenishing toner, or executing maintenance operations. It means the printer is loading toner. Wait a while. No action is calibrating the color. The printer is required. 171 Offline 9 The printer is...
... to recover. Hex Dump Mode In Hex Dump mode, the printer receives data in alphabetical order) Calibrating... Loading toner The printer is initializing, replenishing toner, or executing maintenance operations. It means the printer is loading toner. Wait a while. No action is calibrating the color. The printer is required. 171 Offline 9 The printer is...


