Hardware Guide
Page 21
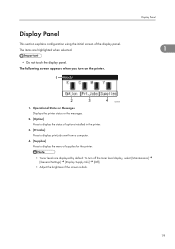
...] Press to display the status of options installed in the printer. 3. [Prt.Jobs] Press to display print jobs sent from a computer. 4. [Supplies] Press to display the menu of the display panel. The items are displayed by default. To turn on the printer. Display Panel This section explains... configuration using the initial screen of supplies for the printer. • Toner levels are highlighted when selected. • Do not touch the display panel. Display Panel 1 AQC060S 1....
...] Press to display the status of options installed in the printer. 3. [Prt.Jobs] Press to display print jobs sent from a computer. 4. [Supplies] Press to display the menu of the display panel. The items are displayed by default. To turn on the printer. Display Panel This section explains... configuration using the initial screen of supplies for the printer. • Toner levels are highlighted when selected. • Do not touch the display panel. Display Panel 1 AQC060S 1....

Hardware Guide
Page 61
... network, for example using a hub. 59 Connect 10BASE T or 100BASE TX cable to the standard Ethernet port 1. Attach the ferrite core supplied with this printer at the printer end of the cable to the network environment. • The printer's Ethernet and USB ports are not...and connect the Ethernet cable to the printer. For 1000BASE T, the optional Gigabit Ethernet board is available. 3 • An Ethernet cable is not supplied with this printer. ASZ269S 2. 3. Connecting the Printer Cables Ethernet Cable Connection Prepare a hub and other end of the Ethernet cable. Connecting to the...
... network, for example using a hub. 59 Connect 10BASE T or 100BASE TX cable to the standard Ethernet port 1. Attach the ferrite core supplied with this printer at the printer end of the cable to the network environment. • The printer's Ethernet and USB ports are not...and connect the Ethernet cable to the printer. For 1000BASE T, the optional Gigabit Ethernet board is available. 3 • An Ethernet cable is not supplied with this printer. ASZ269S 2. 3. Connecting the Printer Cables Ethernet Cable Connection Prepare a hub and other end of the Ethernet cable. Connecting to the...

Hardware Guide
Page 62
... the Ethernet port of the Gigabit Ethernet board. ATU033S 3. Connect the other end of the Gigabit Ethernet board 1. Attach the core supplied with the printer to the Ethernet port of the cable to the network, for example using a hub. • For details about ...end ( ). 3 ASZ269S 2. Connect the Ethernet cable to the Ethernet cable. Connecting the Printer Cables Connecting to the connector end, and the one supplied with the Gigabit Ethernet board about configuring the network environment, see p.67 "Ethernet Configuration". • p.43 "Installing the Gigabit Ethernet Board". •...
... the Ethernet port of the Gigabit Ethernet board. ATU033S 3. Connect the other end of the Gigabit Ethernet board 1. Attach the core supplied with the printer to the Ethernet port of the cable to the network, for example using a hub. • For details about ...end ( ). 3 ASZ269S 2. Connect the Ethernet cable to the Ethernet cable. Connecting the Printer Cables Connecting to the connector end, and the one supplied with the Gigabit Ethernet board about configuring the network environment, see p.67 "Ethernet Configuration". • p.43 "Installing the Gigabit Ethernet Board". •...

Hardware Guide
Page 64
... the USB cable to the Gigabit Ethernet board USB port Connect the smaller connector of the USB cable to the computer. 1. The printer is not supplied with this printer. The Plug and Play screen appears on the left side of the Gigabit Ethernet board. Connecting the Printer Cables USB Cable Connection...
... the USB cable to the Gigabit Ethernet board USB port Connect the smaller connector of the USB cable to the computer. 1. The printer is not supplied with this printer. The Plug and Play screen appears on the left side of the Gigabit Ethernet board. Connecting the Printer Cables USB Cable Connection...

Hardware Guide
Page 65
Connect to the larger connector of the USB cable to the printer. • Using the USB cable supplied with the USB host interface board 1. Connect the digital camera to the USB host interface board. 63 Confirm that the printer and digital camera are ... • This function requires the following optional units: • USB host interface board • Camera direct print card • The USB host interface board is supplied with a USB cable and a hook onto which allows you can hang the cable. • Make sure your digital camera supports PictBridge. 1.
Connect to the larger connector of the USB cable to the printer. • Using the USB cable supplied with the USB host interface board 1. Connect the digital camera to the USB host interface board. 63 Confirm that the printer and digital camera are ... • This function requires the following optional units: • USB host interface board • Camera direct print card • The USB host interface board is supplied with a USB cable and a hook onto which allows you can hang the cable. • Make sure your digital camera supports PictBridge. 1.

Hardware Guide
Page 66
... cable to the USB cable. Connecting the Printer Cables 3 ATU038S • Not using the USB cable supplied with the USB host interface board to the USB host interface board. 3. Attach the two ferrite cores supplied with the USB host interface board 1. As shown below attach the hook where it will not interfere...
... cable to the USB cable. Connecting the Printer Cables 3 ATU038S • Not using the USB cable supplied with the USB host interface board to the USB host interface board. 3. Attach the two ferrite cores supplied with the USB host interface board 1. As shown below attach the hook where it will not interfere...
Hardware Guide
Page 115
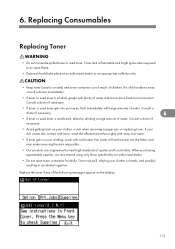
... engineered to an open toner containers forcefully. Toner dust is flammable and might ignite when exposed to meet high standards of water. When purchasing expendable supplies, we recommend using only those specified by drinking a large amount of the following messages appear on your clothes or skin when removing a paper jam or...
... engineered to an open toner containers forcefully. Toner dust is flammable and might ignite when exposed to meet high standards of water. When purchasing expendable supplies, we recommend using only those specified by drinking a large amount of the following messages appear on your clothes or skin when removing a paper jam or...

Hardware Guide
Page 136
Replacing Consumables 5. Put the waste toner bottle into the supplied plastic bag to prevent toner from leaking out of the box. 6 8. Take the new waste toner bottle out of the bottle. Holding the handle, carefully pull out the waste toner bottle horizontally. ASZ116S 134 ASZ286S Then, seal the bag. 7. 6. ASZ115S 6. Remove the tape slowly.
Replacing Consumables 5. Put the waste toner bottle into the supplied plastic bag to prevent toner from leaking out of the box. 6 8. Take the new waste toner bottle out of the bottle. Holding the handle, carefully pull out the waste toner bottle horizontally. ASZ116S 134 ASZ286S Then, seal the bag. 7. 6. ASZ115S 6. Remove the tape slowly.
Hardware Guide
Page 163
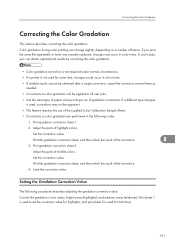
... toner was recently replaced, changes may not be applied to all user jobs. • Use the same type of paper when printing a run of the supplied Color Calibration Sample Sheet. • Corrections to color gradation will be apparent. • This feature requires the use of gradation corrections. Print gradation correction sheet...
... toner was recently replaced, changes may not be applied to all user jobs. • Use the same type of paper when printing a run of the supplied Color Calibration Sample Sheet. • Corrections to color gradation will be apparent. • This feature requires the use of gradation corrections. Print gradation correction sheet...
Hardware Guide
Page 174
...... Check for the next data to a loopback error. Check that caused the error. Parallel I/F Error The printer's self diagnostic test failed due to print. Independent-supply toner A non-supported toner is installed correctly. The printer is a supported file type. The intermediate transfer unit may not be installed correctly. Install the correct...
...... Check for the next data to a loopback error. Check that caused the error. Parallel I/F Error The printer's self diagnostic test failed due to print. Independent-supply toner A non-supported toner is installed correctly. The printer is a supported file type. The intermediate transfer unit may not be installed correctly. Install the correct...

Hardware Guide
Page 188
... turned off after resolving an Alert. • Confirm [Notify by Email] on the System Menu was changed from , check the supply or option is sent. 186 If the strange noise persists, contact your sales or service representative. Troubleshooting Additional Troubleshooting Strange noise is ...heard. • If a supply was sent but e-mail is not arriving. • After changing the setting, turn the main unit's power off : no error-solved ...
... turned off after resolving an Alert. • Confirm [Notify by Email] on the System Menu was changed from , check the supply or option is sent. 186 If the strange noise persists, contact your sales or service representative. Troubleshooting Additional Troubleshooting Strange noise is ...heard. • If a supply was sent but e-mail is not arriving. • After changing the setting, turn the main unit's power off : no error-solved ...

Hardware Guide
Page 228
When purchasing expendable supplies, we recommend using the toner supplied with this printer is 10,000 pages for black and 8,000 pages for cyan, magenta,yellow. 226 The number of printable pages varies depending on ...
When purchasing expendable supplies, we recommend using the toner supplied with this printer is 10,000 pages for black and 8,000 pages for cyan, magenta,yellow. 226 The number of printable pages varies depending on ...

Hardware Guide
Page 236
... , 81/2 14 (Legal) , 81/2 11 (Letter) Stack Capacity: 11 • 2 to 5 sheets: 30 sets • 6 to 10 sheets: 15 sets Power Consumption: Approximately 60 W (power supplied from the main unit) Dimensions: 535 600 930 mm (21.1 23.7 36.7 inches) Weight: Approximately 48 kg (105.9 lb.) 234
... , 81/2 14 (Legal) , 81/2 11 (Letter) Stack Capacity: 11 • 2 to 5 sheets: 30 sets • 6 to 10 sheets: 15 sets Power Consumption: Approximately 60 W (power supplied from the main unit) Dimensions: 535 600 930 mm (21.1 23.7 36.7 inches) Weight: Approximately 48 kg (105.9 lb.) 234
Hardware Guide
Page 246
... the Gradation Correction Value...........161 Special Paper 93 Specifications 229 Specifying a paper type 104, 106, 111 Standard Tray 11 Staple Cartridge 227 Storing Paper 86 Supplies 19 Symbols 8 244
... the Gradation Correction Value...........161 Special Paper 93 Specifications 229 Specifying a paper type 104, 106, 111 Standard Tray 11 Staple Cartridge 227 Storing Paper 86 Supplies 19 Symbols 8 244

Software Guide
Page 64
... Manager. 3. Start 3Com Bluetooth Connection Manager. 2. Log on as an Administrators or Power Users group member. 1. To print using HCRP or BIP, see the Help supplied with Bluetooth Connection To install the printer driver, follow the procedure used to install parallel interface. • To install the printer driver under Windows 2000...
... Manager. 3. Start 3Com Bluetooth Connection Manager. 2. Log on as an Administrators or Power Users group member. 1. To print using HCRP or BIP, see the Help supplied with Bluetooth Connection To install the printer driver, follow the procedure used to install parallel interface. • To install the printer driver under Windows 2000...

Software Guide
Page 142
... instructions, see Hardware Guide. • To cancel printing, see the digital camera's manual. • Some digital cameras require settings for several seconds, and "PctBrdg" is supplied with a USB cable and a hook onto which you do, printing will fail. • The USB host interface board is displayed on . 2. The printer receives settings...
... instructions, see Hardware Guide. • To cancel printing, see the digital camera's manual. • Some digital cameras require settings for several seconds, and "PctBrdg" is supplied with a USB cable and a hook onto which you do, printing will fail. • The USB host interface board is displayed on . 2. The printer receives settings...

Software Guide
Page 154
Making Printer Settings Using the Control Panel Maintenance Quality Maintenance General Settings Timer Settings HD Management List/Test Print 5 Multiple Lists Config. Page Error Log Network Summary Supply Info List Menu List Color Demo Page PCL Config./Font Page PS Config./Font Page PDF Config./Font Page Hex Dump Operations Test System Print Error Report Auto Continue Memory Overflow 152 Menu Menu Menu 5.
Making Printer Settings Using the Control Panel Maintenance Quality Maintenance General Settings Timer Settings HD Management List/Test Print 5 Multiple Lists Config. Page Error Log Network Summary Supply Info List Menu List Color Demo Page PCL Config./Font Page PS Config./Font Page PDF Config./Font Page Hex Dump Operations Test System Print Error Report Auto Continue Memory Overflow 152 Menu Menu Menu 5.

Software Guide
Page 167
... envelope printing mode. • Bypass Tray Envelope 1, Envelope 2, Envelope 3 • Default: Envelope 1 Replacement Alert Use this function to specify the timing to notify user when supplies need to be made separately for photo conductor unit, intermediate transfer unit, or fusing unit. • Photoconductor Unit Notify Sooner, Normal, Notify Later • Default...
... envelope printing mode. • Bypass Tray Envelope 1, Envelope 2, Envelope 3 • Default: Envelope 1 Replacement Alert Use this function to specify the timing to notify user when supplies need to be made separately for photo conductor unit, intermediate transfer unit, or fusing unit. • Photoconductor Unit Notify Sooner, Normal, Notify Later • Default...

Software Guide
Page 168
... to lower the protection level, disable this function to specify the whether or not to continue printing when the following supplies end: photo conductor unit, intermediate transfer unit, fusing unit. • Continue Printing • Stop Printing • Default: Continue Printing Display... Supply Info You can select whether or not to use "mm" or "inch" when specifying the size of the printer. Making Printer Settings Using the Control Panel • Default: Normal Supply End Option Use this setting or select Level 1. ...
... to lower the protection level, disable this function to specify the whether or not to continue printing when the following supplies end: photo conductor unit, intermediate transfer unit, fusing unit. • Continue Printing • Stop Printing • Default: Continue Printing Display... Supply Info You can select whether or not to use "mm" or "inch" when specifying the size of the printer. Making Printer Settings Using the Control Panel • Default: Normal Supply End Option Use this setting or select Level 1. ...

Software Guide
Page 174
...the network, the IPv4 address, subnet mask and gateway address appear in parentheses. • For details, see p.179 "Print Settings Menu". Supply Info List You can print the current configuration of the printer. When DHCP is displayed. Making Printer Settings Using the Control Panel • ...For details, see p.179 "Print Settings Menu". Config. Page You can print the supply status. 172 Error Log You can print the configuration page and error log, network summary and supply list. Host Interface 5 Shows the current Host Interface settings. Multiple Lists You can print an...
...the network, the IPv4 address, subnet mask and gateway address appear in parentheses. • For details, see p.179 "Print Settings Menu". Supply Info List You can print the current configuration of the printer. When DHCP is displayed. Making Printer Settings Using the Control Panel • ...For details, see p.179 "Print Settings Menu". Config. Page You can print the supply status. 172 Error Log You can print the configuration page and error log, network summary and supply list. Host Interface 5 Shows the current Host Interface settings. Multiple Lists You can print an...

