Hardware Guide
Page 1
For safe and correct use, be sure to the Printer 2 Installing Options 3 Connecting the Printer Cables 4 Configuration 5 Paper and Other Media 6 Replacing Consumables 7 Cleaning the Printer 8 Adjusting the Printer 9 Troubleshooting 10 Removing Misfed Paper 11 Appendix Read this manual carefully before using the machine. Operating Instructions Hardware Guide 1 Guide to read the Safety Information before you use this machine and keep it handy for future reference.
For safe and correct use, be sure to the Printer 2 Installing Options 3 Connecting the Printer Cables 4 Configuration 5 Paper and Other Media 6 Replacing Consumables 7 Cleaning the Printer 8 Adjusting the Printer 9 Troubleshooting 10 Removing Misfed Paper 11 Appendix Read this manual carefully before using the machine. Operating Instructions Hardware Guide 1 Guide to read the Safety Information before you use this machine and keep it handy for future reference.
Hardware Guide
Page 3
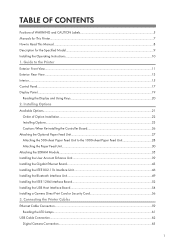
...the Printer Cables Ethernet Cable Connection...59 Reading the LED Lamps...61 USB Cable Connection...62 Digital Camera Connection...63 1 Installing Options Available Options...21 Order of WARNING and CAUTION Labels 5 Manuals for This Printer...7 How to Read This Manual...8 Description... for the Specified Model...9 Installing the Operating Instructions...10 1. TABLE OF CONTENTS Positions of Option Installation...22 Installing Options...23 Cautions When Re-installing the Controller Board 26 Attaching the Optional Paper Feed Unit...27 Attaching the...
...the Printer Cables Ethernet Cable Connection...59 Reading the LED Lamps...61 USB Cable Connection...62 Digital Camera Connection...63 1 Installing Options Available Options...21 Order of WARNING and CAUTION Labels 5 Manuals for This Printer...7 How to Read This Manual...8 Description... for the Specified Model...9 Installing the Operating Instructions...10 1. TABLE OF CONTENTS Positions of Option Installation...22 Installing Options...23 Cautions When Re-installing the Controller Board 26 Attaching the Optional Paper Feed Unit...27 Attaching the...
Hardware Guide
Page 5
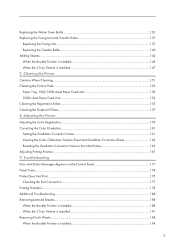
... Connection...177 Printing Problems...178 Additional Troubleshooting...186 Removing Jammed Staples...188 When the Booklet Finisher is Installed...188 When the 2 Tray Finisher is Installed...191 Removing Punch Waste...194 When the Booklet Finisher is Installed...147 7. Cleaning the Printer Cautions When Cleaning...151 Cleaning the Friction Pads...152 Paper Tray, 500/1000... the Fusing Unit and Transfer Roller 137 Replacing the Fusing Unit...137 Replacing the Transfer Roller...140 Adding Staples...142 When the Booklet Finisher is Installed...143 When the 2 Tray Finisher is...
... Connection...177 Printing Problems...178 Additional Troubleshooting...186 Removing Jammed Staples...188 When the Booklet Finisher is Installed...188 When the 2 Tray Finisher is Installed...191 Removing Punch Waste...194 When the Booklet Finisher is Installed...147 7. Cleaning the Printer Cautions When Cleaning...151 Cleaning the Friction Pads...152 Paper Tray, 500/1000... the Fusing Unit and Transfer Roller 137 Replacing the Fusing Unit...137 Replacing the Transfer Roller...140 Adding Staples...142 When the Booklet Finisher is Installed...143 When the 2 Tray Finisher is...
Hardware Guide
Page 6
...Bottle...227 Staple Cartridge...227 Intermediate Transfer Unit...228 Fusing Unit...228 Specifications...229 Mainframe...229 Options...231 INDEX...243 4 When the 2 Tray Finisher is Installed...213 Paper Misfeed Message (Y)...217 Paper Misfeed Message (Z)...218 Duplex Print Always Misfeeds...220 11. Removing Misfed Paper Removing Misfed Paper...197 Paper Misfeed Message... (A)...198 Paper Misfeed Message (B)...200 Paper Misfeed Message (C)...202 Paper Misfeed Message (D)...205 Paper Misfeed Message (R)...207 When the Booklet Finisher is Installed...207 When the 2 Tray Finisher is...
...Bottle...227 Staple Cartridge...227 Intermediate Transfer Unit...228 Fusing Unit...228 Specifications...229 Mainframe...229 Options...231 INDEX...243 4 When the 2 Tray Finisher is Installed...213 Paper Misfeed Message (Y)...217 Paper Misfeed Message (Z)...218 Duplex Print Always Misfeeds...220 11. Removing Misfed Paper Removing Misfed Paper...197 Paper Misfeed Message... (A)...198 Paper Misfeed Message (B)...200 Paper Misfeed Message (C)...202 Paper Misfeed Message (D)...205 Paper Misfeed Message (R)...207 When the Booklet Finisher is Installed...207 When the 2 Tray Finisher is...
Hardware Guide
Page 9
... of the machine. Security Guide Contains information for removing the printer from its box, connecting it to a computer, and installing its security functions. It explains security functions that the administrators can use to prevent data tampering or unauthorized use of this ...machine, its software, and its driver. Hardware Guide (this manual) Contains information about paper and procedures such as installing options, replacing consumables, responding to error messages, and resolving jams. Software Guide Contains information about safe usage of the machine. Also ...
... of the machine. Security Guide Contains information for removing the printer from its box, connecting it to a computer, and installing its security functions. It explains security functions that the administrators can use to prevent data tampering or unauthorized use of this ...machine, its software, and its driver. Hardware Guide (this manual) Contains information about paper and procedures such as installing options, replacing consumables, responding to error messages, and resolving jams. Software Guide Contains information about safe usage of the machine. Also ...

Hardware Guide
Page 12
... this case, launch "Setup.exe" in the [Start] menu, select this printer contains HTML version Operating Instructions. Click [Finish] when the installation is not automatically displayed, open the folder "MANUALLANG (language) \ (manual name) unv" on the CD-ROM "Manuals", and then double-...600 or higher monitor resolution • Web Browsers: • Microsoft Internet Explorer 5.5 SP2 or higher • Firefox 1.0 or higher 1. The installer starts. Click [Exit]. • The CD-ROM "Manuals" contains two versions of the Operating Instructions is complete. 7. Auto Run may not work...
... this case, launch "Setup.exe" in the [Start] menu, select this printer contains HTML version Operating Instructions. Click [Finish] when the installation is not automatically displayed, open the folder "MANUALLANG (language) \ (manual name) unv" on the CD-ROM "Manuals", and then double-...600 or higher monitor resolution • Web Browsers: • Microsoft Internet Explorer 5.5 SP2 or higher • Firefox 1.0 or higher 1. The installer starts. Click [Exit]. • The CD-ROM "Manuals" contains two versions of the Operating Instructions is complete. 7. Auto Run may not work...
Hardware Guide
Page 15
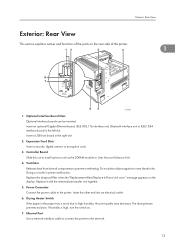
... slot. If humidity is moist due to high humidity, the print quality may decrease. Ethernet Port Use a network interface cable to connect the printer to install options such as the SDRAM module or User Account Enhance Unit. 4. Exterior: Rear View Exterior: Rear View This section explains names and functions of the...
... slot. If humidity is moist due to high humidity, the print quality may decrease. Ethernet Port Use a network interface cable to connect the printer to install options such as the SDRAM module or User Account Enhance Unit. 4. Exterior: Rear View Exterior: Rear View This section explains names and functions of the...
Hardware Guide
Page 17
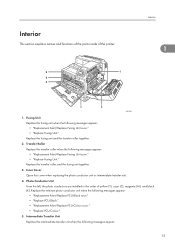
...; "Replace Fusing Unit." Transfer Roller Replace the transfer roller when the following messages appear: 15 Photo Conductor Unit From the left, the photo conductors are installed in the order of the printer. Interior 1 ASZ006S 1. Inner Cover Open this cover when replacing the photo conductor unit or intermediate transfer unit. 4. Replace the...
...; "Replace Fusing Unit." Transfer Roller Replace the transfer roller when the following messages appear: 15 Photo Conductor Unit From the left, the photo conductors are installed in the order of the printer. Interior 1 ASZ006S 1. Inner Cover Open this cover when replacing the photo conductor unit or intermediate transfer unit. 4. Replace the...

Hardware Guide
Page 18
Replace the relevant toner when the following messages appear: • " Out of black (K), yellow (Y), cyan (C), and magenta (M). Toner 1 From the left, the toner is installed in the order of toner." • " Add toner." 16 1. Guide to the Printer • "Replacement Alert/Replace IntTrans Unit soon." • "Replace IntTrans Unit." 6.
Replace the relevant toner when the following messages appear: • " Out of black (K), yellow (Y), cyan (C), and magenta (M). Toner 1 From the left, the toner is installed in the order of toner." • " Add toner." 16 1. Guide to the Printer • "Replacement Alert/Replace IntTrans Unit soon." • "Replace IntTrans Unit." 6.
Hardware Guide
Page 21
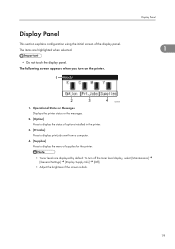
.... The items are displayed by default. Operational Status or Messages Displays the printer status or the messages. 2. [Option] Press to display the status of options installed in the printer. 3. [Prt.Jobs] Press to display print jobs sent from a computer. 4. [Supplies] Press to display the menu of the display panel. The following...
.... The items are displayed by default. Operational Status or Messages Displays the printer status or the messages. 2. [Option] Press to display the status of options installed in the printer. 3. [Prt.Jobs] Press to display print jobs sent from a computer. 4. [Supplies] Press to display the menu of the display panel. The following...

Hardware Guide
Page 23
Option list The following is a list of options for at least an hour. 2. Installing Options Available Options By installing options, you can cause a burn if touched. Option List Description Tray Unit TK3000 500-sheet paper feed unit Paper Feed ...Camera Direct Print Card Type C Camera direct print card Data Overwrite Security Unit Type G Data overwrite security unit For installation of each option, see p.229 "Specifications". 2 • Before installing options, the machine should be turned off and unplugged for this printer. Components inside the machine become very hot,...
Option list The following is a list of options for at least an hour. 2. Installing Options Available Options By installing options, you can cause a burn if touched. Option List Description Tray Unit TK3000 500-sheet paper feed unit Paper Feed ...Camera Direct Print Card Type C Camera direct print card Data Overwrite Security Unit Type G Data overwrite security unit For installation of each option, see p.229 "Specifications". 2 • Before installing options, the machine should be turned off and unplugged for this printer. Components inside the machine become very hot,...

Hardware Guide
Page 24
...or security card Insert the camera direct print card or security card in the user account enhance unit slot of the controller board. 22 2. Install the optional interface board Install an optional Gigabit Ethernet board, IEEE 802.11b interface unit, Bluetooth interface unit or IEEE 1284 interface board in the right slot... MB and 256 MB. 4. Attach the 500-sheet paper feed unit The 500-sheet paper feed unit can be used in the controller board slot. Install a USB host board in the left slot. In this case, attach the 500-sheet paper feed unit to the 1000-sheet paper feed unit before...
...or security card Insert the camera direct print card or security card in the user account enhance unit slot of the controller board. 22 2. Install the optional interface board Install an optional Gigabit Ethernet board, IEEE 802.11b interface unit, Bluetooth interface unit or IEEE 1284 interface board in the right slot... MB and 256 MB. 4. Attach the 500-sheet paper feed unit The 500-sheet paper feed unit can be used in the controller board slot. Install a USB host board in the left slot. In this case, attach the 500-sheet paper feed unit to the 1000-sheet paper feed unit before...
Hardware Guide
Page 25
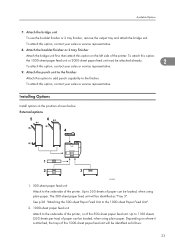
... service representative. 8. To attach this option, the 1000-sheet paper feed unit or 2000-sheet paper feed unit must be loaded, when using plain paper. Installing Options Install options in the positions shown below. Depending on the left side of the printer.
... service representative. 8. To attach this option, the 1000-sheet paper feed unit or 2000-sheet paper feed unit must be loaded, when using plain paper. Installing Options Install options in the positions shown below. Depending on the left side of the printer.

Hardware Guide
Page 26
2. The 2000-sheet paper feed unit will be loaded at one time. The finisher provides features such as "Tray 3". Installing Options When attached to the printer itself: "Tray 3", "Tray 4" When attached to the 500-sheet paper feed unit: "Tray 4", "Tray 5" See p.30 "Attaching the Paper ...
2. The 2000-sheet paper feed unit will be loaded at one time. The finisher provides features such as "Tray 3". Installing Options When attached to the printer itself: "Tray 3", "Tray 4" When attached to the 500-sheet paper feed unit: "Tray 4", "Tray 5" See p.30 "Attaching the Paper ...

Hardware Guide
Page 27
... 1 2 5 2 4 3 ATU084S 1. Optional interface board • Gigabit Ethernet board p.43 "Installing the Gigabit Ethernet Board" • IEEE 802.11b interface unit p.46 "Installing the IEEE 802.11b Interface Unit" • Bluetooth interface unit p.49 "Installing the Bluetooth Interface Unit" • IEEE 1284 interface board p.52 "Installing the IEEE 1284 Interface Board" 4. USB host interface board...
... 1 2 5 2 4 3 ATU084S 1. Optional interface board • Gigabit Ethernet board p.43 "Installing the Gigabit Ethernet Board" • IEEE 802.11b interface unit p.46 "Installing the IEEE 802.11b Interface Unit" • Bluetooth interface unit p.49 "Installing the Bluetooth Interface Unit" • IEEE 1284 interface board p.52 "Installing the IEEE 1284 Interface Board" 4. USB host interface board...

Hardware Guide
Page 28
ATU039S 26 All control panel indicators are lit. 3. To re-install the controller board, holding the handle in the center of the board, push the board firmly into the printer. 2 • The following may occur if the controller board is outside the printer. The "SC670" error message appears on the display. No control panel indicators are lit. 2. Installing Options Cautions When Re-installing the Controller Board When installing options inside the controller board, handle the board carefully while it is not correctly installed: 1. 2.
ATU039S 26 All control panel indicators are lit. 3. To re-install the controller board, holding the handle in the center of the board, push the board firmly into the printer. 2 • The following may occur if the controller board is outside the printer. The "SC670" error message appears on the display. No control panel indicators are lit. 2. Installing Options Cautions When Re-installing the Controller Board When installing options inside the controller board, handle the board carefully while it is not correctly installed: 1. 2.

Hardware Guide
Page 29
... paper feed unit See p.30 "Attaching the Paper Feed Unit" for attachment instructions. 4. Printer 500-sheet paper feed unit 1000-sheet paper feed unit To install options in this to the printer. 3. Then, see p.30 "Attaching the Paper Feed Unit" for instructions about attaching this configuration, first see p.28 "Attaching the...
... paper feed unit See p.30 "Attaching the Paper Feed Unit" for attachment instructions. 4. Printer 500-sheet paper feed unit 1000-sheet paper feed unit To install options in this to the printer. 3. Then, see p.30 "Attaching the Paper Feed Unit" for instructions about attaching this configuration, first see p.28 "Attaching the...

Hardware Guide
Page 30
....5 kg (29.8 lb.). • When moving the paper feed unit, hold the bottom at both sides, and then lift the optional paper feed unit slowly. Installing Options 2 ATU040S • Package contents for 1000-sheet paper feed unit ATU041S • Package contents for 2000-sheet paper feed unit ATU042S Attaching the 500...
....5 kg (29.8 lb.). • When moving the paper feed unit, hold the bottom at both sides, and then lift the optional paper feed unit slowly. Installing Options 2 ATU040S • Package contents for 1000-sheet paper feed unit ATU041S • Package contents for 2000-sheet paper feed unit ATU042S Attaching the 500...

Hardware Guide
Page 32
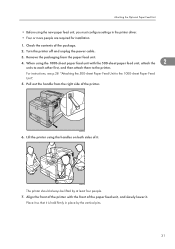
....). • Four or more people are required to attach the 500-sheet paper feed unit, 1000-sheet paper feed unit, and 2000sheet paper feed unit. Installing Options 6. ASZ197S Attaching the Paper Feed Unit This section describes how to move the printer. The procedure is the same for all three units. On...
....). • Four or more people are required to attach the 500-sheet paper feed unit, 1000-sheet paper feed unit, and 2000sheet paper feed unit. Installing Options 6. ASZ197S Attaching the Paper Feed Unit This section describes how to move the printer. The procedure is the same for all three units. On...
Hardware Guide
Page 33
... at least four people. 7. ASZ076S 6. Place it so that it is held firmly in the printer driver. • Four or more people are required for installation. 1. Pull out the handle from the paper feed unit. 4. Align the front of the paper feed unit, and slowly lower it . Lift the printer using...
... at least four people. 7. ASZ076S 6. Place it so that it is held firmly in the printer driver. • Four or more people are required for installation. 1. Pull out the handle from the paper feed unit. 4. Align the front of the paper feed unit, and slowly lower it . Lift the printer using...

