Manuals
Page 6
... Misfeed Message (A)...227 4 Maintaining the Printer Replacing the Print Cartridge...147 Replacing the Waste Toner Bottle...154 Replacing the Intermediate Transfer Unit...161 Replacing the Maintenance Kit...172 Cautions When Cleaning...179 Cleaning the Toner Density Sensor...180 Cleaning the Friction Pad and the Paper Feed Roller 182 Cleaning the Registration Roller...
... Misfeed Message (A)...227 4 Maintaining the Printer Replacing the Print Cartridge...147 Replacing the Waste Toner Bottle...154 Replacing the Intermediate Transfer Unit...161 Replacing the Maintenance Kit...172 Cautions When Cleaning...179 Cleaning the Toner Density Sensor...180 Cleaning the Friction Pad and the Paper Feed Roller 182 Cleaning the Registration Roller...
Manuals
Page 7
Misfeed Tray 1...227 Misfeed Bypass Tray...229 Paper Misfeed Message (B)...231 Paper Misfeed Message (Y)...234 Paper Misfeed Message (Z)...235 11. Appendix Moving and Transporting the Printer...237 Moving the Printer in a Short Distance...238 Consumables...239 Print Cartridge...239 Waste Toner Bottle...240 Intermediate Transfer Unit...240 Maintenance Kit...241 Specifications...242 Mainframe...242 Options...245 Trademarks...249 INDEX...251 5
Misfeed Tray 1...227 Misfeed Bypass Tray...229 Paper Misfeed Message (B)...231 Paper Misfeed Message (Y)...234 Paper Misfeed Message (Z)...235 11. Appendix Moving and Transporting the Printer...237 Moving the Printer in a Short Distance...238 Consumables...239 Print Cartridge...239 Waste Toner Bottle...240 Intermediate Transfer Unit...240 Maintenance Kit...241 Specifications...242 Mainframe...242 Options...245 Trademarks...249 INDEX...251 5
Manuals
Page 174
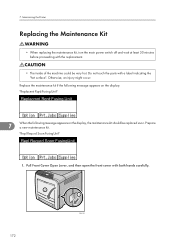
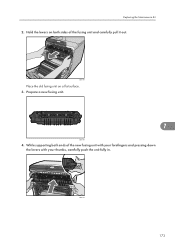
...appears on the display: "Replacmnt Rqrd:Fusing Unit" Replacmnt Rqrd:Fusing Unit 7 When the following message appears on the display, the maintenance kit should be very hot. Otherwise, an injury might occur. "Repl Requrd Soon:FusingUnit" Repl Requrd Soon:FusingUnit 1. 7. Pull Front...cover with a label indicating the "hot surface". Prepare a new maintenance kit. Do not touch the parts with both hands carefully. 2 172 1 CBK130 Maintaining the Printer Replacing the Maintenance Kit • When replacing the maintenance kit, turn the main power switch off and wait at least 30 ...
...appears on the display: "Replacmnt Rqrd:Fusing Unit" Replacmnt Rqrd:Fusing Unit 7 When the following message appears on the display, the maintenance kit should be very hot. Otherwise, an injury might occur. "Repl Requrd Soon:FusingUnit" Repl Requrd Soon:FusingUnit 1. 7. Pull Front...cover with a label indicating the "hot surface". Prepare a new maintenance kit. Do not touch the parts with both hands carefully. 2 172 1 CBK130 Maintaining the Printer Replacing the Maintenance Kit • When replacing the maintenance kit, turn the main power switch off and wait at least 30 ...
Manuals
Page 175
Prepare a new fusing unit. 7 CBK169 4. Hold the levers on a flat surface. 3. While supporting both sides of the new fusing unit with your forefingers and pressing down the levers with your thumbs, carefully push the unit fully in. CBK170 173 CBK168 Place the old fusing unit on both ends of the fusing unit and carefully pull it out. Replacing the Maintenance Kit 2.
Prepare a new fusing unit. 7 CBK169 4. Hold the levers on a flat surface. 3. While supporting both sides of the new fusing unit with your forefingers and pressing down the levers with your thumbs, carefully push the unit fully in. CBK170 173 CBK168 Place the old fusing unit on both ends of the fusing unit and carefully pull it out. Replacing the Maintenance Kit 2.
Manuals
Page 177
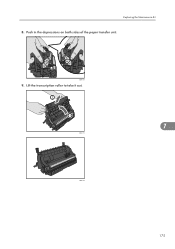
Replacing the Maintenance Kit 8. Lift the transcription roller to take it out. 2 1 7 CBK173 CBK174 175 CBK172 9. Push in the depressions on both sides of the paper transfer unit.
Replacing the Maintenance Kit 8. Lift the transcription roller to take it out. 2 1 7 CBK173 CBK174 175 CBK172 9. Push in the depressions on both sides of the paper transfer unit.

Manuals
Page 179
Place the paper transfer unit on the front cover by aligning the mark on the paper transfer unit with the mark on the green PUSH marks until the paper transfer unit clicks into place. CBK155 177 CBK153 1 2 7 CBK154 Then, push on the front cover. Replacing the Maintenance Kit 12.
Place the paper transfer unit on the front cover by aligning the mark on the paper transfer unit with the mark on the green PUSH marks until the paper transfer unit clicks into place. CBK155 177 CBK153 1 2 7 CBK154 Then, push on the front cover. Replacing the Maintenance Kit 12.

Manuals
Page 207
... a new intermediate transfer unit. Turn the power off, and then back on the Control Panel For details about installing the unit, see p.172 "Replacing the Maintenance Kit". Sensor cleaning required. Error and Status Messages Appear on . Replcmnt Requrd: Print Cart The toner has run out, or the photo conductor unit is installed...
... a new intermediate transfer unit. Turn the power off, and then back on the Control Panel For details about installing the unit, see p.172 "Replacing the Maintenance Kit". Sensor cleaning required. Error and Status Messages Appear on . Replcmnt Requrd: Print Cart The toner has run out, or the photo conductor unit is installed...
Manuals
Page 208
... be installed correctly. If the message is no paper in use by another device on the message screen. 206 For details, see p.172 "Replacing the Maintenance Kit" for Print cartridge installation. Set Waste Toner Bottle correctly. For details, see p.147 "Replacing the Print Cartridge" for fusing unit installation. The print cartridge may...
... be installed correctly. If the message is no paper in use by another device on the message screen. 206 For details, see p.172 "Replacing the Maintenance Kit" for Print cartridge installation. Set Waste Toner Bottle correctly. For details, see p.147 "Replacing the Print Cartridge" for fusing unit installation. The print cartridge may...
Manuals
Page 217
... limit. For details, see p.108 "Supported Paper Types". • Paper is deteriorated or damaged. Confirm that have no gaps. For details, see p.172 "Replacing the Maintenance Kit". Replace the unit. For details, see p.108 "Supported Paper Types". 215 If rubbed with your finger, it smears out. • The setting of the stack...
... limit. For details, see p.108 "Supported Paper Types". • Paper is deteriorated or damaged. Confirm that have no gaps. For details, see p.172 "Replacing the Maintenance Kit". Replace the unit. For details, see p.108 "Supported Paper Types". 215 If rubbed with your finger, it smears out. • The setting of the stack...
Manuals
Page 219
... install an optional hard disk drive or set the password of [RAM Disk] to standard PDF. For details about [RAM Disk], see p.172 "Replacing the Maintenance Kit". For details, see "PDF Menu", Software Guide. For details about [RAM Disk], see "System Menu", Software Guide. • After adding a memory unit and setting the...
... install an optional hard disk drive or set the password of [RAM Disk] to standard PDF. For details about [RAM Disk], see p.172 "Replacing the Maintenance Kit". For details, see "PDF Menu", Software Guide. For details about [RAM Disk], see "System Menu", Software Guide. • After adding a memory unit and setting the...
Manuals
Page 243
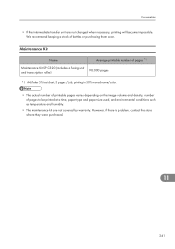
However, if there is problem, contact the store where they were purchased. 11 241 Maintenance Kit Name Average printable number of pages *1 Maintenance Kit SP C320 (includes a fusing unit and transcription roller) 90,000 pages *1 A4/letter 5% test chart, 3 pages / job, printing in 50% monochrome/color. • The actual number ... keeping a stock of pages to be printed at a time, paper type and paper size used, and environmental conditions such as temperature and humidity. • The maintenance kit are not changed when necessary, printing will become impossible.
However, if there is problem, contact the store where they were purchased. 11 241 Maintenance Kit Name Average printable number of pages *1 Maintenance Kit SP C320 (includes a fusing unit and transcription roller) 90,000 pages *1 A4/letter 5% test chart, 3 pages / job, printing in 50% monochrome/color. • The actual number ... keeping a stock of pages to be printed at a time, paper type and paper size used, and environmental conditions such as temperature and humidity. • The maintenance kit are not changed when necessary, printing will become impossible.
Manuals
Page 254
LED lamps 72 Legal size paper 124 Letterhead 110 Light sensor 21 List of options 11 Loading envelopes 139 Loading paper 119 M Maintenance kit 172, 241 Manuals 12 Manuals for this printer 10 Memory cover 17 Menu key 22 Middle thick 108 Misfeed bypass tray 229 Misfeed tray 1 227 ...
LED lamps 72 Legal size paper 124 Letterhead 110 Light sensor 21 List of options 11 Loading envelopes 139 Loading paper 119 M Maintenance kit 172, 241 Manuals 12 Manuals for this printer 10 Memory cover 17 Menu key 22 Middle thick 108 Misfeed bypass tray 229 Misfeed tray 1 227 ...


