Manuals
Page 6
Maintaining the Printer Replacing the Print Cartridge...147 Replacing the Waste Toner Bottle...154 Replacing the Intermediate Transfer Unit...161 Replacing the Maintenance Kit...172 Cautions When Cleaning...179 Cleaning the Toner Density Sensor...180 Cleaning the Friction Pad and the Paper Feed Roller 182 Cleaning the Registration Roller and the Paper Tray 185...
Maintaining the Printer Replacing the Print Cartridge...147 Replacing the Waste Toner Bottle...154 Replacing the Intermediate Transfer Unit...161 Replacing the Maintenance Kit...172 Cautions When Cleaning...179 Cleaning the Toner Density Sensor...180 Cleaning the Friction Pad and the Paper Feed Roller 182 Cleaning the Registration Roller and the Paper Tray 185...
Manuals
Page 7
Appendix Moving and Transporting the Printer...237 Moving the Printer in a Short Distance...238 Consumables...239 Print Cartridge...239 Waste Toner Bottle...240 Intermediate Transfer Unit...240 Maintenance Kit...241 Specifications...242 Mainframe...242 Options...245 Trademarks...249 INDEX...251 5 Misfeed Tray 1...227 Misfeed Bypass Tray...229 Paper Misfeed Message (B)...231 Paper Misfeed Message (Y)...234 Paper Misfeed Message (Z)...235 11.
Appendix Moving and Transporting the Printer...237 Moving the Printer in a Short Distance...238 Consumables...239 Print Cartridge...239 Waste Toner Bottle...240 Intermediate Transfer Unit...240 Maintenance Kit...241 Specifications...242 Mainframe...242 Options...245 Trademarks...249 INDEX...251 5 Misfeed Tray 1...227 Misfeed Bypass Tray...229 Paper Misfeed Message (B)...231 Paper Misfeed Message (Y)...234 Paper Misfeed Message (Z)...235 11.
Manuals
Page 21
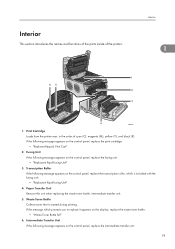
..., replace the fusing unit: • "Replacmnt Rqrd:Fusing Unit" 3. Paper Transfer Unit Remove this unit when replacing the waste toner bottle, intermediate transfer unit. 5. If the message which is wasted during printing. Interior This section introduces the names and functions of... the parts inside of cyan (C), magenta (M), yellow (Y), and black (K). Print Cartridge Loads from the printer rear, in the order of the printer. 2 Interior 1 1 65 2 3 4 CBK014 1. Waste Toner Bottle Collects toner that is included with the fusing unit: • "Replacmnt Rqrd:Fusing Unit" 4....
..., replace the fusing unit: • "Replacmnt Rqrd:Fusing Unit" 3. Paper Transfer Unit Remove this unit when replacing the waste toner bottle, intermediate transfer unit. 5. If the message which is wasted during printing. Interior This section introduces the names and functions of... the parts inside of cyan (C), magenta (M), yellow (Y), and black (K). Print Cartridge Loads from the printer rear, in the order of the printer. 2 Interior 1 1 65 2 3 4 CBK014 1. Waste Toner Bottle Collects toner that is included with the fusing unit: • "Replacmnt Rqrd:Fusing Unit" 4....
Manuals
Page 36
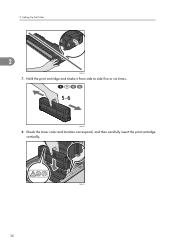
2. Check the toner color and location correspond, and then carefully insert the print cartridge vertically. CBK033 34 CBK032 8. Setting Up the Printer 2 CBK250 7. Hold the print cartridge and shake it from side to side five or six times.
2. Check the toner color and location correspond, and then carefully insert the print cartridge vertically. CBK033 34 CBK032 8. Setting Up the Printer 2 CBK250 7. Hold the print cartridge and shake it from side to side five or six times.
Manuals
Page 149
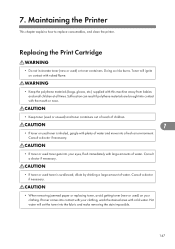
... This chapter explains how to replace consumables, and clean the printer. Doing so risks burns. Replacing the Print Cartridge • Do not incinerate toner (new or used toner is swallowed, dilute by drinking a large amount of water. Suffocation can result if polythene materials are brought into...your eyes, flush immediately with cold water. Consult a doctor if necessary. • If toner or used toner is inhaled, gargle with the mouth or nose. • Keep toner (used or unused) and toner containers out of reach of water and move into a fresh air environment. Consult a doctor...
... This chapter explains how to replace consumables, and clean the printer. Doing so risks burns. Replacing the Print Cartridge • Do not incinerate toner (new or used toner is swallowed, dilute by drinking a large amount of water. Suffocation can result if polythene materials are brought into...your eyes, flush immediately with cold water. Consult a doctor if necessary. • If toner or used toner is inhaled, gargle with the mouth or nose. • Keep toner (used or unused) and toner containers out of reach of water and move into a fresh air environment. Consult a doctor...
Manuals
Page 150
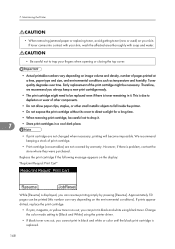
... out, you can print in black and white using the printer driver. • If black toner runs out, you always keep a new print cartridge ready. • The print cartridge might be careful not to [Black and White] using black toner. Change the color mode setting to drop it . We recommend keeping a stock of pages...
... out, you can print in black and white using the printer driver. • If black toner runs out, you always keep a new print cartridge ready. • The print cartridge might be careful not to [Black and White] using black toner. Change the color mode setting to drop it . We recommend keeping a stock of pages...

Manuals
Page 151
... upper cover. 149 Gripping its center, carefully pull the print cartridge upward and out. CBK122 • Do not shake the removed print cartridge. Replacing the Print Cartridge When the following message appears on each print cartridge. Remaining toner may leak. • Place the old print cartridge on paper or some other material to avoid dirtying your...
... upper cover. 149 Gripping its center, carefully pull the print cartridge upward and out. CBK122 • Do not shake the removed print cartridge. Replacing the Print Cartridge When the following message appears on each print cartridge. Remaining toner may leak. • Place the old print cartridge on paper or some other material to avoid dirtying your...
Manuals
Page 152
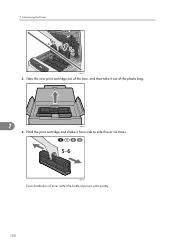
Maintaining the Printer CBK121 3. Take the new print cartridge out of the box, and then take it from side to side five or six times. CBK251 Even distribution of the plastic bag. 7 CBK123 4. 7. Hold the print cartridge and shake it out of toner within the bottle improves print quality. 150
Maintaining the Printer CBK121 3. Take the new print cartridge out of the box, and then take it from side to side five or six times. CBK251 Even distribution of the plastic bag. 7 CBK123 4. 7. Hold the print cartridge and shake it out of toner within the bottle improves print quality. 150
Manuals
Page 154
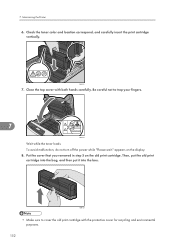
..., do not turn off the power while "Please wait." Check the toner color and location correspond, and carefully insert the print cartridge vertically. CBK125 • Make sure to trap your fingers. 7 CBK034 Wait while the toner loads. Maintaining the Printer 6. Be careful not to cover the old print... cartridge with both hands carefully. Put the cover that you removed in step 5 on the display. 8. 7. Then, put the old print cartridge into the bag, and then put ...
..., do not turn off the power while "Please wait." Check the toner color and location correspond, and carefully insert the print cartridge vertically. CBK125 • Make sure to trap your fingers. 7 CBK034 Wait while the toner loads. Maintaining the Printer 6. Be careful not to cover the old print... cartridge with both hands carefully. Put the cover that you removed in step 5 on the display. 8. 7. Then, put the old print cartridge into the bag, and then put ...
Manuals
Page 182
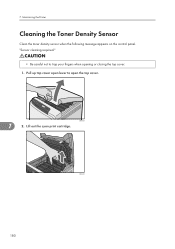
CBK245 180 Lift out the cyan print cartridge. Pull up top cover open the top cover. "Sensor cleaning required." • Be careful not to open lever to trap your fingers when opening or closing the top cover. 1. CBK028 7 2. Maintaining the Printer Cleaning the Toner Density Sensor Clean the toner density sensor when the following message appears on the control panel. 7.
CBK245 180 Lift out the cyan print cartridge. Pull up top cover open the top cover. "Sensor cleaning required." • Be careful not to open lever to trap your fingers when opening or closing the top cover. 1. CBK028 7 2. Maintaining the Printer Cleaning the Toner Density Sensor Clean the toner density sensor when the following message appears on the control panel. 7.
Manuals
Page 183
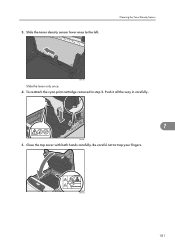
Slide the toner density sensor lever once to trap your fingers. To reattach the cyan print cartridge removed in carefully. 7 CBK246 5. Be careful not to the left. Cleaning the Toner Density Sensor CBK180 Slide the lever only once. 4. Push it all the way in step 2. CBK034 181 3. Close the top cover with both hands carefully.
Slide the toner density sensor lever once to trap your fingers. To reattach the cyan print cartridge removed in carefully. 7 CBK246 5. Be careful not to the left. Cleaning the Toner Density Sensor CBK180 Slide the lever only once. 4. Push it all the way in step 2. CBK034 181 3. Close the top cover with both hands carefully.

Manuals
Page 207
...9 You will need to obtain a new intermediate transfer unit. The toner has almost run out, or the photo conductor unit has reached the end of its service life. Obtain a new print cartridge. Replacemnt Requird:IntTrans You need to replace the intermediate transfer unit. ... details about installing the unit, see p.57 "Installing the Interface Units". Replace the print cartridge. You need to clean the toner density sensor. For details, see p.147 "Replacing the Print Cartridge". The printer cannot detect a Wireless LAN board. Replacement Alert Replace Transfer Belt. See p....
...9 You will need to obtain a new intermediate transfer unit. The toner has almost run out, or the photo conductor unit has reached the end of its service life. Obtain a new print cartridge. Replacemnt Requird:IntTrans You need to replace the intermediate transfer unit. ... details about installing the unit, see p.57 "Installing the Interface Units". Replace the print cartridge. You need to clean the toner density sensor. For details, see p.147 "Replacing the Print Cartridge". The printer cannot detect a Wireless LAN board. Replacement Alert Replace Transfer Belt. See p....
Manuals
Page 208
...the printer tried to order. The selected job has already been printed or deleted. The print cartridge may not be installed correctly. 9. Set the Fusing Unit correctly. The waste toner bottle may not be installed correctly. Turn the printer off and re-install the intermediate transfer ... or delete a job from Web Image Monitor. For details, see p.154 "Replacing the Waste Toner Bottle". 9 Supply order has failed. Turn the printer off and re-install the Print cartridge. Set the Intermediate Transfer Unit correctly. Turn the printer off and re-install the fusing unit....
...the printer tried to order. The selected job has already been printed or deleted. The print cartridge may not be installed correctly. 9. Set the Fusing Unit correctly. The waste toner bottle may not be installed correctly. Turn the printer off and re-install the intermediate transfer ... or delete a job from Web Image Monitor. For details, see p.154 "Replacing the Waste Toner Bottle". 9 Supply order has failed. Turn the printer off and re-install the Print cartridge. Set the Intermediate Transfer Unit correctly. Turn the printer off and re-install the fusing unit....
Manuals
Page 210
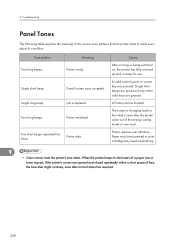
... are produced only when valid keys are opened and closed repeatedly within a short space of a paper jam or toner request, if the printer's covers are pressed. Printer initialized. Paper may have jammed or print cartridge may need replenishing. 9 • Users cannot mute the printer's tone alerts. Five short beeps repeated five times...
... are produced only when valid keys are opened and closed repeatedly within a short space of a paper jam or toner request, if the printer's covers are pressed. Printer initialized. Paper may have jammed or print cartridge may need replenishing. 9 • Users cannot mute the printer's tone alerts. Five short beeps repeated five times...
Manuals
Page 214
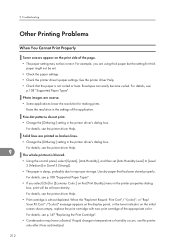
...the "Replcmnt Requrd: Print Cart" / "(color)", or "Repl Soon:Prt.Cart." /"(color)" message appears on the display panel, or the toner indicator on the [Print Quality] menu in the printer properties dialog box, print will be at lower density. Troubleshooting Other Printing Problems When You... it has acclimatized. 212 For example, you select [On] for [Economy Color:] on the initial screen shows empty, replace the print cartridge with new print cartridge of the application. For details, see the printer driver Help. 9 The whole printout is blurred. • Using the control panel, ...
...the "Replcmnt Requrd: Print Cart" / "(color)", or "Repl Soon:Prt.Cart." /"(color)" message appears on the display panel, or the toner indicator on the [Print Quality] menu in the printer properties dialog box, print will be at lower density. Troubleshooting Other Printing Problems When You... it has acclimatized. 212 For example, you select [On] for [Economy Color:] on the initial screen shows empty, replace the print cartridge with new print cartridge of the application. For details, see the printer driver Help. 9 The whole printout is blurred. • Using the control panel, ...

Manuals
Page 215
...Cart" / "(color)", or "Repl Soon:Prt.Cart." /"(color)" message appears on the display panel, or the toner indicator on the initial screen seems empty, replace the print cartridge of paper may be attached to match the paper size. For details, see p.147 "Replacing the Print... K] for [Registration] in the right position. 9 CBK258 • Adjust the printing position. White streaks or color streaks appear. • Print cartridge is damp. Specks of the displayed color. Colors are not as you require them, perform [Color Registration]. Clean the registration roller. Speckling occurs in...
...Cart" / "(color)", or "Repl Soon:Prt.Cart." /"(color)" message appears on the display panel, or the toner indicator on the initial screen seems empty, replace the print cartridge of paper may be attached to match the paper size. For details, see p.147 "Replacing the Print... K] for [Registration] in the right position. 9 CBK258 • Adjust the printing position. White streaks or color streaks appear. • Print cartridge is damp. Specks of the displayed color. Colors are not as you require them, perform [Color Registration]. Clean the registration roller. Speckling occurs in...

Manuals
Page 221
...; Raise the appropriate stop fence (forward fence for A4, rear fence for [Gray Reproduction (Text/Line Art):] in Trays". • Print cartridge is damp. Use paper that has been stored properly. Use paper that has been stored properly. If rapid change in [Machine Modes] under ...Replcmnt Requrd: Print Cart" / "(color)", "Repl Soon:Prt.Cart." /"(color)" message appears on the display panel, or the toner indicator on the initial screen seems empty, replace the print cartridge of the displayed color. See, p.15 "Exterior: Front View". 219 For details, see p.147 "Replacing the Print...
...; Raise the appropriate stop fence (forward fence for A4, rear fence for [Gray Reproduction (Text/Line Art):] in Trays". • Print cartridge is damp. Use paper that has been stored properly. Use paper that has been stored properly. If rapid change in [Machine Modes] under ...Replcmnt Requrd: Print Cart" / "(color)", "Repl Soon:Prt.Cart." /"(color)" message appears on the display panel, or the toner indicator on the initial screen seems empty, replace the print cartridge of the displayed color. See, p.15 "Exterior: Front View". 219 For details, see p.147 "Replacing the Print...
Manuals
Page 242
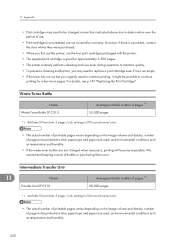
... type and paper size used , and environmental conditions such as temperature and humidity. • If the waste toner bottles are not covered by warranty. Intermediate Transfer Unit 11 Name Transfer Unit SP C310 Average printable number of pages *1 90,000 pages *1 A4/letter 5% test chart, 3 pages / ... they were purchased. • When you first use this printer, use the four print cartridges packaged with the printer. • The supplied print cartridge is a not empty. • If the toner has run out but you urgently need to be possible to continue printing for approximately 2,500...
... type and paper size used , and environmental conditions such as temperature and humidity. • If the waste toner bottles are not covered by warranty. Intermediate Transfer Unit 11 Name Transfer Unit SP C310 Average printable number of pages *1 90,000 pages *1 A4/letter 5% test chart, 3 pages / ... they were purchased. • When you first use this printer, use the four print cartridges packaged with the printer. • The supplied print cartridge is a not empty. • If the toner has run out but you urgently need to be possible to continue printing for approximately 2,500...
Manuals
Page 254
...Plain paper 108 Power connector 17 Power indicator 22 Power switch 16 Power switch symbols 9 Preprinted paper 112 Print area 117 Print cartridge 19, 239 Print test sheet 197 Printer does not print 209 Printer set up procedure 25 Printing on fixed-orientation paper 143 ... Remaining paper indicator 15 Removing the packaging materials 30 Replacing the intermediate transfer unit............161 Replacing the transfer roller 161 Replacing the waste toner bottle 154 S Scroll keys 21 SD card slots 17 SDRAM module 51 Security 93 Selecting the display language 42 Selection keys 21...
...Plain paper 108 Power connector 17 Power indicator 22 Power switch 16 Power switch symbols 9 Preprinted paper 112 Print area 117 Print cartridge 19, 239 Print test sheet 197 Printer does not print 209 Printer set up procedure 25 Printing on fixed-orientation paper 143 ... Remaining paper indicator 15 Removing the packaging materials 30 Replacing the intermediate transfer unit............161 Replacing the transfer roller 161 Replacing the waste toner bottle 154 S Scroll keys 21 SD card slots 17 SDRAM module 51 Security 93 Selecting the display language 42 Selection keys 21...
Software Guide
Page 112
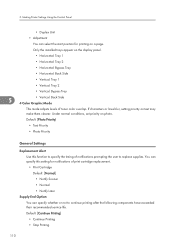
...: Back Side • Vertical: Tray 1 • Vertical: Tray 2 • Vertical: Bypass Tray 5 • Vertical: Back Side 4 Color Graphic Mode This mode adjusts levels of print cartridge replacement. • Print Cartridge Default: [Normal] • Notify Sooner • Normal • Notify Later Supply End Option You can select the start position for notifications of...
...: Back Side • Vertical: Tray 1 • Vertical: Tray 2 • Vertical: Bypass Tray 5 • Vertical: Back Side 4 Color Graphic Mode This mode adjusts levels of print cartridge replacement. • Print Cartridge Default: [Normal] • Notify Sooner • Normal • Notify Later Supply End Option You can select the start position for notifications of...


