User Guide
Page 21
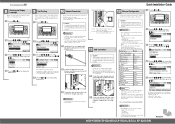
...first make the following settings. • Installing the server certificate • Enabling SSL • Changing the administrator's user name and password using Web Image Monitor For details, see "Setting Up the Machine", Security Guide. • The following table shows the control panel ... items: • IP Address • Subnet Mask • Gateway Address • Consult your cable according to the network. 2. MLP150DN/SP 8200DN/LP150dn/Aficio SP 8200DN Next Sheet BEK204S Press the {▼} or {▲} key to select the preferred language, and then press the {OK} key. Press the...
...first make the following settings. • Installing the server certificate • Enabling SSL • Changing the administrator's user name and password using Web Image Monitor For details, see "Setting Up the Machine", Security Guide. • The following table shows the control panel ... items: • IP Address • Subnet Mask • Gateway Address • Consult your cable according to the network. 2. MLP150DN/SP 8200DN/LP150dn/Aficio SP 8200DN Next Sheet BEK204S Press the {▼} or {▲} key to select the preferred language, and then press the {OK} key. Press the...

User Guide
Page 99
... obtain the CA certificate. Click [OK]. 10. Note that each EAP authentication method has different configuration settings and authentication procedures. Start your user name and password, and then click [Login]. You can be configured using . 2. Methods of EAP authentication method: EAP-TLS, LEAP, EAPTTLS and PEAP. Click [Import]. 9. For details about...
... obtain the CA certificate. Click [OK]. 10. Note that each EAP authentication method has different configuration settings and authentication procedures. Start your user name and password, and then click [Login]. You can be configured using . 2. Methods of EAP authentication method: EAP-TLS, LEAP, EAPTTLS and PEAP. Click [Import]. 9. For details about...

User Guide
Page 100
...If you have selected [Certificate 2] in step 6, click [Certificate 2] in this step. 18. For details about the login user name and password, consult your Web browser. 2. Using a text editor, open the CA signified certificate downloaded in the address bar of your user name and... password, and then click [Login]. Check that is displayed in this step. Click [Certificate 1] or [Certificate 2] on "Certificate Information" page, and then ...
...If you have selected [Certificate 2] in step 6, click [Certificate 2] in this step. 18. For details about the login user name and password, consult your Web browser. 2. Using a text editor, open the CA signified certificate downloaded in the address bar of your user name and... password, and then click [Login]. Check that is displayed in this step. Click [Certificate 1] or [Certificate 2] on "Certificate Information" page, and then ...

User Guide
Page 101
... 0-9) in "Permit Sub-domain". Select [WPA] in the RADIUS server. 75 EAP-TTLS • Click [Change] in "Password", and then enter the password set in "Security Method". 8. In "User Name", enter the user name set in the address bar of WPA/WPA2 1. ...] according to the access point you request two certificates simultaneously, the certificate authority might not display either certificate. Enter your user name and password, and then click [Login]. Click [Configuration], and then click [Wireless LAN Settings] in "Communication Mode". 6. Configurations differ according to...
... 0-9) in "Permit Sub-domain". Select [WPA] in the RADIUS server. 75 EAP-TTLS • Click [Change] in "Password", and then enter the password set in "Security Method". 8. In "User Name", enter the user name set in the address bar of WPA/WPA2 1. ...] according to the access point you request two certificates simultaneously, the certificate authority might not display either certificate. Enter your user name and password, and then click [Login]. Click [Configuration], and then click [Wireless LAN Settings] in "Communication Mode". 6. Configurations differ according to...

User Guide
Page 102
... name set in the RADIUS server. • Make the following settings according to the operating system you select [MSCHAPv2], • click [Change] in "Password", and then enter the password set in the RADIUS server. • click [Change] on "Server ID". • Select [On] or [Off] in the "Device Certificate" window. Click [Logout...
... name set in the RADIUS server. • Make the following settings according to the operating system you select [MSCHAPv2], • click [Change] in "Password", and then enter the password set in the RADIUS server. • click [Change] on "Server ID". • Select [On] or [Off] in the "Device Certificate" window. Click [Logout...

User Guide
Page 190
...dirty. On the [Menu] tab of the printer driver, set . Replace the unit. See p.142 "Cleaning the Registration Roller". For [Change PDF Password], see Web Image Monitor Help. • PDF files not allowed to [Thick Paper]. • Check the paper settings of the printer driver. ...For Web Image Monitor, see the "Print Settings Menu", Software Guide. Open the relevant application and print the PDF file using the [Change PDF Password] menu in [PDF Menu] or Web Image Monitor. See p.109 "Adding Toner". Troubleshooting Printed pages are obvious. • The registration roller is...
...dirty. On the [Menu] tab of the printer driver, set . Replace the unit. See p.142 "Cleaning the Registration Roller". For [Change PDF Password], see Web Image Monitor Help. • PDF files not allowed to [Thick Paper]. • Check the paper settings of the printer driver. ...For Web Image Monitor, see the "Print Settings Menu", Software Guide. Open the relevant application and print the PDF file using the [Change PDF Password] menu in [PDF Menu] or Web Image Monitor. See p.109 "Adding Toner". Troubleshooting Printed pages are obvious. • The registration roller is...

User Guide
Page 264
... Locking the Menus on the Printer's Control Panel 194 Changing the Paper Type...195 Managing User Information...196 Configuring the Energy Saver Mode...201 Setting a Password...202 Checking the Printer Status...203 Changing Names and Comments...204 Viewing and Deleting Spool Print Jobs...204 Using SmartDeviceMonitor for Client...206 Monitoring Printers...
... Locking the Menus on the Printer's Control Panel 194 Changing the Paper Type...195 Managing User Information...196 Configuring the Energy Saver Mode...201 Setting a Password...202 Checking the Printer Status...203 Changing Names and Comments...204 Viewing and Deleting Spool Print Jobs...204 Using SmartDeviceMonitor for Client...206 Monitoring Printers...

User Guide
Page 331
...5. Click the [Contents] tab, select the [PDF Direct Print] check box at the bottom right of the dialog box, enter the password for the PDF file you want to print over the PDF Direct Printing icon on the PDF file you want to [All Programs], [DeskTopBinder...Direct Print Properties] dialog box appears. 4. Click [Next>] repeatedly until the [Printing Function2] dialog box appears. 3. The PDF file is added to print password- Click [Finish]. Click on the Function Palette and drop it there. Printing a PDF File Directly 3. In the [Printing Function2] dialog box, click [...
...5. Click the [Contents] tab, select the [PDF Direct Print] check box at the bottom right of the dialog box, enter the password for the PDF file you want to print over the PDF Direct Printing icon on the PDF file you want to [All Programs], [DeskTopBinder...Direct Print Properties] dialog box appears. 4. Click [Next>] repeatedly until the [Printing Function2] dialog box appears. 3. The PDF file is added to print password- Click [Finish]. Click on the Function Palette and drop it there. Printing a PDF File Directly 3. In the [Printing Function2] dialog box, click [...

User Guide
Page 332
...sheets. 5. Punch Punches holes in the [PDF Menu] on the other also. 3 PDF Direct Print Properties 1 2 3 4 5 6 7 8 1. Other Print Operations • Before printing a password-protected PDF file, perform one of the followings: • In the [PDF Direct Print Properties] dialog box, enter the... the [PDF Menu] has been specified using DeskTopBinder Lite or the printer's control panel, the same group password must be set on the printer's control panel. • If a [PDF Group Password] for the PDF file you want to 63 single byte characters) 2. Layout Prints multiple pages on the tool ...
...sheets. 5. Punch Punches holes in the [PDF Menu] on the other also. 3 PDF Direct Print Properties 1 2 3 4 5 6 7 8 1. Other Print Operations • Before printing a password-protected PDF file, perform one of the followings: • In the [PDF Direct Print Properties] dialog box, enter the... the [PDF Menu] has been specified using DeskTopBinder Lite or the printer's control panel, the same group password must be set on the printer's control panel. • If a [PDF Group Password] for the PDF file you want to 63 single byte characters) 2. Layout Prints multiple pages on the tool ...

User Guide
Page 333
... size: Specify the paper size you want copies to be entered for printing to DeskTopBinder Lite and this printer, enter the group password in PDF direct printing mode if this check box is entered here. 17. Using Commands You can print PDF files directly, using...commands such as "ftp", "sftp", and "lpr". Color/Black and White: (not available for password protected PDF files. Printing a PDF File Directly 7. A password protected PDF file cannot be printed unless its password is selected. 9. For details about UNIX commands, see UNIX supplement. 79 Number of copies Specify...
... size: Specify the paper size you want copies to be entered for printing to DeskTopBinder Lite and this printer, enter the group password in PDF direct printing mode if this check box is entered here. 17. Using Commands You can print PDF files directly, using...commands such as "ftp", "sftp", and "lpr". Color/Black and White: (not available for password protected PDF files. Printing a PDF File Directly 7. A password protected PDF file cannot be printed unless its password is selected. 9. For details about UNIX commands, see UNIX supplement. 79 Number of copies Specify...

User Guide
Page 339
...print job was stored in the printer. 85 Each time pressing the [ ] or [ ] key, the screen switches. 3. To change or clear a password, you select. 2. Page number Displays the current page number. However, "****" is shown instead of the file name for a Locked Print file. 4. ...a selected file. 5. [Change] Changes or clears the password of a file if a password is incorrect, you cannot change or clear any current passwords. • You can also set . To clear the password, press [Change], leave the entering/confirming a new password box blank, and then press the [OK] key. ...
...print job was stored in the printer. 85 Each time pressing the [ ] or [ ] key, the screen switches. 3. To change or clear a password, you select. 2. Page number Displays the current page number. However, "****" is shown instead of the file name for a Locked Print file. 4. ...a selected file. 5. [Change] Changes or clears the password of a file if a password is incorrect, you cannot change or clear any current passwords. • You can also set . To clear the password, press [Change], leave the entering/confirming a new password box blank, and then press the [OK] key. ...

User Guide
Page 344
... has a collate option, make sure it is not possible to delete using the control panel will appear if you do not want to print unless a password is not selected before sending a print job. Print Jobs] or [Auto Del Stored Print Jobs] settings are automatically collated by other people. • A Locked Print...
... has a collate option, make sure it is not possible to delete using the control panel will appear if you do not want to print unless a password is not selected before sending a print job. Print Jobs] or [Auto Del Stored Print Jobs] settings are automatically collated by other people. • A Locked Print...

User Guide
Page 346
...Prt.Jobs]. 2. Select [Locked Print Jobs] using the or [ ] key, and then press the [OK] key. The file will appear if the password is completed, the stored file will be deleted. • For details about [User ID], see p.101 "Printing from the User ID Screen". The ... key. 3. A list of Locked Print files stored in the printer appears. 92 Deleting locked print files 1. Enter the password using the [ ] or [ ] key, and then press [Job List]. If you forget your password, ask your network administrator for help. 7. The remaining sets are printed. Press [Cancel] to enter the...
...Prt.Jobs]. 2. Select [Locked Print Jobs] using the or [ ] key, and then press the [OK] key. The file will appear if the password is completed, the stored file will be deleted. • For details about [User ID], see p.101 "Printing from the User ID Screen". The ... key. 3. A list of Locked Print files stored in the printer appears. 92 Deleting locked print files 1. Enter the password using the [ ] or [ ] key, and then press [Job List]. If you forget your password, ask your network administrator for help. 7. The remaining sets are printed. Press [Cancel] to enter the...

User Guide
Page 347
...deleted. Hold Print Use this function to delete using the or [ ] key, and then press the [OK] key. 3 The delete confirmation screen appears. Enter the password using the [ ] or [ ] key, and then press [Delete]. Press [Clear] to delete the file, press [Cancel]. If you do not want to ... total. • If a Hold Print file has not been stored properly, check the error log on the control panel. 93 Press [Delete]. The password screen appears. 4. The selected file is not entered correctly. Printing from the computer or the printer's control panel later. • A Hold Print file...
...deleted. Hold Print Use this function to delete using the or [ ] key, and then press the [OK] key. 3 The delete confirmation screen appears. Enter the password using the [ ] or [ ] key, and then press [Delete]. Press [Clear] to delete the file, press [Cancel]. If you do not want to ... total. • If a Hold Print file has not been stored properly, check the error log on the control panel. 93 Press [Delete]. The password screen appears. 4. The selected file is not entered correctly. Printing from the computer or the printer's control panel later. • A Hold Print file...

User Guide
Page 348
... in the printer remain. Other Print Operations • Even after you select [Hold Print Jobs] using Web Image Monitor, after you set a file name or a password to set will be recognized easily. However, an error message will appear on the display panel may be difficult. Temp. Print Jobs] and [Auto Del...
... in the printer remain. Other Print Operations • Even after you select [Hold Print Jobs] using Web Image Monitor, after you set a file name or a password to set will be recognized easily. However, an error message will appear on the display panel may be difficult. Temp. Print Jobs] and [Auto Del...

User Guide
Page 351
... a collate option is not selected before sending a print job. Temp. Configure the Stored Print in the [User ID:] box. The same password must be recognized easily. • If you set a password. Printing a stored print file The following procedure describes how to print on the display panel may be produced. • Stored Print...
... a collate option is not selected before sending a print job. Temp. Configure the Stored Print in the [User ID:] box. The same password must be recognized easily. • If you set a password. Printing a stored print file The following procedure describes how to print on the display panel may be produced. • Stored Print...

User Guide
Page 352
...settings is sent to cancel printing. • When multiple files are selected without setting a quantity, one set. • When the number of set a password in the printer appears. Select [Stored Print Jobs] using the [ ] or [ ] key, and then press [Print]. A list of all selected ...files will be printed at one set less than the minimum number of Stored Print files stored in the printer driver, a password confirmation screen appears. The Stored Print job is applied. You can print files also by pressing [User ID]. 6. 3. The confirmation screen ...
...settings is sent to cancel printing. • When multiple files are selected without setting a quantity, one set. • When the number of set a password in the printer appears. Select [Stored Print Jobs] using the [ ] or [ ] key, and then press [Print]. A list of all selected ...files will be printed at one set less than the minimum number of Stored Print files stored in the printer driver, a password confirmation screen appears. The Stored Print job is applied. You can print files also by pressing [User ID]. 6. 3. The confirmation screen ...

User Guide
Page 353
...not be displayed. 3. Select [Stored Print Jobs] using the [ ] or [ ] key, and then press [Delete]. Depending on entering or confirming the new password, and press the [OK] key. • For details about [User ID], see the printer driver Help. You can set or delete... to delete using the [ ] or [ ] key, and then press [Job List]. Press [Prt.Jobs]. 2. If you set a password, enter the new password. If you forget your password, ask your network administrator for help. 99 Deleting stored print files 1. The delete confirmation screen will appear. Select the file and press [Change...
...not be displayed. 3. Select [Stored Print Jobs] using the [ ] or [ ] key, and then press [Delete]. Depending on entering or confirming the new password, and press the [OK] key. • For details about [User ID], see the printer driver Help. You can set or delete... to delete using the [ ] or [ ] key, and then press [Job List]. Press [Prt.Jobs]. 2. If you set a password, enter the new password. If you forget your password, ask your network administrator for help. 99 Deleting stored print files 1. The delete confirmation screen will appear. Select the file and press [Change...

User Guide
Page 357
...printing, press [Cancel]. • After printing is printed for every selected document. If there are multiple passwords, the printer prints only files that correspond to the entered password and files that is not stored under the selected user ID. • When printing multiple Sample Print files... is "1", one set less than the least number of these require a password, the printer prints files that correspond to the entered password. • If you select [Locked Print Jobs], enter the correct password. If the number of sets specified on the confirmation screen, one set ...
...printing, press [Cancel]. • After printing is printed for every selected document. If there are multiple passwords, the printer prints only files that correspond to the entered password and files that is not stored under the selected user ID. • When printing multiple Sample Print files... is "1", one set less than the least number of these require a password, the printer prints files that correspond to the entered password. • If you select [Locked Print Jobs], enter the correct password. If the number of sets specified on the confirmation screen, one set ...

User Guide
Page 367
...window for information about Web Image Monitor, see p.216 "Remote Maintenance by telnet". Contact your administrator for entering the login user name and password appears. 4. Viewing or Deleting spooled jobs using Web Image Monitor Follow the procedure below to delete, and then click [Delete]. To delete...Enter "http://(printer's address)/" in the address bar to access the printer whose settings you want to change. Enter the login user name and password, and then click [Login]. Top Page of spooled jobs appears. 7. On the [Printer] menu, click [Spool Printing]. Click [Login]....
...window for information about Web Image Monitor, see p.216 "Remote Maintenance by telnet". Contact your administrator for entering the login user name and password appears. 4. Viewing or Deleting spooled jobs using Web Image Monitor Follow the procedure below to delete, and then click [Delete]. To delete...Enter "http://(printer's address)/" in the address bar to access the printer whose settings you want to change. Enter the login user name and password, and then click [Login]. Top Page of spooled jobs appears. 7. On the [Printer] menu, click [Spool Printing]. Click [Login]....


