User's Guide
Page 1
For safe and correct use, please be sure to read the Safety Information in this manual before you use this manual carefully before using the machine. SP 5100N User's Guide Read this machine and keep it handy for future reference.
For safe and correct use, please be sure to read the Safety Information in this manual before you use this manual carefully before using the machine. SP 5100N User's Guide Read this machine and keep it handy for future reference.
User's Guide
Page 10
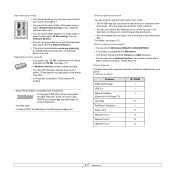
... from your computer in network interface, 10/100 Base TX. See the Software Section. • You can be expanded to your printer. (I: Installed, O: Option) Features SP 5100N IEEE 1284 Parallel I USB 2.0 I Network Interface I (Ethernet 10/100 Base TX) Hard Disk O PostScript* Emulation I Duplex Unit O Optional Tray 2 O Optional Tray 3 O Optional Tray 4 O 1.2 Zoran, the...
... from your computer in network interface, 10/100 Base TX. See the Software Section. • You can be expanded to your printer. (I: Installed, O: Option) Features SP 5100N IEEE 1284 Parallel I USB 2.0 I Network Interface I (Ethernet 10/100 Base TX) Hard Disk O PostScript* Emulation I Duplex Unit O Optional Tray 2 O Optional Tray 3 O Optional Tray 4 O 1.2 Zoran, the...

User's Guide
Page 11
Front view Printer overview Rear view 1 power switch 2 rear cover 3 duplex unit 4 power receptacle * The figure above shows an SP 5100N with all available options. 5 parallel port 6 USB port 7 network port * The figure above shows an SP 5100N with all available options. 1 output tray 2 control panel 3 control board cover 4 tray 1 5 optional tray 2 6 optional tray 3 7 optional tray 4 8 handle 9 paper level indicator 10 multi-purpose tray 11 top cover 12 output support 13 multi-purpose tray paper width guides 14 multi-purpose tray extension 1.3
Front view Printer overview Rear view 1 power switch 2 rear cover 3 duplex unit 4 power receptacle * The figure above shows an SP 5100N with all available options. 5 parallel port 6 USB port 7 network port * The figure above shows an SP 5100N with all available options. 1 output tray 2 control panel 3 control board cover 4 tray 1 5 optional tray 2 6 optional tray 3 7 optional tray 4 8 handle 9 paper level indicator 10 multi-purpose tray 11 top cover 12 output support 13 multi-purpose tray paper width guides 14 multi-purpose tray extension 1.3
User's Guide
Page 23
... use it as your printer. Via the control panel You can set up the following programs that came with your printer: • Web Image Monitor SP 5100N: A web server embedded to use with your network printer.
... use it as your printer. Via the control panel You can set up the following programs that came with your printer: • Web Image Monitor SP 5100N: A web server embedded to use with your network printer.
User's Guide
Page 34
... Start button. 2 For Windows 98/Me/NT 4.0/2000, select Settings and then Printers. For Windows XP/2003, select Printers and Faxes. 3 Double-click the SP 5100N PCL 6 or SP 5100N PS icon. 4 From the Document menu, select Cancel Printing (Windows 98/ Me) or Cancel (Windows NT 4.0/2000/XP/2003). For details about printing, see...
... Start button. 2 For Windows 98/Me/NT 4.0/2000, select Settings and then Printers. For Windows XP/2003, select Printers and Faxes. 3 Double-click the SP 5100N PCL 6 or SP 5100N PS icon. 4 From the Document menu, select Cancel Printing (Windows 98/ Me) or Cancel (Windows NT 4.0/2000/XP/2003). For details about printing, see...
User's Guide
Page 51
Select SP 5100N PCL 6 or SP 5100N PS as the default printer. The printer cover Close the printer cover. is not installed. See page 9.1. The toner cartridge is not closed. Install the ...
Select SP 5100N PCL 6 or SP 5100N PS as the default printer. The printer cover Close the printer cover. is not installed. See page 9.1. The toner cartridge is not closed. Install the ...

User's Guide
Page 52
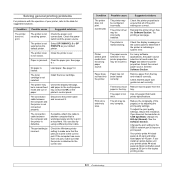
... menu to ensure that it does not contain blank pages. See page 8.4. Check the file to another application. Print the document again. 9.10 Rightclick the SP 5100N PCL 6 printer icon, choose Properties, click the Details tab, and then choose the Spool Settings button. Install more memory in your printer. Install more memory...
... menu to ensure that it does not contain blank pages. See page 8.4. Check the file to another application. Print the document again. 9.10 Rightclick the SP 5100N PCL 6 printer icon, choose Properties, click the Details tab, and then choose the Spool Settings button. Install more memory in your printer. Install more memory...
User's Guide
Page 58
For Windows XP/2003, select Printers and Faxes. 4 Select the SP 5100N PS printer. 5 Click the right mouse button on the printer icon and select Properties. 6 For Windows 98/Me, select the Device Option tab. Make sure ...
For Windows XP/2003, select Printers and Faxes. 4 Select the SP 5100N PS printer. 5 Click the right mouse button on the printer icon and select Properties. 6 For Windows 98/Me, select the Device Option tab. Make sure ...
User's Guide
Page 60
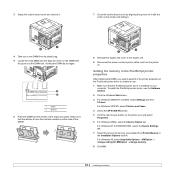
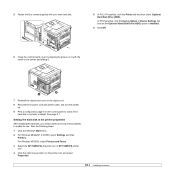
See page 8.1. For Windows XP/2003, select Printers and Faxes. 3 Select the SP 5100N PCL 6 printer icon or SP 5100N PS printer icon. 4 Click the right mouse button on . 9 Print a configuration page from the control panel to check if the hard disk is correctly installed. ...
See page 8.1. For Windows XP/2003, select Printers and Faxes. 3 Select the SP 5100N PCL 6 printer icon or SP 5100N PS printer icon. 4 Click the right mouse button on . 9 Print a configuration page from the control panel to check if the hard disk is correctly installed. ...
User's Guide
Page 77
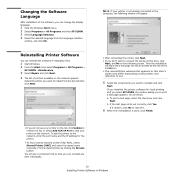
...Reinstalling Printer Software You can reinstall the software if installation fails. 1 Start Windows. 2 From the Start menu select Programs or All Programs → SP 5100N →Maintenance. 3 Select Repair and click Next. 4 The list of printers available on the following window will see your printer on the printer... Next. NOTE: If your printer to the network, enter the port name and the IP address for local printing and you select SP 5100N, the window asking you want to reinstall and click Next. Changing the Software Language After installation of the installation. • The ...
...Reinstalling Printer Software You can reinstall the software if installation fails. 1 Start Windows. 2 From the Start menu select Programs or All Programs → SP 5100N →Maintenance. 3 Select Repair and click Next. 4 The list of printers available on the following window will see your printer on the printer... Next. NOTE: If your printer to the network, enter the port name and the IP address for local printing and you select SP 5100N, the window asking you want to reinstall and click Next. Changing the Software Language After installation of the installation. • The ...
User's Guide
Page 78
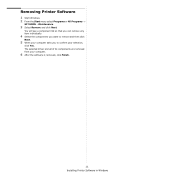
The selected driver and all of its components are removed from your selection, click Yes. Removing Printer Software 1 Start Windows. 2 From the Start menu select Programs or All Programs → SP 5100N →Maintenance. 3 Select Remove and click Next. You will see a component list so that you can remove any item individually. 4 Select the components you want to remove and then click Next. 5 When your computer asks you to confirm your computer. 6 After the software is removed, click Finish. 11 Installing Printer Software in Windows
The selected driver and all of its components are removed from your selection, click Yes. Removing Printer Software 1 Start Windows. 2 From the Start menu select Programs or All Programs → SP 5100N →Maintenance. 3 Select Remove and click Next. You will see a component list so that you can remove any item individually. 4 Select the components you want to remove and then click Next. 5 When your computer asks you to confirm your computer. 6 After the software is removed, click Finish. 11 Installing Printer Software in Windows
User's Guide
Page 93
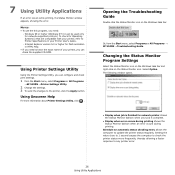
...Guide Double click the Status Monitor icon on the Status Monitor icon. Or, from the Start menu, select Programs or All Programs →SP 5100N →Printer Settings Utility. 2 Change the settings. 3 To send the changes to check the printer status more information about Printer Settings ...or higher (Windows NT 4.0 can configure and check print settings. 1 from the Start menu, select Programs or All Programs → SP 5100N →Troubleshooting Guide. Internet Explorer version 5.0 or higher for flash animation in your job is finished for Operating System(s) that are compatible ...
...Guide Double click the Status Monitor icon on the Status Monitor icon. Or, from the Start menu, select Programs or All Programs →SP 5100N →Printer Settings Utility. 2 Change the settings. 3 To send the changes to check the printer status more information about Printer Settings ...or higher (Windows NT 4.0 can configure and check print settings. 1 from the Start menu, select Programs or All Programs → SP 5100N →Troubleshooting Guide. Internet Explorer version 5.0 or higher for flash animation in your job is finished for Operating System(s) that are compatible ...
User's Guide
Page 108
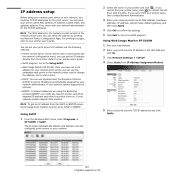
...Even with your network administrator for the print server. First, check with this protocol. Using SetIP 1 From the Windows Start menu, select Programs Æ SP 5100N Æ SetIP. Go to next column. • DHCP: You can use the embedded web server in your network, you cannot find your printer name...turns on your network. 2 Select the name of the network printer card. For printing the page, refer to DHCP or BOOTP. Using Web Image Monitor SP 5100N 1 Run your web browser. 2 Enter your print server's IP address in the URL field and click Go. 3 Click Network Settings Æ TCP/IP...
...Even with your network administrator for the print server. First, check with this protocol. Using SetIP 1 From the Windows Start menu, select Programs Æ SP 5100N Æ SetIP. Go to next column. • DHCP: You can use the embedded web server in your network, you cannot find your printer name...turns on your network. 2 Select the name of the network printer card. For printing the page, refer to DHCP or BOOTP. Using Web Image Monitor SP 5100N 1 Run your web browser. 2 Enter your print server's IP address in the URL field and click Go. 3 Click Network Settings Æ TCP/IP...
User's Guide
Page 111
... select [Have Disk]. Select [Multi Direct Print Type S], and then click [OK]. 4. Search a printer using the following steps: 1 Open a document on a client workstation. 2 Select the SP 5100N as the printer for sending documents to "Installing Printer Software for the network port. 1. DNS Name - Insert port name and click [Finish]. 2 Continue with Test...
... select [Have Disk]. Select [Multi Direct Print Type S], and then click [OK]. 4. Search a printer using the following steps: 1 Open a document on a client workstation. 2 Select the SP 5100N as the printer for sending documents to "Installing Printer Software for the network port. 1. DNS Name - Insert port name and click [Finish]. 2 Continue with Test...
User's Guide
Page 112
... using SNMP. Configuring SNMP To access your network printer, you need to control managed devices. Using SNMP Web Image Monitor SP 5100N accesses, configures, and manages network devices using printing devices and managing various types of variables stored within the devices. •... a Network Management server to determine which allows a booting host to print documents via your network print server through Web Image Monitor SP 5100N using TCP/IP protocol. When certain types of the following methods: • Printer's control panel: Refer to sequentially gather information ...
... using SNMP. Configuring SNMP To access your network printer, you need to control managed devices. Using SNMP Web Image Monitor SP 5100N accesses, configures, and manages network devices using printing devices and managing various types of variables stored within the devices. •... a Network Management server to determine which allows a booting host to print documents via your network print server through Web Image Monitor SP 5100N using TCP/IP protocol. When certain types of the following methods: • Printer's control panel: Refer to sequentially gather information ...
User's Guide
Page 113
...printer devices, DNS may often go stale if an IP address to the DNS server. 2 Configure the same DDNS domain through Web Image Monitor SP 5100N. Microsoft now recommends moving to the printer by its host name rather than 32 characters. • Message Type: You can use the printer.... • Multicast Address: The Multicast Address value is 255. • Registration Lifetime: You can configure SLP protocol settings through Web Image Monitor SP 5100N as a Service Agent and the User Agent. Rather, the user only needs to supply the desired type of service and set of subnets that...
...printer devices, DNS may often go stale if an IP address to the DNS server. 2 Configure the same DDNS domain through Web Image Monitor SP 5100N. Microsoft now recommends moving to the printer by its host name rather than 32 characters. • Message Type: You can use the printer.... • Multicast Address: The Multicast Address value is 255. • Registration Lifetime: You can configure SLP protocol settings through Web Image Monitor SP 5100N as a Service Agent and the User Agent. Rather, the user only needs to supply the desired type of service and set of subnets that...
User's Guide
Page 114
...attached to Mac OS X. For details, see page 5.2. In the network print server 1 Configure the WINS server address through Web Image Monitor SP 5100N. 2 Reboot the print server. Bonjour Bonjour allows for addressing, discovery, description, control, eventing, and presentation, but the Network Printer Card ...servers are optional and are used only if available on searching and control functions or your printer user's guide. • Web Image Monitor SP 5100N: Select Network Settings Æ UPnP. - UPnP supports 6 protocol stacks for a network system to be revealed by a control point....
...attached to Mac OS X. For details, see page 5.2. In the network print server 1 Configure the WINS server address through Web Image Monitor SP 5100N. 2 Reboot the print server. Bonjour Bonjour allows for addressing, discovery, description, control, eventing, and presentation, but the Network Printer Card ...servers are optional and are used only if available on searching and control functions or your printer user's guide. • Web Image Monitor SP 5100N: Select Network Settings Æ UPnP. - UPnP supports 6 protocol stacks for a network system to be revealed by a control point....
User's Guide
Page 115
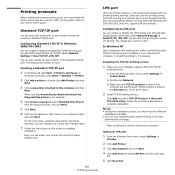
... process, you may need the Windows Installation CD-ROM. • You can enable or disable the LPR Printing port through Web Image Monitor SP 5100N. Select Network Settings Æ Raw TCP/IP, LPR, IPP. Configuring an LPR port You can only install Microsoft TCP/IP Printing if ...2000/XP/2003, and Unix, support LPR port printing. You can enable or disable the Standard TCP/IP Printing port through Web Image Monitor SP 5100N. Installing the TCP/IP printing service 1 Make sure your network printer by Windows. Follow the onscreen instructions to your computer supports Microsoft TCP...
... process, you may need the Windows Installation CD-ROM. • You can enable or disable the LPR Printing port through Web Image Monitor SP 5100N. Select Network Settings Æ Raw TCP/IP, LPR, IPP. Configuring an LPR port You can only install Microsoft TCP/IP Printing if ...2000/XP/2003, and Unix, support LPR port printing. You can enable or disable the Standard TCP/IP Printing port through Web Image Monitor SP 5100N. Installing the TCP/IP printing service 1 Make sure your network printer by Windows. Follow the onscreen instructions to your computer supports Microsoft TCP...

User's Guide
Page 116
... Identifier). 1 Run your printer from network computers running Windows OS that you can send a print job to your web browser and access Web Image Monitor SP 5100N. 2 Click Network Settings Æ Raw TCP/IP, LPR, IPP. 3 Configure the IPP parameters: • Printer Name: Enter the network printer's name to be used with...
... Identifier). 1 Run your printer from network computers running Windows OS that you can send a print job to your web browser and access Web Image Monitor SP 5100N. 2 Click Network Settings Æ Raw TCP/IP, LPR, IPP. 3 Configure the IPP parameters: • Printer Name: Enter the network printer's name to be used with...

User's Guide
Page 117
...menu, select Settings Æ Printers, or select Printers and Faxes. 2 Right-click the printer you can use through Web Image Monitor SP 5100N. Additional functions The following the steps below, each be less than 7 characters. However, these settings do not affect the printer properties ... for all of your network parameter settings to http digest authentication in the print server. 1 Run your web browser and access Web Image Monitor SP 5100N. 2 Click Maintenance Æ Firmware Upgrade. 3 Select a firmware type, Printer Firmware or Network Firmware. 4 Click Browse, and then select ...
...menu, select Settings Æ Printers, or select Printers and Faxes. 2 Right-click the printer you can use through Web Image Monitor SP 5100N. Additional functions The following the steps below, each be less than 7 characters. However, these settings do not affect the printer properties ... for all of your network parameter settings to http digest authentication in the print server. 1 Run your web browser and access Web Image Monitor SP 5100N. 2 Click Maintenance Æ Firmware Upgrade. 3 Select a firmware type, Printer Firmware or Network Firmware. 4 Click Browse, and then select ...


