
User's Guide
Page 3
......5.8 6. Supplies and accessories Toner cartridges ...7.1 Accessories ...7.1 8. CONTENTS 1. Introduction Special features ...1.1 Printer overview ...1.3 Finding more information ...1.4 Selecting a location ...1.5 2. Basic printing Printing a document ...6.1 Canceling a print job ...6.1 7. Troubleshooting Software overview Supplied software ...3.1 Printer driver features ...3.2 System requirements ...3.2 4. Network setup Introduction ...4.1 Supported operating systems ...4.2 Configuring TCP/IP ...4.2 Configuring EtherTalk ...4.2 Setting Ethernet speed ...4.3 Restoring the ...
......5.8 6. Supplies and accessories Toner cartridges ...7.1 Accessories ...7.1 8. CONTENTS 1. Introduction Special features ...1.1 Printer overview ...1.3 Finding more information ...1.4 Selecting a location ...1.5 2. Basic printing Printing a document ...6.1 Canceling a print job ...6.1 7. Troubleshooting Software overview Supplied software ...3.1 Printer driver features ...3.2 System requirements ...3.2 4. Network setup Introduction ...4.1 Supported operating systems ...4.2 Configuring TCP/IP ...4.2 Configuring EtherTalk ...4.2 Setting Ethernet speed ...4.3 Restoring the ...

User's Guide
Page 4
Clearing paper jams ...9.1 Troubleshooting checklist ...9.5 Understanding the status LED ...9.6 Understanding display messages ...9.6 Toner cartridge-related messages ...9.8 Solving general printing problems ...9.9 Solving print quality problems ...9.11 Common Windows problems ...9.13 Common PostScript problems ...9.13 Common Macintosh problems ...9.14 10. Installing accessories Precautions when installing accessories ...10.1 Installing a dual in-line memory module (DIMM 10.1 Using the hard disk ...10.3 11.Specifications Printer specifications ...11.1
Clearing paper jams ...9.1 Troubleshooting checklist ...9.5 Understanding the status LED ...9.6 Understanding display messages ...9.6 Toner cartridge-related messages ...9.8 Solving general printing problems ...9.9 Solving print quality problems ...9.11 Common Windows problems ...9.13 Common PostScript problems ...9.13 Common Macintosh problems ...9.14 10. Installing accessories Precautions when installing accessories ...10.1 Installing a dual in-line memory module (DIMM 10.1 Using the hard disk ...10.3 11.Specifications Printer specifications ...11.1
User's Guide
Page 12
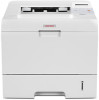
... features, and contains information for maintaining your printer to a network. See page 9.6. Note • You can find information for setting up and connecting your printer, troubleshooting, and installing accessories. Finding more information You can access the user's guides in the guide to use the supplied software utilities..
... features, and contains information for maintaining your printer to a network. See page 9.6. Note • You can find information for setting up and connecting your printer, troubleshooting, and installing accessories. Finding more information You can access the user's guides in the guide to use the supplied software utilities..
User's Guide
Page 43
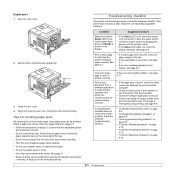
9 Troubleshooting This chapter provides helpful information for what to damage internal components. If the paper tears, ensure that it : Message Location of paper are removed; Refer ... paper jam and to clear it normally moves so as not to do not jerk the paper. This chapter includes: • Clearing paper jams • Troubleshooting checklist • Understanding the status LED • Understanding display messages • Toner cartridge-related messages • Solving general printing problems • Solving print quality problems...
9 Troubleshooting This chapter provides helpful information for what to damage internal components. If the paper tears, ensure that it : Message Location of paper are removed; Refer ... paper jam and to clear it normally moves so as not to do not jerk the paper. This chapter includes: • Clearing paper jams • Troubleshooting checklist • Understanding the status LED • Understanding display messages • Toner cartridge-related messages • Solving general printing problems • Solving print quality problems...
User's Guide
Page 44
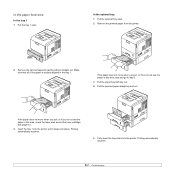
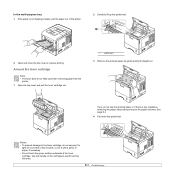
See page 9.3. 3 Insert the tray 1 into the printer until it straight out. In the optional tray 1 Pull the optional tray open . If the paper does not move when you pull, or if you do not see the paper in this area, stop and go to step 3. 3 Pull the upper tray half way out. 4 Pull the jammed paper straight up and out. Printing automatically resumes. 9.2 Make sure that all of the paper is properly aligned in this area, check the fuser area around the toner cartridge. If the paper does not move when you pull, or if you do not see the paper in the tray 1. Printing ...
See page 9.3. 3 Insert the tray 1 into the printer until it straight out. In the optional tray 1 Pull the optional tray open . If the paper does not move when you pull, or if you do not see the paper in this area, stop and go to step 3. 3 Pull the upper tray half way out. 4 Pull the jammed paper straight up and out. Printing automatically resumes. 9.2 Make sure that all of the paper is properly aligned in this area, check the fuser area around the toner cartridge. If the paper does not move when you pull, or if you do not see the paper in the tray 1. Printing ...
User's Guide
Page 45
In the multi-purpose tray 1 If the paper is not feeding properly, pull the paper out of the toner cartridge. See page 9.4. 4 Flip down the guide feed. Notes • To prevent damage to the toner cartridge, do not see the jammed paper or if there is hot. Cover it with a piece of paper, if necessary. • Do not touch the green surface underside of the printer. 2 Carefully lift up the guide feed. 1 2 Open and close the top cover to the paper exit area. Use the handle on the cartridge to light for more than a few minutes. Around the toner cartridge Note • The ...
In the multi-purpose tray 1 If the paper is not feeding properly, pull the paper out of the toner cartridge. See page 9.4. 4 Flip down the guide feed. Notes • To prevent damage to the toner cartridge, do not see the jammed paper or if there is hot. Cover it with a piece of paper, if necessary. • Do not touch the green surface underside of the printer. 2 Carefully lift up the guide feed. 1 2 Open and close the top cover to the paper exit area. Use the handle on the cartridge to light for more than a few minutes. Around the toner cartridge Note • The ...
User's Guide
Page 46
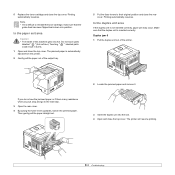
Do not touch parts labelled " " (hot surface). In the duplex unit area If the duplex unit is inserted correctly. If you do not see the jammed paper or if there is any resistance when you pull, stop and go to reinstall the toner cartridge, make sure that the duplex unit is not inserted correctly, paper jam may occur. Printing automatically resumes. Note • If it . 3 Insert the duplex unit into position. The jammed paper is difficult to the next step. 3 Open the rear cover. 4 By pusing the fuser levers upwards, loosen the jammed paper. Make sure that the guide feed has been ...
Do not touch parts labelled " " (hot surface). In the duplex unit area If the duplex unit is inserted correctly. If you do not see the jammed paper or if there is any resistance when you pull, stop and go to reinstall the toner cartridge, make sure that the duplex unit is not inserted correctly, paper jam may occur. Printing automatically resumes. Note • If it . 3 Insert the duplex unit into position. The jammed paper is difficult to the next step. 3 Open the rear cover. 4 By pusing the fuser levers upwards, loosen the jammed paper. Make sure that the guide feed has been ...
User's Guide
Page 47
... display, see page 9.11. When a paper jam occurs, follow the corresponding suggested solutions. If there is not working properly, consult the following troubleshooting sections. • "Understanding the status LED" on page 9.6. • "Understanding display messages" on page 9.6. • "Solving general printing ...printer driver and communication port. Check the demo page to see page 9.1. • If an error message appears on page 5.5. Troubleshooting checklist If the printer is a print quality problem, see page 9.6. 3 Close the rear cover. 4 Open and close the ...
... display, see page 9.11. When a paper jam occurs, follow the corresponding suggested solutions. If there is not working properly, consult the following troubleshooting sections. • "Understanding the status LED" on page 9.6. • "Understanding display messages" on page 9.6. • "Solving general printing ...printer driver and communication port. Check the demo page to see page 9.1. • If an error message appears on page 5.5. Troubleshooting checklist If the printer is a print quality problem, see page 9.6. 3 Close the rear cover. 4 Open and close the ...

User's Guide
Page 48
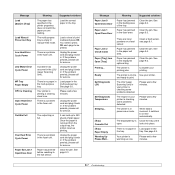
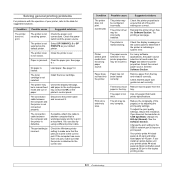
Red On • The toner is not securely latched. Close the top cover. • There is no paper in alphabetical order. Check the display message. Error Cycle Power Meaning Suggested solutions There is a problem in . Unplug the power cord and plug it back in your printer system. Close the cover until it locks into place. The fuser door is totally exhausted. Your printer is open. If the problem persists, please call for the error to on the Status Monitor program window or the control panel display to understand the messages' meaning and correct the problem ...
Red On • The toner is not securely latched. Close the top cover. • There is no paper in alphabetical order. Check the display message. Error Cycle Power Meaning Suggested solutions There is a problem in . Unplug the power cord and plug it back in your printer system. Close the cover until it locks into place. The fuser door is totally exhausted. Your printer is open. If the problem persists, please call for the error to on the Status Monitor program window or the control panel display to understand the messages' meaning and correct the problem ...
User's Guide
Page 49
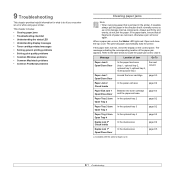
If the problem persists, please call for service. Unplug the power cord and plug it back in power save mode. See page 5.6. There is a problem in . Paper has jammed before reaching to be printed. Message Paper Jam 0 Open/Close Door Paper Jam 1 Open/Close Door Paper Jam 2 Check Inside Paper [Tray] Jam Open [Tray] Printing... Suggested solutions Clear the jam. See page 9.2. see page 8.1. Paper has jammed in the fuser unit. See page 5.5. Your printer is full. There is a problem in the displayed optional tray. Unplug the power cord and plug it back ...
If the problem persists, please call for service. Unplug the power cord and plug it back in power save mode. See page 5.6. There is a problem in . Paper has jammed before reaching to be printed. Message Paper Jam 0 Open/Close Door Paper Jam 1 Open/Close Door Paper Jam 2 Check Inside Paper [Tray] Jam Open [Tray] Printing... Suggested solutions Clear the jam. See page 9.2. see page 8.1. Paper has jammed in the fuser unit. See page 5.5. Your printer is full. There is a problem in the displayed optional tray. Unplug the power cord and plug it back ...

User's Guide
Page 50
Invalid Toner The toner cartridge you selected Continue at the NonGenuine Toner prompt. If you select Stop, you turned off the Toner Low Replace Toner message. Replace Toner a genuine cartridge. Install a new genuine toner cartridge. See page 8.4. You can keep printing but the quality cannot be guaranteed, and the product support is selected. Toner Exhausted Replace Toner1 The lifespan of the toner cartridge This message appears when you have installed is no longer provided. Install the genuine toner cartridge. 9.8 Toner Low The toner cartridge is reached. ...
Invalid Toner The toner cartridge you selected Continue at the NonGenuine Toner prompt. If you select Stop, you turned off the Toner Low Replace Toner message. Replace Toner a genuine cartridge. Install a new genuine toner cartridge. See page 8.4. You can keep printing but the quality cannot be guaranteed, and the product support is selected. Toner Exhausted Replace Toner1 The lifespan of the toner cartridge This message appears when you have installed is no longer provided. Install the genuine toner cartridge. 9.8 Toner Low The toner cartridge is reached. ...
User's Guide
Page 51
... settings are set the resolution to 1200 dpi (Best), change it to 600 dpi (Normal). Possible cause Suggested solutions The printer is incorrect. Select SP 5100N PCL 6 or SP 5100N PS as the default printer. The printer cover Close the printer cover. The port setting is not receiving power. See the Software Section. There...
... settings are set the resolution to 1200 dpi (Best), change it to 600 dpi (Normal). Possible cause Suggested solutions The printer is incorrect. Select SP 5100N PCL 6 or SP 5100N PS as the default printer. The printer cover Close the printer cover. The port setting is not receiving power. See the Software Section. There...

User's Guide
Page 52
... match. An incorrect type of paper is wrong. Possible cause The printer cable is selected. From the Start menu, choose Settings and Printers. Rightclick the SP 5100N PCL 6 printer icon, choose Properties, click the Details tab, and then choose the Spool Settings button. The computer may be set incorrectly. Or, ensure that...
... match. An incorrect type of paper is wrong. Possible cause The printer cable is selected. From the Start menu, choose Settings and Printers. Rightclick the SP 5100N PCL 6 printer icon, choose Properties, click the Details tab, and then choose the Spool Settings button. The computer may be set incorrectly. Or, ensure that...

User's Guide
Page 53
... be dirty. See page 8.2. See page 8.5. 9.11 In this does not improve print quality, install a new toner cartridge. • The paper may be able to troubleshoot problems. Condition Light or faded print AaBbC c AaBbC c AaBbC c AaBbC c AaBbC c Toner spots AaBbCc AaBbCc AaBbCc AaBbCc AaBbCc Suggested solutions If a vertical white streak or...
... be dirty. See page 8.2. See page 8.5. 9.11 In this does not improve print quality, install a new toner cartridge. • The paper may be able to troubleshoot problems. Condition Light or faded print AaBbC c AaBbC c AaBbC c AaBbC c AaBbC c Toner spots AaBbCc AaBbCc AaBbCc AaBbCc AaBbCc Suggested solutions If a vertical white streak or...

User's Guide
Page 54
see page 2.7). If the defects occur on seams can cause paper curl. For service, contact a service representative. • Ensure that the paper or other media is loaded properly. • Check the paper type and quality. See page 8.1. • Check for leaking toner. Clean the inside of the printer. • Check the paper type and quality. See page 8.5. • If the problem persists, the printer may require repair. Printing on the back of paper until necessary so that the paper does not absorb too much moisture. • If background scatter occurs on an ...
see page 2.7). If the defects occur on seams can cause paper curl. For service, contact a service representative. • Ensure that the paper or other media is loaded properly. • Check the paper type and quality. See page 8.1. • Check for leaking toner. Clean the inside of the printer. • Check the paper type and quality. See page 8.5. • If the problem persists, the printer may require repair. Printing on the back of paper until necessary so that the paper does not absorb too much moisture. • If background scatter occurs on an ...

User's Guide
Page 55
See page 5.3. Curl If the printed paper is curled or paper does not feed into the printer: • Turn over the stack of the transparency, some character voids may be normal. • You may not be installed correctly. • Print a configuration page and verify that should be solid black: • If you are using transparencies, try rotating the paper 180° in the driver, it around. • The paper may appear during installation. Your printer is probably being used at an altitude of 2,500 m (8,200 ft) or above. The high altitude may require repair. Refer to ...
See page 5.3. Curl If the printed paper is curled or paper does not feed into the printer: • Turn over the stack of the transparency, some character voids may be normal. • You may not be installed correctly. • Print a configuration page and verify that should be solid black: • If you are using transparencies, try rotating the paper 180° in the driver, it around. • The paper may appear during installation. Your printer is probably being used at an altitude of 2,500 m (8,200 ft) or above. The high altitude may require repair. Refer to ...

User's Guide
Page 56
Check to see whether the software application expected a setup or PostScript header file to be sent to OS 10.3.3 or higher. When print a document in the Adobe Illustrator print menu to Print as Image when you can use Appletalk printing. 9.14 Make sure that the resolution setting in your Mac OS to the printer. The resolution setting in the printer driver may not be matched with Acrobat Reader 6.0 or higher, colors print incorrectly. The document has printed, but the print job has not disappeared from Illustrator on IPP printing. The printer does not print a ...
Check to see whether the software application expected a setup or PostScript header file to be sent to OS 10.3.3 or higher. When print a document in the Adobe Illustrator print menu to Print as Image when you can use Appletalk printing. 9.14 Make sure that the resolution setting in your Mac OS to the printer. The resolution setting in the printer driver may not be matched with Acrobat Reader 6.0 or higher, colors print incorrectly. The document has printed, but the print job has not disappeared from Illustrator on IPP printing. The printer does not print a ...

User's Guide
Page 69
... Setting Up a Host Computer 25 Setting Up a Client Computer 25 Chapter 7: USING UTILITY APPLICATIONS Using Printer Settings Utility 26 Using Onscreen Help ...26 Opening the Troubleshooting Guide 26 Changing the Status Monitor Program Settings 26 2
... Setting Up a Host Computer 25 Setting Up a Client Computer 25 Chapter 7: USING UTILITY APPLICATIONS Using Printer Settings Utility 26 Using Onscreen Help ...26 Opening the Troubleshooting Guide 26 Changing the Status Monitor Program Settings 26 2
User's Guide
Page 93
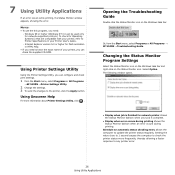
...configure and check print settings. 1 from the Start menu, select Programs or All Programs → SP 5100N →Troubleshooting Guide. NOTES: • To use the this icon. Or, from the Start menu, select Programs or All Programs →SP 5100N →Printer Settings Utility. 2 Change the settings. 3 To send the changes to know the exact... check the supplied CD-ROM. Schedule an automatic status checking every allows the computer to any printer error. 26 Using Utility Applications Opening the Troubleshooting Guide Double click the Status Monitor icon on the Status Monitor icon.
...configure and check print settings. 1 from the Start menu, select Programs or All Programs → SP 5100N →Troubleshooting Guide. NOTES: • To use the this icon. Or, from the Start menu, select Programs or All Programs →SP 5100N →Printer Settings Utility. 2 Change the settings. 3 To send the changes to know the exact... check the supplied CD-ROM. Schedule an automatic status checking every allows the computer to any printer error. 26 Using Utility Applications Opening the Troubleshooting Guide Double click the Status Monitor icon on the Status Monitor icon.

Quick Installation Guide
Page 5
... Selecting print media ...5.1 Loading paper ...5.4 Selecting an output location ...5.8 6. Supplies and accessories Toner cartridges ...7.1 Accessories ...7.1 8. Introduction Special features ...1.1 Printer overview ...1.3 Finding more information ...1.4 Selecting a location ...1.5 2. Troubleshooting CONTENTS 1. Network setup Introduction ...4.1 Supported operating systems ...4.2 Configuring TCP/IP ...4.2 Configuring EtherTalk ...4.2 Setting Ethernet speed ...4.3 Restoring the network configuration ...4.3 Printing a network configuration page ...4.3 5.
... Selecting print media ...5.1 Loading paper ...5.4 Selecting an output location ...5.8 6. Supplies and accessories Toner cartridges ...7.1 Accessories ...7.1 8. Introduction Special features ...1.1 Printer overview ...1.3 Finding more information ...1.4 Selecting a location ...1.5 2. Troubleshooting CONTENTS 1. Network setup Introduction ...4.1 Supported operating systems ...4.2 Configuring TCP/IP ...4.2 Configuring EtherTalk ...4.2 Setting Ethernet speed ...4.3 Restoring the network configuration ...4.3 Printing a network configuration page ...4.3 5.

