
Manuals
Page 2
The preceding list is generally prohibited by law. Certain options might not be available in this manual might result from the use of parts other than genuine parts from the manufacturer with your local dealer. For your office products. Do not copy or print any questions concerning the legality of copying or printing...
The preceding list is generally prohibited by law. Certain options might not be available in this manual might result from the use of parts other than genuine parts from the manufacturer with your local dealer. For your office products. Do not copy or print any questions concerning the legality of copying or printing...
Manuals
Page 10
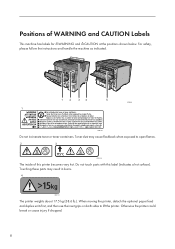
...containers. CEE130 The inside of WARNING and CAUTION Labels This machine has labels for WARNING and CAUTION at the positions shown below. Touching these parts may cause flashback when exposed to lift the printer. When moving the printer, detach the optional paper feed and duplex units first, and then... to open flames. Positions of this label (indicates a hot surface). CEE131 The printer weights about 17.5 kg (38.6 lb.). Do not touch parts with this printer becomes very hot. Otherwise the printer could break or cause injury if dropped. 8 Toner dust may result in burns.
...containers. CEE130 The inside of WARNING and CAUTION Labels This machine has labels for WARNING and CAUTION at the positions shown below. Touching these parts may cause flashback when exposed to lift the printer. When moving the printer, detach the optional paper feed and duplex units first, and then... to open flames. Positions of this label (indicates a hot surface). CEE131 The printer weights about 17.5 kg (38.6 lb.). Do not touch parts with this printer becomes very hot. Otherwise the printer could break or cause injury if dropped. 8 Toner dust may result in burns.
Manuals
Page 11
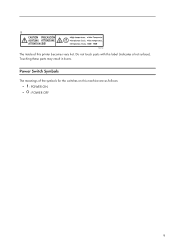
Power Switch Symbols The meanings of this machine are as follows: • : POWER ON • : POWER OFF 9 CEE132 The inside of the symbols for the switches on this printer becomes very hot. Do not touch parts with this label (indicates a hot surface). Touching these parts may result in burns.
Power Switch Symbols The meanings of this machine are as follows: • : POWER ON • : POWER OFF 9 CEE132 The inside of the symbols for the switches on this printer becomes very hot. Do not touch parts with this label (indicates a hot surface). Touching these parts may result in burns.
Manuals
Page 12
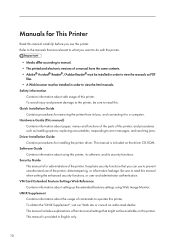
..., replacing consumables, responding to read this . To obtain the "UNIX Supplement", visit our Web site or consult an authorized dealer. names and functions of the parts of functions and settings that might not be installed in English only. 10 It explains security functions that are relevant to what you want to...
..., replacing consumables, responding to read this . To obtain the "UNIX Supplement", visit our Web site or consult an authorized dealer. names and functions of the parts of functions and settings that might not be installed in English only. 10 It explains security functions that are relevant to what you want to...
Manuals
Page 37
... before installing the print cartridge. Do not shake the cartridge. • Print cartridge (consumables) are not covered by using the inset grips on the following parts as doing so could cause a malfunction: • The handle onto the standard paper feed tray. • The underside of the printer. CEE039 When moving the...
... before installing the print cartridge. Do not shake the cartridge. • Print cartridge (consumables) are not covered by using the inset grips on the following parts as doing so could cause a malfunction: • The handle onto the standard paper feed tray. • The underside of the printer. CEE039 When moving the...
Manuals
Page 53
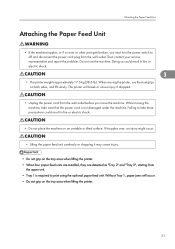
Attaching the Paper Feed Unit Attaching the Paper Feed Unit • If the machine topples, or if a cover or other part gets broken, you move the machine. Do not use the inset grips on the tray area when lifting the printer. 51 Doing so could result ...
Attaching the Paper Feed Unit Attaching the Paper Feed Unit • If the machine topples, or if a cover or other part gets broken, you move the machine. Do not use the inset grips on the tray area when lifting the printer. 51 Doing so could result ...
Manuals
Page 63
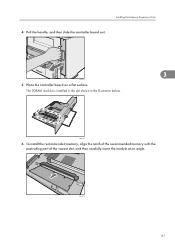
CEE142 6. Place the controller board on a flat surface. CEC013 61 To install the recommended memory, align the notch of the recommended memory with the protruding part of the vacant slot, and then carefully insert the module at an angle. The SDRAM module is installed in the slot shown in the illustration below. Pull the handle, and then slide the controller board out. 3 CEE110 5. Installing the Memory Expansion Units 4.
CEE142 6. Place the controller board on a flat surface. CEC013 61 To install the recommended memory, align the notch of the recommended memory with the protruding part of the vacant slot, and then carefully insert the module at an angle. The SDRAM module is installed in the slot shown in the illustration below. Pull the handle, and then slide the controller board out. 3 CEE110 5. Installing the Memory Expansion Units 4.
Manuals
Page 121
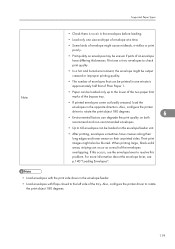
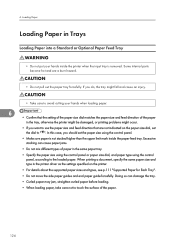
..., configure the printer driver to rotate the print object 180 degrees. 6 • Environmental factors can degrade the print quality on envelopes may be uneven if parts of the bypass tray. • If printed envelopes come out badly creased, load the envelopes in one minute is no air in the envelope feeder...
..., configure the printer driver to rotate the print object 180 degrees. 6 • Environmental factors can degrade the print quality on envelopes may be uneven if parts of the bypass tray. • If printed envelopes come out badly creased, load the envelopes in one minute is no air in the envelope feeder...
Manuals
Page 126
... your hands inside the printer when the input tray is not stacked higher than the upper limit mark inside the paper feed tray. Some internal parts become hot and are not indicated on the printer. • For details about the supported paper sizes and types, see p.111 "Supported Paper for Each...
... your hands inside the printer when the input tray is not stacked higher than the upper limit mark inside the paper feed tray. Some internal parts become hot and are not indicated on the printer. • For details about the supported paper sizes and types, see p.111 "Supported Paper for Each...

Manuals
Page 142
...Loading Envelopes into the printer) by running a pencil or ruler across them. 6 • Some kinds of envelope might be uneven if parts of an envelope have differing thicknesses. For this machine's internal components get very hot. Open the rear cover. 140 CEE040 Otherwise, an injury... might cause misfeeds, wrinkles or print poorly. • Print quality on envelopes may be output creased or improper printing quality. Do not touch the parts with a label indicating the "hot surface". Not doing so could be very hot. Print one size and type of envelope at a time. •...
...Loading Envelopes into the printer) by running a pencil or ruler across them. 6 • Some kinds of envelope might be uneven if parts of an envelope have differing thicknesses. For this machine's internal components get very hot. Open the rear cover. 140 CEE040 Otherwise, an injury... might cause misfeeds, wrinkles or print poorly. • Print quality on envelopes may be output creased or improper printing quality. Do not touch the parts with a label indicating the "hot surface". Not doing so could be very hot. Print one size and type of envelope at a time. •...
Manuals
Page 163
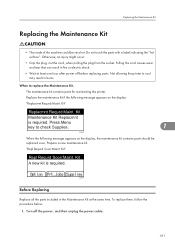
... label indicating the "hot surface". Press Menu key to check Supplies. 7 CEE120 When the following message appears on the display, the maintenance kit contains parts should be very hot. Otherwise, an injury might occur. • Grip the plug, not the cord, when pulling the plug from the socket. ... at least one hour after power off the power, and then unplug the power cable. 161 The maintenance kit contains parts for maintaining the printer. Turn off before replacing parts. Pulling the cord causes wear and tear that can result in fire or electric shock. • Wait at the...
... label indicating the "hot surface". Press Menu key to check Supplies. 7 CEE120 When the following message appears on the display, the maintenance kit contains parts should be very hot. Otherwise, an injury might occur. • Grip the plug, not the cord, when pulling the plug from the socket. ... at least one hour after power off the power, and then unplug the power cable. 161 The maintenance kit contains parts for maintaining the printer. Turn off before replacing parts. Pulling the cord causes wear and tear that can result in fire or electric shock. • Wait at the...
Manuals
Page 167
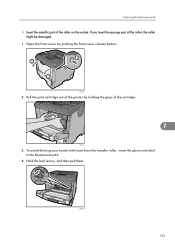
Open the front cover by holding the grips of the printer by pushing the front cover release button. Hold the lock levers, and then pull them. CEE064 165 If you insert the sponge part of the roller on the socket. Pull the print cartridge out of the cartridge. 7 CEE017 3. To avoid dirtying your hands with toner from the transfer roller, wear the gloves included in the Maintenance Kit. 4. Replacing the Maintenance Kit • Insert the metallic part of the roller, the roller might be damaged. 1. CEE008 2.
Open the front cover by holding the grips of the printer by pushing the front cover release button. Hold the lock levers, and then pull them. CEE064 165 If you insert the sponge part of the roller on the socket. Pull the print cartridge out of the cartridge. 7 CEE017 3. To avoid dirtying your hands with toner from the transfer roller, wear the gloves included in the Maintenance Kit. 4. Replacing the Maintenance Kit • Insert the metallic part of the roller, the roller might be damaged. 1. CEE008 2.
Manuals
Page 168
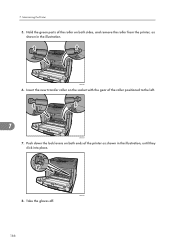
7. CEE066 6. Take the gloves off. 166 Hold the green parts of the printer as shown in the illustration, until they click into place. Push down the lock levers on both sides, and remove the roller from the printer, as shown in the illustration. Insert the new transfer roller on both ends of the roller on the socket with the gear of the roller positioned to the left. 7 CEE067 7. CEE065 8. Maintaining the Printer 5.
7. CEE066 6. Take the gloves off. 166 Hold the green parts of the printer as shown in the illustration, until they click into place. Push down the lock levers on both sides, and remove the roller from the printer, as shown in the illustration. Insert the new transfer roller on both ends of the roller on the socket with the gear of the roller positioned to the left. 7 CEE067 7. CEE065 8. Maintaining the Printer 5.
Manuals
Page 179
Note again that exposure to the laser components inside this machine risks blindness. • The inside this machine. Do not touch the parts with a soft cloth. Dry wipe the exterior with a label indicating the "hot surface". Accumulated dust and grime pose a fire hazard. • Do not allow paper ...
Note again that exposure to the laser components inside this machine risks blindness. • The inside this machine. Do not touch the parts with a soft cloth. Dry wipe the exterior with a label indicating the "hot surface". Accumulated dust and grime pose a fire hazard. • Do not allow paper ...
Manuals
Page 180
... power cord from the wall outlet. • When disconnecting the power cord from the socket. Remove all the cables from the printer. 178 Some internal parts become hot and are a burn hazard. • Do not use chemical cleaners or organic solvents such as follows: • When moving the machine, hold the...
... power cord from the wall outlet. • When disconnecting the power cord from the socket. Remove all the cables from the printer. 178 Some internal parts become hot and are a burn hazard. • Do not use chemical cleaners or organic solvents such as follows: • When moving the machine, hold the...
Manuals
Page 182
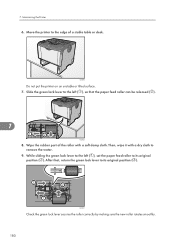
... lever to remove the water. 9. After that the paper feed roller can be released ( ). 7 1 2 CEE026 8. Then, wipe it with a soft damp cloth. Wipe the rubber part of a stable table or desk. 7. Move the printer to the edge of the roller with a dry cloth to its original position ( ).
... lever to remove the water. 9. After that the paper feed roller can be released ( ). 7 1 2 CEE026 8. Then, wipe it with a soft damp cloth. Wipe the rubber part of a stable table or desk. 7. Move the printer to the edge of the roller with a dry cloth to its original position ( ).
Manuals
Page 184
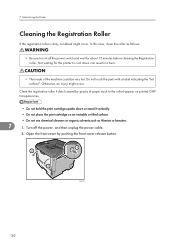
... Roller If the registration roller is dirty, a misfeed might occur. Not waiting for about 15 minutes before cleaning the Registration roller. Do not touch the parts with a label indicating the "hot surface". Turn off the power switch and wait for the printer to cool down can result in a burn. • The...
... Roller If the registration roller is dirty, a misfeed might occur. Not waiting for about 15 minutes before cleaning the Registration roller. Do not touch the parts with a label indicating the "hot surface". Turn off the power switch and wait for the printer to cool down can result in a burn. • The...

Manuals
Page 197
... details about installing the unit, see p.64 "Installing the Interface Units". Replace print cartrdg soon./ Component at end of life. Replace if blurred/streaked Some parts inside the print cartridge have reached their end of life. Error and Status Messages Appear on the Control Panel Prepare Replacement Check print cartridge replacement...
... details about installing the unit, see p.64 "Installing the Interface Units". Replace print cartrdg soon./ Component at end of life. Replace if blurred/streaked Some parts inside the print cartridge have reached their end of life. Error and Status Messages Appear on the Control Panel Prepare Replacement Check print cartridge replacement...

Manuals
Page 213
... the location of the loaded paper. • The paper feed roller is Jammed An error message appears if a paper misfeed occurs. Do not touch the parts with cold water. If toner comes into contact with your hands or clothes. • Toner on your clothing, wash the stained area with a label indicating...
... the location of the loaded paper. • The paper feed roller is Jammed An error message appears if a paper misfeed occurs. Do not touch the parts with cold water. If toner comes into contact with your hands or clothes. • Toner on your clothing, wash the stained area with a label indicating...

Manuals
Page 222
Touching it away. 10 CEE041 220 Open the rear cover. error message appears when a paper misfeed occurs in the paper feed section. • Forcefully removing misfed paper may cause paper to tear and leave scraps of the fusing unit. This might cause a misfeed and damage the printer. • Do not touch the metal part of paper in a burn. 1. Lower the rear cover until it is horizontal, and then pull it could result in the printer. It becomes very hot. 10. CEE040 2. Removing Misfed Paper Paper Misfeed Message (C) The " (C)Open Rear Cover and remove misfeed."
Touching it away. 10 CEE041 220 Open the rear cover. error message appears when a paper misfeed occurs in the paper feed section. • Forcefully removing misfed paper may cause paper to tear and leave scraps of the fusing unit. This might cause a misfeed and damage the printer. • Do not touch the metal part of paper in a burn. 1. Lower the rear cover until it is horizontal, and then pull it could result in the printer. It becomes very hot. 10. CEE040 2. Removing Misfed Paper Paper Misfeed Message (C) The " (C)Open Rear Cover and remove misfeed."


