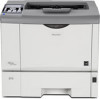
Manuals
Page 4
... Board...64 Installing the Wireless LAN Interface Board 66 Installing the IEEE 1284 Interface Board 68 Installing the SD Memory Card Options...71 Attaching the Duplex Unit...74 4. Connecting the Printer Ethernet Cable Connection...77 Reading the LED Lamps...80 USB Cable Connection...81 Parallel Cable Connection...83 5.
... Board...64 Installing the Wireless LAN Interface Board 66 Installing the IEEE 1284 Interface Board 68 Installing the SD Memory Card Options...71 Attaching the Duplex Unit...74 4. Connecting the Printer Ethernet Cable Connection...77 Reading the LED Lamps...80 USB Cable Connection...81 Parallel Cable Connection...83 5.

Manuals
Page 5
... IEEE 802.1X for Each Tray...111 Symbols...111 Standard Paper Feed Tray...111 Optional Paper Feed Tray...112 Bypass Tray...113 Envelope Feeder...113 Duplex Unit...114 Supported Paper Types...115 Plain Paper...115 Thick Paper...115 Letterhead...116 Label Paper...116 Special Paper...116 Preprinted Paper...117 Color Paper...
... IEEE 802.1X for Each Tray...111 Symbols...111 Standard Paper Feed Tray...111 Optional Paper Feed Tray...112 Bypass Tray...113 Envelope Feeder...113 Duplex Unit...114 Supported Paper Types...115 Plain Paper...115 Thick Paper...115 Letterhead...116 Label Paper...116 Special Paper...116 Preprinted Paper...117 Color Paper...
Manuals
Page 7
Removing Misfed Bypass Tray...215 Paper Misfeed Message (B)...218 Paper Misfeed Message (C)...220 Paper Misfeed Message (Y1)(Y2)...225 Paper Misfeed Message (Z)...227 Removing Misfed Paper Inside the Cover 227 Removing Misfed Paper Inside the Duplex Unit 229 11. Appendix Moving and Transporting the Printer...231 Moving the Printer in a Short Distance...231 Consumables...233 Print Cartridge...233 Maintenance Kit...233 Specifications...235 Mainframe...235 Options...237 Trademarks...241 INDEX...243 5
Removing Misfed Bypass Tray...215 Paper Misfeed Message (B)...218 Paper Misfeed Message (C)...220 Paper Misfeed Message (Y1)(Y2)...225 Paper Misfeed Message (Z)...227 Removing Misfed Paper Inside the Cover 227 Removing Misfed Paper Inside the Duplex Unit 229 11. Appendix Moving and Transporting the Printer...231 Moving the Printer in a Short Distance...231 Consumables...233 Print Cartridge...233 Maintenance Kit...233 Specifications...235 Mainframe...235 Options...237 Trademarks...241 INDEX...243 5
Manuals
Page 10
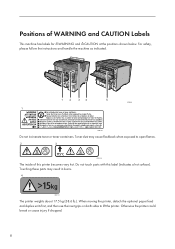
... CAUTION Labels This machine has labels for WARNING and CAUTION at the positions shown below. When moving the printer, detach the optional paper feed and duplex units first, and then use the inset grips on both sides to open flames. Toner dust may result in burns. Touching these parts may cause...
... CAUTION Labels This machine has labels for WARNING and CAUTION at the positions shown below. When moving the printer, detach the optional paper feed and duplex units first, and then use the inset grips on both sides to open flames. Toner dust may result in burns. Touching these parts may cause...

Manuals
Page 14
... 1000 Envelope Feeder Type 400 Hard Disk Drive Type 4310 Memory Unit Type G 128MB Memory Unit Type G 256 MB Referred to as Paper feed unit Duplex Unit Envelope feeder Hard disk SDRAM module SDRAM module Gigabit Ethernet Board Type A Gigabit Ethernet board Gigabit Ethernet Board Type C Gigabit Ethernet board IEEE 802...
... 1000 Envelope Feeder Type 400 Hard Disk Drive Type 4310 Memory Unit Type G 128MB Memory Unit Type G 256 MB Referred to as Paper feed unit Duplex Unit Envelope feeder Hard disk SDRAM module SDRAM module Gigabit Ethernet Board Type A Gigabit Ethernet board Gigabit Ethernet Board Type C Gigabit Ethernet board IEEE 802...
Manuals
Page 49
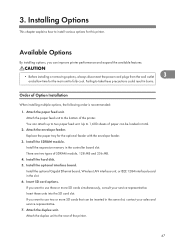
... LAN interface unit, or IEEE 1284 interface board in the controller board slot. Insert SD card options. Attach the duplex unit. Order of SDRAM module, 128 MB and 256 MB. 4. Attach the duplex unit to the bottom of paper can improve printer performance and expand the available features. • Before installing or...
... LAN interface unit, or IEEE 1284 interface board in the controller board slot. Insert SD card options. Attach the duplex unit. Order of SDRAM module, 128 MB and 256 MB. 4. Attach the duplex unit to the bottom of paper can improve printer performance and expand the available features. • Before installing or...

Manuals
Page 50
... on both sides of envelopes. See p.51 "Attaching the Paper Feed Unit". 2. Up to 60 sheets of paper. Duplex unit You can be used. 48 See p.74 "Attaching the Duplex Unit". • The envelope feeder is identified as "Tray 2" and "Tray 3". 3. Remove the rear cover of ...Envelope Feeder". 3. Up to Install Options External options 3 CEE098 1. Envelope feeder Loads up to 500 sheets of the printer to attach the duplex unit. Installing Options Where to two envelope feeder unit can print on the printer. Without the optional paper feed unit, the envelope feeder ...
... on both sides of envelopes. See p.51 "Attaching the Paper Feed Unit". 2. Up to 60 sheets of paper. Duplex unit You can be used. 48 See p.74 "Attaching the Duplex Unit". • The envelope feeder is identified as "Tray 2" and "Tray 3". 3. Remove the rear cover of ...Envelope Feeder". 3. Up to Install Options External options 3 CEE098 1. Envelope feeder Loads up to 500 sheets of the printer to attach the duplex unit. Installing Options Where to two envelope feeder unit can print on the printer. Without the optional paper feed unit, the envelope feeder ...

Manuals
Page 76
3. Installing Options Attaching the Duplex Unit • If you attach the duplex unit and the paper feed unit, the paper feed unit must be attached prior to attaching the duplex unit. • Check the printer nameplate to the printer, and then unplug the power cable. 3. Turn off power to confirm the model code. 1. Remove the adhesive tape and paper. Check the contents of the box for the following items: 3 CEE092 2. CEE093 74 CEE081
3. Installing Options Attaching the Duplex Unit • If you attach the duplex unit and the paper feed unit, the paper feed unit must be attached prior to attaching the duplex unit. • Check the printer nameplate to the printer, and then unplug the power cable. 3. Turn off power to confirm the model code. 1. Remove the adhesive tape and paper. Check the contents of the box for the following items: 3 CEE092 2. CEE093 74 CEE081

Manuals
Page 77
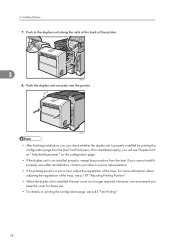
Attaching the Duplex Unit 3 CEE040 5. CEE041 Proceed to step 7 if the paper tray cover is horizontal, and then pull it is not installed. 6. Pull the bottom of the paper tray cover ( ) up slightly, and then remove the paper tray cover ( ), in the order shown in the illustration. 2 1 CEE043 75 Lower the rear cover until it away. 4. Open the rear cover.
Attaching the Duplex Unit 3 CEE040 5. CEE041 Proceed to step 7 if the paper tray cover is horizontal, and then pull it is not installed. 6. Pull the bottom of the paper tray cover ( ) up slightly, and then remove the paper tray cover ( ), in the order shown in the illustration. 2 1 CEE043 75 Lower the rear cover until it away. 4. Open the rear cover.
Manuals
Page 78
... is installed, the rear cover is not correct, adjust the registration of the printer. 3 CEE057 8. Push in the duplex unit along the rails at the back of the trays. If you cannot install it is installed properly, you keep the cover for future use. ...• For details on printing the configuration page, see "Duplex Unit" as " Attached Equipment " on the configuration page. • If the duplex unit is properly installed by printing the configuration page from the start. However, we recommend you will see p.45 "Test...
... is installed, the rear cover is not correct, adjust the registration of the printer. 3 CEE057 8. Push in the duplex unit along the rails at the back of the trays. If you cannot install it is installed properly, you keep the cover for future use. ...• For details on printing the configuration page, see "Duplex Unit" as " Attached Equipment " on the configuration page. • If the duplex unit is properly installed by printing the configuration page from the start. However, we recommend you will see p.45 "Test...
Manuals
Page 93
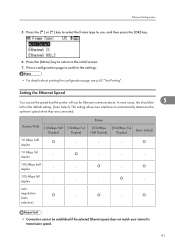
... Select] - - - - - - - - - • Connection cannot be 5 left on the default setting, [Auto Select]. Router/HUB [10Mbps Half [10Mbps Full Duplex] Duplex] 10 Mbps half duplex - 10 Mbps full duplex - 100 Mbps half duplex - - 100 Mbps full duplex - - Setting the Ethernet Speed You can set the speed that the printer will use , and then press the [OK] key...
... Select] - - - - - - - - - • Connection cannot be 5 left on the default setting, [Auto Select]. Router/HUB [10Mbps Half [10Mbps Full Duplex] Duplex] 10 Mbps half duplex - 10 Mbps full duplex - 100 Mbps half duplex - - 100 Mbps full duplex - - Setting the Ethernet Speed You can set the speed that the printer will use , and then press the [OK] key...

Manuals
Page 116
6. Loading Paper Paper capacity Duplex Unit Paper types Paper sizes Paper weight 6 60 sheets (80 g/m2, 20 lb.) Do not load the paper so that the top of the stack exceeds the limit mark inside the tray. Plain Paper, Letterhead, Recycled Paper A4 , A5 , B5 JIS , 8 1/2 " × 14 " (Legal) , 8 1/2 " × 13 " (Foolscap) , 8 1/2 " × 11 " (Letter) , 8 1/4 " × 13 " (Folio) , 8 " × 13 " (F/GL) , 5 1/2 " × 8 1/2 " (Half Letter) , 16K 60 to 130 g/m2 (16 to 35 lb.) 114
6. Loading Paper Paper capacity Duplex Unit Paper types Paper sizes Paper weight 6 60 sheets (80 g/m2, 20 lb.) Do not load the paper so that the top of the stack exceeds the limit mark inside the tray. Plain Paper, Letterhead, Recycled Paper A4 , A5 , B5 JIS , 8 1/2 " × 14 " (Legal) , 8 1/2 " × 13 " (Foolscap) , 8 1/2 " × 11 " (Letter) , 8 1/4 " × 13 " (Folio) , 8 " × 13 " (F/GL) , 5 1/2 " × 8 1/2 " (Half Letter) , 16K 60 to 130 g/m2 (16 to 35 lb.) 114

Manuals
Page 117
... • Bypass Tray: 100 Thick Paper Paper weight Paper type setting using the control panel Paper type setting using the printer driver Supported input tray Duplex printing Note 131 to 162 g/m2 (35 to 43 lb.) The [Menu] key > [Paper Input] > [Paper Type: (tray name)] > [Thick Paper] > the [OK] key [Thick...
... • Bypass Tray: 100 Thick Paper Paper weight Paper type setting using the control panel Paper type setting using the printer driver Supported input tray Duplex printing Note 131 to 162 g/m2 (35 to 43 lb.) The [Menu] key > [Paper Input] > [Paper Type: (tray name)] > [Thick Paper] > the [OK] key [Thick...
Manuals
Page 118
... tray can be used. Not supported Special Paper Paper type setting using the control panel Paper type setting using the printer driver Supported input tray Duplex printing The [Menu] key > [Paper Input] > [Paper Type: (tray name)] > [Letterhead] > the [OK] key [Letterhead] Any input tray can be ...settings, set special paper. 116 6. Loading Paper Letterhead Paper type setting using the control panel Paper type setting using the printer driver Supported input tray Duplex printing Note The [Menu] key > [Paper Input] > [Paper Type: (tray name)] > [Special Paper] > the [OK] key [Special] Any...
... tray can be used. Not supported Special Paper Paper type setting using the control panel Paper type setting using the printer driver Supported input tray Duplex printing The [Menu] key > [Paper Input] > [Paper Type: (tray name)] > [Letterhead] > the [OK] key [Letterhead] Any input tray can be ...settings, set special paper. 116 6. Loading Paper Letterhead Paper type setting using the control panel Paper type setting using the printer driver Supported input tray Duplex printing Note The [Menu] key > [Paper Input] > [Paper Type: (tray name)] > [Special Paper] > the [OK] key [Special] Any...

Manuals
Page 119
... supported Recycled Paper Paper type setting using the control panel Paper type setting using the printer driver Supported input tray Duplex printing The [Menu] key > [Paper Input] > [Paper Type: (tray name)] > [Recycled Paper] > the [OK] key [Recycled] or [Plain & Recycled] Any input tray can ... can be used. Supported Paper Types Preprinted Paper Paper type setting using the control panel Paper type setting using the printer driver Supported input tray Duplex printing The [Menu] key > [Paper Input] > [Paper Type: (tray name)] > [Preprinted Paper] > the [OK] key [Preprinted] Any input tray ...
... supported Recycled Paper Paper type setting using the control panel Paper type setting using the printer driver Supported input tray Duplex printing The [Menu] key > [Paper Input] > [Paper Type: (tray name)] > [Recycled Paper] > the [OK] key [Recycled] or [Plain & Recycled] Any input tray can ... can be used. Supported Paper Types Preprinted Paper Paper type setting using the control panel Paper type setting using the printer driver Supported input tray Duplex printing The [Menu] key > [Paper Input] > [Paper Type: (tray name)] > [Preprinted Paper] > the [OK] key [Preprinted] Any input tray ...

Manuals
Page 120
Loading Paper Paper type setting using the printer driver 6 Supported input tray Duplex printing The [Menu] key > [Paper Input] > [Paper Type: Tray2] or [Paper Type: Tray3], or [Paper Type: Bypass Tray] > [Envelope] > the [OK] key [Envelope] This paper ... envelopes from the bypass tray. Not supported Envelopes Paper type setting using the control panel Paper type setting using the printer driver Supported input tray Duplex printing [Transparency] This paper type can be printed only from Tray 2 or Tray 3, use the envelope feeder unit.
Loading Paper Paper type setting using the printer driver 6 Supported input tray Duplex printing The [Menu] key > [Paper Input] > [Paper Type: Tray2] or [Paper Type: Tray3], or [Paper Type: Bypass Tray] > [Envelope] > the [OK] key [Envelope] This paper ... envelopes from the bypass tray. Not supported Envelopes Paper type setting using the control panel Paper type setting using the printer driver Supported input tray Duplex printing [Transparency] This paper type can be printed only from Tray 2 or Tray 3, use the envelope feeder unit.

Manuals
Page 143
CEE058 141 Use the envelope lever. Raising the envelope lever reduces roller pressure. Push the under board levers ( ) and then pull the duplex unit out of the duplex unit ( ), and then pull it out until it stops ( ). 2 1 CEE056 3. Loading Envelopes 2. If the optional duplex unit is attached, push down the lever on the right side of the printer ( ). 1 6 2 CEE083 4.
CEE058 141 Use the envelope lever. Raising the envelope lever reduces roller pressure. Push the under board levers ( ) and then pull the duplex unit out of the duplex unit ( ), and then pull it out until it stops ( ). 2 1 CEE056 3. Loading Envelopes 2. If the optional duplex unit is attached, push down the lever on the right side of the printer ( ). 1 6 2 CEE083 4.

Manuals
Page 144
Close the rear cover. Securely push the duplex unit into the printer. 142 CEE050 CEE045 6. Loading Paper 5. 6. If the optional duplex unit was removed, re-install it in the printer by pushing it along the rails on the inside of the printer. 6 CEE057 7.
Close the rear cover. Securely push the duplex unit into the printer. 142 CEE050 CEE045 6. Loading Paper 5. 6. If the optional duplex unit was removed, re-install it in the printer by pushing it along the rails on the inside of the printer. 6 CEE057 7.

Manuals
Page 171
If the optional duplex unit is attached, push down the lever on the right side of the printer ( ). 1 2 7 CEE083 5. Push the under board levers ( ), and then pull the duplex unit out of the duplex unit ( ), and then pull it out until it stops ( ). 2 1 CEE056 4. CEE022 169 Replacing the Maintenance Kit 3. Move the printer to the edge of a sturdy and stable table or desk.
If the optional duplex unit is attached, push down the lever on the right side of the printer ( ). 1 2 7 CEE083 5. Push the under board levers ( ), and then pull the duplex unit out of the duplex unit ( ), and then pull it out until it stops ( ). 2 1 CEE056 4. CEE022 169 Replacing the Maintenance Kit 3. Move the printer to the edge of a sturdy and stable table or desk.

Manuals
Page 173
... unit to cool may result in the printer by pushing it in burns. 171 If the optional duplex unit was removed, re-install it along the rails on the inside of the printer. Push the duplex unit securely into the printer. 7 CEE050 • If the printer is equipped with the optional paper...
... unit to cool may result in the printer by pushing it in burns. 171 If the optional duplex unit was removed, re-install it along the rails on the inside of the printer. Push the duplex unit securely into the printer. 7 CEE050 • If the printer is equipped with the optional paper...


