
Quick Guide
Page 6
.... tree. tings of the menu tree. 7 [Escape] key tions indicated by each scroll key. es due to print out the fax- play the menu for configuring the set- have not been printed out exist in the direc- Press to cancel the current job. 9 Power indicator • While... configuring the machine: press Remains lit while the power is processing a job: press to scan, copy, or send a fax. When an alert is off. the instructions ...
.... tree. tings of the menu tree. 7 [Escape] key tions indicated by each scroll key. es due to print out the fax- play the menu for configuring the set- have not been printed out exist in the direc- Press to cancel the current job. 9 Power indicator • While... configuring the machine: press Remains lit while the power is processing a job: press to scan, copy, or send a fax. When an alert is off. the instructions ...

Quick Guide
Page 7
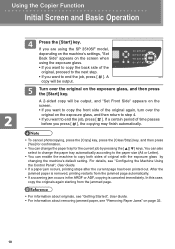
... Press to use the function pre-assigned numbers 1 to 10 and 11 to adjust image density for the destination. screen to display the menu for configur- largement ratio for the current copy 4 [User Tools] key job, or the document size for this key. specifying a scan or fax destination For details, see...
... Press to use the function pre-assigned numbers 1 to 10 and 11 to adjust image density for the destination. screen to display the menu for configur- largement ratio for the current copy 4 [User Tools] key job, or the document size for this key. specifying a scan or fax destination For details, see...
Quick Guide
Page 9
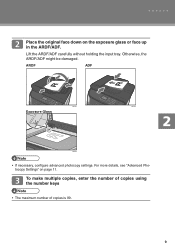
Place the original face down on page 11. Lift the ARDF/ADF carefully without holding the input tray. ARDF ADF CMF351 CMF350 Exposure Glass CMF048 • If necessary, configure advanced photocopy settings. To make multiple copies, enter the number of copies using the number keys • The maximum number of copies is 99. 9 For more details, see "Advanced Photocopy Settings" on the exposure glass or face up in the ARDF/ADF. Otherwise, the ARDF/ADF might be damaged.
Place the original face down on page 11. Lift the ARDF/ADF carefully without holding the input tray. ARDF ADF CMF351 CMF350 Exposure Glass CMF048 • If necessary, configure advanced photocopy settings. To make multiple copies, enter the number of copies using the number keys • The maximum number of copies is 99. 9 For more details, see "Advanced Photocopy Settings" on the exposure glass or face up in the ARDF/ADF. Otherwise, the ARDF/ADF might be damaged.
Quick Guide
Page 10
...from the jammed page. • For information about originals, see "Getting Started", User Guide. • For information about removing jammed paper, see "Configuring the Machine Using the Control Panel", User Guide. • If a paper jam occurs, printing stops after the current page has been printed out. ...Press the [Start] key. If a certain period of original with the exposure glass by pressing the [ ][ ] keys. If you are using the SP 3510SF model, depending on the machine's settings, "Set Back Side" appears on the screen when using the exposure glass. • If you want to ...
...from the jammed page. • For information about originals, see "Getting Started", User Guide. • For information about removing jammed paper, see "Configuring the Machine Using the Control Panel", User Guide. • If a paper jam occurs, printing stops after the current page has been printed out. ...Press the [Start] key. If a certain period of original with the exposure glass by pressing the [ ][ ] keys. If you are using the SP 3510SF model, depending on the machine's settings, "Set Back Side" appears on the screen when using the exposure glass. • If you want to ...
Quick Guide
Page 12
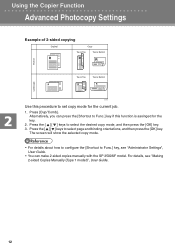
... then press the [OK] key. Press [Dup/Comb]. Alternatively, you can make 2-sided copies manually with the SP 3500SF model. The screen will show the selected copy mode. • For details about how to configure the [Shortcut to Func.] key, see "Making 2-sided Copies Manually (Type 1 model)", User Guide. 12 Using the...
... then press the [OK] key. Press [Dup/Comb]. Alternatively, you can make 2-sided copies manually with the SP 3500SF model. The screen will show the selected copy mode. • For details about how to configure the [Shortcut to Func.] key, see "Making 2-sided Copies Manually (Type 1 model)", User Guide. 12 Using the...
Quick Guide
Page 13
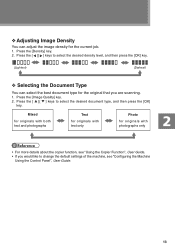
... both text and photographs Text for originals with text only Photo for originals with photographs only • For more details about the copier function, see "Configuring the Machine Using the Control Panel", User Guide. 13 Press the [Density] key. 2.
... both text and photographs Text for originals with text only Photo for originals with photographs only • For more details about the copier function, see "Configuring the Machine Using the Control Panel", User Guide. 13 Press the [Density] key. 2.

Quick Guide
Page 14
... entering a user name and passowrd. For details, see "When LDAP Authentication is inserted in to USB function does not require destinations registered). For details, see "Configuring the Machine Using Web Image Monitor", User Guide. • It is the initial screen in advance. Selection key items • When "Specify Dest." Current status... scanning mode and settings 3. For details, see "Using the Scanner Function", User Guide. • To send files via e-mail, SMTP and DNS settings must be configured properly in scanner mode. 1.
... entering a user name and passowrd. For details, see "When LDAP Authentication is inserted in to USB function does not require destinations registered). For details, see "Configuring the Machine Using Web Image Monitor", User Guide. • It is the initial screen in advance. Selection key items • When "Specify Dest." Current status... scanning mode and settings 3. For details, see "Using the Scanner Function", User Guide. • To send files via e-mail, SMTP and DNS settings must be configured properly in scanner mode. 1.
Quick Guide
Page 18
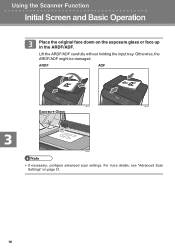
Using the Scanner Function Initial Screen and Basic Operation Place the original face down on page 21. 18 Otherwise, the ARDF/ADF might be damaged. ARDF ADF CMF351 CMF350 Exposure Glass CMF048 • If necessary, configure advanced scan settings. Lift the ARDF/ADF carefully without holding the input tray. For more details, see "Advanced Scan Settings" on the exposure glass or face up in the ARDF/ADF.
Using the Scanner Function Initial Screen and Basic Operation Place the original face down on page 21. 18 Otherwise, the ARDF/ADF might be damaged. ARDF ADF CMF351 CMF350 Exposure Glass CMF048 • If necessary, configure advanced scan settings. Lift the ARDF/ADF carefully without holding the input tray. For more details, see "Advanced Scan Settings" on the exposure glass or face up in the ARDF/ADF.
Quick Guide
Page 20
... see "Using the Scanner Function", User Guide. • For information about originals, see "Getting Started", User Guide. • For information about how to configure the [Shortcut to Func.] key, see "Removing Paper Jams" on page 32. 20 The scan files are discarded. • You can also specify a ... and scan the entire originals again. • For details about removing jammed paper, see "Administrator Settings", User Guide. • You can configure the machine to scan documents in the ARDF/ADF or an access error to the USB flash disk occurs, the scan job will be discarded...
... see "Using the Scanner Function", User Guide. • For information about originals, see "Getting Started", User Guide. • For information about how to configure the [Shortcut to Func.] key, see "Removing Paper Jams" on page 32. 20 The scan files are discarded. • You can also specify a ... and scan the entire originals again. • For details about removing jammed paper, see "Administrator Settings", User Guide. • You can configure the machine to scan documents in the ARDF/ADF or an access error to the USB flash disk occurs, the scan job will be discarded...
Quick Guide
Page 21
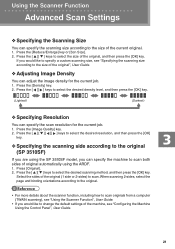
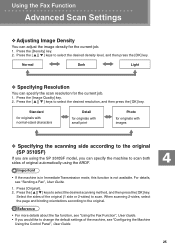
...If you would like to change the default settings of the machine, see "Specifying the scanning size according to the original (SP 3510SF) If you are using the SP 3510SF model, you would like to scan. v Specifying the scanning side according to the size of the original", User Guide.... 2. Press the [ ][ ] keys to select the size of the original (1 side or 2-sides) to specify a custom scanning size, see "Configuring the Machine Using the Control Panel", User Guide. 21 Press the [Density] key. 2. Using the Scanner Function Advanced Scan Settings v Specifying the Scanning...
...If you would like to change the default settings of the machine, see "Specifying the scanning size according to the original (SP 3510SF) If you are using the SP 3510SF model, you would like to scan. v Specifying the scanning side according to the size of the original", User Guide.... 2. Press the [ ][ ] keys to select the size of the original (1 side or 2-sides) to specify a custom scanning size, see "Configuring the Machine Using the Control Panel", User Guide. 21 Press the [Density] key. 2. Using the Scanner Function Advanced Scan Settings v Specifying the Scanning...
Quick Guide
Page 22
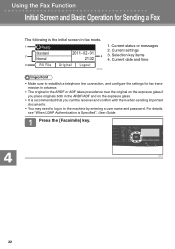
... to log in fax mode. 1. Current settings 3. Press the [Facsimile] key. Current date and time CMF102 • Make sure to establish a telephone line connection, and configure the settings for Sending a Fax The following is Specified", User Guide. Current status or messages 2.
... to log in fax mode. 1. Current settings 3. Press the [Facsimile] key. Current date and time CMF102 • Make sure to establish a telephone line connection, and configure the settings for Sending a Fax The following is Specified", User Guide. Current status or messages 2.
Quick Guide
Page 23
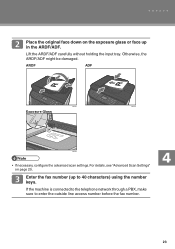
Otherwise, the ARDF/ADF might be damaged. Enter the fax number (up in the ARDF/ADF. ARDF ADF CMF351 CMF350 Exposure Glass CMF048 • If necessary, configure the advanced scan settings. If the machine is connected to the telephone network through a PBX, make sure to 40 characters) using the number keys. For details, see "Advanced Scan Settings" on the exposure glass or face up to enter the outside line access number before the fax number. 23 Place the original face down on page 25. Lift the ARDF/ADF carefully without holding the input tray.
Otherwise, the ARDF/ADF might be damaged. Enter the fax number (up in the ARDF/ADF. ARDF ADF CMF351 CMF350 Exposure Glass CMF048 • If necessary, configure the advanced scan settings. If the machine is connected to the telephone network through a PBX, make sure to 40 characters) using the number keys. For details, see "Advanced Scan Settings" on the exposure glass or face up to enter the outside line access number before the fax number. 23 Place the original face down on page 25. Lift the ARDF/ADF carefully without holding the input tray.

Quick Guide
Page 24
..., the jammed page has not been scanned properly. In addition, you have been scanned, press [No] to start to multiple destinations. Repeat this setting, see "Configuring the Machine Using the Control Panel", User Guide. • For information about originals, see "Getting Started", User Guide. • For information about removing jammed paper...
..., the jammed page has not been scanned properly. In addition, you have been scanned, press [No] to start to multiple destinations. Repeat this setting, see "Configuring the Machine Using the Control Panel", User Guide. • For information about originals, see "Getting Started", User Guide. • For information about removing jammed paper...
Quick Guide
Page 25
...density level, and then press the [OK] key. Press [Original]. 2. Select the sides of original automatically using the SP 3510SF model, you would like to the original (SP 3510SF) If you are using the ARDF. • If the machine is in Immediate Transmission mode, this function is not ...Detail for originals with small print Photo for originals with images v Specifying the scanning side according to change the default settings of the machine, see "Configuring the Machine Using the Control Panel", User Guide. 25 Press the [ ][ ] keys to scan. Press the [Image Quality] key. 2. When...
...density level, and then press the [OK] key. Press [Original]. 2. Select the sides of original automatically using the SP 3510SF model, you would like to the original (SP 3510SF) If you are using the ARDF. • If the machine is in Immediate Transmission mode, this function is not ...Detail for originals with small print Photo for originals with images v Specifying the scanning side according to change the default settings of the machine, see "Configuring the Machine Using the Control Panel", User Guide. 25 Press the [ ][ ] keys to scan. Press the [Image Quality] key. 2. When...
Quick Guide
Page 49
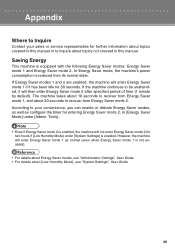
..., the machine will then enter Energy Saver mode 2 after specified period of time (1 minute by default). However, the machine will enter Energy Saver mode 1 as configure the timer for two hours if [Low Humidity Mode] under [Admin. According to recover from its normal state. The machine takes about 10 seconds to...
..., the machine will then enter Energy Saver mode 2 after specified period of time (1 minute by default). However, the machine will enter Energy Saver mode 1 as configure the timer for two hours if [Low Humidity Mode] under [Admin. According to recover from its normal state. The machine takes about 10 seconds to...
Quick Guide
Page 55
... with a Computer Using a USB Cable 66 Connecting with a Network Cable...66 Connecting to a Telephone Line...67 Configuring the Machine...70 Configuring the IPv4 Address Settings...70 Configuring the IPv6 Address Settings...72 Configuring the Ethernet Speed...75 Configuring Telephone Network Settings 76 Sharing the Printer on a Network...80 Installing Option...81 Installing the Paper Feed...
... with a Computer Using a USB Cable 66 Connecting with a Network Cable...66 Connecting to a Telephone Line...67 Configuring the Machine...70 Configuring the IPv4 Address Settings...70 Configuring the IPv6 Address Settings...72 Configuring the Ethernet Speed...75 Configuring Telephone Network Settings 76 Sharing the Printer on a Network...80 Installing Option...81 Installing the Paper Feed...
Quick Guide
Page 56
... Canceled 142 Manual Duplex Printing (Type 1 model)...145 Using Various Print Functions...147 Print Quality Functions...147 Print Output Functions...148 4. Using the Printer Function Configuring Option and Paper Settings...131 Windows...131 Mac OS X 10.3...132 Mac OS X 10.4...132 Mac OS X 10.5/10.6...132 Accessing the Printer Properties...134...
... Canceled 142 Manual Duplex Printing (Type 1 model)...145 Using Various Print Functions...147 Print Quality Functions...147 Print Output Functions...148 4. Using the Printer Function Configuring Option and Paper Settings...131 Windows...131 Mac OS X 10.3...132 Mac OS X 10.4...132 Mac OS X 10.5/10.6...132 Accessing the Printer Properties...134...
Quick Guide
Page 57
... Fax Destination...214 Useful Sending Functions...220 Specifying the Scan Settings...222 Using the Fax Function from a Computer 233 Editing a Fax Cover Sheet...235 Configuring Transmission Settings...237 Receiving a Fax...240 Selecting Reception Mode...240 4 Adjusting Image Density...170 Selecting the Document Type According to USB...188 Specifying the... Scan Settings...191 Scanning from a Computer...195 Basic Operation for Sending Faxes from a Computer (LAN-Fax 226 Configuring the LAN-Fax Address Book 226 Basic Operation for TWAIN Scanning...195 6.
... Fax Destination...214 Useful Sending Functions...220 Specifying the Scan Settings...222 Using the Fax Function from a Computer 233 Editing a Fax Cover Sheet...235 Configuring Transmission Settings...237 Receiving a Fax...240 Selecting Reception Mode...240 4 Adjusting Image Density...170 Selecting the Document Type According to USB...188 Specifying the... Scan Settings...191 Scanning from a Computer...195 Basic Operation for Sending Faxes from a Computer (LAN-Fax 226 Configuring the LAN-Fax Address Book 226 Basic Operation for TWAIN Scanning...195 6.
Quick Guide
Page 58
Configuring the Machine Using the Control Panel Basic Operation Using the Menu Screen...251 Menu Chart...253 Copy Settings...257 Changing Copy Settings...257 Copy Setting ... Changing System Settings...279 System Setting Parameters...279 Network Settings...287 Changing Network Settings...287 Network Setting Parameters...287 Printing Lists/Reports...291 Printing the Configuration Page...291 Types of Lists/Reports...291 Reading the...
Configuring the Machine Using the Control Panel Basic Operation Using the Menu Screen...251 Menu Chart...253 Copy Settings...257 Changing Copy Settings...257 Copy Setting ... Changing System Settings...279 System Setting Parameters...279 Network Settings...287 Changing Network Settings...287 Network Setting Parameters...287 Printing Lists/Reports...291 Printing the Configuration Page...291 Types of Lists/Reports...291 Reading the...
Quick Guide
Page 59
...298 Administrator Setting Parameters...298 Printer Feature Settings...304 Changing Printer Feature Settings...304 Printer Feature Setting Parameters...304 8. Configuring the Machine Using Web Image Monitor Using Web Image Monitor...309 Displaying Top Page...311 Changing the Interface Language.........318 Specifying the Size of Paper for Printing Copies 320 Configuring the Fax Settings...320 Specifying the Priority Tray...323 Configuring the Toner Saving Setting...324 Configuring the I/O Timeout Settings...325 Configuring the Shortcut to Function Key Settings 325 Registering Destinations...327...
...298 Administrator Setting Parameters...298 Printer Feature Settings...304 Changing Printer Feature Settings...304 Printer Feature Setting Parameters...304 8. Configuring the Machine Using Web Image Monitor Using Web Image Monitor...309 Displaying Top Page...311 Changing the Interface Language.........318 Specifying the Size of Paper for Printing Copies 320 Configuring the Fax Settings...320 Specifying the Priority Tray...323 Configuring the Toner Saving Setting...324 Configuring the I/O Timeout Settings...325 Configuring the Shortcut to Function Key Settings 325 Registering Destinations...327...


