
Copy/Document Server Reference
Page 20
... Select 12 Missing image area 14 Placing Originals 15 Original Orientation 15 Placing Originals on Copies v Adjusting Colors ...vi Adjusting Images...vii What You Can Do with This Machine ix Types of jobs 31 Holding print...33 xviii TABLE OF CONTENTS Manuals for This Machine i What You Can Do with This Machine ....iii Color Copying ...iii Stamping on the Exposure Glass 17 Placing Originals in the print queue 31 Changing the order... Symbols ...2 Functions Requiring Optional Configurations 3 Display ...4 Simplified Display...5 User Tools Menu (Copier and Document Server Features 6 1.
... Select 12 Missing image area 14 Placing Originals 15 Original Orientation 15 Placing Originals on Copies v Adjusting Colors ...vi Adjusting Images...vii What You Can Do with This Machine ix Types of jobs 31 Holding print...33 xviii TABLE OF CONTENTS Manuals for This Machine i What You Can Do with This Machine ....iii Color Copying ...iii Stamping on the Exposure Glass 17 Placing Originals in the print queue 31 Changing the order... Symbols ...2 Functions Requiring Optional Configurations 3 Display ...4 Simplified Display...5 User Tools Menu (Copier and Document Server Features 6 1.

Copy/Document Server Reference
Page 21
... Thin Paper 38 When copying onto Thick Paper 39 When Copying onto Envelopes 40 Color Functions 41 Selecting a Color Mode 41 Convert Colors ...42 Erase Color ...43 Color Background ...44 Color Balance...45 Color Balance Program 46 Color Adjustment...48 Image Adjustment ...49 User Color ...53 Copier Functions 57 Adjusting Copy Image Density 57 Selecting the Original Type Setting 59...
... Thin Paper 38 When copying onto Thick Paper 39 When Copying onto Envelopes 40 Color Functions 41 Selecting a Color Mode 41 Convert Colors ...42 Erase Color ...43 Color Background ...44 Color Balance...45 Color Balance Program 46 Color Adjustment...48 Image Adjustment ...49 User Color ...53 Copier Functions 57 Adjusting Copy Image Density 57 Selecting the Original Type Setting 59...

Copy/Document Server Reference
Page 27
AMG054S ❖ Simplified Copier Screen AMG055S 1. [Key Color] Use this to intensify the screen contrast by pressing the {Simplified Display} key. Simplified Display This section explains how to the copier default screen. ❒ The simplified display screen does not contain every available key. 5 Enlarged characters and keys ...the "Simplified Display" and introduces its keys. The simplified display contains main functions only. Not available on the copier default screen. You can view the simplified display from the Copier's initial screen by changing the color of the keys.
AMG054S ❖ Simplified Copier Screen AMG055S 1. [Key Color] Use this to intensify the screen contrast by pressing the {Simplified Display} key. Simplified Display This section explains how to the copier default screen. ❒ The simplified display screen does not contain every available key. 5 Enlarged characters and keys ...the "Simplified Display" and introduces its keys. The simplified display contains main functions only. Not available on the copier default screen. You can view the simplified display from the Copier's initial screen by changing the color of the keys.

Copy/Document Server Reference
Page 121
... the left and right margins, and [↓] and [↑] when setting the top and bottom margins. E Place your originals, and then press the {Start} key. Copier Functions 2 B Press [Margin Adj.]. Press [←] and [→] when setting the left and right margins, and [↓] and [↑] when setting the top and bottom...
... the left and right margins, and [↓] and [↑] when setting the top and bottom margins. E Place your originals, and then press the {Start} key. Copier Functions 2 B Press [Margin Adj.]. Press [←] and [→] when setting the left and right margins, and [↓] and [↑] when setting the top and bottom...

Copy/Document Server Reference
Page 123
D Press [Same Width]. 101 A Press [Edit / Color]. Copier Functions Note ❒ The relationship between the original orientation and the erased part is as follows: L original K original 2 A Erased part B 2-99 mm (0.1"-3.9") ❒ The erase width is set to 10 mm (0.4 inch) as a default. See "Erase Center Width", "Erase Border Width", General Settings Guide. Border Erase (same width) This mode erases the edge margin of the original image. B Press [Erase]. C Press [Erase Center / Border]. You can change this setting with User Tools.
D Press [Same Width]. 101 A Press [Edit / Color]. Copier Functions Note ❒ The relationship between the original orientation and the erased part is as follows: L original K original 2 A Erased part B 2-99 mm (0.1"-3.9") ❒ The erase width is set to 10 mm (0.4 inch) as a default. See "Erase Center Width", "Erase Border Width", General Settings Guide. Border Erase (same width) This mode erases the edge margin of the original image. B Press [Erase]. C Press [Erase Center / Border]. You can change this setting with User Tools.

Copy/Document Server Reference
Page 125
C Press [Erase Center / Border]. F Press [OK] twice. G Place your originals, and then press the {Start} key. 103 Center Erase This mode erases the center margin of the original image. D Press [Erase Center]. A Press [Edit / Color]. B Press [Erase]. E Set the erase center width with [n] and [o]. 2 F Press [OK] twice. G Place your originals, and then press the {Start} key. Copier Functions E Press the key for the border you want to change and set an erase width with [n] and [o].
C Press [Erase Center / Border]. F Press [OK] twice. G Place your originals, and then press the {Start} key. 103 Center Erase This mode erases the center margin of the original image. D Press [Erase Center]. A Press [Edit / Color]. B Press [Erase]. E Set the erase center width with [n] and [o]. 2 F Press [OK] twice. G Place your originals, and then press the {Start} key. Copier Functions E Press the key for the border you want to change and set an erase width with [n] and [o].

Copy/Document Server Reference
Page 127
G Press [OK] twice. D Press [Erase Center / Border]. Copier Functions Center/Border Erase (different width) This mode erases both the center and edge margins of the original image. F Press the key for the order you want to change and set an erase width with [n] and [o]. E Press [Different Width ]. C Press [Erase Center / Border]. H Place your originals, and then press the {Start} key. 105 A Press [Edit / Color]. 2 B Press [Erase].
G Press [OK] twice. D Press [Erase Center / Border]. Copier Functions Center/Border Erase (different width) This mode erases both the center and edge margins of the original image. F Press the key for the order you want to change and set an erase width with [n] and [o]. E Press [Different Width ]. C Press [Erase Center / Border]. H Place your originals, and then press the {Start} key. 105 A Press [Edit / Color]. 2 B Press [Erase].

Copy/Document Server Reference
Page 131
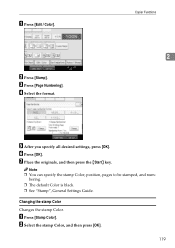
... Letters or images you use the bypass tray with this function. ❒ Only one message can be stamped each time. Copier Functions Changing the stamp Color Changes the stamp Color. A Press [Stamp Color]. B Select the position for print, size, and density, and then press [OK]. Important ❒ You have to ...register a user stamp before using this function. ❒ You cannot use frequently can be registered. GCSTMP0E 109 B Select the stamp Color, and then press [OK]. 2 Changing the stamp position, size and density Changes the stamp position, size and density.
... Letters or images you use the bypass tray with this function. ❒ Only one message can be stamped each time. Copier Functions Changing the stamp Color Changes the stamp Color. A Press [Stamp Color]. B Select the position for print, size, and density, and then press [OK]. Important ❒ You have to ...register a user stamp before using this function. ❒ You cannot use frequently can be registered. GCSTMP0E 109 B Select the stamp Color, and then press [OK]. 2 Changing the stamp position, size and density Changes the stamp position, size and density.
Copy/Document Server Reference
Page 133
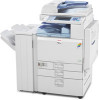
... Settings Guide. A Press [Change] under < Stamp Position >. Copier Functions 2 F After making all settings, press [OK]. B Select the desired position, and then press [OK]. 111 E Press [All Pages] or [1st Page Only] to "1". ❒ The default user stamp Color is selected, the full Color counter will advance to select the print page. G Press [OK...
... Settings Guide. A Press [Change] under < Stamp Position >. Copier Functions 2 F After making all settings, press [OK]. B Select the desired position, and then press [OK]. 111 E Press [All Pages] or [1st Page Only] to "1". ❒ The default user stamp Color is selected, the full Color counter will advance to select the print page. G Press [OK...

Copy/Document Server Reference
Page 137
Copier Functions ❖ Stamp position and original orientation The date stamp positions differ according to be stamped. 115 A Press [Edit / Color]. D Select the stamp format. B Press [Stamp]. You can change the Stamp Color, style and position of the date to the orientation in which you place your originals. 1/21/2006 1/21/2006 2 1/21/2006 1/21/2006 AMG063S Important ❒ You cannot use the bypass tray with this function. C Press [Date Stamp].
Copier Functions ❖ Stamp position and original orientation The date stamp positions differ according to be stamped. 115 A Press [Edit / Color]. D Select the stamp format. B Press [Stamp]. You can change the Stamp Color, style and position of the date to the orientation in which you place your originals. 1/21/2006 1/21/2006 2 1/21/2006 1/21/2006 AMG063S Important ❒ You cannot use the bypass tray with this function. C Press [Date Stamp].
Copy/Document Server Reference
Page 141
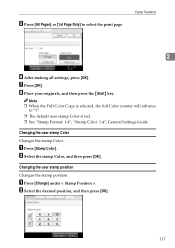
Copier Functions 2 E After you specify all desired settings, press [OK]. Note ❒ You can specify the stamp Color, position, pages to be stamped, and num- B Select the stamp Color, and then press [OK]. 119 Changing the stamp Color Changes the stamp Color. B Press [Stamp]. F Press [OK]. bering. ❒ The default Color is black. ❒ See "Stamp", General Settings Guide. A Press [Stamp Color]. A Press [Edit / Color]. C Press [Page Numbering]. G Place the originals, and then press the {Start} key. D Select the format.
Copier Functions 2 E After you specify all desired settings, press [OK]. Note ❒ You can specify the stamp Color, position, pages to be stamped, and num- B Select the stamp Color, and then press [OK]. 119 Changing the stamp Color Changes the stamp Color. B Press [Stamp]. F Press [OK]. bering. ❒ The default Color is black. ❒ See "Stamp", General Settings Guide. A Press [Stamp Color]. A Press [Edit / Color]. C Press [Page Numbering]. G Place the originals, and then press the {Start} key. D Select the format.

Copy/Document Server Reference
Page 147
...and the reproduction ratio. E Press [Image Repeat]. A Measure the location of [Y2] with the number keys, and then press {q} key. C Press [Edit / Color]. F Press [Specified Area]. Specified Area Repeat Repeatedly copies a specified portion of [Y1] with the number keys, and then press {q} key. 125 J Enter the length...) and its length and width. 2 GCRE032E A Set on the exposure glass Important ❒ You cannot use this function from the ADF. Copier Functions G Place your original, and then press the {Start} key. H Enter the length of the image. D Press [Edit Image].
...and the reproduction ratio. E Press [Image Repeat]. A Measure the location of [Y2] with the number keys, and then press {q} key. C Press [Edit / Color]. F Press [Specified Area]. Specified Area Repeat Repeatedly copies a specified portion of [Y1] with the number keys, and then press {q} key. 125 J Enter the length...) and its length and width. 2 GCRE032E A Set on the exposure glass Important ❒ You cannot use this function from the ADF. Copier Functions G Place your original, and then press the {Start} key. H Enter the length of the image. D Press [Edit Image].

Copy/Document Server Reference
Page 149
...]. Important ❒ You cannot use the bypass tray with the image moved to the center of the copy paper. A Press [Edit / Color]. F Place your originals, and then press the {Start} key. Copier Functions 2 B Press [Edit Image]. C Press [Double Copies]. Note ❒ See "Double Copies Separation Line", General Settings Guide. E Select the paper...
...]. Important ❒ You cannot use the bypass tray with the image moved to the center of the copy paper. A Press [Edit / Color]. F Place your originals, and then press the {Start} key. Copier Functions 2 B Press [Edit Image]. C Press [Double Copies]. Note ❒ See "Double Copies Separation Line", General Settings Guide. E Select the paper...

Copy/Document Server Reference
Page 151
... Image]. If your original is black and white, copy images are inverted. A Press [Edit / Color]. Important ❒ If your original is Color, the density, darkness and brightness of each Color will be reversed and inverted to complimentary Colors. D Press [OK]. Copier Functions Positive/Negative Copies an image inverted. If your original is black and white...
... Image]. If your original is black and white, copy images are inverted. A Press [Edit / Color]. Important ❒ If your original is Color, the density, darkness and brightness of each Color will be reversed and inverted to complimentary Colors. D Press [OK]. Copier Functions Positive/Negative Copies an image inverted. If your original is black and white...

Copy/Document Server Reference
Page 200
... 2 Sided → 1 Sided, 91 2 Sided → 2 Sided, 82 2 Sided → Booklet, 93 A Adjust Color, vi, 48 Adjust Color Image, 6 Adjusting Colors Based on Selected Color, 53 Adjusting Copy Image Density, 57 Adjusting the background density, 51 Adjusting the contrast, 51 Adjusting the sharpness/softness, 50 Adjusting..., 153 check the copy, 74 Color Background, 44 Color background, iii Color Balance, vi, 45 Color Balance Program, 46 Color Functions, 41 Combine, 167 Combined auto and manual image density, 57, 58 Contrast, vii, 49 Convert Colors, iii, 42 Copier Functions, 57, 143 Copying, 25...
... 2 Sided → 1 Sided, 91 2 Sided → 2 Sided, 82 2 Sided → Booklet, 93 A Adjust Color, vi, 48 Adjust Color Image, 6 Adjusting Colors Based on Selected Color, 53 Adjusting Copy Image Density, 57 Adjusting the background density, 51 Adjusting the contrast, 51 Adjusting the sharpness/softness, 50 Adjusting..., 153 check the copy, 74 Color Background, 44 Color background, iii Color Balance, vi, 45 Color Balance Program, 46 Color Functions, 41 Combine, 167 Combined auto and manual image density, 57, 58 Contrast, vii, 49 Convert Colors, iii, 42 Copier Functions, 57, 143 Copying, 25...

General Settings Guide
Page 6
Copier / Document Server Features General Features 89 Reproduction Ratio 94 Edit ...98 Stamp ...104 Background Numbering 104 Preset Stamp ...105 User Stamp ...108 Date Stamp ...109 Page Numbering ...111 Input/Output ...114 Adjust Color Image 117 Settings for the Document Server 118 4. Facsimile Features General Features 119 Scan Settings ...122 Send Settings ...123...
Copier / Document Server Features General Features 89 Reproduction Ratio 94 Edit ...98 Stamp ...104 Background Numbering 104 Preset Stamp ...105 User Stamp ...108 Date Stamp ...109 Page Numbering ...111 Input/Output ...114 Adjust Color Image 117 Settings for the Document Server 118 4. Facsimile Features General Features 119 Scan Settings ...122 Send Settings ...123...
General Settings Guide
Page 11
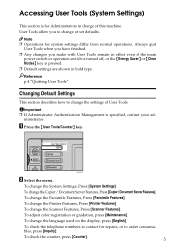
... press [English]. To check the counter, press [Counter]. 3 A Press the {User Tools/Counter} key. To change the Copier / Document Server Features, Press [Copier / Document Server Features]. Always quit User Tools when you have finished. ❒ Any changes you to change or set defaults.... To adjust color registration or gradation, press [Maintenance]. Accessing User Tools (System Settings) This section is for Administrators in...
... press [English]. To check the counter, press [Counter]. 3 A Press the {User Tools/Counter} key. To change the Copier / Document Server Features, Press [Copier / Document Server Features]. Always quit User Tools when you have finished. ❒ Any changes you to change or set defaults.... To adjust color registration or gradation, press [Maintenance]. Accessing User Tools (System Settings) This section is for Administrators in...
General Settings Guide
Page 88
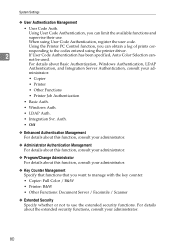
...Code Authentication, you can limit the available functions and supervise their use the extended security functions. responding to use . ministrator. • Copier • Printer • Other Functions • Printer Job Authentication • Basic Auth. • Windows Auth. • LDAP ... your administrator. ❖ Key Counter Management Specify that functions that you want to manage with the key counter. • Copier: Full Color / B&W • Printer: B&W • Other Functions: Document Server / Facsimile / Scanner ❖ Extended Security Specify whether...
...Code Authentication, you can limit the available functions and supervise their use the extended security functions. responding to use . ministrator. • Copier • Printer • Other Functions • Printer Job Authentication • Basic Auth. • Windows Auth. • LDAP ... your administrator. ❖ Key Counter Management Specify that functions that you want to manage with the key counter. • Copier: Full Color / B&W • Printer: B&W • Other Functions: Document Server / Facsimile / Scanner ❖ Extended Security Specify whether...

General Settings Guide
Page 97
... describes user tools in the General Features menu under Copier / Document Server Features. ❖ Auto Image Density Priority You can set whether Auto Image Density is "On" or "Off" when the machine is turned on, reset, or modes are cleared. • Full Color • On • Off • B&W...; On • Off ❖ Original Type Priority You can select the original type effective when the power is turned on, or modes cleared. • Full Color • Text • Text/Photo • Photo • Pale • Generation Copy • Map • B&W • Text • Text/Photo &#...
... describes user tools in the General Features menu under Copier / Document Server Features. ❖ Auto Image Density Priority You can set whether Auto Image Density is "On" or "Off" when the machine is turned on, reset, or modes are cleared. • Full Color • On • Off • B&W...; On • Off ❖ Original Type Priority You can select the original type effective when the power is turned on, or modes cleared. • Full Color • Text • Text/Photo • Photo • Pale • Generation Copy • Map • B&W • Text • Text/Photo &#...

General Settings Guide
Page 110
Copier / Document Server Features ❖ Double Copies Separation Line You can select a separation line using [None]. In "Black and White", printing will be specified when using the Double Copies function from: None, Solid, Broken A, Broken B, or Crop Marks. • None • Solid 3 • Broken A • Broken B • Crop Marks Line color (Full Color): •...
Copier / Document Server Features ❖ Double Copies Separation Line You can select a separation line using [None]. In "Black and White", printing will be specified when using the Double Copies function from: None, Solid, Broken A, Broken B, or Crop Marks. • None • Solid 3 • Broken A • Broken B • Crop Marks Line color (Full Color): •...


