User Manual
Page 1
... Access to the Ricoh Administrative Web Interface 7 2.2.2 Networking/Firewall Configuration 7 2.2.3 PaperCut Settings 7 2.2.4 Choosing Application Version 7 2.2.5 Configuring the Enhanced External Charge Unit (SDK 4.x+ devices only) 8 2.2.6 Disable the Document Server 8 2.2.7 Increase Extended Feature Settings Heap / Stack size 10 2.2.8 Fax Configuration (Recommended when tracking faxes 10 2.2.9 Choose an Installation Method 11 2.2.10 Installing Application using Ricoh Web Admin (Recommended)......... 12 2.2.11 Installing application using the Ricoh Java SD card 14 2.2.12 Set Default...
... Access to the Ricoh Administrative Web Interface 7 2.2.2 Networking/Firewall Configuration 7 2.2.3 PaperCut Settings 7 2.2.4 Choosing Application Version 7 2.2.5 Configuring the Enhanced External Charge Unit (SDK 4.x+ devices only) 8 2.2.6 Disable the Document Server 8 2.2.7 Increase Extended Feature Settings Heap / Stack size 10 2.2.8 Fax Configuration (Recommended when tracking faxes 10 2.2.9 Choose an Installation Method 11 2.2.10 Installing Application using Ricoh Web Admin (Recommended)......... 12 2.2.11 Installing application using the Ricoh Java SD card 14 2.2.12 Set Default...
User Manual
Page 3
...'s embedded software MFD (Multi-Function Device) solutions. they are fully disclosed. The goal of faxing and scanning (for all managed in the print control area. All embedded solutions are developed with the same set of the embedded solution include: 1.1 Consistency: The embedded solutions are all services. PaperCut - Users have a single account and administrators have the same level of reporting and administration for devices supporting SDK...
...'s embedded software MFD (Multi-Function Device) solutions. they are fully disclosed. The goal of faxing and scanning (for all managed in the print control area. All embedded solutions are developed with the same set of the embedded solution include: 1.1 Consistency: The embedded solutions are all services. PaperCut - Users have a single account and administrators have the same level of reporting and administration for devices supporting SDK...
User Manual
Page 4
... Copy/Fax/Scanner buttons - We recommend getting started: PaperCut is installed underneath the other Copier, Fax, and Scanner buttons on the left of the PaperCut embedded application for information on your device supports. Ricoh Embedded Manual Revision: 19 2012-10-26 2 Installation This section covers the installation of the Ricoh LCD screen (this changed by a Ricoh technician when the Java card is below . Ensure you know which SDK version your network...
... Copy/Fax/Scanner buttons - We recommend getting started: PaperCut is installed underneath the other Copier, Fax, and Scanner buttons on the left of the PaperCut embedded application for information on your device supports. Ricoh Embedded Manual Revision: 19 2012-10-26 2 Installation This section covers the installation of the Ricoh LCD screen (this changed by a Ricoh technician when the Java card is below . Ensure you know which SDK version your network...
User Manual
Page 5
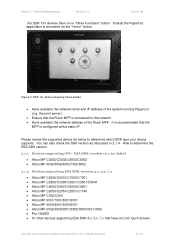
... Or other devices supporting ESA SDK 4.x, 5.x, 7.x that the Ricoh MFP is no "Other Functions" button. Copyright © 2012 PaperCut Software International Pty. the print server). Ensure that have an LCD touch-screen. You can also check the SDK version as discussed in 2.1.4 - Figure 2: SDK 10+ device showing home button. Have available the network name and IP address of the Ricoh MFP. Ltd., All Rights...
... Or other devices supporting ESA SDK 4.x, 5.x, 7.x that the Ricoh MFP is no "Other Functions" button. Copyright © 2012 PaperCut Software International Pty. the print server). Ensure that have an LCD touch-screen. You can also check the SDK version as discussed in 2.1.4 - Figure 2: SDK 10+ device showing home button. Have available the network name and IP address of the Ricoh MFP. Ltd., All Rights...
User Manual
Page 7
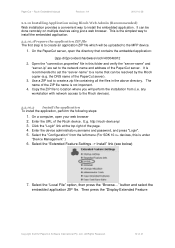
.... Navigate to stop , etc) Check the list of the Ricoh device. This web interface is useful as an alternative way to 'Options -> Advanced' and ensure the option 'Enable external hardware integration' is visible and accessible; Enter the URL of devices in to your web browser 2. Enter the device administrator username and password (default admin/blank), and press "Login". 5. Scroll down and confirm that provides an alternate administration interface. The following applications are installing the SDK...
.... Navigate to stop , etc) Check the list of the Ricoh device. This web interface is useful as an alternative way to 'Options -> Advanced' and ensure the option 'Enable external hardware integration' is visible and accessible; Enter the URL of devices in to your web browser 2. Enter the device administrator username and password (default admin/blank), and press "Login". 5. Scroll down and confirm that provides an alternate administration interface. The following applications are installing the SDK...
User Manual
Page 8
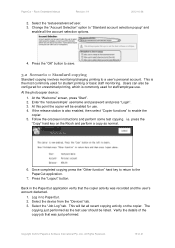
... Option Counter) must be charged to another setting it will not be enabled. Select the "System Settings" button 3. Select the "Key Counter Management" button (usually on the 2nd page of the device panel). 2. PaperCut plans to address this setting be changed : SP-5967-1: Copier Server must be set to the embedded software in authentication (e.g. Select the "User Authentication Management" button (usually on the 2nd page of 41 Select the "Administrator Tools" tab 4. Ricoh Embedded Manual...
... Option Counter) must be charged to another setting it will not be enabled. Select the "System Settings" button 3. Select the "Key Counter Management" button (usually on the 2nd page of the device panel). 2. PaperCut plans to address this setting be changed : SP-5967-1: Copier Server must be set to the embedded software in authentication (e.g. Select the "User Authentication Management" button (usually on the 2nd page of 41 Select the "Administrator Tools" tab 4. Ricoh Embedded Manual...
User Manual
Page 9
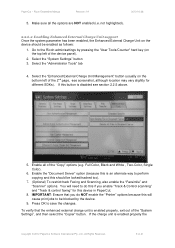
.... 5. Full Color, Black and White , Two-Color, Single Color). 6. To verify that you do this if you enable "Track & Control scanning" and "Track & control faxing" for different SDKs). Go to the Ricoh admin/settings by the device. 9. If this should be enabled as follows: 1. Press OK to perform copying and this button is an alternate way to save the changes. PaperCut - Enable the "Document Server" option (because this is disabled see screenshot, although location may...
.... 5. Full Color, Black and White , Two-Color, Single Color). 6. To verify that you do this if you enable "Track & Control scanning" and "Track & control faxing" for different SDKs). Go to the Ricoh admin/settings by the device. 9. If this should be enabled as follows: 1. Press OK to perform copying and this button is an alternate way to save the changes. PaperCut - Enable the "Document Server" option (because this is disabled see screenshot, although location may...
User Manual
Page 12
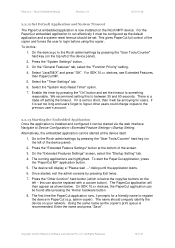
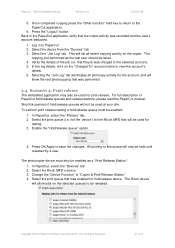
... MFP device. 1. Select the "Configuration" from (i.e. Then press the "Display Extended Feature Copyright © 2012 PaperCut Software International Pty. On the PaperCut server, open your web browser 2. The name of the page. 4. E.g. Enter the device administrator username and password, and press "Login". 5. Open the "connection.properties" file in the above directory. Select the "Local File" option, then press the "Browse..." any workstation with network access to create a zip file containing all the files...
... MFP device. 1. Select the "Configuration" from (i.e. Then press the "Display Extended Feature Copyright © 2012 PaperCut Software International Pty. On the PaperCut server, open your web browser 2. The name of the page. 4. E.g. Enter the device administrator username and password, and press "Login". 5. Open the "connection.properties" file in the above directory. Select the "Local File" option, then press the "Browse..." any workstation with network access to create a zip file containing all the files...
User Manual
Page 14
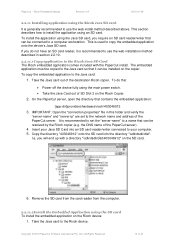
... Ricoh device: 1. To copy the embedded application to install the application using the main power switch. Take the Java Card out of 41 To do not have an SD card reader, it can be resolved by the Ricoh copier (e.g. PaperCut - IMPORTANT: Open the "connection.properties" file in section 2.2.10. 2.2.11.1 Copy application to a computer workstation. the DNS name of the PaperCut server. you do this folder...
... Ricoh device: 1. To copy the embedded application to install the application using the main power switch. Take the Java Card out of 41 To do not have an SD card reader, it can be resolved by the Ricoh copier (e.g. PaperCut - IMPORTANT: Open the "connection.properties" file in section 2.2.10. 2.2.11.1 Copy application to a computer workstation. the DNS name of the PaperCut server. you do this folder...
User Manual
Page 15
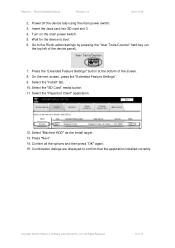
... then press "OK" again. 15. Confirmation dialogs are displayed to boot. 6. PaperCut - Copyright © 2012 PaperCut Software International Pty. Insert the Java card into SD card slot 3. 4. Press the "Extended Feature Settings" button at the bottom of 41 Select the "SD Card" media button. 11. Go to the Ricoh admin/settings by pressing the "User Tools/Counter" hard key (on the main power switch. 5. Select the "Install" tab. 10.
... then press "OK" again. 15. Confirmation dialogs are displayed to boot. 6. PaperCut - Copyright © 2012 PaperCut Software International Pty. Insert the Java card into SD card slot 3. 4. Press the "Extended Feature Settings" button at the bottom of 41 Select the "SD Card" media button. 11. Go to the Ricoh admin/settings by pressing the "User Tools/Counter" hard key (on the main power switch. 5. Select the "Install" tab. 10.
User Manual
Page 16
... appear as shown below the copy/fax buttons on the Ricoh MFP device. Press the "Other function" hard button (which is now installed on the left - The PaperCut application will display a "Please wait ..." Enter the name and press "Save". On the "General Features" tab, select the "Function Priority" setting. 4. Select the "System Auto Reset Timer" option. 7. Enable the timer by pressing Exit twice. 7. The first time the PaperCut application runs...
... appear as shown below the copy/fax buttons on the Ricoh MFP device. Press the "Other function" hard button (which is now installed on the left - The PaperCut application will display a "Please wait ..." Enter the name and press "Save". On the "General Features" tab, select the "Function Priority" setting. 4. Select the "System Auto Reset Timer" option. 7. Enable the timer by pressing Exit twice. 7. The first time the PaperCut application runs...

User Manual
Page 18
... enabled (i.e. This section outlines three test scenarios that this user is used to PaperCut. is complete, the users will be configured differently. Login to save. Once the sync is used to perform basic copier monitoring and control and to personal account" in PaperCut: 1. In PaperCut, select the "Users" tab Copyright © 2012 PaperCut Software International Pty. Ricoh Embedded Manual Revision: 19 2012-10-26 3 Post-install testing...
... enabled (i.e. This section outlines three test scenarios that this user is used to PaperCut. is complete, the users will be configured differently. Login to save. Once the sync is used to perform basic copier monitoring and control and to personal account" in PaperCut: 1. In PaperCut, select the "Users" tab Copyright © 2012 PaperCut Software International Pty. Ricoh Embedded Manual Revision: 19 2012-10-26 3 Post-install testing...
User Manual
Page 19
... function" hard key to return to enable the copier. 5. PaperCut - Ltd., All Rights Reserved. 19 of the copy job that the copier activity was just performed. Enter the 'testusersimple' username and password and press "Login". 3. This will be listed. At the "Welcome" screen, press "Start". 2. Change the "Account Selection" option to "Standard account selection popup" and enable all recent copying activity on the Ricoh and perform a copy as the test user should...
... function" hard key to return to enable the copier. 5. PaperCut - Ltd., All Rights Reserved. 19 of the copy job that the copier activity was just performed. Enter the 'testusersimple' username and password and press "Login". 3. This will be listed. At the "Welcome" screen, press "Start". 2. Change the "Account Selection" option to "Standard account selection popup" and enable all recent copying activity on the Ricoh and perform a copy as the test user should...
User Manual
Page 21
... read the PaperCut manual. Enable the "Hold/release queue" option. 4. The photocopier device must be held until released by a user. Change the "Device Function" to the PaperCut application. 6. PaperCut - Select the print queue (i.e. Select the Ricoh MFD's device. 3. Log in the PaperCut application verify that the job was recorded and the user's account deducted. 1. Selecting the "Job Log" tab will display all recent copying activity on...
... read the PaperCut manual. Enable the "Hold/release queue" option. 4. The photocopier device must be held until released by a user. Change the "Device Function" to the PaperCut application. 6. PaperCut - Select the print queue (i.e. Select the Ricoh MFD's device. 3. Log in the PaperCut application verify that the job was recorded and the user's account deducted. 1. Selecting the "Job Log" tab will display all recent copying activity on...

User Manual
Page 23
Ricoh Embedded Manual Revision: 19 2012-10-26 4 Configuration After completing the Installation section and registering the device with reasonable default settings that are available via the device's 'Summary' tab in the PaperCut administration interface. 4.1 Device Function The device function setting defines which functions will be modified in the following settings are suitable for tracking faxing. (Supported on devices supporting SDK 4 or higher. This section covers how to perform copying. Not all devices. See...
Ricoh Embedded Manual Revision: 19 2012-10-26 4 Configuration After completing the Installation section and registering the device with reasonable default settings that are available via the device's 'Summary' tab in the PaperCut administration interface. 4.1 Device Function The device function setting defines which functions will be modified in the following settings are suitable for tracking faxing. (Supported on devices supporting SDK 4 or higher. This section covers how to perform copying. Not all devices. See...

User Manual
Page 28
... along with "Priority" displayed in the "Priority" column. 5.3.2 Enable Application Switch Button(s) PaperCut allows for up to determine the "product id" of the list with another application like a document acquisition and OCR tool. Enter the device administrator username and password, and press "Login". 5. PaperCut - Ricoh Embedded Manual Revision: 19 2012-10-26 The colors are running they both share the same "Other Functions" button. Set PaperCut as the...
... along with "Priority" displayed in the "Priority" column. 5.3.2 Enable Application Switch Button(s) PaperCut allows for up to determine the "product id" of the list with another application like a document acquisition and OCR tool. Enter the device administrator username and password, and press "Login". 5. PaperCut - Ricoh Embedded Manual Revision: 19 2012-10-26 The colors are running they both share the same "Other Functions" button. Set PaperCut as the...

User Manual
Page 29
...; Login to the PaperCut admin site On the "Devices" tab, select the Ricoh device to indicate the button is disabled. Enter the product id of time. To create a second application switch button perform the same steps setting the "extdevice.ricoh.app-button2.label" and "ext-device.ricoh.app-button2.product-id" settings. Swipe cards contain numbers which are used to identify users according to "DISABLED". 5.4 Configuring Swipe Card Readers For a list of supported card...
...; Login to the PaperCut admin site On the "Devices" tab, select the Ricoh device to indicate the button is disabled. Enter the product id of time. To create a second application switch button perform the same steps setting the "extdevice.ricoh.app-button2.label" and "ext-device.ricoh.app-button2.product-id" settings. Swipe cards contain numbers which are used to identify users according to "DISABLED". 5.4 Configuring Swipe Card Readers For a list of supported card...
User Manual
Page 31
... change the Fax transmission mode to bypass/disable the system if direct copier access is designed to be charged against this problem, PaperCut will not be cleared when the next user logs in admin password should be changed and always kept secure. The power and network cable should be logged OK as long as the user does not press the "Logout" button. Depending on SDK v2 devices...
... change the Fax transmission mode to bypass/disable the system if direct copier access is designed to be charged against this problem, PaperCut will not be cleared when the next user logs in admin password should be changed and always kept secure. The power and network cable should be logged OK as long as the user does not press the "Logout" button. Depending on SDK v2 devices...

User Manual
Page 32
... © 2012 PaperCut Software International Pty. Ricoh Embedded Manual Revision: 19 2012-10-26 7 FAQ & Troubleshooting The "Extended Feature Settings" button does not appear in the correct location/format. Use operating system command-line tools such as described in "connection.properties". The PaperCut embedded application is unable to connect to the card as ipconfig or ifconfig to install? If problems continue, contact PaperCut Support. Ltd., All Rights...
... © 2012 PaperCut Software International Pty. Ricoh Embedded Manual Revision: 19 2012-10-26 7 FAQ & Troubleshooting The "Extended Feature Settings" button does not appear in the correct location/format. Use operating system command-line tools such as described in "connection.properties". The PaperCut embedded application is unable to connect to the card as ipconfig or ifconfig to install? If problems continue, contact PaperCut Support. Ltd., All Rights...
User Manual
Page 37
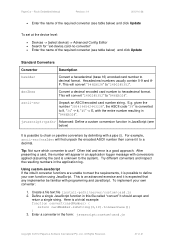
... resulting numbers in this file called "convert" It should accept and return a single string. Define a single JavaScript function in the application log. Ricoh Embedded Manual Revision: 19 2012-10-26 Enter the name of the required converter (see table below) and click Update To set at the device level: Devices -> [select device] -> Advanced Config Editor Search for "ext-device.card-no...
... resulting numbers in this file called "convert" It should accept and return a single string. Define a single JavaScript function in the application log. Ricoh Embedded Manual Revision: 19 2012-10-26 Enter the name of the required converter (see table below) and click Update To set at the device level: Devices -> [select device] -> Advanced Config Editor Search for "ext-device.card-no...


