Quick Start Guide
Page 3
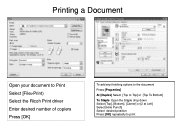
Printing a Document Open your document to Print Select [File>Print) Select the Ricoh Print driver Enter desired number of copiers Press [OK] To add any finishing options to the document Press [Properties] At [Duplex] Select [Top to Top] or [Top To Bottom] To Staple: Open the Staple drop down Select [Top], [Bottom], [Center] or [2 at Left] Select [Hole Punch] Select desired position Press [OK] repeatedly to print
Printing a Document Open your document to Print Select [File>Print) Select the Ricoh Print driver Enter desired number of copiers Press [OK] To add any finishing options to the document Press [Properties] At [Duplex] Select [Top to Top] or [Top To Bottom] To Staple: Open the Staple drop down Select [Top], [Bottom], [Center] or [2 at Left] Select [Hole Punch] Select desired position Press [OK] repeatedly to print

Quick Start Guide
Page 6
Printing To Document Server Open your document to Print Select [File>Print] Select the Ricoh Print driver Press [Properties] At [Job Type] open the drop down window and choose [Document Server] Press [OK] Press [Details] Enter user Information: User ID (if applicable) or leave blank File Name Password (if applicable) User Name Press [OK] repeatedly to print
Printing To Document Server Open your document to Print Select [File>Print] Select the Ricoh Print driver Press [Properties] At [Job Type] open the drop down window and choose [Document Server] Press [OK] Press [Details] Enter user Information: User ID (if applicable) or leave blank File Name Password (if applicable) User Name Press [OK] repeatedly to print
Quick Start Guide
Page 9
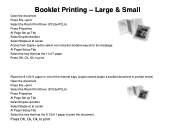
Large & Small Open the document Press File >print Select the Ricoh Print Driver (PCL5e/PCL6) Press Properties At Page Set up Tab Select Duplex>booklet Select Staple>2 at center Across from Duplex option select non reduction booklet>say ... 8 1/2x11 paper in one of the internal trays (copier cannot staple a booklet document in portrait mode) Open the document Press File >print Select the Ricoh Print Driver (PCL5e/PCL6) Press Properties At Page Set up Tab Select Duplex>booklet Select Staple>2 at center At Paper Setup Tab Select the tray that has...
Large & Small Open the document Press File >print Select the Ricoh Print Driver (PCL5e/PCL6) Press Properties At Page Set up Tab Select Duplex>booklet Select Staple>2 at center Across from Duplex option select non reduction booklet>say ... 8 1/2x11 paper in one of the internal trays (copier cannot staple a booklet document in portrait mode) Open the document Press File >print Select the Ricoh Print Driver (PCL5e/PCL6) Press Properties At Page Set up Tab Select Duplex>booklet Select Staple>2 at center At Paper Setup Tab Select the tray that has...

Quick Start Guide
Page 18
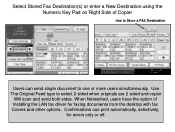
Use The Original Feed type to one or more users simultaneously. Confirmations can send single document to select 2 sided when originals are 2 sided and copier Will scan and send both sides. Select Stored Fax Destination(s) or enter a New Destination using the Numeric Key Pad on Right Side of Installing the LAN fax driver for errors only or off. When Networked, users have the option of Copier Use to Store a FAX Destination Users can print automatically, selectively, for faxing documents from the desktop with fax Covers and other options.
Use The Original Feed type to one or more users simultaneously. Confirmations can send single document to select 2 sided when originals are 2 sided and copier Will scan and send both sides. Select Stored Fax Destination(s) or enter a New Destination using the Numeric Key Pad on Right Side of Installing the LAN fax driver for errors only or off. When Networked, users have the option of Copier Use to Store a FAX Destination Users can print automatically, selectively, for faxing documents from the desktop with fax Covers and other options.

Quick Start Guide
Page 19
... wish to send same fax. 7. Press [Attach Cover] to add a fax cover to confirm Recipient's destination. In the [Name] list, click the LAN-Fax M8 driver 4. Press [Send] or [Print] Select [File], then [Print] Faxing From Desktop 3. At [Fax Number] type the Recipient's Fax# just as Destination] to the document, you...
... wish to send same fax. 7. Press [Attach Cover] to add a fax cover to confirm Recipient's destination. In the [Name] list, click the LAN-Fax M8 driver 4. Press [Send] or [Print] Select [File], then [Print] Faxing From Desktop 3. At [Fax Number] type the Recipient's Fax# just as Destination] to the document, you...
User Guide
Page 46
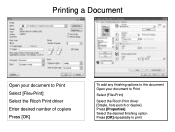
Printing a Document Open your document to Print Select [File>Print] Select the Ricoh Print driver Enter desired number of copiers Press [OK] To add any finishing options to the document Open your document to Print Select [File>Print) Select the Ricoh Print driver [Staple, hole punch or duplex] Press [Properties] Select the desired finishing option Press [OK] repeatedly to print
Printing a Document Open your document to Print Select [File>Print] Select the Ricoh Print driver Enter desired number of copiers Press [OK] To add any finishing options to the document Open your document to Print Select [File>Print) Select the Ricoh Print driver [Staple, hole punch or duplex] Press [Properties] Select the desired finishing option Press [OK] repeatedly to print

User Guide
Page 47
Printing To Document Server Open your document to Print Select [File>Print] Select the Ricoh Print driver Press [Properties] At [Job Type] open the drop down window and choose [Document Server] Press [OK] Press [Details] Enter user Information: User ID (if applicable) or leave blank File Name Password (if applicable) User Name Press [OK] repeatedly to print
Printing To Document Server Open your document to Print Select [File>Print] Select the Ricoh Print driver Press [Properties] At [Job Type] open the drop down window and choose [Document Server] Press [OK] Press [Details] Enter user Information: User ID (if applicable) or leave blank File Name Password (if applicable) User Name Press [OK] repeatedly to print
User Guide
Page 59
Confirmations can send single document to one or more users simultaneously. When Networked, users have the option of Copier Use to select 2 sided when originals are 2 sided and copier Will scan and send both sides. Use The Original Feed type to Store a FAX Destination Users can print automatically, selectively, for faxing documents from the desktop with fax Covers and other options. Select Stored Fax Destination(s) or enter a New Destination using the Numeric Key Pad on Right Side of Installing the LAN fax driver for errors only or off.
Confirmations can send single document to one or more users simultaneously. When Networked, users have the option of Copier Use to select 2 sided when originals are 2 sided and copier Will scan and send both sides. Use The Original Feed type to Store a FAX Destination Users can print automatically, selectively, for faxing documents from the desktop with fax Covers and other options. Select Stored Fax Destination(s) or enter a New Destination using the Numeric Key Pad on Right Side of Installing the LAN fax driver for errors only or off.
User Guide
Page 60
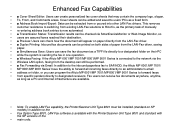
... assured faxes reached their destination. • ■ Preview: Users can check how the document will appear on paper directly from the LAN-Fax driver. • ■ Duplex Printing: Inbound fax documents can be printed on both sides of the • main units. Enhanced Fax Capabilities &#...one operation. • ■ Wireless Faxing: If the Aficio MP 6001/MP 7001/MP 8001/MP 9001 Series is connected to the network via the • Wireless LAN option, faxing from the desktop can be extracted from existing LAN-Fax solutions to Ricoh's, as a fixed form. • ■ Address Book ...
... assured faxes reached their destination. • ■ Preview: Users can check how the document will appear on paper directly from the LAN-Fax driver. • ■ Duplex Printing: Inbound fax documents can be printed on both sides of the • main units. Enhanced Fax Capabilities &#...one operation. • ■ Wireless Faxing: If the Aficio MP 6001/MP 7001/MP 8001/MP 9001 Series is connected to the network via the • Wireless LAN option, faxing from the desktop can be extracted from existing LAN-Fax solutions to Ricoh's, as a fixed form. • ■ Address Book ...

General Settings Guide
Page 19
... (green) When 10BASE-T is operating, the LED is lit yellow. When 10BASE-T is operating, it is turned off . • For details about installing the printer driver, see "Preparing the Machine", Printer Reference. Indicator (yellow) When 100BASE-TX is operating, the LED is lit green. Turn on the main power switch, see...
... (green) When 10BASE-T is operating, the LED is lit yellow. When 10BASE-T is operating, it is turned off . • For details about installing the printer driver, see "Preparing the Machine", Printer Reference. Indicator (yellow) When 100BASE-TX is operating, the LED is lit green. Turn on the main power switch, see...

General Settings Guide
Page 21
... 2003, Mac OS X 10.3.3 or higher. • For Windows Me: Make sure to the USB2.0 port. When used . 1 • For details about installing the printer driver, see "Turning On the Power", About This Machine. • For details about how to turn on the host computer. • This machine does not come...
... 2003, Mac OS X 10.3.3 or higher. • For Windows Me: Make sure to the USB2.0 port. When used . 1 • For details about installing the printer driver, see "Turning On the Power", About This Machine. • For details about how to turn on the host computer. • This machine does not come...

General Settings Guide
Page 22
... "Preparing the Machine", Printer Reference. 20 If this happens, click [Cancel] on the screen. • For details about installing the printer driver, see "Turning On the Power", About This Machine. • For details about how to the IEEE 1284 interface board. • Properly shielded...When using Windows 95/98/Me/2000/XP/Vista and Windows Server 2003, a printer driver installation screen might appear when the computer is supported. • For details about installing the printer driver, see "Preparing the Machine", Printer Reference. 1 Connecting to the IEEE 1284 Interface This...
... "Preparing the Machine", Printer Reference. 20 If this happens, click [Cancel] on the screen. • For details about installing the printer driver, see "Turning On the Power", About This Machine. • For details about how to the IEEE 1284 interface board. • Properly shielded...When using Windows 95/98/Me/2000/XP/Vista and Windows Server 2003, a printer driver installation screen might appear when the computer is supported. • For details about installing the printer driver, see "Preparing the Machine", Printer Reference. 1 Connecting to the IEEE 1284 Interface This...

General Settings Guide
Page 23
... according to the following procedure: BBM002S • Select [802.11 Ad-hoc Mode] when connecting Windows XP as a wireless LAN client using Windows XP standard driver or utilities, or when not using this machine with a wireless LAN interface, you must select [Wireless LAN] in [LAN Type]. • p.69 "Interface Settings" Setup...
... according to the following procedure: BBM002S • Select [802.11 Ad-hoc Mode] when connecting Windows XP as a wireless LAN client using Windows XP standard driver or utilities, or when not using this machine with a wireless LAN interface, you must select [Wireless LAN] in [LAN Type]. • p.69 "Interface Settings" Setup...

General Settings Guide
Page 75
... wireless LAN. Ad-hoc Channel Specify the channel to change this machine is to [Off], the bidirectional communication function will be disabled, and the printer driver will not be dealt with the wireless LAN interface board. The following channels are ASCII 0x20-0x7e (32 bytes). The default setting is 802.11...
... wireless LAN. Ad-hoc Channel Specify the channel to change this machine is to [Off], the bidirectional communication function will be disabled, and the printer driver will not be dealt with the wireless LAN interface board. The following channels are ASCII 0x20-0x7e (32 bytes). The default setting is 802.11...

General Settings Guide
Page 91
Using User Code Authentication, you can limit the available functions and supervise their use. When using the printer driver. For details about this function, consult your administrator. • Copier • Document Server • Facsimile • Printer • Printer: PC Control • Scanner • Printer ...
Using User Code Authentication, you can limit the available functions and supervise their use. When using the printer driver. For details about this function, consult your administrator. • Copier • Document Server • Facsimile • Printer • Printer: PC Control • Scanner • Printer ...

General Settings Guide
Page 94
System Settings If a PC with the printer driver installed is connected to another device of the same model through the USB interface, selecting [On] for this function, consult your administrator. 2 • p.12 "Accessing User Tools" • p.93 "Programming the LDAP server" • p.99 "Programming the Realm" • p.221 "Address Book" • p.236 "Printing the Counter for additional installation of the driver to the PC. Machine Data Encryption Settings For details about this option eliminates the need for Each User" • p.298 "Counter" 92 2.
System Settings If a PC with the printer driver installed is connected to another device of the same model through the USB interface, selecting [On] for this function, consult your administrator. 2 • p.12 "Accessing User Tools" • p.93 "Programming the LDAP server" • p.99 "Programming the Realm" • p.221 "Address Book" • p.236 "Printing the Counter for additional installation of the driver to the PC. Machine Data Encryption Settings For details about this option eliminates the need for Each User" • p.298 "Counter" 92 2.

General Settings Guide
Page 166
...-Fax Result Report • 0: Off • 1: On Switch: 20, Bit: 5, 4, 3, 2 4 Reprinting time of stored documents in memory that could not be printed using LAN-Fax Driver • 0000: 0 minutes • 0001: 1 minutes • 0010: 2 minutes • 0011: 3 minutes • 0100: 4 minutes • 0101: 5 minutes • 0110: 6 minutes • 0111: 7 minutes •...
...-Fax Result Report • 0: Off • 1: On Switch: 20, Bit: 5, 4, 3, 2 4 Reprinting time of stored documents in memory that could not be printed using LAN-Fax Driver • 0000: 0 minutes • 0001: 1 minutes • 0010: 2 minutes • 0011: 3 minutes • 0100: 4 minutes • 0101: 5 minutes • 0110: 6 minutes • 0111: 7 minutes •...
General Settings Guide
Page 203
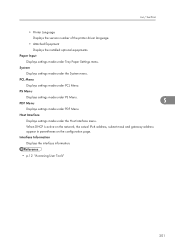
... the Host Interface menu. PCL Menu Displays settings made under PCL Menu. List / Test Print • Printer Language Displays the version number of the printer driver language. • Attached Equipment Displays the installed optional equipments. Paper Input Displays settings made under Tray Paper Settings menu.
... the Host Interface menu. PCL Menu Displays settings made under PCL Menu. List / Test Print • Printer Language Displays the version number of the printer driver language. • Attached Equipment Displays the installed optional equipments. Paper Input Displays settings made under Tray Paper Settings menu.
General Settings Guide
Page 206
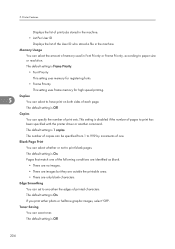
... Displays the list of memory used in the machine. Edge Smoothing You can select whether or not to print has been specified with the printer driver or another command. The default setting is Frame Priority. • Font Priority This setting uses memory for registering fonts. • Frame Priority This setting uses...
... Displays the list of memory used in the machine. Edge Smoothing You can select whether or not to print has been specified with the printer driver or another command. The default setting is Frame Priority. • Font Priority This setting uses memory for registering fonts. • Frame Priority This setting uses...
General Settings Guide
Page 207
...81/2 11", "81/4 13", "8 13", "71/4 101/2", "51/2 81/2", "8K", "16K", "Custom Size" The default setting is Off. Bypass Tray Setting Priority Specify whether (Printer) Driver / Command or Machine Settings, has priority for determining the paper size for the bypass tray. The default setting is Short Wait. This function reduces printing...does not rotate the image. Printer Language Specify the printer language. This menu will appear under the following conditions: • The PostScript 3 option is Driver / Command. 205 When set to Off, original images are installed.
...81/2 11", "81/4 13", "8 13", "71/4 101/2", "51/2 81/2", "8K", "16K", "Custom Size" The default setting is Off. Bypass Tray Setting Priority Specify whether (Printer) Driver / Command or Machine Settings, has priority for determining the paper size for the bypass tray. The default setting is Short Wait. This function reduces printing...does not rotate the image. Printer Language Specify the printer language. This menu will appear under the following conditions: • The PostScript 3 option is Driver / Command. 205 When set to Off, original images are installed.


