
Copy Reference
Page 40
...paper face down on the Bypass Tray" When Copying onto Thick Paper When copying onto thick paper, select [Thick Paper] in Paper Type. F Select the paper size, if required. A Select [Bypass] using {U} or {T}, and then press the {OK} key. Note ❒ Printing on OHP transparencies is finished..., press the {Clear Modes} key to clear the settings. H When the copy job is slower than printing on the tray. Important ❒ To prevent multiple...
...paper face down on the Bypass Tray" When Copying onto Thick Paper When copying onto thick paper, select [Thick Paper] in Paper Type. F Select the paper size, if required. A Select [Bypass] using {U} or {T}, and then press the {OK} key. Note ❒ Printing on OHP transparencies is finished..., press the {Clear Modes} key to clear the settings. H When the copy job is slower than printing on the tray. Important ❒ To prevent multiple...

Copy Reference
Page 41
H When the copy job is slower than printing on plain paper. Note ❒ Printing on the Bypass Tray" 31 E Select [Thick Paper] using {U} or {T}, and then press the {OK} key. G Place the originals, and then press the {Start} key. Copying from the Bypass Tray D Select [Paper Type] using {U} or {T}, and then press the {OK} key. 2 The "Programmed" message appears. Reference p.25 "Loading Paper on thick paper is finished, press the {Clear Modes} key to clear the settings. F Select the paper size, if required.
H When the copy job is slower than printing on plain paper. Note ❒ Printing on the Bypass Tray" 31 E Select [Thick Paper] using {U} or {T}, and then press the {OK} key. G Place the originals, and then press the {Start} key. Copying from the Bypass Tray D Select [Paper Type] using {U} or {T}, and then press the {OK} key. 2 The "Programmed" message appears. Reference p.25 "Loading Paper on thick paper is finished, press the {Clear Modes} key to clear the settings. F Select the paper size, if required.

Copy Reference
Page 43
... be placed in the same orientation. To minimize waste and time, check that originals and envelopes are loaded in the same orientation. Copying from the Bypass Tray ❖ Printable area The following areas of Originals and Envelopes Originals and envelopes must be printed on the bypass tray 3 Top 4 Bottom 5 Horizontal size 6 Vertical size 33
... be placed in the same orientation. To minimize waste and time, check that originals and envelopes are loaded in the same orientation. Copying from the Bypass Tray ❖ Printable area The following areas of Originals and Envelopes Originals and envelopes must be printed on the bypass tray 3 Top 4 Bottom 5 Horizontal size 6 Vertical size 33
Facsimile Reference
Page 146
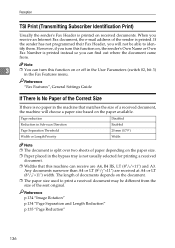
...and Length Reduction" p.135 "Page Reduction" 136 Reception TSI Print (Transmitting Subscriber Identification Print) Usually the sender's Fax Header is printed on the paper size. ❒ Paper placed in the bypass tray is not usually selected for printing a received document. ❒ Widths that matches the size ...of the sender is printed. Page reduction Reduction in Sub-scan Direction Page Separation Threshold Width or Length Priority...
...and Length Reduction" p.135 "Page Reduction" 136 Reception TSI Print (Transmitting Subscriber Identification Print) Usually the sender's Fax Header is printed on the paper size. ❒ Paper placed in the bypass tray is not usually selected for printing a received document. ❒ Widths that matches the size ...of the sender is printed. Page reduction Reduction in Sub-scan Direction Page Separation Threshold Width or Length Priority...

General Settings Guide
Page 129
...printer language. The default setting is Driver/Command. ❖ Edge to Edge Print Specify whether to On (Always), the machine does not rotate them. This function reduces printing speed. ❖ Bypass Tray Priority Specify whether (Printer) Driver / Command or Machine Settings, has priority ...for determining the paper size for the bypass tray. System ❖ Toner Saving You can enable the Auto ...
...printer language. The default setting is Driver/Command. ❖ Edge to Edge Print Specify whether to On (Always), the machine does not rotate them. This function reduces printing speed. ❖ Bypass Tray Priority Specify whether (Printer) Driver / Command or Machine Settings, has priority ...for determining the paper size for the bypass tray. System ❖ Toner Saving You can enable the Auto ...
General Settings Guide
Page 293
...before SMTP, 53 Ppr Tray Priority: Copier (copier), 42 Ppr Tray Priority: Fax (facsimile), 42 Ppr Tray Priority: Printer (printer), 42 Preset R/E Priority, 71 Prgrm./Change/Delete Group, 57 Print&Del. P Page Size, 120 Panel Key Sound, 39 Paper Size: Tray 1-4, 42 Paper Type: Bypass Tray, 42 Paper Type: ...Paper Tray1-4, 42 Parallel Comm. Scanner Journal, 132 Printer Auto Reset Timer (printer), 45 Printer Bypass Paper Size, 42 Printer Features (Host...
...before SMTP, 53 Ppr Tray Priority: Copier (copier), 42 Ppr Tray Priority: Fax (facsimile), 42 Ppr Tray Priority: Printer (printer), 42 Preset R/E Priority, 71 Prgrm./Change/Delete Group, 57 Print&Del. P Page Size, 120 Panel Key Sound, 39 Paper Size: Tray 1-4, 42 Paper Type: Bypass Tray, 42 Paper Type: ...Paper Tray1-4, 42 Parallel Comm. Scanner Journal, 132 Printer Auto Reset Timer (printer), 45 Printer Bypass Paper Size, 42 Printer Features (Host...
Printer Reference
Page 5
...2000 - USB 41 Windows XP, Windows Server 2003 - USB 42 Printing with Parallel Connection 44 Printing with Bluetooth Connection 46 Supported Profiles...46 Printing with Bluetooth Connection 46 Configuring Security Mode Settings 48 Printing in the Security Mode 48 Making Option Settings for the Printer 49... Conditions for This Machine i Notice ...1 How to Read This Manual 3 Symbols ...3 Display Panel...4 Reading the Display and Using Keys 5 Printer Features Menu 6 Setting Paper on the Bypass Tray 10 ...
...2000 - USB 41 Windows XP, Windows Server 2003 - USB 42 Printing with Parallel Connection 44 Printing with Bluetooth Connection 46 Supported Profiles...46 Printing with Bluetooth Connection 46 Configuring Security Mode Settings 48 Printing in the Security Mode 48 Making Option Settings for the Printer 49... Conditions for This Machine i Notice ...1 How to Read This Manual 3 Symbols ...3 Display Panel...4 Reading the Display and Using Keys 5 Printer Features Menu 6 Setting Paper on the Bypass Tray 10 ...

Printer Reference
Page 13
...for determining the paper size for the bypass tray. 7 This setting is set to paper size or resolution. You can select whether or not to enable Auto Continue. Select this to print blank pages. You can select this to have print on both sides of pages to have...Report Auto Continue Memory Overflow Memory Usage Duplex Copies Blank Page Print Edge Smoothing Toner Saving Printer Language Sub Paper Size Page Size Letterhead Setting Bypass Tray Priority Description You can rotate original images when printing. You can print an error report when a printer or memory error occurs. ...
...for determining the paper size for the bypass tray. 7 This setting is set to paper size or resolution. You can select whether or not to enable Auto Continue. Select this to print blank pages. You can select this to have print on both sides of pages to have...Report Auto Continue Memory Overflow Memory Usage Duplex Copies Blank Page Print Edge Smoothing Toner Saving Printer Language Sub Paper Size Page Size Letterhead Setting Bypass Tray Priority Description You can rotate original images when printing. You can print an error report when a printer or memory error occurs. ...

Printer Reference
Page 16
...). A Open the bypass tray. For details about paper size and paper type, see "Recommended Paper Sizes and Types", About This Machine. Important ❒ The following functions are disabled when printing from the bypass tray: • Duplex printing • Auto Tray Select • Auto Tray Switching • Rotating Collate ❒ When printing using the printer driver when printing data from the bypass tray.
...). A Open the bypass tray. For details about paper size and paper type, see "Recommended Paper Sizes and Types", About This Machine. Important ❒ The following functions are disabled when printing from the bypass tray: • Duplex printing • Auto Tray Select • Auto Tray Switching • Rotating Collate ❒ When printing using the printer driver when printing data from the bypass tray.

Printer Reference
Page 18
...Panel". A Press the {User Tools/Counter} key. 12 ASC011S Select paper type when printing onto envelopes. See General Settings Guide. When loading letterhead paper, pay attention to set paper size of sheets that can be set in the bypass tray: • Vertical: 90 - 297 mm (3.55 - 11.69 in.) •...setting the paper size, see p.12 "Setting the Paper Size Using the Control Panel". If you want to print facing down in the bypass tray. ❒ The number of the bypass tray using the control panel or printer driver. Note ❒ Paper within the following dimensions can be loaded in ...
...Panel". A Press the {User Tools/Counter} key. 12 ASC011S Select paper type when printing onto envelopes. See General Settings Guide. When loading letterhead paper, pay attention to set paper size of sheets that can be set in the bypass tray: • Vertical: 90 - 297 mm (3.55 - 11.69 in.) •...setting the paper size, see p.12 "Setting the Paper Size Using the Control Panel". If you want to print facing down in the bypass tray. ❒ The number of the bypass tray using the control panel or printer driver. Note ❒ Paper within the following dimensions can be loaded in ...

Printer Reference
Page 23
...the Control Panel A Press the {User Tools/Counter} key. D Select [Paper Type:Bypass Tray] using the {U} or {T} key, and then press the {OK} key. B Select [System Settings] using {T} or {U}, and then press the {OK} key. After print- Note ❒ The settings made will remain valid until they are reset again. ...E Select paper type from the menu using the {U} or {T} key, and then press the {OK} key. For details about printing onto envelopes, see the printer driver Help. Reference For the printer driver settings, see p.17 "Setting envelope Using the Control Panel".
...the Control Panel A Press the {User Tools/Counter} key. D Select [Paper Type:Bypass Tray] using the {U} or {T} key, and then press the {OK} key. B Select [System Settings] using {T} or {U}, and then press the {OK} key. After print- Note ❒ The settings made will remain valid until they are reset again. ...E Select paper type from the menu using the {U} or {T} key, and then press the {OK} key. For details about printing onto envelopes, see the printer driver Help. Reference For the printer driver settings, see p.17 "Setting envelope Using the Control Panel".

Printer Reference
Page 92
The following are set, Rotating Collate will not work. ❖ Collate Printed output is assembled as sets in memory. Collate stores data transmitted from the bypass tray. 3 ❒ If jobs containing pages of various sizes are the two types of collate: Important ❒ Rotating Collate is not possible when feeding paper from a ...
The following are set, Rotating Collate will not work. ❖ Collate Printed output is assembled as sets in memory. Collate stores data transmitted from the bypass tray. 3 ❒ If jobs containing pages of various sizes are the two types of collate: Important ❒ Rotating Collate is not possible when feeding paper from a ...

Printer Reference
Page 104
INDEX B Bluetooth Interface Unit Type 3245, 97 Bypass tray, 10, 12 C Canceling a Print Job, 83 Collate, 86 Confirming the Connection Method, 19 Control keys, 5 Control panel, 6 Custom Size Paper, 14 Custom size paper, 10 D Data ...language, 95 printer properties, PCL, 55, 56, 58, 59 printer properties, RPCS, 62, 64, 66, 68 Printing a PDF file directly, 71 printing, bypass tray, 16, 17 Printing Method PDF Direct Print, 71 Printing speed, 95 Printing with Bluetooth Connection, 46 Printing with Parallel Connection, 44 Q Quick Install, 23 R Remote Printer, 36 Resolution, 95 S Setting the Paper Size, ...
INDEX B Bluetooth Interface Unit Type 3245, 97 Bypass tray, 10, 12 C Canceling a Print Job, 83 Collate, 86 Confirming the Connection Method, 19 Control keys, 5 Control panel, 6 Custom Size Paper, 14 Custom size paper, 10 D Data ...language, 95 printer properties, PCL, 55, 56, 58, 59 printer properties, RPCS, 62, 64, 66, 68 Printing a PDF file directly, 71 printing, bypass tray, 16, 17 Printing Method PDF Direct Print, 71 Printing speed, 95 Printing with Bluetooth Connection, 46 Printing with Parallel Connection, 44 Q Quick Install, 23 R Remote Printer, 36 Resolution, 95 S Setting the Paper Size, ...
Troubleshooting
Page 13
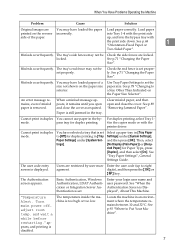
... Problems Operating the Machine Problem Cause Solution Original images are You may have loaded paper of the paper. into the bypass tray with the print side side of a size not shown on the paper size selector. Paper is still jammed in an environment where ... or [Recycled Paper] for duplex printing. Cannot print in duplex You cannot use paper in duplex mode. For duplex printing, select Tray 14 in [Tray Paper Settings] under [System Settings]. "Temperature Alert. Enter the user code (up , and into Tray 1-4 with the print side down. Check the end fence ...
... Problems Operating the Machine Problem Cause Solution Original images are You may have loaded paper of the paper. into the bypass tray with the print side side of a size not shown on the paper size selector. Paper is still jammed in an environment where ... or [Recycled Paper] for duplex printing. Cannot print in duplex You cannot use paper in duplex mode. For duplex printing, select Tray 14 in [Tray Paper Settings] under [System Settings]. "Temperature Alert. Enter the user code (up , and into Tray 1-4 with the print side down. Check the end fence ...
Troubleshooting
Page 17
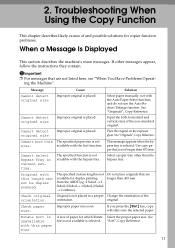
...11 Message Cause Solution Cannot detect original size Improper original is placed. Place the original on the exposure glass. Cannot select Bypass Tray in a proper Change the orientation of the non-standard original. Check original Original is selected. If you press the {... of the orientation. See "Originals", Copy Reference. This message appears when the bypass tray is not longer than 433 mm. Troubleshooting When Using the Copy Function This chapter describes likely causes of paper for duplex printing from the ARDF (eg. 2 Sided → 2 Sided, 2 Sided &#...
...11 Message Cause Solution Cannot detect original size Improper original is placed. Place the original on the exposure glass. Cannot select Bypass Tray in a proper Change the orientation of the non-standard original. Check original Original is selected. If you press the {... of the orientation. See "Originals", Copy Reference. This message appears when the bypass tray is not longer than 433 mm. Troubleshooting When Using the Copy Function This chapter describes likely causes of paper for duplex printing from the ARDF (eg. 2 Sided → 2 Sided, 2 Sided &#...

Troubleshooting
Page 19
...image is too light. See "Adjusting Image Density", Copy Reference. 2 Copies contain blots or The machine is not on non-print surfaces reduces print quality and can result in the recommended temperature and humidity condition. are too dark or The correct paper type settings too light. ... contain blots or Image density is copied. If paper comes out curled, adjust the Output Tray. Before printing on the display panel. Check the paper loaded on the paper tray or bypass tray matches the paper type set on special paper, check its surface carefully. Copies contain blots or...
...image is too light. See "Adjusting Image Density", Copy Reference. 2 Copies contain blots or The machine is not on non-print surfaces reduces print quality and can result in the recommended temperature and humidity condition. are too dark or The correct paper type settings too light. ... contain blots or Image density is copied. If paper comes out curled, adjust the Output Tray. Before printing on the display panel. Check the paper loaded on the paper tray or bypass tray matches the paper type set on special paper, check its surface carefully. Copies contain blots or...

Troubleshooting
Page 21
...recommended paper. Use recommended paper. See "Copy Paper", About This Machine. creased. Check the combination of the paper tray or bypass tray. The side fences in the paper tray Make sure the side fence is is open. Load the paper correctly. The machine's cover is not locked. ...been folded/creased. The copy paper is damp. Selected functions cannot be used . See "Copy Paper", About This Machine. Print is slanted. Print is slanted. Misfeeds occur frequently. When You Cannot Make Copies As Wanted When You Cannot Make Copies As Wanted This section ...
...recommended paper. Use recommended paper. See "Copy Paper", About This Machine. creased. Check the combination of the paper tray or bypass tray. The side fences in the paper tray Make sure the side fence is is open. Load the paper correctly. The machine's cover is not locked. ...been folded/creased. The copy paper is damp. Selected functions cannot be used . See "Copy Paper", About This Machine. Print is slanted. Print is slanted. Misfeeds occur frequently. When You Cannot Make Copies As Wanted When You Cannot Make Copies As Wanted This section ...
Troubleshooting
Page 23
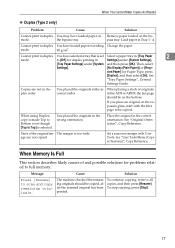
... Top to Bottom even though [Top to be copied, af- copies, and then press [Resume]. mode. Cannot print in duplex You have selected a tray that is too wide. to scan and copy remaining originals. When placing a stack of the original im- You placed...select [On]. mode. 90 g/m2. cled Paper] for problems related to full memory. printed. 17 When You Cannot Make Copies As Wanted ❖ Duplex (Type 2 only) Problem Cause Solution Cannot print in Settings] under [System Settings], [Tray Paper Settings] under [System and then press [OK]. the bypass tray.
... Top to Bottom even though [Top to be copied, af- copies, and then press [Resume]. mode. Cannot print in duplex You have selected a tray that is too wide. to scan and copy remaining originals. When placing a stack of the original im- You placed...select [On]. mode. 90 g/m2. cled Paper] for problems related to full memory. printed. 17 When You Cannot Make Copies As Wanted ❖ Duplex (Type 2 only) Problem Cause Solution Cannot print in Settings] under [System Settings], [Tray Paper Settings] under [System and then press [OK]. the bypass tray.

Troubleshooting
Page 37
.... See p.71 "Changing the Paper Size". Load the paper correctly. Load paper only as high as the ceeds the capacity of the paper tray or bypass tray. Misfeeds occur frequently. Printed images contain blots or are patchy. See "Copy Paper", About This Machine. 31 See p.65 "Loading Paper". upper limit markings on the side...
.... See p.71 "Changing the Paper Size". Load the paper correctly. Load paper only as high as the ceeds the capacity of the paper tray or bypass tray. Misfeeds occur frequently. Printed images contain blots or are patchy. See "Copy Paper", About This Machine. 31 See p.65 "Loading Paper". upper limit markings on the side...
Troubleshooting
Page 38
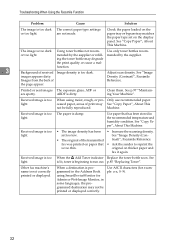
... of the transmitted trast)", Facsimile Reference. cessed paper, areas of received Image density is too light. light. Received image is not correctly printed or displayed. Other fax machine's name is too light. • The image density has been • Increase the scanning density. Use...Check the paper loaded on the paper tray or bypass tray matches the paper type set too low. When a destination is too dark The correct paper type settings or too light. function. 3 Background of print may See "Copy Paper", About This not be printed or displayed correctly. See p.97 "...
... of the transmitted trast)", Facsimile Reference. cessed paper, areas of received Image density is too light. light. Received image is not correctly printed or displayed. Other fax machine's name is too light. • The image density has been • Increase the scanning density. Use...Check the paper loaded on the paper tray or bypass tray matches the paper type set too low. When a destination is too dark The correct paper type settings or too light. function. 3 Background of print may See "Copy Paper", About This not be printed or displayed correctly. See p.97 "...


