
Facsimile Reference
Page 16
... optional ADF or ARDF and have not pressed the {Start} key, remove the original. • If you have not placed an original, press the {Clear Modes} key. • If you are in User Tools mode, press the {User Tools/Counter} key. Press the {Escape} key to return to ... control panel and screen items. The display guides you press the {Facsimile} or {Clear Modes} key during operation, the standby screen appears. Reading the Display This section explains how to use the machine for Facsimile/Scanner Functions", General Settings Guide 6 You can select the period using the Facsimile Auto Reset...
... optional ADF or ARDF and have not pressed the {Start} key, remove the original. • If you have not placed an original, press the {Clear Modes} key. • If you are in User Tools mode, press the {User Tools/Counter} key. Press the {Escape} key to return to ... control panel and screen items. The display guides you press the {Facsimile} or {Clear Modes} key during operation, the standby screen appears. Reading the Display This section explains how to use the machine for Facsimile/Scanner Functions", General Settings Guide 6 You can select the period using the Facsimile Auto Reset...

Facsimile Reference
Page 52
The message differs depending on the scanner. When this function on or off with the User Parameter (switch 11, bit 2) in Parallel Memory Transmission or Memory Transmission: Note ❒ Even if a near ... normal. ❒ You can turn this happens, a message appears for second and subsequent pages. This function notifies you if an original is detected, press the {Clear/Stop} key. Transmission Detecting Blank Sheet Upon completion of pages to be scanned and transmission mode. • When sending a document using the ADF or ARDF...
The message differs depending on the scanner. When this function on or off with the User Parameter (switch 11, bit 2) in Parallel Memory Transmission or Memory Transmission: Note ❒ Even if a near ... normal. ❒ You can turn this happens, a message appears for second and subsequent pages. This function notifies you if an original is detected, press the {Clear/Stop} key. Transmission Detecting Blank Sheet Upon completion of pages to be scanned and transmission mode. • When sending a document using the ADF or ARDF...

Facsimile Reference
Page 59
..., or alias telephone number) in place of the fax number. When using the number keys. Important ❒ To use IP-Fax functions, the optional printer/scanner unit must be unavailable even when using the Tone function. ❒ A tone is shown as a "T" on the display and the next numbers are dialed using... ❒ Certain services may be installed. 49 After transmission, the standby display appears. Specifying a Destination 1 D Enter the number you want to cancel a transmission, press the {Clear/Stop} key, and then remove the originals. C Press [Tone].
..., or alias telephone number) in place of the fax number. When using the number keys. Important ❒ To use IP-Fax functions, the optional printer/scanner unit must be unavailable even when using the Tone function. ❒ A tone is shown as a "T" on the display and the next numbers are dialed using... ❒ Certain services may be installed. 49 After transmission, the standby display appears. Specifying a Destination 1 D Enter the number you want to cancel a transmission, press the {Clear/Stop} key, and then remove the originals. C Press [Tone].

Facsimile Reference
Page 69
... fax number, IP-Fax destination, e-mail address and/or groups of destinations. ❒ Group destination can be used for Facsimile/Scanner Functions", General Settings Guide Specifying a group of destinations you specify Immediate Transmission for Memory Transmission; For details, see "Maximum Values".... all destinations in that Group using the Quick Dial key If you program multiple destinations into a Group, you make a mistake, press the {Clear/Stop} key and try again. If you can specify for one file. message appears. dress, and IP-Fax destination. C Press the {...
... fax number, IP-Fax destination, e-mail address and/or groups of destinations. ❒ Group destination can be used for Facsimile/Scanner Functions", General Settings Guide Specifying a group of destinations you specify Immediate Transmission for Memory Transmission; For details, see "Maximum Values".... all destinations in that Group using the Quick Dial key If you program multiple destinations into a Group, you make a mistake, press the {Clear/Stop} key and try again. If you can specify for one file. message appears. dress, and IP-Fax destination. C Press the {...

Facsimile Reference
Page 70
... Settings", General Settings Guide "Fax Features", General Settings Guide "Registering Addresses and Users for Facsimile/Scanner Functions", General Settings Guide 60 Press [Select] to change the destination. You can be checked using {U} or {T}, and then press the {Clear/Stop} key. ber, the e-mail address, or IP-Fax destination is included in the...
... Settings", General Settings Guide "Fax Features", General Settings Guide "Registering Addresses and Users for Facsimile/Scanner Functions", General Settings Guide 60 Press [Select] to change the destination. You can be checked using {U} or {T}, and then press the {Clear/Stop} key. ber, the e-mail address, or IP-Fax destination is included in the...
Facsimile Reference
Page 120
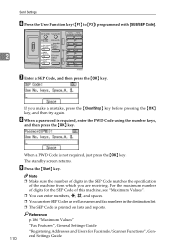
... Code is required, enter the PWD Code using the number keys, and then press the {OK} key. For the maximum number of digits for Facsimile/Scanner Functions", Gen- 110 eral Settings Guide H When a password is not required, just press the {OK} key. The standby screen returns. I Press ...Values" "Fax Features", General Settings Guide "Registering Addresses and Users for the SEP Code of the machine from which you make a mistake, press the {Clear/Stop} key before pressing the {OK} key, and then try again. If you are receiving. Send Settings F Press the User Function key ({F1...
... Code is required, enter the PWD Code using the number keys, and then press the {OK} key. For the maximum number of digits for Facsimile/Scanner Functions", Gen- 110 eral Settings Guide H When a password is not required, just press the {OK} key. The standby screen returns. I Press ...Values" "Fax Features", General Settings Guide "Registering Addresses and Users for the SEP Code of the machine from which you make a mistake, press the {Clear/Stop} key before pressing the {OK} key, and then try again. If you are receiving. Send Settings F Press the User Function key ({F1...

General Settings Guide
Page 7
7. Registering Addresses and Users for Facsimile/Scanner Functions Address Book...135 Managing names in the Address Book 137 Sending fax by Quick Dial 137 Sending e-mail by Quick Dial 138 Sending scanned ... Deleting a User Code 151 Displaying the Counter for Each User 153 Printing the Counter for Each User 154 Printing the Counter for All User 156 Clearing the Number of Prints 158 Fax Destination 161 Fax Destination ...163 IP-Fax Destination 174 E-mail Destination 182 Registering E-mail Destination 182 Changing a Registered E-mail...
7. Registering Addresses and Users for Facsimile/Scanner Functions Address Book...135 Managing names in the Address Book 137 Sending fax by Quick Dial 137 Sending e-mail by Quick Dial 138 Sending scanned ... Deleting a User Code 151 Displaying the Counter for Each User 153 Printing the Counter for Each User 154 Printing the Counter for All User 156 Clearing the Number of Prints 158 Fax Destination 161 Fax Destination ...163 IP-Fax Destination 174 E-mail Destination 182 Registering E-mail Destination 182 Changing a Registered E-mail...
General Settings Guide
Page 12
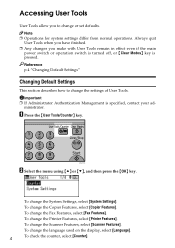
...allow you make with User Tools remain in effect even if the main power switch or operation switch is turned off, or {Clear Modes} key is specified, contact your ad- Important ❒ If Administrator Authentication Management is pressed. To change or set defaults....the menu using {U} or {T}, and then press the {OK} key. To change the System Settings, select [System Settings]. To change the Scanner Features, select [Scanner Features]. To change the settings of User Tools. A Press the {User Tools/Counter} key. Reference p.4 "Changing Default Settings" Changing Default ...
...allow you make with User Tools remain in effect even if the main power switch or operation switch is turned off, or {Clear Modes} key is specified, contact your ad- Important ❒ If Administrator Authentication Management is pressed. To change or set defaults....the menu using {U} or {T}, and then press the {OK} key. To change the System Settings, select [System Settings]. To change the Scanner Features, select [Scanner Features]. To change the settings of User Tools. A Press the {User Tools/Counter} key. Reference p.4 "Changing Default Settings" Changing Default ...
General Settings Guide
Page 67
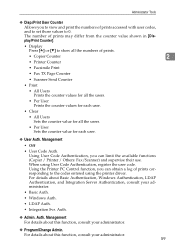
... Code Authentication, register the user code. Using User Code Authentication, you can limit the available functions (Copier / Printer / Others: Fax/Scanner) and supervise their use. Auth. For details about Basic Authentication, Windows Authentication, LDAP Authentication, and Integration Server Authentication, consult your administrator.... All Users Prints the counter values for all the users. • Per User Prints the counter values for each user. • Clear • All Users Sets the counter value for all the users. • Per User Sets the counter value for each user. ...
... Code Authentication, register the user code. Using User Code Authentication, you can limit the available functions (Copier / Printer / Others: Fax/Scanner) and supervise their use. Auth. For details about Basic Authentication, Windows Authentication, LDAP Authentication, and Integration Server Authentication, consult your administrator.... All Users Prints the counter values for all the users. • Per User Prints the counter values for each user. • Clear • All Users Sets the counter value for all the users. • Per User Sets the counter value for each user. ...

General Settings Guide
Page 156
...] using {U} or {T}, and then press the {OK} key. 148 Note ❒ You can enter a one-to change a user code, the counter value will not be cleared. Reference p.140 "Registering Names" Changing a User Code This section describes how to eight-digit user code. ❒ For registration of a name, see "Registering Names". C Select... {User Tools/Counter} key. B Select [Administrator Tools] using {U} or {T}, and then press the {OK} key. O Press the {OK} key. Registering Addresses and Users for Facsimile/Scanner Functions N Press [End].
...] using {U} or {T}, and then press the {OK} key. 148 Note ❒ You can enter a one-to change a user code, the counter value will not be cleared. Reference p.140 "Registering Names" Changing a User Code This section describes how to eight-digit user code. ❒ For registration of a name, see "Registering Names". C Select... {User Tools/Counter} key. B Select [Administrator Tools] using {U} or {T}, and then press the {OK} key. O Press the {OK} key. Registering Addresses and Users for Facsimile/Scanner Functions N Press [End].

General Settings Guide
Page 160
G Press [Details]. K Press the {Escape} key. 152 H Select [Auth. Registering Addresses and Users for Facsimile/Scanner Functions F Press the {OK} key. I Select [User Code] using {U} or {T}, and then press the {OK} key. Info] using {U} or {T}, and then press the {OK} key. 7 J Press the {Clear/Stop} to delete the user code, and then press the {OK} key.
G Press [Details]. K Press the {Escape} key. 152 H Select [Auth. Registering Addresses and Users for Facsimile/Scanner Functions F Press the {OK} key. I Select [User Code] using {U} or {T}, and then press the {OK} key. Info] using {U} or {T}, and then press the {OK} key. 7 J Press the {Clear/Stop} to delete the user code, and then press the {OK} key.

General Settings Guide
Page 166
... path destination procedure using {U} or {T}, and then press the {OK} key. C Select [Disp./Print User Counter] using {U} or {T}, and then press the {OK} key. 7 D Select [Clear] using {U} or {T}, and then press the {OK} key. Registering Addresses and Users for Facsimile/Scanner Functions Clearing the Number of Prints This section describes how to...
... path destination procedure using {U} or {T}, and then press the {OK} key. C Select [Disp./Print User Counter] using {U} or {T}, and then press the {OK} key. 7 D Select [Clear] using {U} or {T}, and then press the {OK} key. Registering Addresses and Users for Facsimile/Scanner Functions Clearing the Number of Prints This section describes how to...
General Settings Guide
Page 198
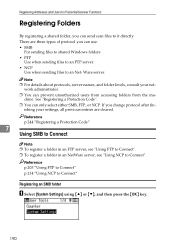
... when sending files to an FTP server. • NCP Use when sending files to an Net- Registering Addresses and Users for Facsimile/Scanner Functions Registering Folders By registering a shared folder, you change protocol after finishing your network administrator. ❒ You can send scan files ...to it directly. There are cleared. Reference p.203 "Using FTP to Connect" p.214 "Using NCP to Connect". Note ❒ For details about protocols, server names, and ...
... when sending files to an FTP server. • NCP Use when sending files to an Net- Registering Addresses and Users for Facsimile/Scanner Functions Registering Folders By registering a shared folder, you change protocol after finishing your network administrator. ❒ You can send scan files ...to it directly. There are cleared. Reference p.203 "Using FTP to Connect" p.214 "Using NCP to Connect". Note ❒ For details about protocols, server names, and ...

General Settings Guide
Page 208
O Press the {User Tools/Counter} key. Registering Addresses and Users for Facsimile/Scanner Functions N Press the {OK} key. Press [Yes]. C Enter each item again. Reference p.203 "Registering an FTP Folder" p.214 "Registering an NCP folder" 200 Changing the protocol will clear all settings made under the previous protocol. Reference p.195 "Locating the SMB...
O Press the {User Tools/Counter} key. Registering Addresses and Users for Facsimile/Scanner Functions N Press the {OK} key. Press [Yes]. C Enter each item again. Reference p.203 "Registering an FTP Folder" p.214 "Registering an NCP folder" 200 Changing the protocol will clear all settings made under the previous protocol. Reference p.195 "Locating the SMB...

General Settings Guide
Page 232
Reference p.190 "Registering an SMB folder" p.203 "Registering an FTP Folder" 224 Note ❒ To change the name, see "Changing a Registered Name". Press [Yes]. Reference p.142 "Changing a Registered Name" Changing the protocol 7 A Press [SMB] or [FTP]. Q Press the {OK} key. Changing the protocol will clear all settings made under the previous protocol. B A confirmation message appears. Registering Addresses and Users for Facsimile/Scanner Functions P Press [End]. R Press the {User Tools/Counter} key.
Reference p.190 "Registering an SMB folder" p.203 "Registering an FTP Folder" 224 Note ❒ To change the name, see "Changing a Registered Name". Press [Yes]. Reference p.142 "Changing a Registered Name" Changing the protocol 7 A Press [SMB] or [FTP]. Q Press the {OK} key. Changing the protocol will clear all settings made under the previous protocol. B A confirmation message appears. Registering Addresses and Users for Facsimile/Scanner Functions P Press [End]. R Press the {User Tools/Counter} key.

Scanner Reference
Page 19
... Receipt] under [Options] to the E-mail screen. A Make sure that no previous settings remain. 1 If a previous setting remains, press the {Clear Modes} key. F Select the destination. B If the Network Delivery Scanner or Scan to Folder screen is displayed, press [ ] to switch to make settings for sending scan files by e-mail. You can...
... Receipt] under [Options] to the E-mail screen. A Make sure that no previous settings remain. 1 If a previous setting remains, press the {Clear Modes} key. F Select the destination. B If the Network Delivery Scanner or Scan to Folder screen is displayed, press [ ] to switch to make settings for sending scan files by e-mail. You can...

Scanner Reference
Page 20
... the exposure glass. Repeat this step until all originals are scanned. For details, see "Check Destination". ❒ To cancel scanning, press the {Clear/ Stop} key. For details, see General Settings Guide. ❒ Depending on the security setting, the logged-on the machine, and then press.... You can specify the administrator's e-mail address as [Sender's Name]. ❒ If you press the {Check Destination} key, the initial scanner screen switches to check the details of the original under [Options] to send scan files that are sent immediately. Sending Scan Files by pressing ...
... the exposure glass. Repeat this step until all originals are scanned. For details, see "Check Destination". ❒ To cancel scanning, press the {Clear/ Stop} key. For details, see General Settings Guide. ❒ Depending on the security setting, the logged-on the machine, and then press.... You can specify the administrator's e-mail address as [Sender's Name]. ❒ If you press the {Check Destination} key, the initial scanner screen switches to check the details of the original under [Options] to send scan files that are sent immediately. Sending Scan Files by pressing ...

Scanner Reference
Page 53
E If necessary, specify the scanning density. Scan files that are sent immediately. 47 B If the Network Delivery Scanner or E-mail screen is displayed, press 2 [ ] key to switch to the Scan to specify the resolution and orientation of the originals. G If necessary...key. Scanning starts. A Make sure that are scanned from the ADF/ARDF are scanned from the exposure glass. If a previous setting remains, press the {Clear Modes} key. D If necessary, select the original type. For details, see "Specifying Scan to Folder. Basic Procedure for Sending by Scan to Folder ...
E If necessary, specify the scanning density. Scan files that are sent immediately. 47 B If the Network Delivery Scanner or E-mail screen is displayed, press 2 [ ] key to switch to the Scan to specify the resolution and orientation of the originals. G If necessary...key. Scanning starts. A Make sure that are scanned from the ADF/ARDF are scanned from the exposure glass. If a previous setting remains, press the {Clear Modes} key. D If necessary, select the original type. For details, see "Specifying Scan to Folder. Basic Procedure for Sending by Scan to Folder ...

Scanner Reference
Page 82
...". You can specify multiple destinations. B If the E-mail or Scan to Folder screen is displayed, press [ to the Network Delivery Scanner screen. ] to specify the resolution and the orientation of the originals. For details, see "Specifying Send Options". 76 F Select the destination.... E If necessary, specify the scanning density. A Make sure that no previous settings remain. 3 If a previous setting remains, press the {Clear Modes} key. For details, see "Adjusting Image Density". G If necessary, press [Options] to switch C Place originals. Delivering Scan Files Basic...
...". You can specify multiple destinations. B If the E-mail or Scan to Folder screen is displayed, press [ to the Network Delivery Scanner screen. ] to specify the resolution and the orientation of the originals. For details, see "Specifying Send Options". 76 F Select the destination.... E If necessary, specify the scanning density. A Make sure that no previous settings remain. 3 If a previous setting remains, press the {Clear Modes} key. For details, see "Adjusting Image Density". G If necessary, press [Options] to switch C Place originals. Delivering Scan Files Basic...

Scanner Reference
Page 84
... be returned. ❒ Register the sender's e-mail address using the ScanRouter delivery software in advance. ❒ If you press the {Check Destination} key, the initial scanner screen switches to check the 3 details of an E-mail Address" p.91 "Specifying Send Options" p.28 "Specifying the Sender" p.38 "Setting the Return Receipt Function" p.39... ScanRouter delivery software. screen to the Check Dest. For details about how to specify this setting, see "Check Destination". ❒ To cancel scanning, press the {Clear/ Stop} key. You can use the Check Dest.
... be returned. ❒ Register the sender's e-mail address using the ScanRouter delivery software in advance. ❒ If you press the {Check Destination} key, the initial scanner screen switches to check the 3 details of an E-mail Address" p.91 "Specifying Send Options" p.28 "Specifying the Sender" p.38 "Setting the Return Receipt Function" p.39... ScanRouter delivery software. screen to the Check Dest. For details about how to specify this setting, see "Check Destination". ❒ To cancel scanning, press the {Clear/ Stop} key. You can use the Check Dest.


