
Operating Instructions
Page 20
... not receiving a fax. 12 If you press the operation switch, check the explanations below and turn off while using the fax function, waiting fax and print jobs may result in the following points in mode even if you have to the memory. ABU112S.eps ABU112S Note ˆ Even if you turn... deleted an hour after you press the operation switch, the indicator does not go out, but blinks in damage to turn off this may be canceled, and incoming fax documents not received.
... not receiving a fax. 12 If you press the operation switch, check the explanations below and turn off while using the fax function, waiting fax and print jobs may result in the following points in mode even if you have to the memory. ABU112S.eps ABU112S Note ˆ Even if you turn... deleted an hour after you press the operation switch, the indicator does not go out, but blinks in damage to turn off this may be canceled, and incoming fax documents not received.
Operating Instructions
Page 46
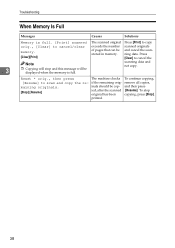
...Reset * orig., then press The machine checks To continue copying, [Resume] to scan and copy the re- and cancel the scanning data. scanning data and not copy. printed. 38 and then press ied, after the scanned [Resume]. if the remaining orig- To stop and this message will ...be displayed when the memory is full. [Print] scanned The scanned original Press [Print] to copy orig., [Clear] to cancel the Note 3 ˆ Copying...
...Reset * orig., then press The machine checks To continue copying, [Resume] to scan and copy the re- and cancel the scanning data. scanning data and not copy. printed. 38 and then press ied, after the scanned [Resume]. if the remaining orig- To stop and this message will ...be displayed when the memory is full. [Print] scanned The scanned original Press [Print] to copy orig., [Clear] to cancel the Note 3 ˆ Copying...

User Instructions
Page 27
...and {Darker} keys Press to turn the power off the main power switch while the On indicator is selected, the corresponding indicator lights. 22. {Cancel} key again. Reference Printer Reference 1 26. {Start} key Press to 16. Operation switch Press to change the image density setting. 1 Important... ˆ Do not turn off , press (Photo)]. Press to cancel an operation or return to start copying, printing, scanning or sending. 15 numeric value. 17. {On Line} key 24. Control Panel 14. Main power indicator and On...
...and {Darker} keys Press to turn the power off the main power switch while the On indicator is selected, the corresponding indicator lights. 22. {Cancel} key again. Reference Printer Reference 1 26. {Start} key Press to 16. Operation switch Press to change the image density setting. 1 Important... ˆ Do not turn off , press (Photo)]. Press to cancel an operation or return to start copying, printing, scanning or sending. 15 numeric value. 17. {On Line} key 24. Control Panel 14. Main power indicator and On...

User Instructions
Page 97
... programming a key operator code. 85 To protect documents from such intrusion, not only can passwords be set in memory. When a copy or print job is completed, or a job is canceled, the data is on, delivery server settings cannot be used to strengthen security. Setting Extended Security Preparation The Extended Security setting is...
... programming a key operator code. 85 To protect documents from such intrusion, not only can passwords be set in memory. When a copy or print job is completed, or a job is canceled, the data is on, delivery server settings cannot be used to strengthen security. Setting Extended Security Preparation The Extended Security setting is...

User Instructions
Page 107
... being fed into the machine) by running a pencil or ruler across them. • Use only rectangular envelopes. • Some kinds of paper. You can cancel this setting. Note ˆ When using the bypass tray, we recommend you load paper of the same size and in the same direction in two... trays, the machine automatically shifts to L. ˆ When printing on envelopes, note the following kinds of copies. If there is no improvement, change the paper size, see Copy Reference. Important ˆ Do not use...
... being fed into the machine) by running a pencil or ruler across them. • Use only rectangular envelopes. • Some kinds of paper. You can cancel this setting. Note ˆ When using the bypass tray, we recommend you load paper of the same size and in the same direction in two... trays, the machine automatically shifts to L. ˆ When printing on envelopes, note the following kinds of copies. If there is no improvement, change the paper size, see Copy Reference. Important ˆ Do not use...

Printer Reference
Page 11
... online and offline. 11. Note ˆ This key is turned on . Data In indicator Blinks while the printer is data remaining to be printed. 12. {Cancel} key Press to cancel an operation or return to the previous display. 13. {OK} key Press to enter numeric values. 3 Display Displays operation status and messages. 4. Press...
... online and offline. 11. Note ˆ This key is turned on . Data In indicator Blinks while the printer is data remaining to be printed. 12. {Cancel} key Press to cancel an operation or return to the previous display. 13. {OK} key Press to enter numeric values. 3 Display Displays operation status and messages. 4. Press...

Printer Reference
Page 15
...appear when the computer is longer than 3 meters (10 feet). ˆ Rating voltage of the interface connector: Max. If this happens, click [Cancel] on the computer. The printer driver must be installed next. This machine does not come with a parallel cable to connect the machine to use...interface board or optional IEEE 1394 interface board. Preparing the Machine Connecting the Machine to the host using the parallel cable/IEEE 1394 (SCSI print) cable ™ Parallel Connection ABW017S1.eps Connect the machine to install the printer driver, see "Turning Off the Power", Copy Reference. The...
...appear when the computer is longer than 3 meters (10 feet). ˆ Rating voltage of the interface connector: Max. If this happens, click [Cancel] on the computer. The printer driver must be installed next. This machine does not come with a parallel cable to connect the machine to use...interface board or optional IEEE 1394 interface board. Preparing the Machine Connecting the Machine to the host using the parallel cable/IEEE 1394 (SCSI print) cable ™ Parallel Connection ABW017S1.eps Connect the machine to install the printer driver, see "Turning Off the Power", Copy Reference. The...

Printer Reference
Page 20
vL], and then press the {OK} key. turn to Print Setting envelopes G Select [Printer Features] using {U} or {T}, and then press the {OK} A Press the {User Tools/Counter} key. ing {U} or {T}, and then press the {OK} ...} key. ***PRN015.tif*** C Select [Tray Paper Settings] using {U} or {T}, and then press the {OK} key. ***PRN013.tif*** K Press the {User Tools/Counter} key. F Press the {Cancel} key twice to re-
vL], and then press the {OK} key. turn to Print Setting envelopes G Select [Printer Features] using {U} or {T}, and then press the {OK} A Press the {User Tools/Counter} key. ing {U} or {T}, and then press the {OK} ...} key. ***PRN015.tif*** C Select [Tray Paper Settings] using {U} or {T}, and then press the {OK} key. ***PRN013.tif*** K Press the {User Tools/Counter} key. F Press the {Cancel} key twice to re-

Printer Reference
Page 21
... software using Auto Run, log on the CD-ROM root directory. ˆ If you want to cancel Auto Run, hold down until the computer has finished accessing the CD-ROM. The procedure for installing ..., see p.32 "Installing the Printer Driver Using IEEE 1394". Note ˆ If "plug and play" starts, click [Cancel] in - 2 stall the following the procedure used for an Ethernet connection. • For details about the parallel/network... USB". • For details about the IEEE 1394 connection (SCSI print), see the operating instructions that has Administrators permission. 13
... software using Auto Run, log on the CD-ROM root directory. ˆ If you want to cancel Auto Run, hold down until the computer has finished accessing the CD-ROM. The procedure for installing ..., see p.32 "Installing the Printer Driver Using IEEE 1394". Note ˆ If "plug and play" starts, click [Cancel] in - 2 stall the following the procedure used for an Ethernet connection. • For details about the parallel/network... USB". • For details about the IEEE 1394 connection (SCSI print), see the operating instructions that has Administrators permission. 13

Printer Reference
Page 28
tings], and then click [Printers]. The [Printers] window appears. C On the [File] menu, click [Proper- A Click [Cancel] to close the [Extended Features Settings] dialog box. • For IPP, you should access the printer properties dialog box from an ...Settings and Timeout Settings. D Click [OK] to close the [Port Settings] dialog box. 2 B Start SmartDeviceMonitor for each port] check box. Preparing to Print Note ˆ If you cannot set up options by clicking the [Start] button on the taskbar, click [Control Panel], click [Printers and Other Hardware], ...
tings], and then click [Printers]. The [Printers] window appears. C On the [File] menu, click [Proper- A Click [Cancel] to close the [Extended Features Settings] dialog box. • For IPP, you should access the printer properties dialog box from an ...Settings and Timeout Settings. D Click [OK] to close the [Port Settings] dialog box. 2 B Start SmartDeviceMonitor for each port] check box. Preparing to Print Note ˆ If you cannot set up options by clicking the [Start] button on the taskbar, click [Control Panel], click [Printers and Other Hardware], ...

Printer Reference
Page 40
...Locate Driver Files" ap- Installing the Printer Driver Using IEEE 1394 2 32 Printing using an account that uses SCSI print is only one, and the client cannot access the IEEE 1394 interface board without using a SCSI print device with Service Pack 1 or later. C Select [Optional search locations:], ...and then click [Next]. If the "plug and play" function starts, click [Cancel] in the printer...
...Locate Driver Files" ap- Installing the Printer Driver Using IEEE 1394 2 32 Printing using an account that uses SCSI print is only one, and the client cannot access the IEEE 1394 interface board without using a SCSI print device with Service Pack 1 or later. C Select [Optional search locations:], ...and then click [Next]. If the "plug and play" function starts, click [Cancel] in the printer...

Printer Reference
Page 41
terface cable. The [Found New Hardware Wizard] dialog box appears. 2 F Click [Browse]. B Confirm that does not support SCSI print, or plug in/take out the cable, disable the de- "Please choose your search and installation option." D Install the printer driver follow-... dialog box appears. Note ˆ When installation is complete, the printer with its port directed to install. If the Auto Run program starts, click [Cancel], and then click [Exit]. appears. Each printer driver is stored in the [Printers] folder. ("n" is displayed, and click [Install from a list or...
terface cable. The [Found New Hardware Wizard] dialog box appears. 2 F Click [Browse]. B Confirm that does not support SCSI print, or plug in/take out the cable, disable the de- "Please choose your search and installation option." D Install the printer driver follow-... dialog box appears. Note ˆ When installation is complete, the printer with its port directed to install. If the Auto Run program starts, click [Cancel], and then click [Exit]. appears. Each printer driver is stored in the [Printers] folder. ("n" is displayed, and click [Install from a list or...

Fax Guide
Page 7
...Send Later 3 User Transmission 5 E-mail Options...7 Fax Header Print ...8 Label Insertion ...9 2. TABLE OF CONTENTS Manuals for This Machine i How to Read This Manual 1 Symbols ...1 Names of Files in Memory (Print TX Standby File List 13 Checking the Transmission Result (TX ...the Reception Result (RX File Status 15 Printing a File (Print TX Standby File 16 Printing a File Received with Memory Lock (Print Memory Lock File 17 Printing the Journal 19 Journal ...20 E-mail Reception 22 3. Communication Information Canceling a Transmission 11 Printing a List of Major Options 2 1. ...
...Send Later 3 User Transmission 5 E-mail Options...7 Fax Header Print ...8 Label Insertion ...9 2. TABLE OF CONTENTS Manuals for This Machine i How to Read This Manual 1 Symbols ...1 Names of Files in Memory (Print TX Standby File List 13 Checking the Transmission Result (TX ...the Reception Result (RX File Status 15 Printing a File (Print TX Standby File 16 Printing a File Received with Memory Lock (Print Memory Lock File 17 Printing the Journal 19 Journal ...20 E-mail Reception 22 3. Communication Information Canceling a Transmission 11 Printing a List of Major Options 2 1. ...

Fax Guide
Page 18
...law requires that your fax number be printed on the header of your machine is printed on the receiver's paper. See, ⇒ p.76 "User Parameters". B Select [Print Fax Header] using {U} or {T}, and then press the {OK} key. ***FAX674.tif*** D Press the {Cancel} key. Program the fax number ...can select whether or not dates, fax header names, file numbers, or page numbers are printed by changing their respective User Parameters. (switch 18, bit 0, 1, 2, 3) See p.76 "User Parameters". ˆ You can program one of the line your original. Note ˆ To check the settings, press [TX Mode...
...law requires that your fax number be printed on the header of your machine is printed on the receiver's paper. See, ⇒ p.76 "User Parameters". B Select [Print Fax Header] using {U} or {T}, and then press the {OK} key. ***FAX674.tif*** D Press the {Cancel} key. Program the fax number ...can select whether or not dates, fax header names, file numbers, or page numbers are printed by changing their respective User Parameters. (switch 18, bit 0, 1, 2, 3) See p.76 "User Parameters". ˆ You can program one of the line your original. Note ˆ To check the settings, press [TX Mode...

Fax Guide
Page 23
...file numbers are stored in memory can also be useful (for details. Note ˆ The contents of Files in Memory (Print TX Standby File List) Print this list if you want to find out which files are . The standby display appears. The display re- 2 turns to...see p.65 "Print List/Report" for example when erasing files). See D Press the {Cancel} key. p.16 "Printing a File (Print TX Standby File)". ABZ121S.eps Note ˆ You can be printed. ing {U} or {T}, and then press the {OK} key. B Select [Print TX Standby File List] us- Note ˆ To cancel printing after pressing the ...
...file numbers are stored in memory can also be useful (for details. Note ˆ The contents of Files in Memory (Print TX Standby File List) Print this list if you want to find out which files are . The standby display appears. The display re- 2 turns to...see p.65 "Print List/Report" for example when erasing files). See D Press the {Cancel} key. p.16 "Printing a File (Print TX Standby File)". ABZ121S.eps Note ˆ You can be printed. ing {U} or {T}, and then press the {OK} key. B Select [Print TX Standby File List] us- Note ˆ To cancel printing after pressing the ...

Fax Guide
Page 28
E Press the {Cancel} key. The display returns to that of step C. The standby display appears. 18 Note ˆ If the Memory Lock ID does not match, the message "Specified code does not match the programmed Memory Lock ID. Communication Information D Enter a 4-digit Memory Lock ID using the number keys, and then press the {Start} key. ***FAX683.tif*** 2 The display returns to that of step C. " appears, and then the display returns to that of step D. ˆ To cancel printing after pressing the {Start} key, press the {Clear/Stop} key.
E Press the {Cancel} key. The display returns to that of step C. The standby display appears. 18 Note ˆ If the Memory Lock ID does not match, the message "Specified code does not match the programmed Memory Lock ID. Communication Information D Enter a 4-digit Memory Lock ID using the number keys, and then press the {Start} key. ***FAX683.tif*** 2 The display returns to that of step C. " appears, and then the display returns to that of step D. ˆ To cancel printing after pressing the {Start} key, press the {Clear/Stop} key.

Fax Guide
Page 29
...) on the machine can set whether you need to that user codes will be printed instead of user names. FAX676.tif C Press the {Start} key. ***FAX684.tif*** Note ˆ To cancel printing after printing. D Press the {Cancel} key. It is automatically printed after every 50 communications (receptions & transmissions). 2 You can program a User Function key with operations...
...) on the machine can set whether you need to that user codes will be printed instead of user names. FAX676.tif C Press the {Start} key. ***FAX684.tif*** Note ˆ To cancel printing after printing. D Press the {Cancel} key. It is automatically printed after every 50 communications (receptions & transmissions). 2 You can program a User Function key with operations...

Fax Guide
Page 61
...more destinations, repeat steps B and C. Reference p.51 "Attaching a cover sheet" p.51 "Previewing fax images" p.53 "Printing and Saving" p.52 "Specifying options" If you to step F. tions, proceed to check how the fax document will be ...Send]. E Specify options. Attaching a cover sheet Selecting the [Attach a Cover Sheet] check box causes a cover sheet to be printed from Computers B In the [Name:] list select [Contact], [Company], or [Group], and then select [All] or an initial ... as sender info. 5 • Fax Number as Destination]. Note ˆ To cancel printing or sending, click...
...more destinations, repeat steps B and C. Reference p.51 "Attaching a cover sheet" p.51 "Previewing fax images" p.53 "Printing and Saving" p.52 "Specifying options" If you to step F. tions, proceed to check how the fax document will be ...Send]. E Specify options. Attaching a cover sheet Selecting the [Attach a Cover Sheet] check box causes a cover sheet to be printed from Computers B In the [Name:] list select [Contact], [Company], or [Group], and then select [All] or an initial ... as sender info. 5 • Fax Number as Destination]. Note ˆ To cancel printing or sending, click...

Fax Guide
Page 90
... to that of importance or often-used items are included in the list. The standby display appears. FAX706.tif 80 FAX660.tif Note ˆ To cancel printing a list after pressing the {Start} key, press the {Clear/Stop} key. D Select [Parameter Setting] using {U} or {T}, and then press the {OK} key. FAX708.tif B ... {Start} key. ***FAX711.tif*** 7 C Select [Key Operator Tools] using {U} or {T}, and then press the {OK} key. However, only items of step D. Key Operator Setting Printing the User Parameter List Print this list to see the current User Parameter settings.
... to that of importance or often-used items are included in the list. The standby display appears. FAX706.tif 80 FAX660.tif Note ˆ To cancel printing a list after pressing the {Start} key, press the {Clear/Stop} key. D Select [Parameter Setting] using {U} or {T}, and then press the {OK} key. FAX708.tif B ... {Start} key. ***FAX711.tif*** 7 C Select [Key Operator Tools] using {U} or {T}, and then press the {OK} key. However, only items of step D. Key Operator Setting Printing the User Parameter List Print this list to see the current User Parameter settings.

Fax Guide
Page 101
...then press the The standby display appears. {OK} key. FAX660.tif D Select [Program Memory Lock ID] us - FAX723.tif Note ˆ To cancel printing, press the {Cancel} key. F Press the {Start} key. ***FAX729.tif*** Programming a Memory Lock ID Program a Memory Lock ID to be any four-digit number, ...except 0000. FAX659.tif Note ˆ To cancel printing after pressing the {Start} key, press the 7 {Clear/Stop} key. G Press the {User Tools/Counter} key. The display re- A Press the...
...then press the The standby display appears. {OK} key. FAX660.tif D Select [Program Memory Lock ID] us - FAX723.tif Note ˆ To cancel printing, press the {Cancel} key. F Press the {Start} key. ***FAX729.tif*** Programming a Memory Lock ID Program a Memory Lock ID to be any four-digit number, ...except 0000. FAX659.tif Note ˆ To cancel printing after pressing the {Start} key, press the 7 {Clear/Stop} key. G Press the {User Tools/Counter} key. The display re- A Press the...


