Operating Instructions
Page 2
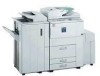
... the operation and notes about power source, see P.3 "Machine Types".) • Type 1: 4051/DSm651/LD151/Aficio 2051 • Type 2: 4060/DSm660/LD160/Aficio 2060 • Type 3: 4075/DSm675/LD175/Aficio 2075 Certain types might not be sure to connect the power cord to the inch version. For details, please... use of this machine. Please keep this machine refer to a power source as above. For details about the use of parts other than genuine parts from the use genuine toner from the supplier. Notes: The model names of procedures other than those specified in this manual ...
... the operation and notes about power source, see P.3 "Machine Types".) • Type 1: 4051/DSm651/LD151/Aficio 2051 • Type 2: 4060/DSm660/LD160/Aficio 2060 • Type 3: 4075/DSm675/LD175/Aficio 2075 Certain types might not be sure to connect the power cord to the inch version. For details, please... use of this machine. Please keep this machine refer to a power source as above. For details about the use of parts other than genuine parts from the use genuine toner from the supplier. Notes: The model names of procedures other than those specified in this manual ...
Operating Instructions
Page 3
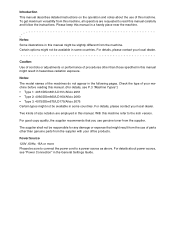
CD-ROM1) Provides information about configuring and operating the printer in a network environment or using software. i For particular functions, see the relevant parts of this machine. Note ❒ Manuals provided are specific to machine type. ❒ Adobe Acrobat Reader is necessary to view the manuals as a PDF file. &#...
CD-ROM1) Provides information about configuring and operating the printer in a network environment or using software. i For particular functions, see the relevant parts of this machine. Note ❒ Manuals provided are specific to machine type. ❒ Adobe Acrobat Reader is necessary to view the manuals as a PDF file. &#...
Operating Instructions
Page 20
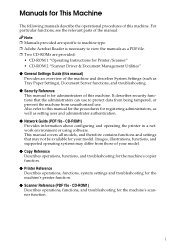
.../2" × 13", 81/4" × 13", 8" × 13" with a pencil or a similar instrument. Place these originals on the exposure glass in- 1 stead. • Originals other projecting parts • Sticky originals such as translucent paper • Thin originals that have low stiffness • Thick originals such as postcards • Originals of the L L K L L K L 17...
.../2" × 13", 81/4" × 13", 8" × 13" with a pencil or a similar instrument. Place these originals on the exposure glass in- 1 stead. • Originals other projecting parts • Sticky originals such as translucent paper • Thin originals that have low stiffness • Thick originals such as postcards • Originals of the L L K L L K L 17...
Operating Instructions
Page 27
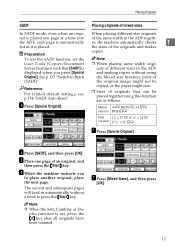
... automatically without using this function are as it is nals of originals that [SADF] is placed. See p.133 "Switch to Batch the Mixed size function, parts of mixed sizes In SADF mode, even when an origi- Placing Originals SADF Placing originals of (SADF)". The second and subsequent pages will feed in...
... automatically without using this function are as it is nals of originals that [SADF] is placed. See p.133 "Switch to Batch the Mixed size function, parts of mixed sizes In SADF mode, even when an origi- Placing Originals SADF Placing originals of (SADF)". The second and subsequent pages will feed in...

Operating Instructions
Page 69
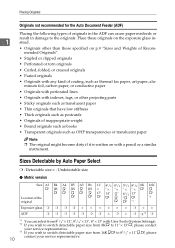
B Press [Erase]. D Set the erase border width. L original Copier Functions K original 1 2 2 1 ❒ 1: Erased part ❒ 2: 2-99 mm (0.1"-3.9") ❖ Inside Erases a designated area of the copy image other than the area you have selected. You can change this setting with ...
B Press [Erase]. D Set the erase border width. L original Copier Functions K original 1 2 2 1 ❒ 1: Erased part ❒ 2: 2-99 mm (0.1"-3.9") ❖ Inside Erases a designated area of the copy image other than the area you have selected. You can change this setting with ...

Operating Instructions
Page 71
... change, and then set the erase margin width using [n] and [o]. Copier Functions Selecting [Diff. C Press [Erase Center/Border]. G Set the erase border width for the part you want to be erased. H Press [OK] twice. D Press [OK]. I Place the originals, and then press the {Start} key. Center/border erase A Press [Edit/Stamp...
... change, and then set the erase margin width using [n] and [o]. Copier Functions Selecting [Diff. C Press [Erase Center/Border]. G Set the erase border width for the part you want to be erased. H Press [OK] twice. D Press [OK]. I Place the originals, and then press the {Start} key. Center/border erase A Press [Edit/Stamp...
Operating Instructions
Page 96
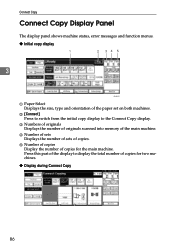
... to switch from the initial copy display to display the total number of copies for two machines. ❖ Display during Connect Copy 86 Press this part of the display to the Connect Copy display. E Number of copies Display the number of copies for the main machine. D Number of sets Displays the...
... to switch from the initial copy display to display the total number of copies for two machines. ❖ Display during Connect Copy 86 Press this part of the display to the Connect Copy display. E Number of copies Display the number of copies for the main machine. D Number of sets Displays the...

Operating Instructions
Page 120
...- See p.26 "Adjusting Copy Image Density". The image density is dirty The exposure glass or ADF Clean them face up. Put tape over pasted parts. The same copy area is too ies if you use pasted origi- Note ❒ A light copy may result when you use damp or rough...an orig- is Select a proper paper size. Machine", General Settings Guide. The paper size is almost empty. The toner cartridge is not suitable. Parts of the image are not The original is produced on copies. "Placing Originals". See p.9 "Placing Originals". A moiré pattern is not set cor-
...- See p.26 "Adjusting Copy Image Density". The image density is dirty The exposure glass or ADF Clean them face up. Put tape over pasted parts. The same copy area is too ies if you use pasted origi- Note ❒ A light copy may result when you use damp or rough...an orig- is Select a proper paper size. Machine", General Settings Guide. The paper size is almost empty. The toner cartridge is not suitable. Parts of the image are not The original is produced on copies. "Placing Originals". See p.9 "Placing Originals". A moiré pattern is not set cor-

Operating Instructions
Page 121
... rect. Selected functions cannot Check the combination of copies ex- You can set a margin between 2-99mm. In Border, Center, or Center/Border mode, parts of the binding position Set a narrower margin with the User Tools. correctly. "Staple". 4 Copy paper is not cor- You have set an erase ... correct paper size. You have set an erase margin that is not copied repeatedly. There is too wide. In Margin Adjustment mode, parts of the original image and copy paper is not cor- Select the proper reproduction ratio. 111 If You Cannot Make Copies As You Want...
... rect. Selected functions cannot Check the combination of copies ex- You can set a margin between 2-99mm. In Border, Center, or Center/Border mode, parts of the binding position Set a narrower margin with the User Tools. correctly. "Staple". 4 Copy paper is not cor- You have set an erase ... correct paper size. You have set an erase margin that is not copied repeatedly. There is too wide. In Margin Adjustment mode, parts of the original image and copy paper is not cor- Select the proper reproduction ratio. 111 If You Cannot Make Copies As You Want...
Operating Instructions
Page 122
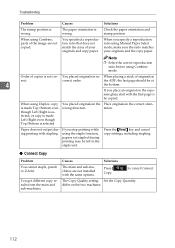
... two machines. 112 Check the paper orientation and stamp position. You placed originals in in the staple unit. Paper does not output dur- using Combine, parts of originals in the correct orientation. The paper orientation is wrong. When using the staple function, papers not stapled during printing may be at 4 the...
... two machines. 112 Check the paper orientation and stamp position. You placed originals in in the staple unit. Paper does not output dur- using Combine, parts of originals in the correct orientation. The paper orientation is wrong. When using the staple function, papers not stapled during printing may be at 4 the...

Operating Instructions
Page 141
...: The stamp is printed on the image. Note ❒ Default: Normal ❖ Density You can set the size of the stamp. You cannot check which parts will overlap. ❒ Lighter: The image can select the language of the stamp. Settings You Can Change with User Tools ❖ Copy Order in Combine...
...: The stamp is printed on the image. Note ❒ Default: Normal ❖ Density You can set the size of the stamp. You cannot check which parts will overlap. ❒ Lighter: The image can select the language of the stamp. Settings You Can Change with User Tools ❖ Copy Order in Combine...

Operating Instructions
Page 143
...can have the date printed on slip sheets when you press [Special Original]. You can have page numbers printed in white where it overlaps black parts of the page number. Stamp Position: 1-1, 1-2... Press the arrow keys to have the Date Stamp printed in white where they overlap black... parts of the duplex back page number printed using the Combine and Page Numbering function together. Note ❒ Default: Batch 133 Settings You Can Change ...
...can have the date printed on slip sheets when you press [Special Original]. You can have page numbers printed in white where it overlaps black parts of the page number. Stamp Position: 1-1, 1-2... Press the arrow keys to have the Date Stamp printed in white where they overlap black... parts of the duplex back page number printed using the Combine and Page Numbering function together. Note ❒ Default: Batch 133 Settings You Can Change ...

Operating Instructions
Page 149
... in the bypass tray depends on copies. • Copies can select a ratio regardless of the size of an original or copy paper. With some ratios, parts of the image might be skewed. If you have an odd number of 12 preset ratios (5 enlargement ratios, 7 reduction ratios). • You can be displayed...
... in the bypass tray depends on copies. • Copies can select a ratio regardless of the size of an original or copy paper. With some ratios, parts of the image might be skewed. If you have an odd number of 12 preset ratios (5 enlargement ratios, 7 reduction ratios). • You can be displayed...
Operating Instructions
Page 150
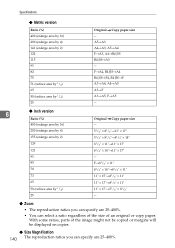
... be copied or margins will be displayed on copies. ❖ Size Magnification 140 The reproduction ratios you can specify are 25-400%. With some ratios, parts of an original or copy paper.
... be copied or margins will be displayed on copies. ❖ Size Magnification 140 The reproduction ratios you can specify are 25-400%. With some ratios, parts of an original or copy paper.

Operating Instructions
Page 151
... that can specify are 25-400%. • When entering a size in millimeters or inches, and the calculated ratio is as follows. However, with some ratios, parts of the image might not be copied or margins will be displayed on the tray is over the maximum or under the minimum ratio, it...
... that can specify are 25-400%. • When entering a size in millimeters or inches, and the calculated ratio is as follows. However, with some ratios, parts of the image might not be copied or margins will be displayed on the tray is over the maximum or under the minimum ratio, it...

Operating Instructions
Page 160
... not be copied. • You cannot use the following copy paper with this mode, the machine selects the reproduction ratio automatically. However, with some ratios, parts of the image might not be adjusted to minimum ratio. Specifications ❖ Duplex • You cannot use custom size paper. • If the orientation of...
... not be copied. • You cannot use the following copy paper with this mode, the machine selects the reproduction ratio automatically. However, with some ratios, parts of the image might not be adjusted to minimum ratio. Specifications ❖ Duplex • You cannot use custom size paper. • If the orientation of...
Operating Instructions
Page 161
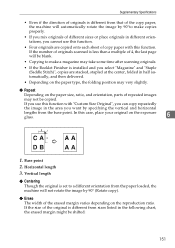
... by 90° (Rotate copy). ❖ Erase The width of repeated images may very slightly. ❖ Repeat Depending on the paper size, ratio, and orientation, parts of the erased margin varies depending on the exposure glass. 6 1. Base point 2. Horizontal length 3. Vertical length ❖ Centering Though the original is installed and you...
... by 90° (Rotate copy). ❖ Erase The width of repeated images may very slightly. ❖ Repeat Depending on the paper size, ratio, and orientation, parts of the erased margin varies depending on the exposure glass. 6 1. Base point 2. Horizontal length 3. Vertical length ❖ Centering Though the original is installed and you...

Operating Instructions
Page 162
...mode, the binding margin is added to the copies after the combination is finished. ❖ Background Numbering If the numbers overlap the copied image, the parts overlapped may not be printed. • When you can print the stamp only on the first page. ❖ Date Stamp • When using.... ❖ Margin Adjustment 6 • If you set a binding margin that is too wide, part of the image may look like some pattern. ❖ Preset Stamp • You can change the stamp size, parts of the stamp with the Magazine or Booklet function, you use this function with User Tools.
...mode, the binding margin is added to the copies after the combination is finished. ❖ Background Numbering If the numbers overlap the copied image, the parts overlapped may not be printed. • When you can print the stamp only on the first page. ❖ Date Stamp • When using.... ❖ Margin Adjustment 6 • If you set a binding margin that is too wide, part of the image may look like some pattern. ❖ Preset Stamp • You can change the stamp size, parts of the stamp with the Magazine or Booklet function, you use this function with User Tools.
Quick Start Guide
Page 3
...information now allowed by statutory or judicial law or hereinafter granted including without notice in the United States and other countries. Ricoh ESA Integration Guide Introduction Purpose of this Document This document describes the installation and setup of this document may be trademarks ...of Microsoft Corporation in those marks. Copyright © 2007 Technesis Corporation. Use of all or a part of Technesis' application integration on using this document. Copyright Protection Copyright protection claimed includes all rights in the United States and other...
...information now allowed by statutory or judicial law or hereinafter granted including without notice in the United States and other countries. Ricoh ESA Integration Guide Introduction Purpose of this Document This document describes the installation and setup of this document may be trademarks ...of Microsoft Corporation in those marks. Copyright © 2007 Technesis Corporation. Use of all or a part of Technesis' application integration on using this document. Copyright Protection Copyright protection claimed includes all rights in the United States and other...

Quick Start Guide
Page 49
...3. Security Code. Limitations. o You agree not to reverse-assemble, reverse-compile, or otherwise reverse-engineer The Software, in whole or in part, or permit others to do not include sales tax or other applicable taxes, duties or governmental charges (which may not assign this Agreement on ...this license without right to sublicense, to be separately set forth in Section 9 hereof), without the prior written consent of 50 Technesis Ricoh Java Application You can be provided to you agree to use license granted herein, all ownership of which licenses will also include your...
...3. Security Code. Limitations. o You agree not to reverse-assemble, reverse-compile, or otherwise reverse-engineer The Software, in whole or in part, or permit others to do not include sales tax or other applicable taxes, duties or governmental charges (which may not assign this Agreement on ...this license without right to sublicense, to be separately set forth in Section 9 hereof), without the prior written consent of 50 Technesis Ricoh Java Application You can be provided to you agree to use license granted herein, all ownership of which licenses will also include your...


