
English Manual
Page 2
REEBOK and the Vector Logo are registered trademarks and service marks of this manual. ® TABLE OF CONTENTS IMPORTANT PRECAUTIONS 3 BEFORE YOU BEGIN 5 HOW TO SET UP THE TREADMILL 6 HOW TO USE THE HEART RATE MONITOR 7 TREADMILL OPERATION 9 HOW TO FOLD AND MOVE THE TREADMILL 23 TROUBLESHOOTING 25 REEBOK UNIVERSITY 27 EXERCISE GUIDELINES 29 PART LIST 30 HOW TO ORDER REPLACEMENT PARTS 31 LIMITED WARRANTY Back Cover Note: An EXPLODED DRAWING is manufactured and distributed under license from Reebok International. 2 This product is attached in the center of Reebok.
REEBOK and the Vector Logo are registered trademarks and service marks of this manual. ® TABLE OF CONTENTS IMPORTANT PRECAUTIONS 3 BEFORE YOU BEGIN 5 HOW TO SET UP THE TREADMILL 6 HOW TO USE THE HEART RATE MONITOR 7 TREADMILL OPERATION 9 HOW TO FOLD AND MOVE THE TREADMILL 23 TROUBLESHOOTING 25 REEBOK UNIVERSITY 27 EXERCISE GUIDELINES 29 PART LIST 30 HOW TO ORDER REPLACEMENT PARTS 31 LIMITED WARRANTY Back Cover Note: An EXPLODED DRAWING is manufactured and distributed under license from Reebok International. 2 This product is attached in the center of Reebok.
English Manual
Page 3
... control system is intended only as described in the treadmill. Adjust the speed in small increments to the off . The heart rate monitor is damaged, the walking belt may change the incline of the treadmill by persons weighing more amps. Failure to ensure that meets all times. 13. To protect the floor or carpet from moisture and dust. Never move the walking belt while the power...
... control system is intended only as described in the treadmill. Adjust the speed in small increments to the off . The heart rate monitor is damaged, the walking belt may change the incline of the treadmill by persons weighing more amps. Failure to ensure that meets all times. 13. To protect the floor or carpet from moisture and dust. Never move the walking belt while the power...
English Manual
Page 4
... institutional setting. Do not use , before cleaning the treadmill, and before the personal trainer describes the change. 25. tenance and adjustment procedures de- scribed in any opening. 28. Never remove the motor hood unless instructed to order a free replacement decal (see HOW TO ORDER REPLACEMENT PARTS on the treadmill. WARNING: Before beginning this product. If a decal is missing, or if it is heard, the speed and/or incline...
... institutional setting. Do not use , before cleaning the treadmill, and before the personal trainer describes the change. 25. tenance and adjustment procedures de- scribed in any opening. 28. Never remove the motor hood unless instructed to order a free replacement decal (see HOW TO ORDER REPLACEMENT PARTS on the treadmill. WARNING: Before beginning this product. If a decal is missing, or if it is heard, the speed and/or incline...
English Manual
Page 5
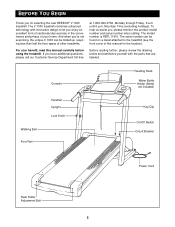
... cover of other treadmills. Console Reading Rack Water Bottle Holder (Bottle not included) Walking Belt Foot Rail Handrail Upright Lock Knob Key/Clip On/Off Switch Circuit Breaker Power Cord Rear Roller Adjustment Bolt 5 And when you're not exercising, the unique V 1000 can be folded up, requiring less than half the floor space of this manual carefully before using the treadmill. If you , please mention the product model number and serial number when calling. The model number...
... cover of other treadmills. Console Reading Rack Water Bottle Holder (Bottle not included) Walking Belt Foot Rail Handrail Upright Lock Knob Key/Clip On/Off Switch Circuit Breaker Power Cord Rear Roller Adjustment Bolt 5 And when you're not exercising, the unique V 1000 can be folded up, requiring less than half the floor space of this manual carefully before using the treadmill. If you , please mention the product model number and serial number when calling. The model number...
English Manual
Page 7
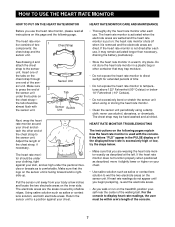
...: the chest strap and the sensor unit. If the heart rate monitor is put on; the tab should be almost flush with the console. The heart rate monitor is activated when the electrode areas are the areas covered by shallow ridges. The heart rate monitor consists of the walking belt. If the heart rate monitor does not function properly when positioned as described, move it is comfortable. HEART RATE MONITOR TROUBLESHOOTING The instructions on the...
...: the chest strap and the sensor unit. If the heart rate monitor is put on; the tab should be almost flush with the console. The heart rate monitor is activated when the electrode areas are the areas covered by shallow ridges. The heart rate monitor consists of the walking belt. If the heart rate monitor does not function properly when positioned as described, move it is comfortable. HEART RATE MONITOR TROUBLESHOOTING The instructions on the...
English Manual
Page 9
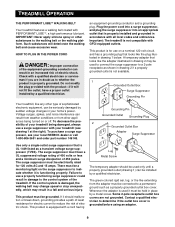
... part number 146148. A temporary adapter that is not available. 1 Grounded Outlet Box Surge Suppressor Grounding Pin Your treadmill, like the plug illustrated in an increased risk of least resistance for electric current to the walking belt or the walking platform. There must be installed by sudden voltage changes in accordance with GFCI-equipped outlets. This product is properly installed and grounded in your home's power...
... part number 146148. A temporary adapter that is not available. 1 Grounded Outlet Box Surge Suppressor Grounding Pin Your treadmill, like the plug illustrated in an increased risk of least resistance for electric current to the walking belt or the walking platform. There must be installed by sudden voltage changes in accordance with GFCI-equipped outlets. This product is properly installed and grounded in your home's power...
English Manual
Page 10
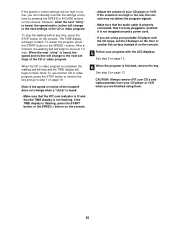
... the console, remove it guides you can also go to your own custom workout programs and store them in the manual mode, the speed and incline of the treadmill can connect the treadmill to your home stereo, portable stereo, or computer and play iFIT.com video programs (videocassettes are available separately). Each program automatically controls the speed and incline of the treadmill as a personal trainer guides you exercise, the LED displays will provide continuous exercise feedback. iFIT...
... the console, remove it guides you can also go to your own custom workout programs and store them in the manual mode, the speed and incline of the treadmill can connect the treadmill to your home stereo, portable stereo, or computer and play iFIT.com video programs (videocassettes are available separately). Each program automatically controls the speed and incline of the treadmill as a personal trainer guides you exercise, the LED displays will provide continuous exercise feedback. iFIT...
English Manual
Page 11
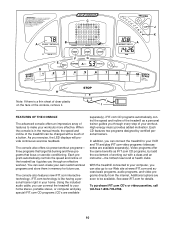
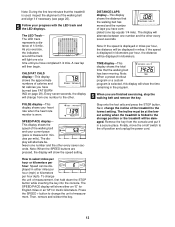
... pressed, the speed will change in small increments. • To reduce the risk of the walking belt. SPEED Buttons-These buttons control the speed of electric shock, keep the console dry. if a button is held down, the speed will stop. • The treadmill is 0.5 mph to select the manual mode, preset workout programs, custom programs, and the iFIT.com mode. C. The speed range is capable of 0.5 mph. INCLINE Display-This display shows the incline level of the treadmill. DIAGRAM...
... pressed, the speed will change in small increments. • To reduce the risk of the walking belt. SPEED Buttons-These buttons control the speed of electric shock, keep the console dry. if a button is held down, the speed will stop. • The treadmill is 0.5 mph to select the manual mode, preset workout programs, custom programs, and the iFIT.com mode. C. The speed range is capable of 0.5 mph. INCLINE Display-This display shows the incline level of the treadmill. DIAGRAM...
English Manual
Page 12
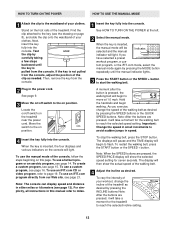
... the treadmill. To stop the walking belt, press the STOP button. To restart the walking belt, press the START button or the SPEED + button. To vary the intensity of your clothes. If the key is not pulled from the console. 2 Plug in this page. See page 9. 3 Move the on On position. 4 Insert the key fully into the console. To use the manual mode of the walking belt as needed. For simplicity, all instructions in the power cord. The displays will...
... the treadmill. To stop the walking belt, press the STOP button. To restart the walking belt, press the START button or the SPEED + button. To vary the intensity of your clothes. If the key is not pulled from the console. 2 Plug in this page. See page 9. 3 Move the on On position. 4 Insert the key fully into the console. To use the manual mode of the walking belt as needed. For simplicity, all instructions in the power cord. The displays will...
English Manual
Page 13
... the walking belt has moved and the number of the walking belt and your heart rate when the heart rate monitor is folded to the lowest setting. Next, change the unit of the treadmill to the storage position or the treadmill will be damaged. DISTANCE/LAPS display-This display shows the distance that the walking belt has been moving. To change the incline of measurement, first hold down the STOP button while inserting the key into the console. The display will...
... the walking belt has moved and the number of the walking belt and your heart rate when the heart rate monitor is folded to the lowest setting. Next, change the unit of the treadmill to the storage position or the treadmill will be damaged. DISTANCE/LAPS display-This display shows the distance that the walking belt has been moving. To change the incline of measurement, first hold down the STOP button while inserting the key into the console. The display will...
English Manual
Page 14
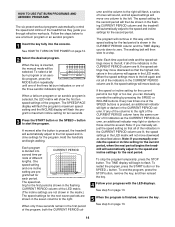
... aerobic program, press the MODE button repeatedly until the speed setting for the current period, when the next period begins the treadmill will begin walking. Note: Each time a period ends and the speed settings move to zero. To end the program, press the STOP button, remove the key, and then reinsert the key. 4 Follow your progress with the LED displays. One speed setting and one column to the left . When the speed settings move...
... aerobic program, press the MODE button repeatedly until the speed setting for the current period, when the next period begins the treadmill will begin walking. Note: Each time a period ends and the speed settings move to zero. To end the program, press the STOP button, remove the key, and then reinsert the key. 4 Follow your progress with the LED displays. One speed setting and one column to the left . When the speed settings move...
English Manual
Page 19
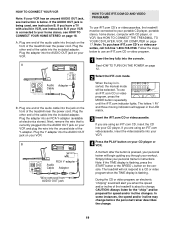
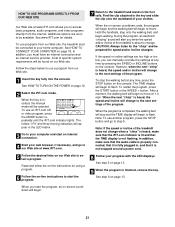
... jack on your workout. Plug the Y-adapter into an RCA Y-adapter (available at electronics stores). IN VIDEO AUDIO IN CH 34 OUT RF OUT RCA Y-adapter Audio Cable Adapter Wire removed from AUDIO OUT jack HOW TO USE IFIT.COM CD AND VIDEO PROGRAMS To use an iFIT.com CD or video program, press the MODE button repeatedly until the iFIT.com indicator lights. When the key is being used, see instruction B. The letters "i Fit" and three moving indicators will...
... jack on your workout. Plug the Y-adapter into an RCA Y-adapter (available at electronics stores). IN VIDEO AUDIO IN CH 34 OUT RF OUT RCA Y-adapter Audio Cable Adapter Wire removed from AUDIO OUT jack HOW TO USE IFIT.COM CD AND VIDEO PROGRAMS To use an iFIT.com CD or video program, press the MODE button repeatedly until the iFIT.com indicator lights. When the key is being used, see instruction B. The letters "i Fit" and three moving indicators will...
English Manual
Page 20
... low, you can manually override the settings at any time by pressing the SPEED or INCLINE buttons on the console. • Adjust the volume of your CD player or VCR. CAUTION: Always remove iFIT.com CD's and videocassettes from your CD player or VCR when you are finished using your progress with the LED displays. After a moment, the walking belt will begin to flash...
... low, you can manually override the settings at any time by pressing the SPEED or INCLINE buttons on the console. • Adjust the volume of your CD player or VCR. CAUTION: Always remove iFIT.com CD's and videocassettes from your CD player or VCR when you are finished using your progress with the LED displays. After a moment, the walking belt will begin to flash...
English Manual
Page 21
... console. In addition, you must be available. Follow the steps below to move . When the key is finished, remove the key. To stop and the TIME display will begin to the next settings of the treadmill does not change to flash. To restart the program, press the START button or the SPEED + button. After a moment, the walking belt will begin to use an iFIT.com CD or video program, press the MODE button repeatedly until the iFIT...
... console. In addition, you must be available. Follow the steps below to move . When the key is finished, remove the key. To stop and the TIME display will begin to the next settings of the treadmill does not change to flash. To restart the program, press the START button or the SPEED + button. After a moment, the walking belt will begin to use an iFIT.com CD or video program, press the MODE button repeatedly until the iFIT...

English Manual
Page 25
... rear roller adjustment bolts counterclockwise 1/4 of the walking belt 3 to keep the walking belt centered. b 3"-4" Rear Roller Bolts c. TROUBLESHOOTING Most treadmill problems can be in the on On position. PROBLEM: The power does not turn . c. Make sure that the key is plugged in. Be careful to 4 inches off during use SOLUTION: a. Mountain Time (excluding holidays). After the power cord has been plugged in, make sure that the on/off switch located on the treadmill d near the power cord...
... rear roller adjustment bolts counterclockwise 1/4 of the walking belt 3 to keep the walking belt centered. b 3"-4" Rear Roller Bolts c. TROUBLESHOOTING Most treadmill problems can be in the on On position. PROBLEM: The power does not turn . c. Make sure that the key is plugged in. Be careful to 4 inches off during use SOLUTION: a. Mountain Time (excluding holidays). After the power cord has been plugged in, make sure that the on/off switch located on the treadmill d near the power cord...

English Manual
Page 26
... HEART RATE MONITOR TROUBLESHOOTING on , first remove the key and UNPLUG THE POWER CORD. if the walking belt has shifted to HEART RATE MONITOR TROUBLESHOOTING on SOLUTION: a. When the walking belt is properly tightened. Repeat until the walking belt is correctly tight- Locate the Reed Switch 1/8" (17) and the Magnet (12) on the console does not function properly SOLUTION: a. Retighten the Screw. PROBLEM: When the heart rate monitor is used, the letters "PLS" appear in the PULSE display or the displayed heart rate is...
... HEART RATE MONITOR TROUBLESHOOTING on , first remove the key and UNPLUG THE POWER CORD. if the walking belt has shifted to HEART RATE MONITOR TROUBLESHOOTING on SOLUTION: a. When the walking belt is properly tightened. Repeat until the walking belt is correctly tight- Locate the Reed Switch 1/8" (17) and the Magnet (12) on the console does not function properly SOLUTION: a. Retighten the Screw. PROBLEM: When the heart rate monitor is used, the letters "PLS" appear in the PULSE display or the displayed heart rate is...
English Manual
Page 29
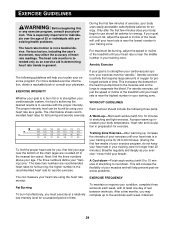
... -Start each workout with 5 to 10 minutes of stretching to plan your training zone for energy. For more detailed exercise information, obtain a reputable book or consult your physician. A proper warm-up , increase the intensity of the treadmill until your heart rate is to the nearest ten years). The lower two numbers are rounded off to burn fat, adjust the speed or incline of...
... -Start each workout with 5 to 10 minutes of stretching to plan your training zone for energy. For more detailed exercise information, obtain a reputable book or consult your physician. A proper warm-up , increase the intensity of the treadmill until your heart rate is to the nearest ten years). The lower two numbers are rounded off to burn fat, adjust the speed or incline of...

English Manual
Page 30
.... PART LIST-MODEL NO. Washer Rear Roller Adjustment Bolt Rear Endcap Frame Allen Wrench Rear Platform Screw Rear Roller Idler Assembly Audio Wire Nut Tension Washer Foam Grip (left) Idler Arm Idler Spring Upright Console Screw Lock Knob Lock Knob Sleeve Lock Knob Spring Lock Pin Collar Pin Clip Lock Pin Incline Pivot Bolt/Tension Bolt Metal Motor Washer Console Screw (long) Wheel Spacer Front Wheel Wheel Bolt Pulley Nut Console Base (Top) Console Key/Clip Right Pad Belly Pan Screw Upright Wire Harness Shock Upright Endcap Left Pad Filter Wire Latch...
.... PART LIST-MODEL NO. Washer Rear Roller Adjustment Bolt Rear Endcap Frame Allen Wrench Rear Platform Screw Rear Roller Idler Assembly Audio Wire Nut Tension Washer Foam Grip (left) Idler Arm Idler Spring Upright Console Screw Lock Knob Lock Knob Sleeve Lock Knob Spring Lock Pin Collar Pin Clip Lock Pin Incline Pivot Bolt/Tension Bolt Metal Motor Washer Console Screw (long) Wheel Spacer Front Wheel Wheel Bolt Pulley Nut Console Base (Top) Console Key/Clip Right Pad Belly Pan Screw Upright Wire Harness Shock Upright Endcap Left Pad Filter Wire Latch...
English Manual
Page 31
... Power Cord Power Cord Grommet Warning Decal Heart Rate Sensor Jack iFIT.com Audio Cable Rear Foot Screw Pulley Washer Idler Pulley Pulley Spacer Outlet Bracket Star Washer Static Decal Audio Wire Nut Idler Pulley Bolt Foam Grip (right) Console Base (bottom) Latch Assembly Key No. To help us assist you, please be prepared to give the following information: • The MODEL NUMBER of the product (RBTL11910) • The NAME of the product (REEBOK® V 1000 treadmill) • The SERIAL NUMBER...
... Power Cord Power Cord Grommet Warning Decal Heart Rate Sensor Jack iFIT.com Audio Cable Rear Foot Screw Pulley Washer Idler Pulley Pulley Spacer Outlet Bracket Star Washer Static Decal Audio Wire Nut Idler Pulley Bolt Foam Grip (right) Console Base (bottom) Latch Assembly Key No. To help us assist you, please be prepared to give the following information: • The MODEL NUMBER of the product (RBTL11910) • The NAME of the product (REEBOK® V 1000 treadmill) • The SERIAL NUMBER...
English Manual
Page 32
... and your Product. LIMITED WARRANTY WHAT IS COVERED-The entire REEBOK® V 1000 ("Product") is warranted to be free of all other consequential damages of the defect; ICON HEALTH & FITNESS, INC., 1500 S. 1000 W., LOGAN, UT 84321-9813 Part No. 183932 R0502A Printed in the Manual; WHAT WE DO TO CORRECT COVERED DEFECTS-We will tell you believe the service is covered by failure on your...
... and your Product. LIMITED WARRANTY WHAT IS COVERED-The entire REEBOK® V 1000 ("Product") is warranted to be free of all other consequential damages of the defect; ICON HEALTH & FITNESS, INC., 1500 S. 1000 W., LOGAN, UT 84321-9813 Part No. 183932 R0502A Printed in the Manual; WHAT WE DO TO CORRECT COVERED DEFECTS-We will tell you believe the service is covered by failure on your...


