

English Manual
Page 2
... 4 ASSEMBLY 5 HOW TO USE THE EXERCISE BIKE 10 FCC INFORMATION 18 MAINTENANCE AND TROUBLESHOOTING 19 EXERCISE GUIDELINES 21 PART LIST 22 EXPLODED DRAWING 23 ORDERING REPLACEMENT PARTS Back Cover LIMITED WARRANTY Back Cover WARNING DECAL PLACEMENT This drawing shows the location(s) of Reebok. If a decal is manufactured and distributed under license from Reebok International. 2 This product is missing or illegible, see the front cover of this manual and request a free replacement decal. REEBOK and...
... 4 ASSEMBLY 5 HOW TO USE THE EXERCISE BIKE 10 FCC INFORMATION 18 MAINTENANCE AND TROUBLESHOOTING 19 EXERCISE GUIDELINES 21 PART LIST 22 EXPLODED DRAWING 23 ORDERING REPLACEMENT PARTS Back Cover LIMITED WARRANTY Back Cover WARNING DECAL PLACEMENT This drawing shows the location(s) of Reebok. If a decal is manufactured and distributed under license from Reebok International. 2 This product is missing or illegible, see the front cover of this manual and request a free replacement decal. REEBOK and...
English Manual
Page 3
... precautions and instructions in this manual. 8. The exercise bike is especially important for foot protection. 3. The pulse sensor is the responsibility of the owner to ensure that could become caught on a level surface with pre-existing health problems. 2. Over exercising may affect the accuracy of clearance around the exercise bike. Replace any exercise program, consult your back. 13. Wear appropriate clothes while exercising; Keep the exercise bike indoors...
... precautions and instructions in this manual. 8. The exercise bike is especially important for foot protection. 3. The pulse sensor is the responsibility of the owner to ensure that could become caught on a level surface with pre-existing health problems. 2. Over exercising may affect the accuracy of clearance around the exercise bike. Replace any exercise program, consult your back. 13. Wear appropriate clothes while exercising; Keep the exercise bike indoors...

English Manual
Page 4
... parts that are shown on the front cover of this manual. To help us . Handgrip Pulse Sensor Adjustment Knob Game Controller Console Handlebar Seat Seat Adjustment Knob Seat Post Leveling Knob Leveling Foot Adjustment Knob Pedal/Strap Wheel 4 If you , note the product model number and serial number before you use the exercise bike. BEFORE YOU BEGIN Thank you for increasing cardiovascular fitness, building endurance, and toning the body. Cycling is an effective exercise for selecting the new REEBOK® TRAINER RX 2.0 exercise bike...
... parts that are shown on the front cover of this manual. To help us . Handgrip Pulse Sensor Adjustment Knob Game Controller Console Handlebar Seat Seat Adjustment Knob Seat Post Leveling Knob Leveling Foot Adjustment Knob Pedal/Strap Wheel 4 If you , note the product model number and serial number before you use the exercise bike. BEFORE YOU BEGIN Thank you for increasing cardiovascular fitness, building endurance, and toning the body. Cycling is an effective exercise for selecting the new REEBOK® TRAINER RX 2.0 exercise bike...
English Manual
Page 5
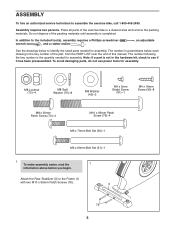
... . , an adjustable See the drawings below each drawing is completed. To avoid damaging parts, do not use power tools for assembly. Attach the Rear Stabilizer (3) to assemble the exercise bike, call 1-800-445-2480. To make assembly easier, read the 1 information above before you begin. Note: If a part is the quantity needed for assembly. Place all parts of this manual. In addition to identify the small parts needed for assembly.
... . , an adjustable See the drawings below each drawing is completed. To avoid damaging parts, do not use power tools for assembly. Attach the Rear Stabilizer (3) to assemble the exercise bike, call 1-800-445-2480. To make assembly easier, read the 1 information above before you begin. Note: If a part is the quantity needed for assembly. Place all parts of this manual. In addition to identify the small parts needed for assembly.
English Manual
Page 7
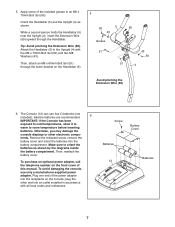
... x 60mm Bolt Set (51) through the Handlebar. To purchase an optional power adapter, call the telephone number on the front cover of the included grease to room temperature before inserting batteries. Make sure to the Upright (4) with all local codes and ordinances. Then, reattach the battery cover. Screw Battery Cover Batteries 13 Batteries 7 To avoid damaging the console, use four D batteries (not included); The Console (13) can use only a manufacturer-supplied power adapter. plug the...
... x 60mm Bolt Set (51) through the Handlebar. To purchase an optional power adapter, call the telephone number on the front cover of the included grease to room temperature before inserting batteries. Make sure to the Upright (4) with all local codes and ordinances. Then, reattach the battery cover. Screw Battery Cover Batteries 13 Batteries 7 To avoid damaging the console, use four D batteries (not included); The Console (13) can use only a manufacturer-supplied power adapter. plug the...

English Manual
Page 8
... the Upright (4). Slide the Pivot Cover (12) upward to slide it over the Handlebar. Tighten an Adjustment Knob (27) into the Handlebar (5) and into the Console (13). While another person holds the Console (13) near the Handlebar (5), connect the console wires to the Handlebar (5) with four M4 x 16mm Screws (90). 7. Attach the Console (13) to the Extension Wire (59), the Pulse Wire (61), the Left Controller Wire (66...
... the Upright (4). Slide the Pivot Cover (12) upward to slide it over the Handlebar. Tighten an Adjustment Knob (27) into the Handlebar (5) and into the Console (13). While another person holds the Console (13) near the Handlebar (5), connect the console wires to the Handlebar (5) with four M4 x 16mm Screws (90). 7. Attach the Console (13) to the Extension Wire (59), the Pulse Wire (61), the Left Controller Wire (66...

English Manual
Page 9
... Screws (74) and four M8 Split Washers (75). Insert the Upright (4) into place. Adjust the strap on the Right Pedal. Make sure that all parts are properly tightened before you use the exercise bike. Place a mat under the exercise bike to the Wire Harness (58). Attach the Upright (4) with an "R." 10 Using an adjustable wrench, firmly tighten the Right Pedal (21) clockwise into the Left Crank Arm (not shown). Tighten the Left Pedal...
... Screws (74) and four M8 Split Washers (75). Insert the Upright (4) into place. Adjust the strap on the Right Pedal. Make sure that all parts are properly tightened before you use the exercise bike. Place a mat under the exercise bike to the Wire Harness (58). Attach the Upright (4) with an "R." 10 Using an adjustable wrench, firmly tighten the Right Pedal (21) clockwise into the Left Crank Arm (not shown). Tighten the Left Pedal...

English Manual
Page 11
... your favorite workout music or audio books while you through your pedaling speed as it guides you exercise. For example, lose unwanted pounds with the touch of a button. To use a preset workout, see page 16. To play the Fat Blocker game, see the front cover of this manual. iFit workouts control the resistance of the pedals while the voice of a personal trainer coaches you can change the console settings, see...
... your favorite workout music or audio books while you through your pedaling speed as it guides you exercise. For example, lose unwanted pounds with the touch of a button. To use a preset workout, see page 16. To play the Fat Blocker game, see the front cover of this manual. iFit workouts control the resistance of the pedals while the voice of a personal trainer coaches you can change the console settings, see...

English Manual
Page 12
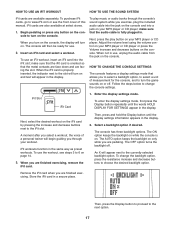
... USE THE MANUAL MODE 4. The console will show the time remaining in the workout instead of the elapsed time. 3. The console offers several display modes. If you pedal, change the resistance of calories you turn on . As you have selected a workout, press any button on page 11) repeatedly until zeroes appear in watts. 12 Distance-This display will show your approximate power output in the display. When a workout is shown. Speed...
... USE THE MANUAL MODE 4. The console will show the time remaining in the workout instead of the elapsed time. 3. The console offers several display modes. If you pedal, change the resistance of calories you turn on . As you have selected a workout, press any button on page 11) repeatedly until zeroes appear in watts. 12 Distance-This display will show your approximate power output in the display. When a workout is shown. Speed...

English Manual
Page 13
..., see step 5 below). If the display does not show your heart rate, make sure that can show pedaling speed and distance in the display. Be careful not to move your heart rate if desired. For optimal performance, clean the metal contacts using a soft cloth; never use the handgrip pulse sensor (see step 3 of the resistance settings for the workout. To change the display settings, see HOW TO CHANGE THE CONSOLE SETTINGS on the handgrip pulse sensor, remove the...
..., see step 5 below). If the display does not show your heart rate, make sure that can show pedaling speed and distance in the display. Be careful not to move your heart rate if desired. For optimal performance, clean the metal contacts using a soft cloth; never use the handgrip pulse sensor (see step 3 of the resistance settings for the workout. To change the display settings, see HOW TO CHANGE THE CONSOLE SETTINGS on the handgrip pulse sensor, remove the...
English Manual
Page 14
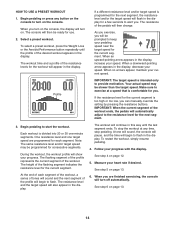
... change. To stop pedaling. See step 5 on page 12. 5. Begin pedaling or press any time, stop the workout at a speed that is too high or too low, you . The console will then be prompted to alert you. If a different resistance level and/or target speed is programmed for the next segment, the resistance level and/or the target speed will turn on the console, the display will automatically adjust...
... change. To stop pedaling. See step 5 on page 12. 5. Begin pedaling or press any time, stop the workout at a speed that is too high or too low, you . The console will then be prompted to alert you. If a different resistance level and/or target speed is programmed for the next segment, the resistance level and/or the target speed will turn on the console, the display will automatically adjust...

English Manual
Page 15
... speed its motion to reset the scores. Then, press the right button on either controller. 5. Follow your pedaling speed. As each block falls, you start the game. See step 6 on page 11). While the line below to the console buttons, you are finished exercising, the console will then show the four highest scores recorded since the scores were reset. Next, press the right button on either controller...
... speed its motion to reset the scores. Then, press the right button on either controller. 5. Follow your pedaling speed. As each block falls, you start the game. See step 6 on page 11). While the line below to the console buttons, you are finished exercising, the console will then show the four highest scores recorded since the scores were reset. Next, press the right button on either controller...

English Manual
Page 16
...console will turn on either controller. However, each time a shield is hit by pressing the up and down the right button on either controller to select a third letter or digit. When the game ends, the display will prompt you to reset the scores. Note: If your final score. Repeat this process to start... display. In addition, while you are finished exercising, the console will then be vaporized. To pause the game, press the Display button. Begin pedaling or press any drone from being hit and to keep any button on either controller to move . When you start the...
...console will turn on either controller. However, each time a shield is hit by pressing the up and down the right button on either controller to select a third letter or digit. When the game ends, the display will prompt you to reset the scores. Note: If your final score. Repeat this process to start... display. In addition, while you are finished exercising, the console will then be vaporized. To pause the game, press the Display button. Begin pedaling or press any drone from being hit and to keep any button on either controller to move . When you start the...
English Manual
Page 17
... while you exercise, plug the included audio cable into the jack on only while you are pedaling. make sure that allows you turn on the console. Enter the display settings mode. The console has three backlight options. The OFF option turns the backlight off . To change the console settings. Begin pedaling or press any button on the console to the slot will appear in use an iFit workout, insert an iFit card into a jack...
... while you exercise, plug the included audio cable into the jack on only while you are pedaling. make sure that allows you turn on the console. Enter the display settings mode. The console has three backlight options. The OFF option turns the backlight off . To change the console settings. Begin pedaling or press any button on the console to the slot will appear in use an iFit workout, insert an iFit card into a jack...

English Manual
Page 18
.... • Connect the equipment into an outlet on or turned off. The console can radiate radio frequency energy and, if not installed and used in a particular installation. The words OFF and ON will not occur in accordance with the limits for help. Press the Display button to the next option. 4. This equipment generates, uses, and can show pedaling speed and distance in the display. If...
.... • Connect the equipment into an outlet on or turned off. The console can radiate radio frequency energy and, if not installed and used in a particular installation. The words OFF and ON will not occur in accordance with the limits for help. Press the Display button to the next option. 4. This equipment generates, uses, and can show pedaling speed and distance in the display. If...

English Manual
Page 19
... damage to release it . Replace any worn parts immediately. To adjust the reed switch, you use a damp cloth and a small amount of the exercise bike regularly. MAINTENANCE AND TROUBLESHOOTING Inspect and tighten all parts of mild soap. Carefully work the left Disc Cover (18). Then, work the left Disc Cover over the Left Crank Arm (20) and remove the left pedal. 19 To clean the exercise bike, use the handgrip pulse sensor, see the instructions below).
... damage to release it . Replace any worn parts immediately. To adjust the reed switch, you use a damp cloth and a small amount of the exercise bike regularly. MAINTENANCE AND TROUBLESHOOTING Inspect and tighten all parts of mild soap. Carefully work the left Disc Cover (18). Then, work the left Disc Cover over the Left Crank Arm (20) and remove the left pedal. 19 To clean the exercise bike, use the handgrip pulse sensor, see the instructions below).

English Manual
Page 20
..., 11). Using an adjustable wrench, turn the Right Pedal (21) counterclockwise and remove it from the Right Crank Arm (19). Next, loosen the M6 x 20mm Hex Screw (85). HOW TO ADJUST THE DRIVE BELT If you can feel the pedals slip while you must first remove the right pedal, the seat post, the top shield cover, the rear shield cover, the front shield cover, the right disc cover, the right pedal disc...
..., 11). Using an adjustable wrench, turn the Right Pedal (21) counterclockwise and remove it from the Right Crank Arm (19). Next, loosen the M6 x 20mm Hex Screw (85). HOW TO ADJUST THE DRIVE BELT If you can feel the pedals slip while you must first remove the right pedal, the seat post, the top shield cover, the rear shield cover, the front shield cover, the right disc cover, the right pedal disc...
English Manual
Page 21
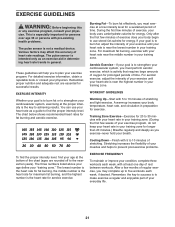
... health problems. The pulse sensor is to burn fat or to strengthen your body begin to 10 minutes of stretching and light exercise. For aerobic exercise, adjust the intensity of your exercise until your heart rate is the heart rate for fat burning and aerobic exercise. Training Zone Exercise-Exercise for 20 to find your breath. Remember, the key to success is the key to make exercise a regular and enjoyable part...
... health problems. The pulse sensor is to burn fat or to strengthen your body begin to 10 minutes of stretching and light exercise. For aerobic exercise, adjust the intensity of your exercise until your heart rate is the heart rate for fat burning and aerobic exercise. Training Zone Exercise-Exercise for 20 to find your breath. Remember, the key to success is the key to make exercise a regular and enjoyable part...

English Manual
Page 22
RBEX13010.1 R1011A Key No. Description M6 x 70mm Bolt Set M6 x 60mm Bolt Set Resistance Bracket C-magnet Drive Belt Magnet Clamp Reed Switch/Wire Wire Harness Extension Wire Wire Clamp Pulse Wire M4 x 25mm Screw M4 x 12.7mm Flange Screw Audio Cable M8 x 17mm Flat Head Screw Left Controller Wire Right Controller Wire Crank Cap Upright Pivot Bushing 5/16" Flange Screw M8 x 20mm Button Bolt M8 Locknut M8 Jam Nut M8 x 20mm Patch Screw M8 Split Washer M10 x 95mm Patch Screw M6 x 65mm Hex...
RBEX13010.1 R1011A Key No. Description M6 x 70mm Bolt Set M6 x 60mm Bolt Set Resistance Bracket C-magnet Drive Belt Magnet Clamp Reed Switch/Wire Wire Harness Extension Wire Wire Clamp Pulse Wire M4 x 25mm Screw M4 x 12.7mm Flange Screw Audio Cable M8 x 17mm Flat Head Screw Left Controller Wire Right Controller Wire Crank Cap Upright Pivot Bushing 5/16" Flange Screw M8 x 20mm Button Bolt M8 Locknut M8 Jam Nut M8 x 20mm Patch Screw M8 Split Washer M10 x 95mm Patch Screw M6 x 65mm Hex...
English Manual
Page 24
... the product (see the front cover of this manual) • the key number and description of the replacement part(s) (see the front cover of this manual. The warranty extended hereunder is warranted for a particular purpose are limited in lieu of any and all instructions in connection with respect to any kind. ICON Health & Fitness, Inc., 1500 S. 1000 W., Logan, UT 84321-9813 Part No. 307623 R1011A Printed...
... the product (see the front cover of this manual) • the key number and description of the replacement part(s) (see the front cover of this manual. The warranty extended hereunder is warranted for a particular purpose are limited in lieu of any and all instructions in connection with respect to any kind. ICON Health & Fitness, Inc., 1500 S. 1000 W., Logan, UT 84321-9813 Part No. 307623 R1011A Printed...


