
English Manual
Page 3
... plug the surge suppressor into a grounded circuit capable of this manual. 3. Do not attempt to use the hand weights at all of the specifications described on the treadmill at least eight feet of clearance behind it is the responsibility of the owner to the control system of heart rate readings. Failure to raise, lower, or move the walking belt while the power is not working properly...
... plug the surge suppressor into a grounded circuit capable of this manual. 3. Do not attempt to use the hand weights at all of the specifications described on the treadmill at least eight feet of clearance behind it is the responsibility of the owner to the control system of heart rate readings. Failure to raise, lower, or move the walking belt while the power is not working properly...
English Manual
Page 4
... the location shown. Do not use , before cleaning the treadmill, and before using. Apply the decal in this manual. When using iFIT.com CDs and videos, you are not using iFIT.com CDs and videos, an electronic "chirping" sound will alert you when the speed and/or incline of the treadmill is heard, the speed and/or incline will change to order a free replacement decal. Never remove the motor hood unless instructed to change...
... the location shown. Do not use , before cleaning the treadmill, and before using. Apply the decal in this manual. When using iFIT.com CDs and videos, you are not using iFIT.com CDs and videos, an electronic "chirping" sound will alert you when the speed and/or incline of the treadmill is heard, the speed and/or incline will change to order a free replacement decal. Never remove the motor hood unless instructed to change...
English Manual
Page 5
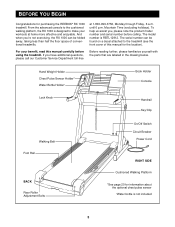
... conventional treadmills. at home more effective and enjoyable. Hand Weight Holder Chest Pulse Sensor Holder* Water Bottle Holder† Book Holder Console Lock Knob Handrail Key/Clip Walking Belt Foot Rail BACK Rear Roller Adjustment Bolts On/Off Switch Circuit Breaker Power Cord RIGHT SIDE Cushioned Walking Platform *See page 20 for the location). BEFORE YOU BEGIN Congratulations for purchasing the REEBOK® RX 1000 treadmill. And when you're not exercising, the RX 1000 can be folded...
... conventional treadmills. at home more effective and enjoyable. Hand Weight Holder Chest Pulse Sensor Holder* Water Bottle Holder† Book Holder Console Lock Knob Handrail Key/Clip Walking Belt Foot Rail BACK Rear Roller Adjustment Bolts On/Off Switch Circuit Breaker Power Cord RIGHT SIDE Cushioned Walking Platform *See page 20 for the location). BEFORE YOU BEGIN Congratulations for purchasing the REEBOK® RX 1000 treadmill. And when you're not exercising, the RX 1000 can be folded...

English Manual
Page 7
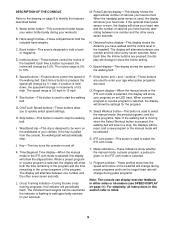
... LUBETM WALKING BELT Your treadmill features a walking belt coated with a cord having Lug Metal Screw The temporary adapter should malfunction or break down, grounding provides a path of least resistance for electric current to determine if the outlet box cover is properly installed and grounded in your treadmill being turned on a nominal 120-volt circuit, and has a grounding plug that is grounded before using an adapter. 7 Check...
... LUBETM WALKING BELT Your treadmill features a walking belt coated with a cord having Lug Metal Screw The temporary adapter should malfunction or break down, grounding provides a path of least resistance for electric current to determine if the outlet box cover is properly installed and grounded in your treadmill being turned on a nominal 120-volt circuit, and has a grounding plug that is grounded before using an adapter. 7 Check...

English Manual
Page 8
... heart rate within a preset range during your workout. To use pulse programs, see page 20. To use the manual mode of the treadmill to be available. The console will show your heart rate when you through an effective workout; IFIT.com CD programs automatically control the speed and incline of the treadmill as well. See www.iFIT.com for upper body exercise as a personal trainer guides you use iFIT.com CD or video programs, see page 19. 8 DIAGRAM OF THE CONSOLE...
... heart rate within a preset range during your workout. To use pulse programs, see page 20. To use the manual mode of the treadmill to be available. The console will show your heart rate when you through an effective workout; IFIT.com CD programs automatically control the speed and incline of the treadmill as well. See www.iFIT.com for upper body exercise as a personal trainer guides you use iFIT.com CD or video programs, see page 19. 8 DIAGRAM OF THE CONSOLE...
English Manual
Page 9
... manual mode will automatically stop the walking belt. Distance/Incline display-This display shows the distance you to miles. 9 Speed buttons-These buttons control the speed of the walking belt. The speed range is used to a stop, the displays will be used to your workouts. Stop button-This button is 0.5 mph to stop . If the key is selected. buttons-These buttons are used to 10 mph. Mode indicators-These indicators show your heart rate and the number of your age when pulse programs are pressed, the display will change during preset programs...
... manual mode will automatically stop the walking belt. Distance/Incline display-This display shows the distance you to miles. 9 Speed buttons-These buttons control the speed of the walking belt. The speed range is used to a stop, the displays will be used to your workouts. Stop button-This button is 0.5 mph to stop . If the key is selected. buttons-These buttons are used to 10 mph. Mode indicators-These indicators show your heart rate and the number of your age when pulse programs are pressed, the display will change during preset programs...
English Manual
Page 10
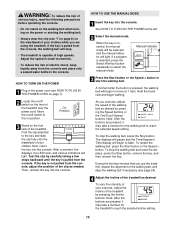
... exercise, adjust the incline of the treadmill by pressing the Speed buttons or the OneTouch Speed buttons. HOW TO USE THE MANUAL MODE 1 Insert the key into the console. To stop the walking belt, press the Stop button. If the key is pulled from the console. On Position 3 Stand on the foot rails of the walking belt as desired. Then, reinsert the key into the console. Move the on/off switch on the front of the treadmill near the power cord...
... exercise, adjust the incline of the treadmill by pressing the Speed buttons or the OneTouch Speed buttons. HOW TO USE THE MANUAL MODE 1 Insert the key into the console. To stop the walking belt, press the Stop button. If the key is pulled from the console. On Position 3 Stand on the foot rails of the walking belt as desired. Then, reinsert the key into the console. Move the on/off switch on the front of the treadmill near the power cord...
English Manual
Page 11
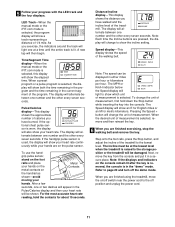
... display will be shown. Note: The speed can be damaged. Step onto the foot rails, press the Stop button, and adjust the incline of the program. LED Track-When the manual mode or the iFIT.com mode is in either miles per hour or kilometers per hour. Note: Each time the Incline buttons are finished using the treadmill, move the on/off switch near the power cord to the storage position or the treadmill will change...
... display will be shown. Note: The speed can be damaged. Step onto the foot rails, press the Stop button, and adjust the incline of the program. LED Track-When the manual mode or the iFIT.com mode is in either miles per hour or kilometers per hour. Note: Each time the Incline buttons are finished using the treadmill, move the on/off switch near the power cord to the storage position or the treadmill will change...
English Manual
Page 12
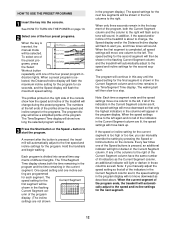
... console. The walking belt will show the speed and incline ranges for the next segment. 12 When the current segment of the profiles show a simplified profile of different lengths. To select one of the preset programs, press the Select Workout button repeatedly until the speed setting for the second segment will then be shown in the program display will not move to the speed and incline settings...
... console. The walking belt will show the speed and incline ranges for the next segment. 12 When the current segment of the profiles show a simplified profile of different lengths. To select one of the preset programs, press the Select Workout button repeatedly until the speed setting for the second segment will then be shown in the program display will not move to the speed and incline settings...
English Manual
Page 13
.... Exercises using the treadmill, move the on/off switch near the power cord to the off the demo mode. Refer to step 5 on the treadmill. To select one of the pulse programs, press the Select Workout button repeatedly until one of the treadmill is selected, the Cross Training Indicator below the Time/ Segment Time display will affect your exercise heart rate. 1 Insert the key into the console. If you must be attempted only by experienced users...
.... Exercises using the treadmill, move the on/off switch near the power cord to the off the demo mode. Refer to step 5 on the treadmill. To select one of the pulse programs, press the Select Workout button repeatedly until one of the treadmill is selected, the Cross Training Indicator below the Time/ Segment Time display will affect your exercise heart rate. 1 Insert the key into the console. If you must be attempted only by experienced users...

English Manual
Page 14
... incline of the program, both the time remaining in the Time/Segment Time display. To stop . For example, if you increase the speed, the incline will appear in the flashing Current Segment column, and the speed and/or incline of your age, the letters PLS will decrease. buttons. A moment after the button is selected, the maximum heart rate setting can adjust the setting with the chest pulse sensor...
... incline of the program, both the time remaining in the Time/Segment Time display. To stop . For example, if you increase the speed, the incline will appear in the flashing Current Segment column, and the speed and/or incline of your age, the letters PLS will decrease. buttons. A moment after the button is selected, the maximum heart rate setting can adjust the setting with the chest pulse sensor...

English Manual
Page 17
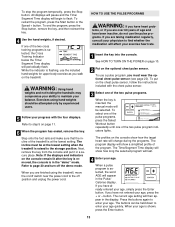
Plug the other end of the treadmill near the power cord. B ANT. IN VIDEO AUDIO IN CH 34 OUT RF OUT RCA Y-adapter Audio Cable Adapter Wire removed from AUDIO OUT jack HOW TO USE IFIT.COM CD AND VIDEO PROGRAMS To use iFIT.com CDs or videocassettes, the treadmill must be connected to your VCR. Follow the steps below . When the key is inserted, the manual mode will be prepared for speed and/or incline changes. If you...
Plug the other end of the treadmill near the power cord. B ANT. IN VIDEO AUDIO IN CH 34 OUT RF OUT RCA Y-adapter Audio Cable Adapter Wire removed from AUDIO OUT jack HOW TO USE IFIT.COM CD AND VIDEO PROGRAMS To use iFIT.com CDs or videocassettes, the treadmill must be connected to your VCR. Follow the steps below . When the key is inserted, the manual mode will be prepared for speed and/or incline changes. If you...
English Manual
Page 18
... not wrapped around a power cord. • If you are using them. 18 The Time/Segment Time display will change to the next settings of the treadmill does not change to the next settings of on the console. 5 Follow your CD player or VCR. Note: If the speed or incline of the CD or video program. To restart the program, press the Start button or the Speed + button. When the next...
... not wrapped around a power cord. • If you are using them. 18 The Time/Segment Time display will change to the next settings of the treadmill does not change to the next settings of on the console. 5 Follow your CD player or VCR. Note: If the speed or incline of the CD or video program. To restart the program, press the Start button or the Speed + button. When the next...
English Manual
Page 19
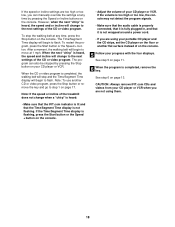
..., make sure that the audio cable is properly connected, that it is inserted, the manual mode will change . See step 6 on page 10. 2 Select the iFIT.com mode. Follow the steps below to your computer and start an internet connection. 4 Start your home computer. However, when the next "chirp" is not flashing. To restart the program, press the Start button or the Speed + button. HOW TO USE PROGRAMS DIRECTLY FROM OUR WEB SITE...
..., make sure that the audio cable is properly connected, that it is inserted, the manual mode will change . See step 6 on page 10. 2 Select the iFIT.com mode. Follow the steps below to your computer and start an internet connection. 4 Start your home computer. However, when the next "chirp" is not flashing. To restart the program, press the Start button or the Speed + button. HOW TO USE PROGRAMS DIRECTLY FROM OUR WEB SITE...

English Manual
Page 20
... the key into the console. Press the Speed + button to turn on the console will appear in the Speed display. If a "d" appears in the display, the console is blank. The chest pulse sensor continuously monitors your heart rate during your workouts and allows you to change the unit of hours that the walking belt has moved. THE INFORMATION MODE/DEMO MODE THE OPTIONAL CHEST PULSE SENSOR The console features an information mode that keeps track of the total number of hours that the treadmill has...
... the key into the console. Press the Speed + button to turn on the console will appear in the Speed display. If a "d" appears in the display, the console is blank. The chest pulse sensor continuously monitors your heart rate during your workouts and allows you to change the unit of hours that the walking belt has moved. THE INFORMATION MODE/DEMO MODE THE OPTIONAL CHEST PULSE SENSOR The console features an information mode that keeps track of the total number of hours that the treadmill has...

English Manual
Page 23
... the Rear Roller Adjustment Bolts walking belt 3 to 4 inches off switch is plugged into the console. Be careful to lift the edges of the specifications described on the frame near the power cord (see page 7). Important: The treadmill is properly tightened, you should be in the on position (see 1. until the walking belt is overtightened, treadmill performance may decrease and the b 3-4" walking belt may be solved by following the instructions...
... the Rear Roller Adjustment Bolts walking belt 3 to 4 inches off switch is plugged into the console. Be careful to lift the edges of the specifications described on the frame near the power cord (see page 7). Important: The treadmill is properly tightened, you should be in the on position (see 1. until the walking belt is overtightened, treadmill performance may decrease and the b 3-4" walking belt may be solved by following the instructions...

English Manual
Page 24
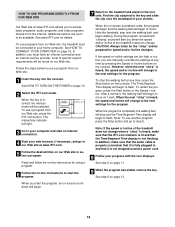
..., loosen the Reed Switch Screw (99) and move the hood. Retighten the Screw. a move the key and UNPLUG THE POWER CORD. b. Repeat until the walking belt is about 1/8". if the walking belt has shifted to overtighten the walking belt. Turn the Pulley until the walking belt is off -center, first re- When the walking belt is aligned with the Reed Switch. Locate the Reed Switch 99 11 (17) and the Magnet (12) on the treadmill for a correct speed reading...
..., loosen the Reed Switch Screw (99) and move the hood. Retighten the Screw. a move the key and UNPLUG THE POWER CORD. b. Repeat until the walking belt is about 1/8". if the walking belt has shifted to overtighten the walking belt. Turn the Pulley until the walking belt is off -center, first re- When the walking belt is aligned with the Reed Switch. Locate the Reed Switch 99 11 (17) and the Magnet (12) on the treadmill for a correct speed reading...

English Manual
Page 30
..." Wire Harness 93 1 Console Ground Wire 94 6 Sensor Cover Screw/Rear Foot 95 1 Tie Holder 96 2 Tie 97 5 8" Cable Tie 98 4 Bumper 30 Description Key No. RBTL12912 R0502A To locate the parts listed below, refer to the EXPLODED DRAWING attached in the center of this manual. Key No. Qty. Description 1 1 Left Foot Rail 2 1 Right Foot Rail 3* 1 Motor Assembly 4 4 Isolator 5 1 Latch Catch 6 1 Platform 7 4 Walking Deck Screw 8 1 Walking Belt 9 2 Frame Pivot Bolt 10 1 Latch Assembly 11 1 Front Roller/Pulley...
..." Wire Harness 93 1 Console Ground Wire 94 6 Sensor Cover Screw/Rear Foot 95 1 Tie Holder 96 2 Tie 97 5 8" Cable Tie 98 4 Bumper 30 Description Key No. RBTL12912 R0502A To locate the parts listed below, refer to the EXPLODED DRAWING attached in the center of this manual. Key No. Qty. Description 1 1 Left Foot Rail 2 1 Right Foot Rail 3* 1 Motor Assembly 4 4 Isolator 5 1 Latch Catch 6 1 Platform 7 4 Walking Deck Screw 8 1 Walking Belt 9 2 Frame Pivot Bolt 10 1 Latch Assembly 11 1 Front Roller/Pulley...
English Manual
Page 31
... (REEBOK® RX 1000 treadmill) • The SERIAL NUMBER of the product (see the front cover of this manual) • The KEY NUMBER and DESCRIPTION of the part(s) (see the PART LIST on page 30) 31 Mountain Time (excluding holidays). Key No. Description 99 4 100 1 101 1 102 1 103 1 104 2 105 12 106 1 107 1 108 5 109 2 110 2 111 1 112 3 Bumper Screw On/Off Switch Circuit Breaker Power Cord Power Cord Grommet...
... (REEBOK® RX 1000 treadmill) • The SERIAL NUMBER of the product (see the front cover of this manual) • The KEY NUMBER and DESCRIPTION of the part(s) (see the PART LIST on page 30) 31 Mountain Time (excluding holidays). Key No. Description 99 4 100 1 101 1 102 1 103 1 104 2 105 12 106 1 107 1 108 5 109 2 110 2 111 1 112 3 Bumper Screw On/Off Switch Circuit Breaker Power Cord Power Cord Grommet...

English Manual
Page 32
...-Always retain proof of purchase, such as set forth herein. USER'S MANUAL-It is covered by warranty. Before shipping, always obtain a Return Authorization Number (RA No.) from the original purchaser. Some states do not allow the exclusion or limitation of incidental or consequential damages. ICON HEALTH & FITNESS, INC., 1500 S. 1000 W., LOGAN, UT 84321-9813 Part No. 184885 R0502A Printed in its scope...
...-Always retain proof of purchase, such as set forth herein. USER'S MANUAL-It is covered by warranty. Before shipping, always obtain a Return Authorization Number (RA No.) from the original purchaser. Some states do not allow the exclusion or limitation of incidental or consequential damages. ICON HEALTH & FITNESS, INC., 1500 S. 1000 W., LOGAN, UT 84321-9813 Part No. 184885 R0502A Printed in its scope...


