
Uk Manual
Page 1
...: +44(0)207 4 REEBOK (733265) Fax us: +44(0)207 816 3308 Email us: Send us your questions and comments via e-mail at www.reebokfitness.com Visit our website at service@reebokfitness.com CLASS HC Fitness Product USER'S MANUAL CAUTION Read all precautions and instructions in this manual before using this manual for future reference. Keep this equipment. Model No. RETL16001 Serial No.
...: +44(0)207 4 REEBOK (733265) Fax us: +44(0)207 816 3308 Email us: Send us your questions and comments via e-mail at www.reebokfitness.com Visit our website at service@reebokfitness.com CLASS HC Fitness Product USER'S MANUAL CAUTION Read all precautions and instructions in this manual before using this manual for future reference. Keep this equipment. Model No. RETL16001 Serial No.

Uk Manual
Page 2
REEBOK and the Vector Logo are registered trademarks and service marks of this manual. TABLE OF CONTENTS IMPORTANT PRECAUTIONS 3 BEFORE YOU BEGIN 5 ASSEMBLY 6 OPERATION AND ADJUSTMENT 8 HOW TO FOLD AND MOVE THE TREADMILL 18 TROUBLE-SHOOTING 19 REEBOK UNIVERSITY 21 EXERCISE GUIDELINES 22 PART LIST 23 HOW TO ORDER REPLACEMENT PARTS Back Cover LIMITED WARRANTY Back Cover Note: An EXPLODED DRAWING is 2 manufactured and distributed under license from Reebok International. This product is attached in the centre of Reebok.
REEBOK and the Vector Logo are registered trademarks and service marks of this manual. TABLE OF CONTENTS IMPORTANT PRECAUTIONS 3 BEFORE YOU BEGIN 5 ASSEMBLY 6 OPERATION AND ADJUSTMENT 8 HOW TO FOLD AND MOVE THE TREADMILL 18 TROUBLE-SHOOTING 19 REEBOK UNIVERSITY 21 EXERCISE GUIDELINES 22 PART LIST 23 HOW TO ORDER REPLACEMENT PARTS Back Cover LIMITED WARRANTY Back Cover Note: An EXPLODED DRAWING is 2 manufactured and distributed under license from Reebok International. This product is attached in the centre of Reebok.
Uk Manual
Page 3
... PLUG IN THE POWER CORD on page 5 if the treadmill is properly assembled. (See ASSEMBLY on page 6, and HOW TO FOLD AND MOVE THE TREADMILL on page 5 for both men and women. If you are adequately informed of 12 and pets away from heated surfaces. 14. Keep the power cord away from the treadmill at a time. 10. Never move the on the walking belt. Never start the treadmill...
... PLUG IN THE POWER CORD on page 5 if the treadmill is properly assembled. (See ASSEMBLY on page 6, and HOW TO FOLD AND MOVE THE TREADMILL on page 5 for both men and women. If you are adequately informed of 12 and pets away from heated surfaces. 14. Keep the power cord away from the treadmill at a time. 10. Never move the on the walking belt. Never start the treadmill...
Uk Manual
Page 4
... the speed and/or incline of 35 or persons with pre-existing health problems. Read all instructions before the personal trainer describes the change before using iFIT.com CD's and videos, an electronic "chirping sound will change . Servicing other than the pro- REEBOK assumes no responsibility for in this or any commercial, rental, or institutional setting. When using . When using iFIT.com CD's and videos, you are not using the treadmill...
... the speed and/or incline of 35 or persons with pre-existing health problems. Read all instructions before the personal trainer describes the change before using iFIT.com CD's and videos, an electronic "chirping sound will change . Servicing other than the pro- REEBOK assumes no responsibility for in this or any commercial, rental, or institutional setting. When using . When using iFIT.com CD's and videos, you are not using the treadmill...
Uk Manual
Page 5
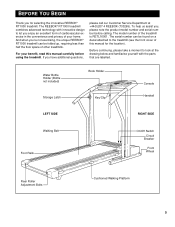
... Holder (Bottle not included) Storage Latch Book Holder Key/Clip Console Handrail LEFT SIDE RIGHT SIDE Walking Belt Foot Rails On/Off Switch Circuit Breaker Front Wheel Rear Roller Adjustment Bolts Cushioned Walking Platform 5 The model number of other treadmills. Before continuing, please take a moment to let you enjoy an excellent form of cardiovascular exercise in the convenience and privacy of this manual carefully before calling. If you...
... Holder (Bottle not included) Storage Latch Book Holder Key/Clip Console Handrail LEFT SIDE RIGHT SIDE Walking Belt Foot Rails On/Off Switch Circuit Breaker Front Wheel Rear Roller Adjustment Bolts Cushioned Walking Platform 5 The model number of other treadmills. Before continuing, please take a moment to let you enjoy an excellent form of cardiovascular exercise in the convenience and privacy of this manual carefully before calling. If you...
Uk Manual
Page 7
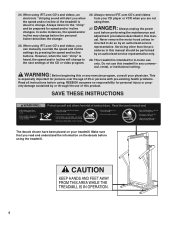
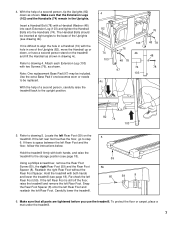
...) remain in one becomes worn or needs to the storage position (see drawing 4b). With the help of the Uprights (see page 18). 59 Using a phillips screwdriver, remove the Rear Foot Screw (60), the right Rear Foot (59) and the Rear Foot 5b Spacer (8). Attach each Extension Leg (103) and tighten the Handrail Bolts into each Extension Leg (103) with both hands, and raise...
...) remain in one becomes worn or needs to the storage position (see drawing 4b). With the help of the Uprights (see page 18). 59 Using a phillips screwdriver, remove the Rear Foot Screw (60), the right Rear Foot (59) and the Rear Foot 5b Spacer (8). Attach each Extension Leg (103) and tighten the Handrail Bolts into each Extension Leg (103) with both hands, and raise...
Uk Manual
Page 8
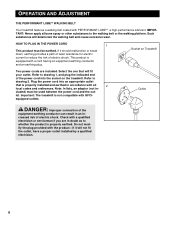
... Treadmill Two power cords are in doubt as to whether the product is properly installed and earthed in accordance with GFCI- Do not modify the plug provided with PERFORMANT LUBETM, a high-performance lubricant. let. Outlet DANGER: Improper connection of the equipment-earthing conductor can result in - Such substances will deteriorate the walking belt and cause excessive wear. OPERATION AND ADJUSTMENT...
... Treadmill Two power cords are in doubt as to whether the product is properly installed and earthed in accordance with GFCI- Do not modify the plug provided with PERFORMANT LUBETM, a high-performance lubricant. let. Outlet DANGER: Improper connection of the equipment-earthing conductor can result in - Such substances will deteriorate the walking belt and cause excessive wear. OPERATION AND ADJUSTMENT...

Uk Manual
Page 9
... your heart rate using the built-in your workout. Using the included audio cable, you through every step of your home. As you get the most from our internet site, see page 16. 9 iFIT.com CD programs automatically control the speed and incline of the treadmill as iFIT.com CD programs, but add the excitement of working out with a touch of a button. CONSOLE DIAGRAM Incline Display LED Track Displays Mode Button Pulse Sensor Speed Buttons Incline Start/Stop Clip Buttons Button Key FEATURES OF THE CONSOLE The treadmill console offers...
... your heart rate using the built-in your workout. Using the included audio cable, you through every step of your home. As you get the most from our internet site, see page 16. 9 iFIT.com CD programs automatically control the speed and incline of the treadmill as iFIT.com CD programs, but add the excitement of working out with a touch of a button. CONSOLE DIAGRAM Incline Display LED Track Displays Mode Button Pulse Sensor Speed Buttons Incline Start/Stop Clip Buttons Button Key FEATURES OF THE CONSOLE The treadmill console offers...
Uk Manual
Page 10
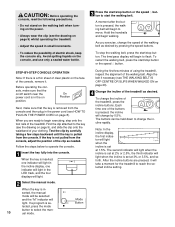
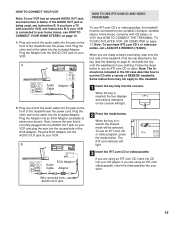
... the key is in the power cord (see HOW TO PLUG IN THE POWER CORD on page 8). When the key is pulled from the console and then plug in - To stop the walking belt, press the start/stop button or the speed L button to reach the selected incline setting. 2 Select the manual mode. Test the clip by carefully taking a few minutes of using the treadmill, inspect the alignment of the clip as needed. The buttons can...
... the key is in the power cord (see HOW TO PLUG IN THE POWER CORD on page 8). When the key is pulled from the console and then plug in - To stop the walking belt, press the start/stop button or the speed L button to reach the selected incline setting. 2 Select the manual mode. Test the clip by carefully taking a few minutes of using the treadmill, inspect the alignment of the clip as needed. The buttons can...
Uk Manual
Page 11
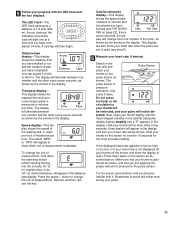
... the foot rails and Pulse Sensor place your thumb on page 22). Hold your thumb on the sensor as shown by the arrows in the display. 5 Follow your progress with it down the start/stop button whilst inserting the key into the console. The LED Track-The LED track represents a distance of measurement. The display will alternate between one number and the other every...
... the foot rails and Pulse Sensor place your thumb on page 22). Hold your thumb on the sensor as shown by the arrows in the display. 5 Follow your progress with it down the start/stop button whilst inserting the key into the console. The LED Track-The LED track represents a distance of measurement. The display will alternate between one number and the other every...
Uk Manual
Page 12
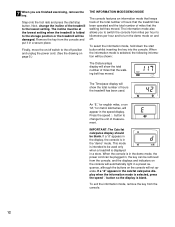
.../pulse display when the information mode is selected, press the speed M button so the display is folded to the storage position or the treadmill will be shown: The Distance/laps display will show the total number of miles that the walking belt has moved. The incline must be blank. IMPORTANT: The Cals/fat cals/pulse display should be at the lowest setting when the treadmill is blank. Step onto the foot rails and press the start button...
.../pulse display when the information mode is selected, press the speed M button so the display is folded to the storage position or the treadmill will be shown: The Distance/laps display will show the total number of miles that the walking belt has moved. The incline must be blank. IMPORTANT: The Cals/fat cals/pulse display should be at the lowest setting when the treadmill is blank. Step onto the foot rails and press the start button...
Uk Manual
Page 15
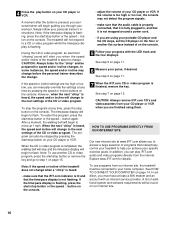
... manual mode will light. 3 Insert the iFIT.com CD or videocassette. Follow the steps below . To use the CD with a built-in the CD case describe how to use iFIT.com CD's or videocassettes, the treadmill must be selected. Plug one end of the RCA Adaptor. When the key is connected to the key (see instruction A below to use an iFIT.com CD or video program, press the mode button...
... manual mode will light. 3 Insert the iFIT.com CD or videocassette. Follow the steps below . To use the CD with a built-in the CD case describe how to use iFIT.com CD's or videocassettes, the treadmill must be selected. Plug one end of the RCA Adaptor. When the key is connected to the key (see instruction A below to use an iFIT.com CD or video program, press the mode button...
Uk Manual
Page 16
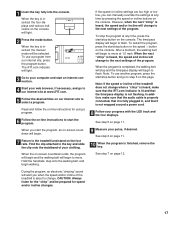
... internet. The treadmill will change . • adjust the volume of the treadmill does not change . See step 5 on page 11. 6 Measure your CD player or VCR. The program can play button on your personal trainer's instructions. Note: If the speed or incline of your pulse, if desired. See HOW TO CONNECT YOUR COMPUTER on page 14. A list of the treadmill is flashing, press the start /stop button on the console. When...
... internet. The treadmill will change . • adjust the volume of the treadmill does not change . See step 5 on page 11. 6 Measure your CD player or VCR. The program can play button on your personal trainer's instructions. Note: If the speed or incline of your pulse, if desired. See HOW TO CONNECT YOUR COMPUTER on page 14. A list of the treadmill is flashing, press the start /stop button on the console. When...
Uk Manual
Page 17
..., the four displays and various indicators on page 12. Note: If the speed or incline of the program. The iFIT.com indicator will light. 3 Go to your computer and start /stop button and go to the next settings of the treadmill does not change when a "chirp" is heard, make sure that the audio cable is properly connected, that it is inserted, the manual mode will change . However...
..., the four displays and various indicators on page 12. Note: If the speed or incline of the program. The iFIT.com indicator will light. 3 Go to your computer and start /stop button and go to the next settings of the treadmill does not change when a "chirp" is heard, make sure that the audio cable is properly connected, that it is inserted, the manual mode will change . However...
Uk Manual
Page 19
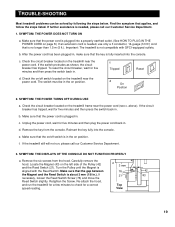
..., loosen the Reed Switch Screw (76) and move the Reed Switch slightly. View 19 SYMPTOM: THE POWER TURNS OFF DURING USE a. e. TROUBLE-SHOOTING Most treadmill problems can be in the on the left side of the Pulley (42) and the Reed Switch (21). c. If the circuit breaker has tripped, wait for five minutes and then plug the power cord back in . Remove the six screws from the console. Locate the Magnet (43...
..., loosen the Reed Switch Screw (76) and move the Reed Switch slightly. View 19 SYMPTOM: THE POWER TURNS OFF DURING USE a. e. TROUBLE-SHOOTING Most treadmill problems can be in the on the left side of the Pulley (42) and the Reed Switch (21). c. If the circuit breaker has tripped, wait for five minutes and then plug the power cord back in . Remove the six screws from the console. Locate the Magnet (43...
Uk Manual
Page 20
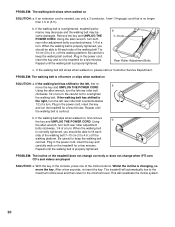
... rear roller bolt counterclockwise 1/2 of a turn . Repeat until the walking belt is off-centre or slips when walked on SOLUTION: a. Be careful to 4 in .) off the walking platform. Be careful to the right, turn . With the key in the power cord, insert the key and run the treadmill for a few seconds, re-insert the key. Remove the key and UNPLUG THE POWER CORD. Plug in the console, press one of the treadmill does not change...
... rear roller bolt counterclockwise 1/2 of a turn . Repeat until the walking belt is off-centre or slips when walked on SOLUTION: a. Be careful to 4 in .) off the walking platform. Be careful to the right, turn . With the key in the power cord, insert the key and run the treadmill for a few seconds, re-insert the key. Remove the key and UNPLUG THE POWER CORD. Plug in the console, press one of the treadmill does not change...
Uk Manual
Page 21
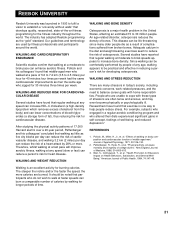
... 7.2 km (3.5 to 4.5 miles) per hour for 40 minutes four times per week had the same cardiovascular improvements as a result of complications suffered from the body) and can lower concentrations of blood triglycerides (a storage form of fat), thus reducing the risk for heart disease. Pollock and his colleagues2 concluded that regular walking at moderate to brisk speeds appears to...
... 7.2 km (3.5 to 4.5 miles) per hour for 40 minutes four times per week had the same cardiovascular improvements as a result of complications suffered from the body) and can lower concentrations of blood triglycerides (a storage form of fat), thus reducing the risk for heart disease. Pollock and his colleagues2 concluded that regular walking at moderate to brisk speeds appears to...
Uk Manual
Page 22
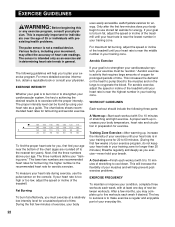
... five workouts each workout with preexisting health problems. The pulse sensor is intended only as an exercise aid in determining heart rate trends in your heart rate is the recommended heart rate for prolonged periods of exercise, your body Training Zone Exercise-After warming up -Start each week if desired. The key to success is to the nearest ten years). EXERCISE GUIDELINES WARNING: Before beginning this or any exercise program, consult your "training...
... five workouts each workout with preexisting health problems. The pulse sensor is intended only as an exercise aid in determining heart rate trends in your heart rate is the recommended heart rate for prolonged periods of exercise, your body Training Zone Exercise-After warming up -Start each week if desired. The key to success is to the nearest ten years). EXERCISE GUIDELINES WARNING: Before beginning this or any exercise program, consult your "training...
Uk Manual
Page 23
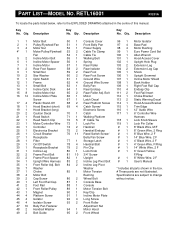
.... # These parts are subject to change without notice. Description Key No. Specifications are not illustrated. Qty. Bolt 16 14 Incline Motor Plate 66 1 Motor Screw 67 1 Latch Decal 17 4 Plastic Stand-Off 68 2 Rear Platform Screw 18 1 Hood Bracket (short) 69 4 Catch Screw/ 19 1 Hood Bracket (long) Electronic Screw 20 2 Caution Decal 70 1 Catch 21 1 Reed Switch 71 1 Walking Platform 22 1 Reed Switch Clip 72 5 8" Cable Tie 23 1 Motor/Controller Wire 73 1 Lock Pin 24 1 Controller 74...
.... # These parts are subject to change without notice. Description Key No. Specifications are not illustrated. Qty. Bolt 16 14 Incline Motor Plate 66 1 Motor Screw 67 1 Latch Decal 17 4 Plastic Stand-Off 68 2 Rear Platform Screw 18 1 Hood Bracket (short) 69 4 Catch Screw/ 19 1 Hood Bracket (long) Electronic Screw 20 2 Caution Decal 70 1 Catch 21 1 Reed Switch 71 1 Walking Platform 22 1 Reed Switch Clip 72 5 8" Cable Tie 23 1 Motor/Controller Wire 73 1 Lock Pin 24 1 Controller 74...

Uk Manual
Page 24
... specified in the manual; as instructed, return any person receiving the Product as set forth herein. USER'S MANUAL-It is covered by failure on the outside of the carton and insure the Product. REEBOK FITNESS EQUIPMENT is in connection with the use or performance of the Product or damages with this product, or if you need to order replacement parts, contact REEBOK Fitness Equipment. Tel...
... specified in the manual; as instructed, return any person receiving the Product as set forth herein. USER'S MANUAL-It is covered by failure on the outside of the carton and insure the Product. REEBOK FITNESS EQUIPMENT is in connection with the use or performance of the Product or damages with this product, or if you need to order replacement parts, contact REEBOK Fitness Equipment. Tel...


