
English Manual
Page 1
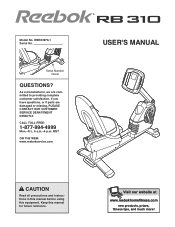
....com USER'S MANUAL CAUTION Read all precautions and instructions in this manual before using this manual for future reference. RBEX3976.1 Serial No. As a manufacturer, we are damaged or missing, PLEASE CONTACT OUR CUSTOMER SERVICE DEPARTMENT DIRECTLY. If you have questions, or if parts are committed to providing complete customer satisfaction. Visit our website at www.reebokhomefitness.com new products, prizes, fitness...
....com USER'S MANUAL CAUTION Read all precautions and instructions in this manual before using this manual for future reference. RBEX3976.1 Serial No. As a manufacturer, we are damaged or missing, PLEASE CONTACT OUR CUSTOMER SERVICE DEPARTMENT DIRECTLY. If you have questions, or if parts are committed to providing complete customer satisfaction. Visit our website at www.reebokhomefitness.com new products, prizes, fitness...

English Manual
Page 2
... on a level surface, with pre-existing health problems. Read all warnings on the front cover of heart rate readings. If you feel pain or dizziness while exercising, stop immediately and cool down. 5. ICON assumes no responsibility for foot protection. 2. Do not use the exercise cycle. 8. The pulse sensor is intended only as described in the location shown. do not wear loose clothes that...
... on a level surface, with pre-existing health problems. Read all warnings on the front cover of heart rate readings. If you feel pain or dizziness while exercising, stop immediately and cool down. 5. ICON assumes no responsibility for foot protection. 2. Do not use the exercise cycle. 8. The pulse sensor is intended only as described in the location shown. do not wear loose clothes that...
English Manual
Page 3
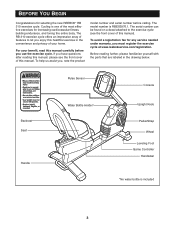
... for increasing cardiovascular fitness, building endurance, and toning the entire body. Before reading further, please familiarize yourself with the parts that are labeled in the convenience and privacy of the most effective exercises for selecting the new REEBOK® RB 310 exercise cycle. Cycling is RBEX3976.1. Pulse Sensor Console Backrest Seat Handle Water Bottle Holder* Upright Knob Pedal/Strap Wheel Leveling Foot Game Controller Handlebar *No water...
... for increasing cardiovascular fitness, building endurance, and toning the entire body. Before reading further, please familiarize yourself with the parts that are labeled in the convenience and privacy of the most effective exercises for selecting the new REEBOK® RB 310 exercise cycle. Cycling is RBEX3976.1. Pulse Sensor Console Backrest Seat Handle Water Bottle Holder* Upright Knob Pedal/Strap Wheel Leveling Foot Game Controller Handlebar *No water...
English Manual
Page 4
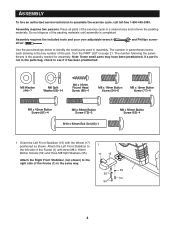
... small parts used in the parts bag, check to assemble the exercise cycle, call toll-free 1-800-445-2480. The number following the parentheses is completed. M6 Washer (44)-7 M8 Split Washer (55)-14 M4 x 16mm Round Head Screw (80)-4 M8 x 16mm Button Screw (54)-6 M8 x 19mm Button Screw (77)-4 M6 x 42mm Button Screw (81)-4 M6 x 38mm Button Screw (72)-3 M10 x 63mm Bolt Set (62)-1 M8 x 50mm Button Screw (52)-4 1. Assembly...
... small parts used in the parts bag, check to assemble the exercise cycle, call toll-free 1-800-445-2480. The number following the parentheses is completed. M6 Washer (44)-7 M8 Split Washer (55)-14 M4 x 16mm Round Head Screw (80)-4 M8 x 16mm Button Screw (54)-6 M8 x 19mm Button Screw (77)-4 M6 x 42mm Button Screw (81)-4 M6 x 38mm Button Screw (72)-3 M10 x 63mm Bolt Set (62)-1 M8 x 50mm Button Screw (52)-4 1. Assembly...

English Manual
Page 5
... the Console. Remove the battery cover from the back of the Wire Harnesses. Then, pull the other end of the wire tie upward out of the top of the Frame (1), 2 attach the Rear Stabilizer (16) to the Frame (1) with four M8 x 50mm Button Screws (52) and four M8 Split Washers (55). 3. Attach the Upright (2) to the Frame with an M10 x 63mm Bolt Set (62...
... the Console. Remove the battery cover from the back of the Wire Harnesses. Then, pull the other end of the wire tie upward out of the top of the Frame (1), 2 attach the Rear Stabilizer (16) to the Frame (1) with four M8 x 50mm Button Screws (52) and four M8 Split Washers (55). 3. Attach the Upright (2) to the Frame with an M10 x 63mm Bolt Set (62...

English Manual
Page 6
... 80 43 2 Console Wire Harnesses 7 9 11 8. Attach the Console (4) to the Upper and Main Wire Harnesses (42, 43). Start all four Button Screws before you tighten any of them . 6 3 44 44 81 81 8 3 44 72 44 44 72 Attach the Backrest (8) to avoid pinching the Wire Harnesses (42, 43). 7. While another person holds the Console (4) near the Upright (2), connect the console wire harnesses to the Upright (2) with...
... 80 43 2 Console Wire Harnesses 7 9 11 8. Attach the Console (4) to the Upper and Main Wire Harnesses (42, 43). Start all four Button Screws before you tighten any of them . 6 3 44 44 81 81 8 3 44 72 44 44 72 Attach the Backrest (8) to avoid pinching the Wire Harnesses (42, 43). 7. While another person holds the Console (4) near the Upright (2), connect the console wire harnesses to the Upright (2) with...

English Manual
Page 7
... adjustable wrench, firmly tighten the Left Pedal counterclockwise into the Right Crank Arm (not shown). Then, connect the Left Controller Wire (61) to the other wire on the seat handle to the desired position, and press the end of the exercise cycle until it stops. Push the seat handle down. Make sure that all parts are positioned side by side under the plastic cover on the Rear Wire...
... adjustable wrench, firmly tighten the Left Pedal counterclockwise into the Right Crank Arm (not shown). Then, connect the Left Controller Wire (61) to the other wire on the seat handle to the desired position, and press the end of the exercise cycle until it stops. Push the seat handle down. Make sure that all parts are positioned side by side under the plastic cover on the Rear Wire...
English Manual
Page 8
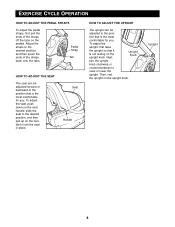
... desired position, and then press the ends of the straps off the tabs on the upright knob. Adjust the straps to lock the seat in place. Upright 8 Pedal Strap Tab HOW TO ADJUST THE SEAT The seat can be adjusted forward or backward to raise or lower the upright. tion that is not resting on the pedals. EXERCISE CYCLE OPERATION HOW TO ADJUST THE PEDAL STRAPS To adjust the pedal straps, first pull the...
... desired position, and then press the ends of the straps off the tabs on the upright knob. Adjust the straps to lock the seat in place. Upright 8 Pedal Strap Tab HOW TO ADJUST THE SEAT The seat can be adjusted forward or backward to raise or lower the upright. tion that is not resting on the pedals. EXERCISE CYCLE OPERATION HOW TO ADJUST THE PEDAL STRAPS To adjust the pedal straps, first pull the...

English Manual
Page 9
... vary your pedaling pace as it guides you can even measure your workouts-the harder you exercise, the console will display continuous exercise feedback. To use the manual mode of Blackjack or Texas Hold 'Em. To play the challenging Fat Blocker™ game or the fast-paced Calorie Destroyer™ game during your heart rate using the handgrip pulse sensor. Using the dual game controllers, play the...
... vary your pedaling pace as it guides you can even measure your workouts-the harder you exercise, the console will display continuous exercise feedback. To use the manual mode of Blackjack or Texas Hold 'Em. To play the challenging Fat Blocker™ game or the fast-paced Calorie Destroyer™ game during your heart rate using the handgrip pulse sensor. Using the dual game controllers, play the...
English Manual
Page 10
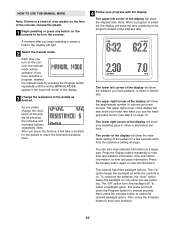
... pedals by pressing the Program button repeatedly until the words MANUAL MODE appear in miles or kilometers. As you pedal, change the resistance of the display will also show your pedaling pace in the program instead of calories you press the buttons, it will take a moment for the pedals to turn on the console, the manual mode will be selected. The lower right corner of the display will show your heart rate when you turn...
... pedals by pressing the Program button repeatedly until the words MANUAL MODE appear in miles or kilometers. As you pedal, change the resistance of the display will also show your pedaling pace in the program instead of calories you press the buttons, it will take a moment for the pedals to turn on the console, the manual mode will be selected. The lower right corner of the display will show your heart rate when you turn...
English Manual
Page 11
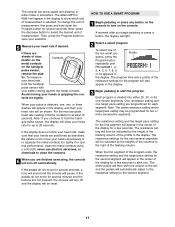
... your heart rate will turn off and the display will then be indicated by the heights of the resistance settings for a few seconds to turn off automatically. The resistance settings for the second segment. 11 The entire profile will then shift one target pace setting are not pressed, the console will turn on the handgrip pulse sensor, remove the plas- Profile grams, press the Program button repeatedly until PROGRAM 1, 2, 3, 4, 5, 6, 7, 8, 9, or...
... your heart rate will turn off and the display will then be indicated by the heights of the resistance settings for a few seconds to turn off automatically. The resistance settings for the second segment. 11 The entire profile will then shift one target pace setting are not pressed, the console will turn on the handgrip pulse sensor, remove the plas- Profile grams, press the Program button repeatedly until PROGRAM 1, 2, 3, 4, 5, 6, 7, 8, 9, or...
English Manual
Page 12
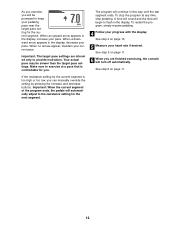
.... To restart the program, simply resume pedaling. 4 Follow your heart rate if desired. See step 6 on page 11. 6 When you can manually override the setting by pressing the increase and decrease buttons. Make sure to flash in the display, decrease your current pace. To stop pedaling. If the resistance setting for the next segment. See step 5 on page 11. 12 The program will turn off automatically. A tone...
.... To restart the program, simply resume pedaling. 4 Follow your heart rate if desired. See step 6 on page 11. 6 When you can manually override the setting by pressing the increase and decrease buttons. Make sure to flash in the display, decrease your current pace. To stop pedaling. If the resistance setting for the next segment. See step 5 on page 11. 12 The program will turn off automatically. A tone...

English Manual
Page 13
In addition to the console buttons, you will use the four-button game controllers on the console. Follow the steps below the first letter is flashing, press the up and down the right button on page 11. 13 A block composed of calories you have reached. Then, press the right button on the right controller. The display will slowly move downward one of the four highest...
In addition to the console buttons, you will use the four-button game controllers on the console. Follow the steps below the first letter is flashing, press the up and down the right button on page 11. 13 A block composed of calories you have reached. Then, press the right button on the right controller. The display will slowly move downward one of the four highest...

English Manual
Page 14
... button on the console. Your goal is to play , the drones will appear in the display. Next, press the right button on page 11. 14 Repeat this process to reset the scores. While you begin pedaling or press a button, the display will show the elapsed time. See step 6 on either controller to turn off automatically. To select the Calorie Destroyer game, press the Fitness Games button...
... button on the console. Your goal is to play , the drones will appear in the display. Next, press the right button on page 11. 14 Repeat this process to reset the scores. While you begin pedaling or press a button, the display will show the elapsed time. See step 6 on either controller to turn off automatically. To select the Calorie Destroyer game, press the Fitness Games button...

English Manual
Page 15
...card game resource. 1 Begin pedaling or press any time, press the Fitness Games button. 4 Follow your cards and tap the screen to turn off automatically. Your goal during the game, your current total will appear in three boxes on page 11. 15 As you are finished exercising, the console will appear in the display...center of the display. To select the Blackjack game, press the Fitness Games button repeatedly until the word BLACKJACK appears at any button on the console to select a game option. See step 6 on the right side of the game is a casino-style card game in ...
...card game resource. 1 Begin pedaling or press any time, press the Fitness Games button. 4 Follow your cards and tap the screen to turn off automatically. Your goal during the game, your current total will appear in three boxes on page 11. 15 As you are finished exercising, the console will appear in the display...center of the display. To select the Blackjack game, press the Fitness Games button repeatedly until the word BLACKJACK appears at any button on the console to select a game option. See step 6 on the right side of the game is a casino-style card game in ...

English Manual
Page 16
... to select the desired number of the display. The game will continue in this area when the turn and river are finished exercising, the console will be shown in the lower left corner of the display. To view additional exercise information, press the Display button repeatedly. When it is to win credits. When the flop is located in the lower right corner of the...
... to select the desired number of the display. The game will continue in this area when the turn and river are finished exercising, the console will be shown in the lower left corner of the display. To view additional exercise information, press the Display button repeatedly. When it is to win credits. When the flop is located in the lower right corner of the...

English Manual
Page 17
... PULSE SENSOR TROUBLESHOOTING If the handgrip pulse sensor does not function properly, see step 5 on page 5 for replacement instructions. Carefully move the exercise cycle, hold the handle on the rear stabilizer and carefully lift it . ing feet under the front stabilizers until the exercise cycle can be moved on the front wheels. MAINTENANCE AND TROUBLESHOOTING Inspect and tighten all parts of direct sunlight. Replace any worn parts immediately. HOW TO MOVE...
... PULSE SENSOR TROUBLESHOOTING If the handgrip pulse sensor does not function properly, see step 5 on page 5 for replacement instructions. Carefully move the exercise cycle, hold the handle on the rear stabilizer and carefully lift it . ing feet under the front stabilizers until the exercise cycle can be moved on the front wheels. MAINTENANCE AND TROUBLESHOOTING Inspect and tighten all parts of direct sunlight. Replace any worn parts immediately. HOW TO MOVE...

English Manual
Page 18
... your exercise program. During the first few minutes of exercising with pre-existing health problems. The pulse sensor is especially important for energy. WORKOUT GUIDELINES Each workout should include the following guidelines will help you to the nearest ten years). A cool-down, with 5 to 30 minutes of exercise does your body begin to use stored fat calories for exercise. EXERCISE GUIDELINES The following three parts...
... your exercise program. During the first few minutes of exercising with pre-existing health problems. The pulse sensor is especially important for energy. WORKOUT GUIDELINES Each workout should include the following guidelines will help you to the nearest ten years). A cool-down, with 5 to 30 minutes of exercise does your body begin to use stored fat calories for exercise. EXERCISE GUIDELINES The following three parts...

English Manual
Page 21
... 4 # 1 # 1 Description Drive Belt Rear Stabilizer Endcap Foam Grip Flange Screw Rear Wire Harness M8 x 50mm Button Screw M6 Nylon Locknut M8 x 16mm Button Screw M8 Split Washer Seat Rail Endcap M4 x 16mm Screw Lower Wire Harness Small Snap Ring Tension Wheel Left Controller Wire M10 x 63mm Bolt Set Wheel Bushing M4 x 10mm Screw Stop Block Front Stabilizer Endcap Seat Bracket Endcap Upright Cover Wheel Bolt M4 x 12mm Screw Seat Carriage Wheel M6 x 38mm Button Screw M6 x 20mm Button Bolt Water...
... 4 # 1 # 1 Description Drive Belt Rear Stabilizer Endcap Foam Grip Flange Screw Rear Wire Harness M8 x 50mm Button Screw M6 Nylon Locknut M8 x 16mm Button Screw M8 Split Washer Seat Rail Endcap M4 x 16mm Screw Lower Wire Harness Small Snap Ring Tension Wheel Left Controller Wire M10 x 63mm Bolt Set Wheel Bushing M4 x 10mm Screw Stop Block Front Stabilizer Endcap Seat Bracket Endcap Upright Cover Wheel Bolt M4 x 12mm Screw Seat Carriage Wheel M6 x 38mm Button Screw M6 x 20mm Button Bolt Water...
English Manual
Page 24
... set forth above is limited to be free from defects in lieu of any implied warranties of whatsoever nature. To help us : • the MODEL NUMBER of the product (RBEX3976.1) • the NAME of the product (REEBOK RB 310 exercise cycle) • the SERIAL NUMBER of the product (see the front cover of this manual) • the KEY NUMBER and DESCRIPTION of the part(s) (see the front cover...
... set forth above is limited to be free from defects in lieu of any implied warranties of whatsoever nature. To help us : • the MODEL NUMBER of the product (RBEX3976.1) • the NAME of the product (REEBOK RB 310 exercise cycle) • the SERIAL NUMBER of the product (see the front cover of this manual) • the KEY NUMBER and DESCRIPTION of the part(s) (see the front cover...


